background image

20

Using the Karaoke Function

1. Load a karaoke disc.

2. Set the MIC VOL control to the minimum level to

prevent acoustic feedback (e.g. a loud howling
sound) before connecting the microphone.

3. Connect a microphone to MIC socket.

Note:

If a microphone is not connected, the karaoke menu
will not appear.

4. Press PLAY to start playback.

5. Adjust MIC VOL control and then sing a song.

If you want to set KARAOKE option, follow the
steps 6-8.

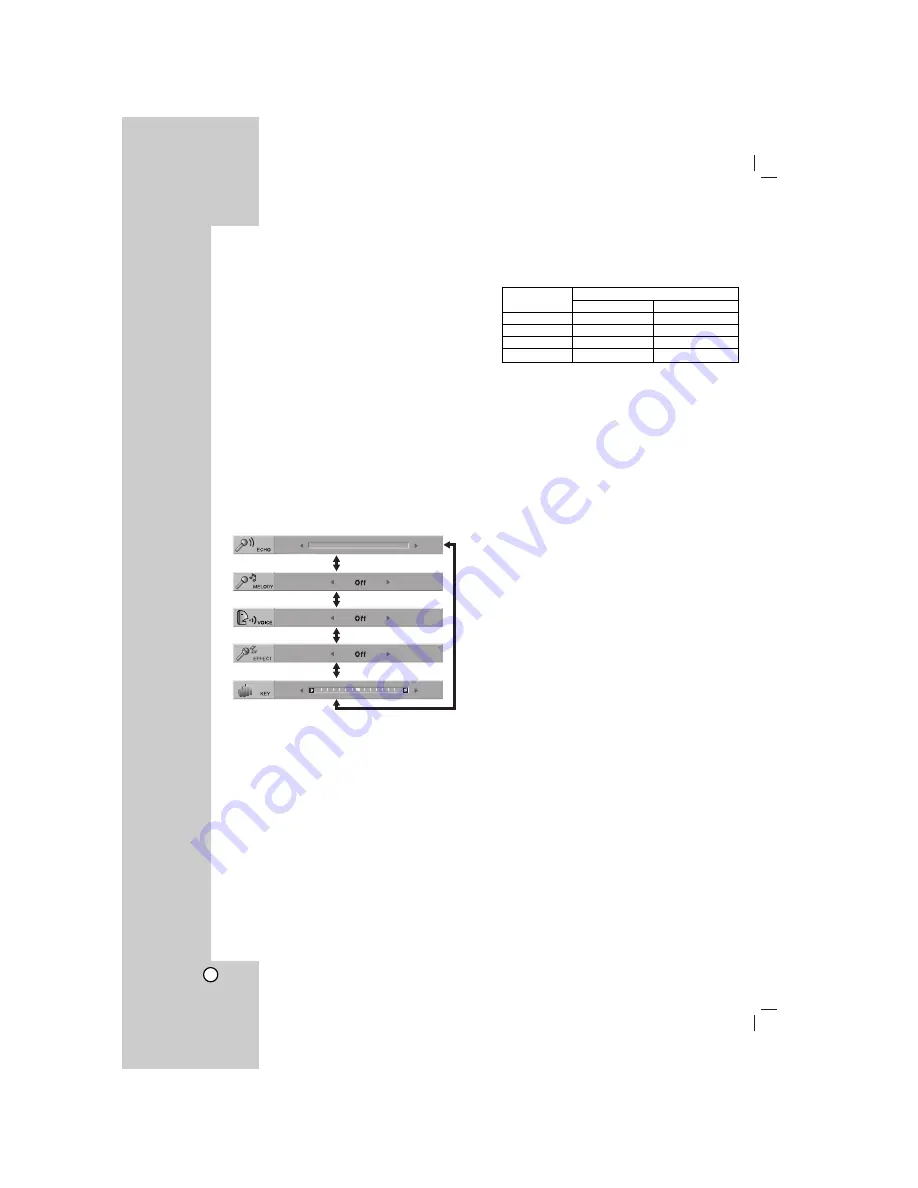
6. Press KARAOKE during playback.

KARAOKE menu appears.

7. Use 

v

/

V

to select an desired item (ECHO,

MELODY, VOICE, EFFECT or KEY).
The display changes as shown in the chart below.

8. Use 

b / B

to adjust the value of the selected item.

ECHO:

You can adjust the echo volume by 

pressing 

b / B

.

MELODY:

If you wish to sing only to the backing

band or orchestra unaccompanied by a vocal
guide melody, set MELODY to Off.

VOICE:

If you wish to sing a duet with the

recorded karaoke singer, select a voice you
desire.

EFFECT: 

You can use Special Effects. Each time

b / B

is pressed, the Special Effect changes as

shown below.
Off 

→ 

FLANGE 

→ 

CHORUS

KEY: 

You can change the key by pressing 

b / B

.

Note:

Controlling the key when DVD player is connected to
amplifier (receiver) with digital audio connection, may
cause mute the sound of the front left/right speakers
connected to amplifier (receiver). 
In that case, you must change the sound mode of the
amplifier (receiver) for the output of the speakers.

9. Press KARAOKE to exit the KARAOKE menu.

Note:

• The microphone may not be available during special

playback. (ex. slow)

• The karaoke feature functions only with karaoke-

compatible discs.

• The VOICE and MELODY menus may not be

available on some karaoke discs.

• For more details, refer to the information attached

with the disc.

• There is no microphone’s sound output while a disc

encoded with DTS is playing back.

Voice Select

Output

Left speaker

Right speaker

V1

Voice1

Voice1

V2

Voice2

Voice2

V1+V2

Voice1

Voice2

Off

None voice

None voice

Содержание DK764

Страница 1: ... DKU860 Before connecting operating or adjusting this product please read this instruction booklet carefully and completely DV246 256K EM BUKRLLS_ENG Internet address http ua lge com Customer Information Center LG 380 44 490 7777 8 800 303 0000 ...

Страница 2: ...d circuit That is a single outlet circuit which powers only that appliance and has no additional outlets or branch circuits Check the specification page of this owner s manual to be certain Do not overload wall outlets Overloaded wall outlets loose or damaged wall outlets extension cords frayed power cords or damaged or cracked wire insulation are dangerous Any of these conditions could result in ...

Страница 3: ... Mode 11 Progressive Scan 11 AUDIO 12 Dolby Digital DTS MPEG 12 Sample Freq Frequency 12 Dynamic Range Control DRC 12 LOCK Parental Control 12 Rating 12 Password 12 Area Code 13 OTHERS 13 PBC 13 B L E Black Level Expansion 13 DivX R VOD 13 Score 13 Operation 14 20 General Features 14 Additional Features 15 Playing an Audio CD or MP3 WMA file 16 Programmed Playback 17 Repeat Programmed Tracks 17 Er...

Страница 4: ...stortion Before playing clean the disc with a clean cloth Wipe the disc from the center out Do not use strong solvents such as alcohol benzine thinner commercially available cleaners or anti static spray intended for older vinyl records Maintenance and Service Refer to the information in this chapter before contacting a service technician Handling the Unit When shipping the unit Please save the or...

Страница 5: ...copy broadcast show broadcast via cable play in public or rent copyrighted material without permission This product features the copy protection function developed by Macrovision Copy protection signals are recorded on some discs When recording and playing the pictures of these discs picture noise will appear This product incorporates copyright protection technology that is protected by method cla...

Страница 6: ...r track SKIP Go to the next chapter or track c Disc Tray Insert a disc here d Display window Shows the current status of the unit e Remote Sensor Point the remote control here f Microphone jack s Connect a microphone s to the MIC socket s g Microphone volume control Adjusts microphone volume h Z OPEN CLOSE Opens or closes the disc tray a b c d e f g h DK765 a b c d e f g h DK764 DKU860 ...

Страница 7: ...annel SUBTITLE Selects a subtitle language ANGLE Selects a DVD camera angle if available SETUP Accesses or removes the Setup menu MARKER Marks any point during playback SEARCH Displays MARKER SEARCH menu PROGRAM Enter the program edit mode ZOOM Enlarges video image REPEAT Repeat chapter track title all A B Repeat sequence from point A to point B RANDOM Plays tracks in random order KARAOKE ECHO Acc...

Страница 8: ...on the TV using the video cable V Audio Connect the left and right AUDIO OUT jacks of the DVD player to the audio left and right IN jacks on the TV using the audio cables A Do not connect the unit s AUDIO OUT jack to the phone in jack record deck of your audio system Component Video Connect the COMPONENT PROGRESSIVE SCAN jacks on the unit to the corresponding jacks on the TV using an Y PB PR cable...

Страница 9: ...l sound A digital multi channel connection provides the best sound quality For this you need a multi channel audio video receiver that supports one or more of the audio formats supported by your DVD player such as MPEG 2 Dolby Digital and DTS Check the receiver manual and the logos on the front of the receiver Notes If the audio format of the digital output does not match the capabilities of your ...

Страница 10: ...can make various adjustments to items such as picture and sound You can also set a language for the subtitles and the Setup menu among other things For details on each Setup menu item see the pages 11 to 13 To display and exit the Menu Press SETUP to display the menu A second press of SETUP will take you back to initial screen To go to the next level Press B on the remote control To go back to the...

Страница 11: ...essive Scan Video provides the highest quality pictures with less flickering If you are using the Component Video jacks for connection to a TV or a monitor that is compatible with a progressive scan signal set Progressive Scan to On To Turn ON progressive scan Connect component video out of this unit to the input of your TV or monitor set your TV or monitor to Component Input 1 Select Progressive ...

Страница 12: ...and the quietest ones This allows you to listen to a movie at a lower volume without losing clarity of sound Set DRC to On for this effect LOCK Parental Control Rating Blocks playback of rated DVDs based on their contents Not all discs are rated 1 Select Rating on the LOCK menu then press B 2 To access the LOCK options you must input the password you have created If you have not yet entered passwo...

Страница 13: ...OD Video On Demand registration code that allows you to rent and purchase videos based on the DivX VOD service For more information visit www divx com vod 1 Select DivX R VOD option and then press B 2 Press ENTER while Select is selected and the registration code will appear Use the registration code to purchase or rent the videos from DivX VOD service at www divx com vod Follow the instructions a...

Страница 14: ...e A B button one at a time to select a point A and point B and repeats a sequence from point A Starting point to point B End point ZOOM During playback or pause mode press ZOOM to enlarge the video image 3 steps You can move through the zoomed picture using b B v V buttons Press CLEAR to exit RANDOM During playback or in stop mode press RANDOM for random playback TITLE If the current DVD title has...

Страница 15: ...R at the desired point on the disc The Marker icon appears on the TV screen briefly Repeat to enter up to nine markers To Recall or Clear a Marked Scene 1 During disc playback press SEARCH The marker search menu appears on the screen 2 Within 9 seconds press b B to select a marker number that you want to recall or clear 3 Press ENTER and playback starts from the marked scene Or Press CLEAR and the...

Страница 16: ... that has a file extension other than mp3 wma CD R physical format should be ISO 9660 If you record MP3 WMA files using software that cannot create a file system eg Direct CD it is impossible to playback MP3 WMA files We recommend that you use Easy CD Creator which creates an ISO 9660 file system File names should have a maximum of 8 letters and must incorporate an mp3 or wma extension They should...

Страница 17: ...epeat mode Track repeats the current track All repeats all the tracks on the Program list Off No display does not play repeatedly Note If you press once during Repeat Track playback the repeat playback cancels Erasing a Track from Program List 1 Use v V b B to select the track that you wish to erase from the Program list 2 Press CLEAR Repeat step 1 2 to erase additional tracks on the list Erasing ...

Страница 18: ...ress ZOOM to enlarge the video image 3 steps You can move through the zoomed picture using b B v V buttons Rotating the picture Press v V during showing a picture to rotate the picture clockwise or counter clockwise To listen to MP3 WMA music while watching picture 1 Insert the disc containing the two types of file in the player 2 Press TITLE to display the PHOTO menu 3 Press v V to select a photo...

Страница 19: ... language code until the subtitle is displayed properly 3 Press ENTER to continue playback Note The DivX subtitle file name has to be identified with the DivX file name to display by this unit DivX disc compatibility with this player is limited as follows Available resolution size of the DivX file is under 720x576 W x H pixel The file name of the DivX subtitle is available by 56 characters If ther...

Страница 20: ...duet with the recorded karaoke singer select a voice you desire EFFECT You can use Special Effects Each time b B is pressed the Special Effect changes as shown below Off FLANGE CHORUS KEY You can change the key by pressing b B Note Controlling the key when DVD player is connected to amplifier receiver with digital audio connection may cause mute the sound of the front left right speakers connected...

Страница 21: ...et may be reset to the default setting Set the appropriate code number again Video Mode Setting With certain discs the playback picture may be flickering or Dot Crawl is shown on straight lines That means Vertical interpolation or De interlace is not perfectly matched with the disc In this case the picture quality may be improved by changing the video mode To change the video mode press and hold D...

Страница 22: ...elorussian 6669 Cambodian 7577 Catalan 6765 Chinese 9072 Corsican 6779 Croatian 7282 Czech 6783 Danish 6865 Dutch 7876 English 6978 Esperanto 6979 Estonian 6984 Faroese 7079 Language Code Fiji 7074 Finnish 7073 French 7082 Frisian 7089 Galician 7176 Georgian 7565 German 6869 Greek 6976 Greenlandic 7576 Guarani 7178 Gujarati 7185 Hausa 7265 Hebrew 7387 Hindi 7273 Hungarian 7285 Icelandic 7383 Indon...

Страница 23: ...ayer again by pressing POWER Insert a playable disc Check the disc type and regional code Change the rating level Point the remote control at the remote sensor of the DVD player Operate the remote control closer to the DVD player Troubleshooting Specifications General Power requirements AC 200 240 V 50 60 Hz Power consumption 8W Dimensions Approx 360 x 35 x 202 mm W x H x D without foot Net Weight...

Страница 24: ...P NO MFL38396253 ...

Отзывы: