background image

Type

Chassis

Name

5000

7000

9000

12000

18000

24000

30000

36000

SQ

SR

ST

S4

S5

SZ

SU

S3

SP1

SA

TC1

TE1

TH

TR

TQ

TP

TN

BH

BT

BT1

BP

VE

VE

Model Name

Capacity, Btu/h

Standard Type

Artcool Deluxe Type

Artcool Type

Ceilling Mounted

Cassete Type 1Way

Ceilling Mounted

Cassete Type 4Way

Ceilling concealed

Duct(High Static)

Ceilling concealed

Duct(Low Static)

Ceilling concealed

Duct(Built In)

Convertible Type

34

Multi Air Conditioner

Combination indoor units

Combination indoor units

The indoor units connectable to the outdoor unit are shown below.

:

1. The total capacity(in kBtu/h unit) of connected indoor unit models represents the total sum of the figures

expressed in the indoor model name.

2. Combinations in which the total capacity of the connected indoor units exceeds the capacity of the

outdoor unit will reduce the capacity of each indoor unit below the rated capacity during simultaneous
operation. Therefore, if circumstances allows, combine indoor units within the capacity of the outdoor unit

NOTICE

Содержание A3UW186FA3

Страница 1: ...fore installing the product Installation work must be performed in accordance with the national wiring standards by authorized personnel only Please retain this installation manual for future reference after reading it thoroughly TYPE MULTI P NO 3828A20567H ENGLISH ITALIANO ESPAÑOL FRANÇAIS DEUTSCH ...

Страница 2: ...anel Front Assembly 30 Installation PI485 31 Test running 33 Combination indoor units 34 Max Combination Capacity 35 Installation guide at the seaside 36 Seasonal wind and cautions in winter 36 Level gauge Screw driver Electric drill Hole core drill ø65mm Horizontal meter Flaring tool set Specified torque wrenches 1 8kg m 4 2kg m 5 5kg m 6 6kg m different depending on model No Spanner Half union A...

Страница 3: ...ontrol Type A screw and plastic anchors Standard Type 5 Copper pipe Liquid side 6 Copper pipe Gas side 7 Connecting cable more than 30cm more than 60cm more than 60cm more than 70cm more than 30cm more than 30cm more than 70cm more than 30cm more than 30cm Air Outlet Air Intake side rear Connection pipe Drain hose Connecting wire Control cover more than 30cm more than 60cm more than 60cm ...

Страница 4: ...circuit breaker and main breaker No installation may cause fire and electric shock For installation always contact the dealer or service center Otherwise it may cause fire electric shock explosion or injury For electric work contact the dealer or service center Otherwise It will cause fire or electric shock Safety Precautions To prevent injury to the user or other people and property damage the fo...

Страница 5: ...uct Install the drain hose to ensure that drain can be securely done Otherwise it may cause water leakage Keep the level even while installing the product Otherwise it may cause vibration or water leakage Do not install the product where the noise or hot wind from the outdoor unit could give any casualty to the neighborhood Otherwise it may cause dispute with the neighborhoods Do not touch operate...

Страница 6: ... plants in the path of the warm air 4 Take the air conditioner weight into account and select a place where noise and vibration are minimum 5 Select a place so that the warm air and noise from the air conditioner do not disturb neighbors Rooftop Installations If the outdoor unit is installed on a roof structure be sure to level the unit Ensure the roof structure and anchoring method are adequate f...

Страница 7: ...te routing of the wiring to power outlets is through the walls typically Drilling the hole through the wall for piping connections must be done safely Chassis Hook Installation Plate Type A Installation plate Left rear piping Right rear piping Ø70mm Ø70mm 105mm 105mm 55mm 65mm Type 1 Type 1 45mm 140mm Ø 70mm 65mm 45mm Ø 70mm Installation plate Left rear piping Right rear piping Type 3 Installation...

Страница 8: ... Max Length A B Max Elevation h1 In In Elevation h2 40 100 50 50 15 30 15 1Ø 48 135 55 80 15 30 15 56 145 55 90 15 30 15 42 125 55 70 15 30 15 3Ø 48 135 55 80 15 30 15 54 145 55 90 15 30 15 Phase Capacity kBtu h Total Length Max Main Pipe Length A B Total Branch Pipe Length Max Branch Pipe Length Max Elevation h1 In In Elevation h2 CAUTION Capacity is based on standard length and maximum allowance...

Страница 9: ...g m A Room Branch Length Standard Length x 20g m B Room Branch Length Standard Length x 20g m C Room Branch Length Standard Length x 20g m CF Correction Factor x 100 CF Max number of connectable indoor unit Total number of connected indoor unit Additional Charge Calculation Example 1 Model Standard length m Max piping for one room m Max total Piping Length m Additional Charge g m A3UW186FA3 FM19AH...

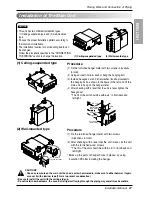
Страница 10: ...e two screws for fixing cover pipe 2 Pull up the cover side of desired connecting direction then cover side is separated 3 In case of connecting direction is left or right path through the hole of cover side CAUTION After removing the pipe hole cut the burr for safety When connecting pipe path through rear wall don t remove the hole NOTICE Drain hose junction 1 Remove the rubber stopple of desired...

Страница 11: ...nto drilled points Hang the hole of product at the upper screws In this time Remove the map Falling attention Check the fixed product with light power Adjust level even by level guage and fix to installation for reference on the wall Drill the piercing part for connecting pipe as diameter Ø65mm In case of piercing rear surface Refer to No 5 on this page when making a hole in the wall First Drive t...

Страница 12: ...end of the copper tube pipe in a downward direction as you remove burrs in order to avoid dropping burrs into the tubing Putting nut on Remove flare nuts attached to indoor and outdoor unit then put them on pipe tube having completed burr removal not possible to put them on after flaring work Flaring work Carry out flaring work using flaring tool as shown below Firmly hold copper pipe in a bar in ...

Страница 13: ...remote controller side Main board CN REMO The maximum length of the cord is 100m If the length of the cord exceeds 50m use a wire size greater than 0 5mm2 Remote controller CN REMO Remote control box body Lever carefully the box open using a screw driver etc Front case The lower part Face of wall Upper notch Upper flange Under plate Remote control cord Remote control unit Tapping screw Local suppl...

Страница 14: ... the remote controller LED s the remote controller should be installed properly as shown in Fig 1 The standard height is 1 2 1 5 m from floor level Operation unit ZONE 1 2 3 4 Humidify JET AUTO AUTO SWING OPERATION FAN SPEED Program set SUB FUNCTION SET TEMP Room Temp HI MED LO Heater Defrost Filter Preheat Out door Time Timer On Set no Time Off 01 03 05 07 09 11 13 15 17 19 21 23 Opera tion unit ...

Страница 15: ...ide of the bundle Locating at the upper side can cause drain pan to overflow inside the unit Inclined Inside is shiny without scratches Smooth all round Even length all round Surface damaged Cracked Uneven thickness Improper flaring Connection of piping Indoor Drain hose Drain hose Drain hose Connecting cable Gas side piping Liquid side piping Drain hose Loop Connecting pipe Connecting cable Tape ...

Страница 16: ...re nut with a wrench 3 When extending the drain hose at the indoor unit install the drain pipe Wrap the insulation material around the connecting portion 1 Overlap the connection pipe insulation material and the indoor unit pipe insulation material Bind them together with vinyl tape so that there is no gap 2 Wrap the area which accommodates the rear piping housing section with vinyl tape Drain hos...

Страница 17: ...e from left to right could cause problem of pipe damage Align the center of the piping and sufficiently tighten the flare nut by hand Connecting pipe order 1 A E UNIT gas side pipe 2 A E UNIT liquid side pipe Finally tighten the flare nut with torque wrench until the wrench clicks When tightening the flare nut with torque wrench ensure the direction for tightening follows the arrow on the wrench M...

Страница 18: ...cts from entering Figure3 Plug the pipe through holes with putty or insulation material procured locally to stop up all gaps as shown in the figure 3 Insects or small animals entering the outdoor unit may cause a short circuit in the electrical box Outdoor unit Continuous Forward Sideways Backward Knock out Base pan Downward Gas side piping Bigger Dia Liquid side piping Smaller Dia Putty or insula...

Страница 19: ...Outdoor Unit unit mm To BD Unit A B Ø19 05 Ø9 52 Ø9 52 Liquid and gas pipe joints Insulator included with kit Insulator for field piping Tape field supply Liquid and gas pipe joints Insulation Insulation Insulation Insulation Tape field supply Tape field supply Tape field supply Tape field supply Branch Ensure that the branch pipes are attached horizontally or vertically see the diagram below Bran...

Страница 20: ...wn in the diagram below for both ceiling suspended installation and wall mounted installation This unit does not require drain treatment as it uses internal foam treatment as low pressure piping insulation Service direction is the side B and C The piping for the indoor unit may be led around in direction A The inclination of side B must be within 5 degrees forward or back or to the sides 50 30 111...

Страница 21: ...agon nut and a flat washer locally procured to the hanging bolt as shown in the figure in the left and lift the main unit to hang on the hanger metal 4 After checking with a level that the unit is level tighten the hexagon nut The tilt of the unit should be within 5 in front back and left right CAUTIONS Once a screw hole on the main unit has had a screw hammered in make sure to either hammer it ag...

Страница 22: ...ram is not subject to change without notice Be sure to connect wires according to the wiring diagram Connect the wires firmly so that not to be pulled out easily Connect the wires according to color codes by referring the wiring diagram CAUTION Provide a circuit breaker between power source and the unit as shown below CAUTION The power cord connected to the outdoor unit should be complied with the...

Страница 23: ...tdoor unit Over 5mm Holder for power supply cord Terminal block Loosen terminal screw CAUTION After the confirmation of the above conditions prepare the wiring as follows 1 Never fail to have an individual power circuit specifically for the air conditioner As for the method of wiring be guided by the circuit diagram posted on the inside of control cover 2 Firmly tighten the terminal screws to prev...

Страница 24: ... to connect the connection wires of indoor outdoor units to terminal board numbers 1 2 and 3 Always fix each ground wire separately with a ground screw See the figure below After completing the wiring fix the outer coating of wires securely with wire clamps The wire clamp on indoor unit side is furnished Follow the procedure below to install Refer to the circuit diagram on the control cover inside...

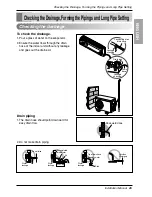
Страница 25: ...re the water flows through the drain hose of the indoor unit without any leakage and goes out the drain exit Drain piping 1 The drain hose should point downward for easy drain flow 2 Do not make drain piping Drain pan Drain hose Leakage checking Connecting area drain hose Leakage checking Downward slope Do not raise Accumulated drain water Tip of drain hose dipped in water Air Waving Water leakage...

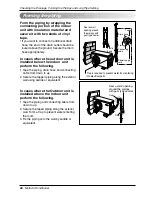
Страница 26: ... drain hose and connecting cable from down to up 2 Secure the tapped piping along the exterior wall using saddle or equivalent In cases where the Outdoor unit is installed above the Indoor unit perform the following 1 Tape the piping and connecting cable from down to up 2 Secure the taped piping along the exterior wall Form a trap to prevent water entering the room 3 Fix the piping onto the wall b...

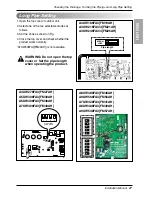
Страница 27: ...over and check whether the product works normally A7UW406FA2 FM40AH is not available WARNING Do not open the top cover or Set the pipe length when operating the product NORMAL LONG Pipe length A3UW186FA3 FM19AH A3UW216FA3 4 FM21AH A4UW246FA3 4 FM25AH 1 SW01N 2 3 4 A4UW276FA3 FM27AH A5UW306FA3 FM30AH A5UW406FA3 FM38AH A7UW406FA3 FM40AH ON 1 2 3 4 5 ON 1 2 3 4 5 A8UW486FA3 FM48AH A9UW566FA3 FM56AH A...

Страница 28: ...es and dry nitrogen gas cylinder to this service port with charge hoses CAUTION Be sure to use a manifold valve for leakage test If it is not available use a stop valve for this purpose The Hi knob of the manifold valve must always be kept close Pressurize the system to no more than 150 P S I G with dry nitrogen gas and close the cylinder valve when the gauge reading reached 150 P S I G Next test ...

Страница 29: ...he valve stem of gas side valve counter clockwise to fully open the valve 3 Loosen the charge hose connected to the gas side service port slightly to release the pressure then remove the hose 4 Replace the flare nut and its bonnet on the gas side service port and fasten the flare nut securely with an adjustable wrench This process is very important to prevent leakage from the system 5 Replace the ...

Страница 30: ...mbly exactly Fix power cord in the bottom groove of cover side left 2 Assemble connecting lead wire with controller and first fix the upper part of panel front then match the lower part of panel front 3 Suspend hook of front panel in the groove after contract lower of 2 screws Panel Front Connector Panel Front Connector ...

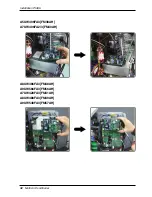
Страница 31: ...on Manual 31 ENGLISH Installation PI485 Fix the PI485 PCB as shown in Fig Detailed installation method refer to PI485 Installation Manual A3UW186FA3 FM19AH A3UW216FA3 4 FM21AH A4UW246FA3 4 FM25AH A4UW276FA3 FM27AH A5UW306FA3 FM30AH ...

Страница 32: ...32 Multi Air Conditioner Installation PI485 A5UW406FA3 FM38AH A7UW406FA2 3 FM40AH A8UW486FA3 FM48AH A9UW566FA3 FM56AH A7UW428FA3 FM41AH A8UW488FA3 FM49AH A9UW548FA3 FM57AH ...

Страница 33: ...rge 1 Measure the pressure of the gas side service valve 2 Measure the temperature of the intake and discharge of air 3 Ensure the difference between the intake temperature and the discharge is more than 8 C 4 For reference the gas side pressure of optimum condition is as below Cooling If the actual pressure are higher than shown the system is most likely over charged and charge should be removed ...

Страница 34: ...e 34 Multi Air Conditioner Combination indoor units Combination indoor units The indoor units connectable to the outdoor unit are shown below 1 The total capacity in kBtu h unit of connected indoor unit models represents the total sum of the figures expressed in the indoor model name 2 Combinations in which the total capacity of the connected indoor units exceeds the capacity of the outdoor unit w...

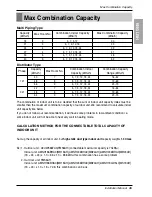
Страница 35: ...at the sum of indoor unit capacity index must be smaller than the maximum combination capacity of outdoor unit We recommend to calculate indoor unit capacity like below If you do not follow our recommendation it will have some problems in low ambient condition i e some indoor unit will not be able to heat very well in heating mode CALCULATION METHOD FOR THE CONNECTABLE TOTAL CAPACITY OF INDOOR UNI...

Страница 36: ...t up a windbreak not to be exposed to the sea wind 3 Select a well drained place It should be strong enough like concrete to prevent the sea wind from the sea The height and width should be more than 150 of the outdoor unit It should be keep more than 70 cm of space between outdoor unit and the windbreak for easy air flow Sea wind Windbreak CAUTION Sea wind Sea wind Sufficient measures are require...

Страница 37: ......

Отзывы: