background image

ENGLISH

16

Installing on a Wall

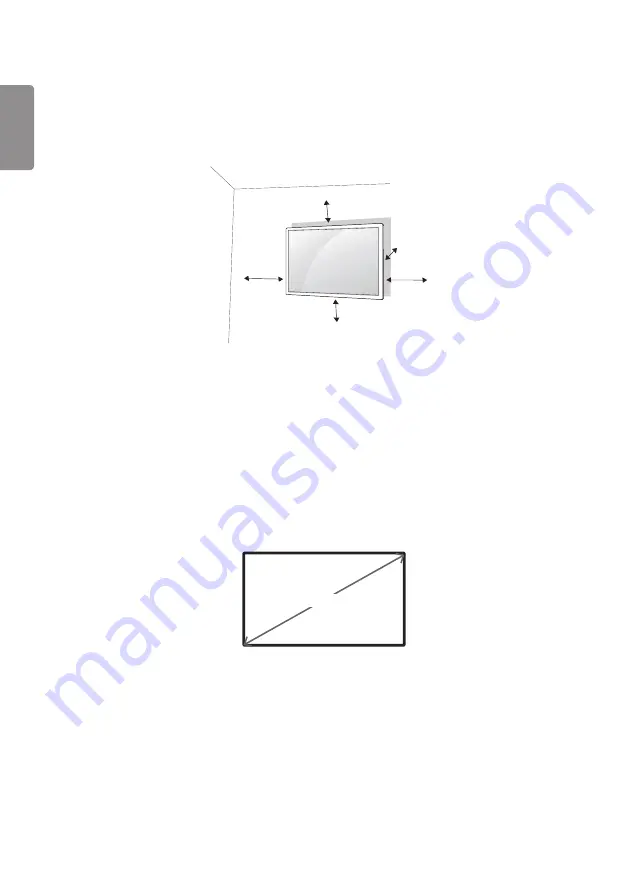
For proper ventilation, allow a clearance of 100 mm on each side and from the wall. Detailed installation instructions 

are available from your dealer, see the optional Tilt Wall Mounting Bracket Installation and Setup Guide.

100 mm

100 mm

100 mm

100 mm

100 mm

To install your monitor on a wall, attach a wall mounting bracket (optional part) to the back of the monitor.
Make sure that the wall mounting bracket is securely fixed to the monitor and to the wall.

Use only screws and wall mounting brackets that conform to VESA standards.

Screws which are longer than standard length may damage the inside of the monitor.

A non-VESA standard screw may damage the product and cause the monitor to fall. BSI is not liable for any 

accidents related to the use of non-standard screws.

Please use VESA standard as below.


785 mm and above
* Fixing screws: Diameter 6.0 mm x Pitch 1.0 mm x Length 12 mm

785 mm

Содержание 65UH5PC

Страница 1: ...Bi Search International Inc www bisearch com OWNER S MANUAL Digital Signage MONITOR SIGNAGE Please read this manual carefully before operating your set and retain it for future reference 65UH5PC ...

Страница 2: ...Precautions In Using the Product 8 Mounting on a Wall 9 LICENSES 10 ASSEMBLY AND PREPARATION 11 Parts and Buttons 12 Assembling the Memory Cover 13 Connecting the IR Sensor 14 Portrait Layout 15 Installing on a Wall 16 REMOTE CONTROL 19 MAKING CONNECTIONS 21 Connecting to a PC 21 External Device Connection 21 Using the Input List 23 TROUBLESHOOTING 24 PRODUCT SPECIFICATIONS 27 ...

Страница 3: ...swallowed by mistake force the patient to vomit and visit the nearest hospital Additionally vinyl packing can cause suffocation Keep it out of the reach of children Do not put heavy objects on the product or sit upon it If the product collapses or is dropped you may be injured Children must pay particular attention Do not leave the power or signal cable unattended on the pathway The passerby can t...

Страница 4: ... more than 100 mm from the wall If you install the product too close to the wall it may be deformed or fire can break out due to internal heat Do not block the ventilation hole of the product by a tablecloth or curtain The product can be deformed or fire can break out due to overheating inside the product Install the product on a flat and stable place that has no risk of dropping the product If th...

Страница 5: ...cause electric shock or fire Be careful not to step or place heavy objects electronic appliances clothing etc on the power cord or AC adapter Be careful not to damage the power cord or AC adapter with sharp objects Damaged power cords may cause a fire or electric shock Never disassemble repair or modify the power cord or AC adapter This may cause a fire or electric shock Make sure to connect the p...

Страница 6: ...sconnect device Please make sure the device is installed near the wall outlet to which it is connected and that the outlet is easily accessible As long as this unit is connected to the AC wall outlet it is not disconnected from the AC power source even if the unit is turned off CAUTION Be sure to keep the outlet AC adapter and pins of the power plug clean from dust and etc This may cause a fire Do...

Страница 7: ...hands to move If you drop the product the damaged product can cause electric shock or fire Contact an authorized the service center for repair Make sure the product is turned off unplugged and all cables have been removed It may take 2 or more people to carry larger apparatus Do not press against or put stress on the front panel of the apparatus CAUTION Do not shock the product when moving it You ...

Страница 8: ...ch as benzene paint thinners or alcohol Take a rest from time to time to protect your vision Keep the product clean at all times Take a comfortable and natural position when working with a product to relax the muscles Take a regular break when working with a product for a long time Do not press strongly upon the panel with a hand or sharp object such as nail pencil or pen or make a scratch on it K...

Страница 9: ...may cause staining WATER CHEMICALS Do not use products using high voltage around the Monitor e g a bug zapper Monitor may have malfunction as its electrical shock Mounting on a Wall Do NOT install this product by yourself as you may injure yourself or cause damage to product Please contact service personnel authorised by manufacturer ...

Страница 10: ...gistered trademarks of HDMI Licensing LLC in the United States and other countries Manufactured under license from Dolby Laboratories Dolby and the double D symbol are trademarks of Dolby Laboratories For DTS patents see http patents dts com Manufactured under license from DTS Licensing Limited DTS DTS HD the Symbol DTS or DTS HD and the Symbol together are registered trademarks of DTS Inc DTS Inc...

Страница 11: ...njury caused by the use of counterfeit components NOTE The accessories provided with your product may vary depending on the model or region Product specifications or contents in this manual may be changed without prior notice due to upgrade of product functions The warranty will not cover any damage caused by using the product in an excessively dusty environment ...

Страница 12: ...rent according to the model Buttons INPUT Changes the input source MENU Accesses the main menus or saves your input and exits the menus Adjust the up and down Moves left and right AUTO SET Displays the current signal and mode I Turns the power on or off ...

Страница 13: ...ENGLISH 13 Assembling the Memory Cover Assemble the cover with a screw as illustrated to prevent the USB memory from theft 1 2 ...

Страница 14: ...duct the feature for receiving remote control signals is activated Rotate the IR sensor according to the screen orientation Landscape Portrait The image may be different according to the model Basic installation Front Rear Landscape scene Front Rear Portrait scene Front Rear ...

Страница 15: ...onitor For more information on installation and use of this system refer to the manual provided with the Kensington security system or visit http www kensington com Connect the Kensington security system cable between the monitor and a table NOTE The Kensington security system is optional You can obtain additional accessories from most electronics retail stores The illustration shows a general exa...

Страница 16: ...l part to the back of the monitor Make sure that the wall mounting bracket is securely fixed to the monitor and to the wall 1 Use only screws and wall mounting brackets that conform to VESA standards 2 Screws which are longer than standard length may damage the inside of the monitor 3 A non VESA standard screw may damage the product and cause the monitor to fall BSI is not liable for any accidents...

Страница 17: ...hat meet the VESA standard Any damage or injuries caused by misuse or use of improper accessories are not covered by the warranty To prevent injury this apparatus must be securely attached to the wall in accordance with the installation instructions This pertains only to Australia and New Zealand NOTE The wall mount kit includes the installation guide and all necessary parts The wall mounting brac...

Страница 18: ...autions such as Using cabinets or stands recommended by the manufacturer Only using furniture that can safely support the monitor Ensuring the monitor is not overhanging the edge of the supporting furniture Not placing the monitor on tall furniture for example cupboards or bookcases without anchoring both the furniture and the monitor to a suitable support Not placing cloth or other materials betw...

Страница 19: ...he remote control sensor on the monitor Some features of the remote control may not be supported in certain models Turns the monitor on or off Turns the monitor on Turns the monitor off Adjusts the brightness of the picture to reduce energy consumption Selects the input mode Used for viewing 3D videos Toggles between numerical and alphabetical Number and Alphabet buttons Enters numerical or alphab...

Страница 20: ...and confirms your input Allows you to move back one step in the user interaction function Quit all OSD tasks and applications Allows you to control various multimedia devices to enjoy multimedia simply by using the remote control through the SimpLink menu Selects the TILE Mode When the Picture ID number matches the Set ID number you can control whichever monitor you want in multi display format US...

Страница 21: ...cables are not provided This monitor supports the Plug and Play feature Plug and Play a feature that enables a PC to recognize devices attached by the user without device configuration or user intervention when powering up External Device Connection Connect a HD receiver DVD or VCR player to the monitor and select an appropriate input mode Some of the cables are not provided For the best picture a...

Страница 22: ...e please check your PC settings Some PCs require you to manually change the default audio output to HDMI If you want to use HDMI PC mode you must set your PC DTV to PC mode You may experience compatibility issues if you use HDMI PC mode Make sure the power cable is disconnected If you connect a gaming device to the monitor use the cable provided with the gaming device It is recommended to use the ...

Страница 23: ...ENGLISH 23 Using the Input List HDMI1 HDMI2 OPS DVI D DISPLAYPORT ...

Страница 24: ... remote control to check the input signal The Unknown Product message appears when the product is connected Problem Action Did you install the driver Check if the Plug and Play function is supported by referring to the graphics card user manual The screen image looks abnormal Problem Action Is the screen position wrong Check if the graphics card resolution and frequency are supported by the produc...

Страница 25: ...d Sound is too low Adjust the volume Screen color is abnormal Problem Action Screen has poor color resolution 16 colors Set the number of colors to more than 24 bits true color Select Control Panel Display Settings Color Table in Windows The settings may differ depending on your operating system Screen color is unstable or mono colored Check the connection status of the signal cable Or re insert t...

Страница 26: ...M 123 PW ID UPM 123 PW When changing colors using complementary colors helps to prevent image sticking BM BM BM CF CF CF OC PI PI TFT Layers Glass Glass LC CF ITO or MoTi Pixel Layer 2 Change the image using the same time interval Make sure that the characters or images before changing the image remain in the same location after changing the image What is image sticking When the LCD panel displays...

Страница 27: ...MI2 Displayport 3840 x 2160 60 Hz This may not be supported on some OS or graphics card types Horizontal frequency DVI D OPS 30 kHz to 83 kHz HDMI1 HDMI2 Displayport 30 kHz to 135 kHz Vertical frequency 30 Hz to 60 31 Hz Synchronization Separate Sync Digital Input output ports SPEAKER OUT HDMI1 HDMI2 LAN PIXEL SENSOR IR LIGHT SENSOR DP IN OUT DVI D IN SD USB 3 0 IN AUDIO IN OUT RS 232C IN OUT Embe...

Страница 28: ... 100 240 V 50 60 Hz 1 5 A Power consumption On Mode 134 W Typ Sleep Mode DVI D HDMI1 HDMI2 0 5 W Sleep Mode DisplayPort 0 5 W Off Mode 0 5 W Dimensions Width x Height x Depth Weight Monitor 1458 6 mm x 848 9 mm x 40 1 mm 26 kg Monitor in package 1561 mm x 971 mm x 190 mm 32 5 kg ...

Страница 29: ...x 1080 67 5 60 3840 x 2160 67 5 30 HDMI DisplayPort 3840 x 2160 135 60 HDMI DisplayPort HDMI DisplayPort OPS DTV Support Mode Resolution Horizontal frequency kHz Vertical frequency Hz Remark 480 60p 31 5 60 O 576 50p 31 25 50 O 720 50p 37 5 50 O 720 60p 45 60 O 1080 50i 28 1 50 O 1080 60i 33 75 60 O 1080 50p 56 25 50 O 1080 60p 67 432 59 94 O 1080 60p 67 5 60 O 2160 30p 67 5 30 HDMI DisplayPort 21...

Страница 30: ...available for the Input Label option in HDMI DVI D DisplayPort input modes 1280 x 720 60 Hz 1920 x 1080 60 Hz 480p 720p and 1080p DTV resolutions Vertical frequency The product display functions by the screen image changing dozens of times every second like a fluorescent lamp The vertical frequency or refresh rate is the number of image displays per second The unit is Hz Horizontal frequency The h...

Страница 31: ...Safety Precautions before using the product The model and serial numbers of the SET are located on the back and one side of the SET Record it below should you ever need service MODEL SERIAL Temporary noise is normal when powering ON or OFF this device ...

Отзывы: