LG 60PZ750S Скачать руководство пользователя страница 16

16

ENG

ENGLISH

ASSEMBLING AND PREPARING
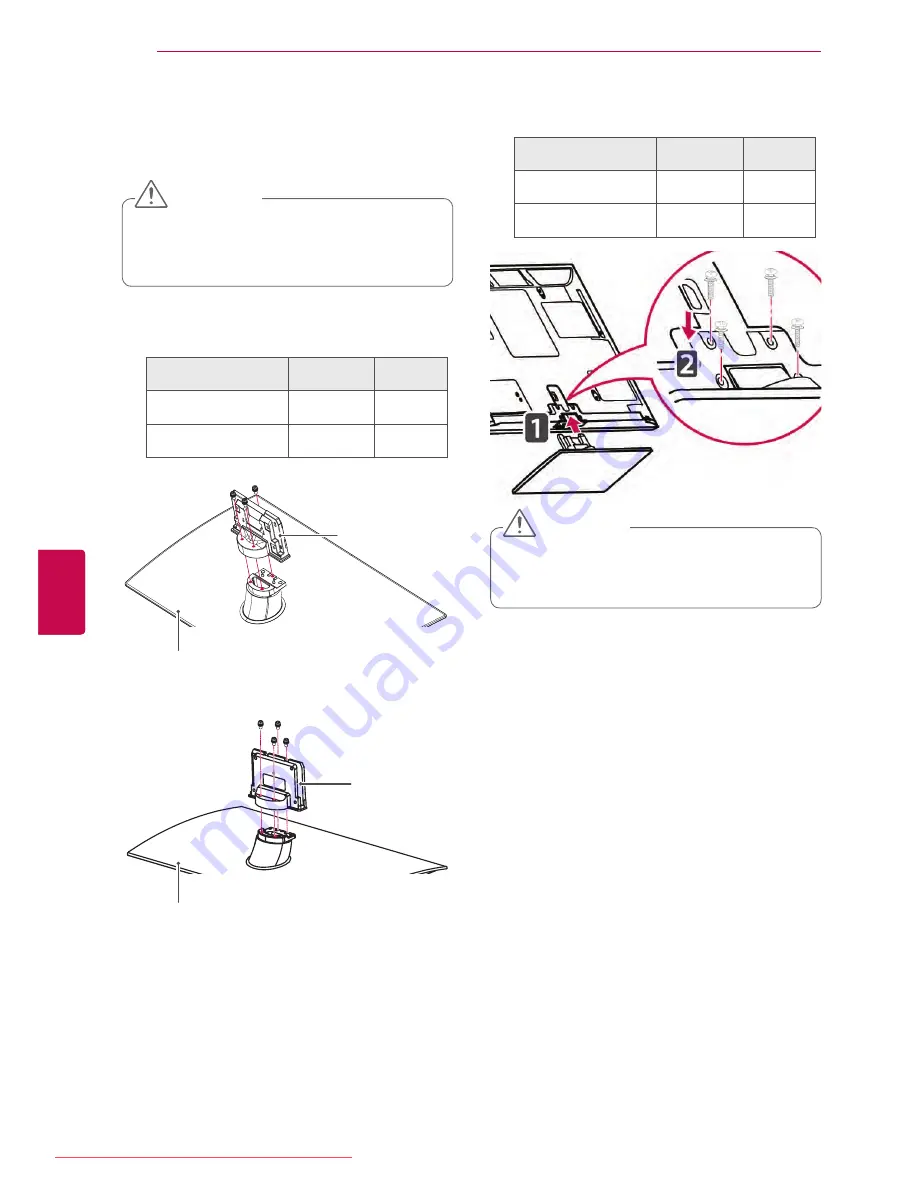
2

  Assemble the parts of the 

Stand Body

 with the 

Stand Base

 of the TV.

Model

Screw for 

assembly

Number of 

screws

50PZ75**

50PZ95**

M5x14.5

3

60PZ75**

60PZ95**

M5x14.5

4

Only 50/60PZ75**, 50/60PZ95**

1

  Lay the TV with the screen side down on a flat 

surface.

y

y

Lay a foam mat or soft protective cloth 

on the surface to protect the screen from 

damage. Make sure no objects press 

against the screen.

CAUTION

y

y

Tighten the screws firmly to prevent 
the TV from tilting forward. Do not over 
tighten.

CAUTION

3

  Secure the TV and the stand with the 4 screws.

Model

Screw for 

assembly

Number of 

screws

50PZ75**

50PZ95**

M4 x 26

4

60PZ75**

60PZ95**

M4 x 28

4

Stand Body

Stand Base

Stand Body

Stand Base

Downloaded From TV-Manual.com Manuals

Содержание 60PZ750S

Страница 1: ...www lg com OWNER S MANUAL LED LCD TV LCD TV PLASMA TV Please read this manual carefully before operating the set and retain it for future reference Downloaded From TV Manual com Manuals ...

Страница 2: ...our files into DivX video ABOUT DIVX VIDEO ON DEMAND This DivX Certified device must be regis tered in order to play purchased DivX Video on Demand VOD movies To obtain your registration code locate the DivX VOD section in your device setup menu Go to vod divx com for more information on how to complete your registration DivX Certified to play DivX and DivX Plus HD H 264 MKV video up to 1080p HD i...

Страница 3: ...3 ENG ENGLISH LICENSES Downloaded From TV Manual com Manuals ...

Страница 4: ...ist 42 Using the quick menu 43 ENTERTAINMENT 43 Network Connection 43 Connecting to a wired network 44 Connecting to a wireless network 46 When a security code is already set 49 Network Status 50 Premium Account Function 50 Notice 52 LG Apps Function 52 Registration LG Apps 53 Sign in with your LG Apps account 54 Using LG Apps 55 Using My Apps 56 Web Browser Function 56 Using Web Browser 57 Browsi...

Страница 5: ...ing to Headphone Connection 119 Connecting to a USB 119 Connecting to a CI Module 120 Connecting the Wireless Media Box 120 SIMPLINK Connection 121 Activating and Using the SIMPLINK menus 122 TELETEXT 122 Switch On Off 122 Simple Text 122 Page selection 122 Top Text 122 Block Group Page Selection 122 Direct Page Selection 123 Fastext 123 Page selection 123 Special Teletext Function 124 DIGITAL TEL...

Страница 6: ...ou purchased your product The illustrations in this manual may differ from the actual product and item 1 Gently wipe the spots on the cabinet with the polishing cloth 2 Wipe spots on the exterior only with the cleasing cloths Do not wipe roughly when removing stains Excessive pressure may cause scratches or discolouration For cleaning front frame please slowly wipe in one direction after spraying ...

Страница 7: ... x 26 M5x14 5 x 4 x 3 M4 x 28 M5 x 24 x 4 x 4 M4 x 28 M5x14 5 Only 50PZ57 50PZ75 50PZ95 Only 60PZ57 Only 60PZ75 60PZ95 Screw for assembly Protection cover Protection cover tape Cable holder Power Cord holder Power Cord 3D Glasses AG S250 Magic Motion Remote Control Strap Batteries AA Only 50 60PZ95 Wireless LAN for Broad band DLNA Adaptor AN WF100 Only 50 60PZ95 Downloaded From TV Manual com Manua...

Страница 8: ...e to reduce the electromagnetic interference in the power cable Wind the power cable on the ferrite core once Place the ferrite core close to the TV and a wall plug to a wall plug Black Cross Section of Ferrite Core Figure 2 If there are two ferrite cores follow as shown in Figures 3 1 If there are three ferrite cores follow as shown in Figures 1 and 3 1 If there are six ferrite cores follow as sh...

Страница 9: ... These devices only work with compatible LG LED LCD TV LCD TV or Plasma TV Wireless Media Box AN WL100E AN WL100ET Only 50 60PZ75 50 60PZ95 3D Glasses AG S230 AG S250 AG S270 Only 50 60PZ57 50 60PZ75 50 60PZ95 Magic Motion Remote Control AN MR200 Wireless LAN for Broadband DLNA Adaptor AN WF100 Only 32 37 42 47LV37 50 60PZ75 LG USB for VOD AN UM200 Only France Downloaded From TV Manual com Manuals...

Страница 10: ...y consumed during use can be significantly reduced if the level of brightness of the picture is reduced and this will reduce the overall running cost NOTE y y Do not step on the glass stand or subject it to any impact It may break causing possible injury from fragments of glass or the TV may fall y y Do not drag the TV The floor or the product may be damaged y y In case of some model the thin film...

Страница 11: ...menu option or confirms an input Adjusts the volume level Scrolls through the saved programmes 1 Intelligent sensor Adjusts the image quality and brightness based on the surrounding environment 2 All of the buttons are touch sensitive and can be operated through simple touch with your finger Remote control and intelligent1 sensors Power Indicator Screen Touch buttons2 Rear Connection panel See p 1...

Страница 12: ...ith your finger Touch button2 Description Turns the power on or off Changes the input source Accesses the Home menu or saves your input and exits the menus Selects the highlighted menu option or confirms an input Adjusts the volume level Scrolls through the saved programmes Screen Touch buttons2 Only 50 60PZ570G 50 60PZ570S Rear Connection panel See p 111 Speakers Power Indicator Remote control an...

Страница 13: ...r finger Touch button2 Description Turns the power on or off Changes the input source Accesses the Home menu or saves your input and exits the menus Selects the highlighted menu option or confirms an input Adjusts the volume level Scrolls through the saved programmes Screen Touch buttons2 Remote control and intelligent1 sensors Power Indicator Only 50 60PZ750G 50 60PZ750S 50 60PZ950G 50 60PZ950S R...

Страница 14: ...old the transparent part speaker or speaker grill area y y When transporting a large TV there should be at least 2 people y y When transporting the TV by hand hold the TV as shown in the following illustration y y When transporting the TV do not expose the TV to jolts or excessive vibration y y When transporting the TV keep the TV upright never turn the TV on its side or tilt towards the left or r...

Страница 15: ...t protective cloth on the surface to protect the screen from damage Make sure no objects press against the screen CAUTION 2 Assemble the parts of the Stand Body with the Stand Base of the TV Model Screw for assembly Number of screws 50PZ57 M5 x 14 5 3 60PZ57 M5 x 24 3 Stand Base Stand Body 3 Secure the TV and the stand with the 4 screws Model Screw for assembly Number of screws 50PZ57 M4 x 26 4 60...

Страница 16: ...t surface y y Lay a foam mat or soft protective cloth on the surface to protect the screen from damage Make sure no objects press against the screen CAUTION y y Tighten the screws firmly to prevent the TV from tilting forward Do not over tighten CAUTION 3 Secure the TV and the stand with the 4 screws Model Screw for assembly Number of screws 50PZ75 50PZ95 M4 x 26 4 60PZ75 60PZ95 M4 x 28 4 Stand Bo...

Страница 17: ...ts upright position on a table Leave a 10 cm minimum space from the wall for proper ventilation 10 cm 10 cm 10 cm 10 cm Only 50 60PZ57 50 60PZ75 50 60PZ95 Not using the Desk Type Stand When installing the wall mounting bracket use the Protection cover This will protect the opening from accumulating dust and dirt y y Push the supplied protection cover into the opening at the bottom of the TV until ...

Страница 18: ...y rope Make sure to keep the rope horizontal with the flat surface y y Use a platform or cabinet that is strong and large enough to support the TV securely NOTE y y Make sure that children do not climb on or hang on the TV CAUTION Securing the TV to a table Only 32 37LV37 Fix the TV to a table to prevent from tilting forward damage and potential injury Mount the TV on a table and then insert and t...

Страница 19: ... solid wall perpendicular to the floor When you attach the TV to other building materials please contact qualified personnel LG recommends that wall mounting be performed by a qualified professional installer Make sure to use screws and wall mount bracket that meet the VESA standard Standard dimen sions for the wall mount kits are described in the following table Separate purchase Wall Mounting Br...

Страница 20: ... in severe injury Use an authorized LG wall mount bracket and contact the local dealer or qualified personnel y y Do not over tighten the screws as this may cause damage to the TV and void your war ranty y y Use the screws and wall mount bracket that meet the VESA standard Any damages or injuries by misuse or using an improper ac cessory are not covered by the warranty CAUTION y y Use the screws t...

Страница 21: ...the installation actions in reverse y y Do not mix old and new batteries as this may damage the remote control CAUTION Alphanumeric buttons Enters letters and numbers LIST See p 37 Accesses the saved programme list Space Opens an empty space on the screen keyboard Q VIEW Returns to the previously viewed programme POWER Turns the TV on or off LIGHT Illuminates the remote control buttons ENERGY SAVI...

Страница 22: ...reen displays and return to TV viewing AV MODE LIGHT INPUT TV RAD ENERGY SAVING 1 2abc 3def 4ghi 5jkl 6mno 7pqrs 8tuv 0 9wxyz BACK EXIT OK LIST Q VIEW Premium Home Q MENU GUIDE APP INFO RATIO FAV RATIO MUTE MARK DELETE CHAR NUM P P A G E L R SELECT LIVE TV AD GUIDE SMART TV 3D OPTION Adjusts the volume level MARK Selects a menu or option FAV See p 38 Accesses your favourite programme list CHAR NUM...

Страница 23: ...e using the TV AV Component RGB PC or HDMI input source REC Uses to adjust DVR menu INFO See p 88 Views the information of the current programme and screen AD Switches the Audio Description On or Off RATIO See p 39 Resizes an image GUIDE Shows programme guide SIMPLINK See p 120 Accesses the AV devices connected to the TV Opens the SIMPLINK menu APP Select the MHP TV menu source Only Italy Dependin...

Страница 24: ...s up down left right Scrolls through menus or options Pointer RF transmitter Blinks the light when operating Home Accesses the Home menu OK Selects menus or options and confirms your input Press this button to display the pointer when it disappears from the screen You can control the TV by selecting Quick Menu on the screen If you press the Navigation button while moving the pointer on the screen ...

Страница 25: ...again Precautions to Take when Using the Magic Motion Remote Control y y Use the remote control within the maximum communication distance 10 m Using the remote control beyond this distance or with an object obstructing it may cause a com munication failure y y A communication failure may occur due to nearby devices Electrical devices such as a microwave oven or wireless LAN product may cause inter...

Страница 26: ... y Use a signal splitter to use more than 2 TVs y y If the image quality is poor install a signal amplifier properly to improve the image quality y y If the image quality is poor with an antenna connected aim the antenna to the correct direction y y An antenna cable and converter are not supplied NOTE Wall Antenna Socket Connecting with a satellite dish Only Satellite models Connect the TV to a sa...

Страница 27: ...setting screen appears Select a language and customize the basic settings 1 Connect the power cord to a power outlet 2 In Standby mode press POWER to turn the TV on The Initial setting screen appears if you turn the TV on for the first time 3 Follow the on screen instructions to customize your TV settings according to your preferences Selects a language to display Selects Home Use for the home env...

Страница 28: ...can enjoy various content files by selecting each card and you can edit the premium card by selecting 5 items 4 Function card position 5 Sign In 6 Exit 7 Current watching channel screen 8 INPUT SETUP GUIDE menu 9 Launcher bar Sign In Premium Search Sat Jan 1 2011 12 00 World Nature 5 05 5 55 LG Apps Web Browser Media Link Arrow Sudoku My Apps INPUT SETUP GUIDE LG Apps HOT NEW Exit UCC Service Movi...

Страница 29: ...Nordic models y y In the following country DVB cable can be used Germany Netherlands Sweden Switzerland Denmark Austria Finland Nor way Slovenia Hungary Ukraine Bulgaria Ireland Poland Romania Russia Lithuania Estonia Latvia Spain The supported coun try can be added Automatically setting up programme 1 Press Home to access the Home menu 2 Press the Navigation buttons to scroll to SETUP and press O...

Страница 30: ...vice such as modem sends symbols to a channel Modulation Enter a user defined modulation Modulation Loading of audio or video signals onto carrier Network ID Unique identifier allocated for each user Start Frequency Enter a user defined start frequency range End Frequency Enter a user defined end frequency range 1 Press Home to access the Home menu 2 Press the Navigation buttons to scroll to SETUP...

Страница 31: ...y Satellite models 1 Press Home to access the Home menu 2 Press the Navigation buttons to scroll to SETUP and press OK 3 Press the Navigation buttons to scroll to SETUP and press OK 4 Press the Navigation buttons to scroll to Auto Tuning and press OK 5 Press the Navigation buttons to scroll to Cable Satellite and press OK 6 Press the Navigation buttons to scroll to Service Operator and press OK 7 ...

Страница 32: ...nly Only Satellite models In Cable Cable Satellite Only Satellite models mode only Option Description Satellite Select your desired Satellite LNB Frequency Select one value from Universal 9750 10600 5150 If you select Universal for LNB Frequency which is 9750 10600 MHz 22KHz Tone is disabled If you cannot find the LNB frequency value from the list select User and manually enter the frequency 22KHz...

Страница 33: ...pdates the changed Programme List in formation by based on country broadcasting circumstance and satellite y y It updates the Programme List when the TV turn off all the time After updates the Pro gramme List may be changed If not want select Off 6 If you select Motorized System to On select your desired source 7 When you are finished press EXIT When you return to the previous menu press BACK Opti...

Страница 34: ...OTE y y If the TV scans a blocked programme you will be prompted to enter your password to keep the programme scanned y y Symbol rate Enter a user defined symbol rate Symbol rate Speed at which a device such as modem sends symbols to a chan nel y y Modulation Enter a user defined modula tion Modulation Loading of audio or video signals onto carrier y y You can not select the Cable DTV when the ser...

Страница 35: ...but tons to scroll to the desired channel number 10 Press the Navigation buttons to scroll and start searching 11 Press the Navigation buttons to scroll to Store and press OK 12 When you are finished press EXIT When you return to the previous menu press BACK NOTE y y If the TV scans a blocked programme you will be prompted to enter your password to keep the programme scanned y y Transponder If the...

Страница 36: ... 8 Press the Navigation buttons to scroll to Close and press OK 9 Press the Navigation buttons to scroll to Store and press OK 10 When you are finished press EXIT When you return to the previous menu press BACK Fine Tuning Normally fine tuning is only necessary if reception is poor 1 Press Home to access the Home menu 2 Press the Navigation buttons to scroll to SETUP and press OK 3 Press the Navig...

Страница 37: ...he following buttons When a programme number is skipped it means that you will be unable to select it using P but ton during TV viewing If you wish to select the skipped programme directly enter the programme number with the NUMBER buttons or select it in the Programme edit menu This function enables you to skip the stored pro grammes Button Description Highlight the programme type Scrolls through...

Страница 38: ...o scroll to CI Information and press OK 5 Select the desired item Module information smart card information language or software download etc and press OK 6 When you are finished press EXIT This function enables you to watch some encrypt ed services pay services If you remove the CI Module you cannot watch pay services When the module is inserted into the CI slot you can access the module menu To ...

Страница 39: ...n is available y y In Analogue DTV AV Scart mode Full Wide is available NOTE 16 9 Resizes images to fit the screen width Just Scan Displays video images in the origi nal size without removing parts of the edge of the image y y If you select Just Scan you may see image noises at the edge or edges of the screen NOTE 4 3 Resizes images to the previous standard 4 3 Full Wide When TV receives the wide ...

Страница 40: ...laying a video game using PlayStation or Xbox it is recommended to use the Game mode When in Game mode functions related to picture quality will be optimized for playing games 14 9 You can view a picture format of 14 9 or a general TV programme in the 14 9 mode The 14 9 screen is viewed in the same way as in 4 3 but is moved to the up and down Cinema Zoom Choose Cinema Zoom when you want to enlarg...

Страница 41: ...ent Watch video from a DVD or other external devices or through a digital set top box RGB Use the TV as a computer monitor HDMI Watch video from a HTS or other high definition devices Antenna USB 1 Input List Input Label Exit AV1 NETWORK AV2 Component1 SIMPLINK Page 1 2 HDMI2 HDMI3 HDMI1 Component2 RGB USB 2 y y Image shown may differ from your TV The disconnected input sources will be gray To add...

Страница 42: ...s Auto Intelligent sensor Off Minimum Me dium Maximum Screen Off AV Mode Sets the optimized image and sound settings Off Cinema or THX Cinema Sport Game Skip Off On Sets the Skip Off On MULTIFEED Only Satellite models Select video from List for a Multifeed Service USB Device Eject a USB device The menu is displayed only when the USB device is connected y y The available menus and options may diffe...

Страница 43: ...imultaneously con nected press the Navigation buttons to select Wired and press OK 6 If you have already set the Network Setting select Resetting The new connection settings will reset the current network settings 7 Select IP Auto Setting or IP Manual Setting If selecting IP Manual Setting press the Navigation and Number buttons IP address es will need to be input manually IP Auto Setting Select t...

Страница 44: ... or video stored on a PC using the router a wired connection is recommended y y When the wireless port of the router is used there may be restrictions on some functions y y It is recommended that an Access Point AP be located more than 1 m away from the TV If the AP is installed closer than 1 m the magic motion remote control may not perform as expected due to frequency interference y y If you wan...

Страница 45: ...lect Setting from the AP list and press OK Scan the all available AP Access Point or wireless routers within range and display them as a list Selecting the wireless network setting type Select the wireless network setting type Setting from the AP list Simple setting WPS button mode Setting Ad hoc network Previous Exit Next 8 Press the Navigation buttons to select an AP Access Point or wireless rou...

Страница 46: ...Insert PIN number at the AP webpage and press Connect button PIN NUMBER 12345670 Connect Previous For more information check the AP manual Exit Next 5 Repeat step 6 7 on Connecting to a wired network WPS Wi Fi Protected Setup If your router or AP has a WPS button it is the easiest connection method You simply press the button on the router and then select the WPS on the TV within 120 seconds 1 Rep...

Страница 47: ...etwork setting is completed 7 Press the OK Ad hoc Mode Ad hoc mode allows the TV to use a wireless to connect to a computer without using a router or access point 1 Repeat step 1 5 on Connecting to a wireless network 2 Press the Navigation buttons to select Setting Ad hoc network and press OK 3 Press the Navigation buttons to select OK and press OK 4 Press OK to select Connect to connect Ad hoc ne...

Страница 48: ...ection feature contained in this TV or you may be lim ited to the number of devices you can connect at the same time If your ISP limits sub scription to one device this TV may not be allowed to con nect when a PC is already connected y y The use of a Router may not be allowed or its usage may be limited depending on the policies and restrictions of your ISP For details contact your ISP directly y ...

Страница 49: ...ttons to scroll to NET WORK and press OK 4 Press the Navigation buttons to select Net work Status 5 Press OK to check the network status Option Description Setting Return to the network setting menu or wireless network setting type menu Test Test the current network status after setting the network Close Return to the previous menu Downloaded From TV Manual com Manuals ...

Страница 50: ... may change without notice Please refer to the help menu on the screen y y All information data documents commu nications downloads files text images photographs graphics videos webcasts publications tools resources software code programmes applets widgets applications products and other content Content and all services and offerings Services provided or made available by or through any third part...

Страница 51: ...IABLE WHETHER IN CONTRACT OR TORT FOR ANY DIRECT INDIRECT INCIDENTAL SPECIAL OR CONSEQUENTIAL DAMAGES OR ANY OTHER DAMAGES ARISING OUT OF ANY INFORMA TION CONTAINED IN OR ANY CONTENT OR SERVICE ACCESSED BY YOU OR ANY THIRD PARTY EVEN IF ADVISED OF THE POSSIBILITY OF SUCH DAMAGES Third party services may be changed suspended removed terminated or interrupted or access may be disabled at any time wi...

Страница 52: ... Sign Out Sign in or sign out to the premium service 2 Exit Returns to TV viewing 3 LG Apps Moves to LG Apps 4 Moves to the LG Apps you want directly 5 Search These functions may be not available for a certain period of time depending on country or set In such cases the buttons may be disabled They are enabled when the services are available 6 Web Browser 7 Media Link 8 Quick Apps Stores the most ...

Страница 53: ...k Auto Sign In you are automati cally logged in whenever you turn on TV 4 Enjoy LG Apps You can enjoy Premium service LG Apps My Apps and much more ID Management 1 After sign in press Red button again A pop up window will appears 2 Press the Navigation buttons to scroll to the desired menu option and press OK Account Setting Change User Sign Out Close 3 Manage the ID by using following menu Option...

Страница 54: ...e information of the App 2 Press Purchase to buy a App Option Description 1 Sign In Sign Out Sign in or out to use the LG Apps 2 My Apps Move to My Apps 3 Back Move to the previous screen 4 App description Shows the description of the current Apps 5 Fee Shows the fee of the current app 6 Install Install or purchase the App You can purchase an app on either your PC or TV but it can only be installe...

Страница 55: ...y Apps 3 Shows the downloaded apps Moves to the previous or next page using P button 4 Moves the LG Apps 5 Quick Apps 6 Sign In the LG Apps After sign in manage the ID option Ac count Setting Change User Sign Out 7 Edit the My Apps 8 Exit the My Apps 9 Move to the Home menu Delete the Apps My Apps Edit Sign In Exit Page 1 1 Delete 4 6 7 8 1 3 2 9 Search LG Apps Web Browser Media Link Arrow Sudoku ...

Страница 56: ... The Web Browser will close when this happens y y The web browser on this device uses a single built in font Some text may not be displayed as intended y y The web browser on this device does not sup port downloading of files or fonts y y The web browser on this device is a TV browser It may work differently to PC browsers Using Web Browser 1 Connect to the network 2 Press Home to access the Home ...

Страница 57: ...s to scroll to the Web Browser and press OK 4 Press the Navigation buttons to scroll to the Favourites and press OK By adding frequently visited websites to Fa vourites you can browse them easily Option Description 1 Browse a website by directly entering the URL address 2 Select a website in Favourites 3 View the list of recently viewed web pages 4 Select a site to browse 5 Edit Favourites Move Ch...

Страница 58: ...nter the address Se lect characters to enter 6 Select the keyboard language 7 Change the keyboard 8 Clear the similar addresses appearing below the address input field 9 Move to the previous page Exit the web browser Hide the keyboard Select the address input field to display the keyboard again Move the cursor left or right Delete the text before the cursor one charac ter at a time Press this afte...

Страница 59: ...which has normal music or image files y y Use only USB storage devices that are for matted as a FAT 32 or NTFS file system y y You may need to connect a USB storage device to an external power supply with a power adapter y y If the TV does not recognize a connected USB storage device replace the cable and try again Do not use an excessively long cable y y The TV does not support some USB storage d...

Страница 60: ...during playback y y When playing a video in DLNA mode the Multi Audio and Closed Caption features are not supported y y When selecting Full Screen in DLNA mode the ratio of the outputted screen may differ from the original y y When more than one TV is connected to a single server in DLNA mode a file may not play properly depending on the server performance y y If the play time information is not p...

Страница 61: ...omputer s CD ROM drive 4 Click Nero MediaHome 4 Essentials The installation wizard will appear 5 Click the Next button to display the serial number input screen Click Next to go to the next step 6 If you accept all conditions click I accept the License Conditions check box and click Next Installation is not possible without this agree ment 7 Click Typical and click Next The installation process is...

Страница 62: ... there is an unplayable music file in the Smart Share menu the TV will skip the file and play next file y y Files in a folder can be played only when they are of the same type y y The file information indicated on the screen may not always correct for music and movie files in Smart Share menu y y This TV only supports movie subtitle files supplied by Nero MediaHome 4 y y The subtitle file name and...

Страница 63: ...change the name of a TV while DMR media is playing Change it when playback is stopped NOTE Connecting DLNA DMR Digital Living Network Alliance Digital Media Render This supports remote playing of media files Media from a compatible device Windows 7 Mobile Phone with PlayTo or other compatible DLNA DMC device can be pushed to the TV The DMR function only works properly when the TV and PC are on the...

Страница 64: ...storage devices Type Supported file format Video y y MPG MPEG DAT TS TRP TP VOB MP4 MOV MKV DivX AVI ASF WMV M4V y y Max bitrate of playable movie file 20 Mbps Mega bit per second y y Bit rate of audio format within 32 kbps to 320 kbps MP3 y y Supported external subtitle format smi srt sub MicroDVD SubViewer 1 0 2 0 ass ssa txt TMPlayer psb PowerDivX y y Supported Internal subtitle format only XSU...

Страница 65: ...deos Play video files on the TV Your TV can display video files from a USB storage device 1 Press Home to access the Home menu 2 Press the Navigation buttons to scroll to Smart Share and press OK 3 Press the Navigation buttons to scroll to the device you want and press OK 4 Press the Navigation buttons to scroll to Movie List and press OK 5 Press Navigation buttons to select a folder or file you w...

Страница 66: ...play the video files with a resolution higher than the supported resolution for each frame y y The TV may not properly play the video files not included on the specified type and format y y The TV may not play the files encoded with GMC Global Motion Compensation or quarter pel motion estimation y y The TV supports the only 10 000 sync blocks within the subtitle file y y The TV supports the H 264 ...

Страница 67: ...c If the video is not synchro nized with the captions it can be adjusted by 0 5 second Position Move the location of the subtitles Size Changes the subtitle font size Repeat Turn on off repeat function of movie playback When turned on the file within the folder will be played back repeatedly When turned off if the next file name is similar to the previous file it can be played sequentially Set Vid...

Страница 68: ...lete the existing authentication information to receive a new DivX user authentication for the TV Once this function is executed a DivX user authentication is required again to see DivX DRM files 1 Press Home to access the Home menu 2 Press the Navigation buttons to scroll to SETUP and press OK 3 Press the Navigation buttons to scroll to OP TION and press OK 4 Press the Navigation buttons to scrol...

Страница 69: ...der Yellow button Go to upper folder 7 The following options are available while viewing photos Option Description Slideshow Starts or stops a slideshow All photos saved in the current folder display during a slideshow To set a slideshow speed select Op tion BGM Background Music Turns the background music on or off To set the background music folder select Option Colour Filter Only PlasmaTV Displa...

Страница 70: ...M Selects a music folder for the back ground music Select Repeat or Random option y y You cannot change the music folder while the background music is playing NOTE Set Video Allows you to change Video settings Refer to PICTURE Settings Set Audio Allows you to change Audio settings Refer to AUDIO Settings y y Option values changed in Photo List do not affect Movie List and Music List y y Option val...

Страница 71: ... but tons Button Description Navigation button Scrolls through the files OK Plays the highlighted file P Moves to the previous or next page Red button Change device Changes to a differ ent input Green button Go to root folder Yellow button Go to upper folder Blue button Open music player It is enabled during playing music Page 1 1 Music List USB2 External Drive1 Page 1 2 Page Change M1 M2 M3 M4 M5...

Страница 72: ...ttings Refer to AUDIO Settings y y Option values changed in Movie List does not affect the Photo List and Music List y y Option value changed in Photo List and Music List are changed likewise in Photo List and Music List y y The TV will not play copy protected files y y If the TV is not in use for some time during playback the information box as a screen saver will appear to prevent image burn To ...

Страница 73: ...s displayed in English and the data transmitted will not be displayed when using the following languages Thai Arabic Per sian Hebrew Kurdish y y When using the video plug in initial buffering may take a while if the TV does not support a file to be played and conversion needs to be performed on the computer The conver sion performance may vary depending on the computer s performance and the networ...

Страница 74: ...dia Link Media Link will retrieve information on shared movies as described below 1 Press Home to access the Home menu 2 Press the Navigation buttons to scroll to the Media Link and press OK 3 Press the Navigation buttons to scroll to the Video and press OK Option Description 1 Show information for the selected movie 2 Show images captured from the movie file 3 Search movies within the section 4 D...

Страница 75: ...tion buttons to scroll to the TV Show section and press OK Option Description 1 Sort the music files in the selected section in the order of artist album song title 2 Select a folder or a song 3 Show the artist album and information for the selected music 4 Search music files within the section 5 Display the list according to the selected filter 6 Move to the previous page 7 Exit Media Link You ca...

Страница 76: ... PC Movie Plug ins Back Exit Option Description 1 Move the cursor to a plug in to view the plug in information on the right pane Plug ins already installed You can run update reinstall or remove them Plug ins not yet installed You can install them Once installed you can run the plug in by selecting Video Music or Picture Plug in from the Media Link main screen 2 A list of plug ins available for in...

Страница 77: ...y USB maker or an excessively long cable the device may not be recognized y y Some USB storage devices may not be supported or operate properly y y The TV will display up to 128 characters of a files name y y Please backup important files because data on USB device may be damaged Data management is consumer s responsibility and as a result the manufacturer does not cover data damage NOTE y y The r...

Страница 78: ...emove the USB device It may cause error on the TV and the storage device USB device Initialization Initialization completed Ready to record Timeshift Mode On Close i Cancel OK To use LG DVR feature USB storage device needs to be formatted Do you want to continue NOTE y y When initialization is completed a popup notice of completion is displayed and the connected USB HDD is available for DVR y y De...

Страница 79: ...oll to Timeshift Mode and press OK 4 Press Navigation buttons to scroll to On or Off and press OK 5 When you are finished press EXIT When you return to the previous menu press BACK Menu Description Recorded List Moves to the Recorded List Schedule List Moves to the Schedule List Select schedule by date Moves to the Manual Timer Select schedule by programme Set up timer recording by going to the Pr...

Страница 80: ...Radio or satellite programmes or some scramble programmes cannot be recorded y y You can record and enjoy DTV programmes in 3D Timeshift Progress The Progress Bar This function indicates what Timeshift reviewing is possible a current on screen and live broadcasting position 1 Preview 2 Current location and progress time in playback 3 Total progress time of the Timeshift 1 After connecting USB devi...

Страница 81: ... When you move the cursor using the Navigation button during playback and then press the OK button the screen will directly play at the applicable screen where the cursor is located LIVE TV To view the current live broadcast press the LIVE TV button during playback Use of remote control RECORDING Start Stop record Use this function when you cannot watch the de sired programme due to being out You ...

Страница 82: ...nu Apr 2 2010 15 30 Recorded List Schedule List Select schedule by date Select schedule by programme Option Exit Recording starts Manual Timer Select the date to schedule Sun 28 29 30 31 Mon Tue Wed Thu Fri Sat 1 2 3 10 17 24 9 16 23 8 15 22 7 14 21 6 13 20 5 12 19 4 11 18 Apr 2 2010 No schedule list Apr 2 2010 15 30 2 Programme Guide Schedule List Exit Move OK Once Daily Weekly Fri Mon Fri Cancel...

Страница 83: ...n you return to the previous menu press BACK Menu Description Modify Edit the contents of Start date Start time End time Title Repeat You must press the BACK button to save the edited contents This feature is disabled in reserved reminding Delete Delete the selected item in the list Delete All Delete all items in the list Close Close the pop up menu Schedule List Initialzation This function is to ...

Страница 84: ...l turn on the power of the part required for the recording and proceed to the reservation y y When it is time for the reserved recording to start and the Immediate recording is in progress the recording of the programme currently being recorded will be stopped and saved and then proceed to the reserved recording y y If the TV is unplugged once or turn off the reserved recording will not work Progr...

Страница 85: ... 200 you cannot record any more y y When the full duration of the recording is played back the screen will stay in the stopped condition for 10 seconds and then automatically end the playback y y The recording can be played back even dur ing the recording reserved recording y y During the playback of the recording the hard disk can generate a certain level of noise y y This noise is irrelevant fro...

Страница 86: ... programmes in the list Yellow button Play Marked Play the first selected file Once recorded programmes finishes playing the next selected one will be played automatically Blue button Delete Marked Delete the marked recorded programmes FAV Exit Mark Mode Playing Recorded programmes You can play a selected programme from the recorded list 1 After connecting USB device press the OK button 2 Press Gr...

Страница 87: ...he bottom of the screen Start and end of the Interval clip edit can be set both in forward and reverse direction Interval shorter than 10 seconds cannot be saved Blue button Repeat Press the Blue button at the starting point where you want to set the Interval repeat and press it again at the ending point To cancel the playback for the interval repeat press Blue button one more time The start of th...

Страница 88: ... AAC Programme Aspect ratio of broadcasting programme Aspect ratio of broadcasting programme Displayed with a Teletext Programme Displayed with a Subtitle Programme Displayed with a Scramble Programme Displayed with a Dolby Digital Programme Displayed with a Dolby Digital PLUS Pro gramme 576i p 720p 1080i p Resolution of broadcasting programme Broadcasted programme with the icon may not be display...

Страница 89: ...rmation on or off Text Up Down Select Timer Record Remind setting mode GUIDE Switch off EPG EXIT Date Change Mode Button Description Green button Switch off Date setting mode BACK OK Change to the selected date Select a date GUIDE Switch off EPG EXIT 8 Day Guide Mode Button Description Red button Change EPG mode Green button Enter Date setting mode Yellow button Enter Manual Timer mode See p 82 Bl...

Страница 90: ...owsy stop watching the TV and have a rest y y Pregnant woman seniors persons with heart problems or persons who experience frequent drowsiness should refrain from watching 3D TV y y Some 3D imaging may cause you to duck or dodge the image displayed in the video There fore it is best if you do not watch 3D TV near fragile objects or near any objects that can be knocked over easily y y Please preven...

Страница 91: ...the video produced in 3D 2 Press 3D to watch 3D imaging 3 Wear the 3D glasses 4 Press the Navigation buttons to scroll the OK and press OK 5 Press the Navigation buttons to scroll the shape and press OK See 3D supported mode Mode Description 2D 3D Changed from 2D imaging to 3D imaging 2D to 3D converted videos may appear less realistic than titles originally produced as 3D videos Side by Side Top ...

Страница 92: ...roll to one of the following options and press OK Choose options 3D Mode Setting Set Video Set Audio Close 3D Mode Setting Set Video Allows you to change Video settings Refer to PICTURE Settings Set Audio Allows you to change Audio settings Refer to AUDIO Settings Option Only 3D Models Description 3D Picture Size Cuts off the outer edges of the picture and stretch it to fit the full screen in 3D m...

Страница 93: ...ttons to scroll to the setting or option you want and press OK 5 When you are finished press EXIT Menu Description SETUP Sets up and edit programmes PICTURE Adjusts the image size quality or effect AUDIO Adjusts the sound quality effect or volume level TIME Sets the time date or timer feature LOCK Locks or unlocks channels and programmes OPTION Customizes the general settings NETWORK Sets up the n...

Страница 94: ...See p 34 Programme Edit Edits programmes See p 37 Booster Sets to the optimised sensitivity depending on the signal reception See p 38 CI Information Enables you to watch some encrypted services pay services See p 38 Cable DTV Setting In Cable Cable Satellite Only Satellite models mode only Sets various options for viewing cable DTV See p 32 Satellite DTV Setting In Satellite Antenna Satellite Cab...

Страница 95: ...t and H V Sharpness values are not applied NOTE Energy Saving Reduces the power consumption by adjusting the screen brightness y y When adjusting Energy Saving in MHEG MHP mode the Energy Saving setting is applied after MHEG MHP is finished y y Selecting Screen Off while tuned to a radio station channel will reduce power consumption y y When selecting Auto or Maximum Backlight will not work Only L...

Страница 96: ...uality in without any separate adjustments THX Cinema express the optimal screen quality when the room is dark THX Bright Room express the optimal screen quality when the room is bright y y THX THX Thomlinson Holman s Experiment is an audio and video certification standard established by George Lucas and Thomlinson A THX certified display guarantees screen quality that exceeds the display standard...

Страница 97: ... after image of the screen Screen Customizes the PC display options Option Resolution Selects a proper resolution when your PC uses Auto Configure Sets the TV to optimize the options automatically for the TV display Position Locates the image at the proper position Size Adjusts the image size Phase Eliminates horizontal streaking Reset Restores the options to the default setting LED Local Dim ming...

Страница 98: ...etting Description Dynamic Contrast Adjusts the contrast to keep it at the best level according to the brightness of the screen The picture is improved by making bright parts brighter and dark parts darker Dynamic Colour Adjusts screen colours so that they look livelier richer and clearer This feature enhances hue saturation and luminance so that red blue and green white look more vivid Clear Whit...

Страница 99: ... saturation and hue accurately Colour Temperature Adjusts the overall colour of the screen by changing the white baseline LED LCD TV LCD TV a Method 2 Points y y Pattern Inner Outer y y Red Green Blue Contrast Red Green Blue Brightness The adjust ment range is 50 to 50 b Method 10 Point IRE y y Pattern Inner Outer y y IRE Institute of Radio Engineers is the unit to display the size of the video si...

Страница 100: ...ives im mersive 5 1 surround sound with just two front speakers Treble Controls the dominant sounds in the output When you turn up the treble it will increase the output to the higher frequency range Bass Controls the softer sounds in the output When you turn up the bass it will increase the output to the lower frequency range Sound Reset Resets the sound mode to the default setting Sound Opti miz...

Страница 101: ...out an additional optical cable y y Some HDMI cables may not support this mode A High Speed HDMI cable is recommended y y The ARC mode only works on the HDMI 1 Only LED LCD TV LCD TV or HDMI 3 Only Plasma TV input on the TV y y Activates the SIMPLINK feature to use this feature NOTE Option On If the device with the ARC feature is turned on the device speaker is automatically used when SIMPLINK is ...

Страница 102: ...the stereo signal is weak switch to FM MONO 3 When NICAM dual is received you can select NICAM DUAL I NICAM DUAL II or NICAM DUAL I II or FM MONO In AV Component RGB and HDMI mode you can select output sound for the left and right loudspeakers Select the sound output L R Audio signal from audio L input is sent to the left loudspeaker and audio signal from audio R input is sent to the right loudspe...

Страница 103: ... the Time Zone for his or her area it automatically sets the time for the corresponding area However even though the user selected his or her area if the broadcasting station s local time offset is not offered or if the region information does not match then the user may select the Offset from the Time Zone to set the correct time Time Zone Moscow Yekaterinburg Omsk Krasnoyarsk Irkutsk Yakutsk Vla...

Страница 104: ...ny button within 2 hours after the TV turns on by the On Time feature the TV enters the Standby mode automatically y y If you set both Off time and On time features to the same time the Off time feature over rides the On time feature NOTE Sleep Timer Sets the length of time until the TV to turns off When you turn the TV off and turn it on again the Sleep timer feature will be set to off Downloaded...

Страница 105: ...formation this function does not operate A password is required to gain access to this menu This set is programmed to remember which option it was last set to even if you switch the set off Prevents children from watching certain adult s TV programmes according to the ratings limit set Enter a password to watch a blocked programme Rating differs by country Input Block Block the input sources It is...

Страница 106: ...itle Language Use the Subtitle function when two or more subtitle languages are broadcast If subtitle data in a selected language is not broadcast the default language subtitle will be displayed Subtitle Language OSD Information Display Status N A Not Available Teletext Subtitle Subtitle for Hard of Hearing Text Language In Digital mode use the Text language function when two or more Text language...

Страница 107: ...rrent situation in a TV programme in addition to the basic audio When Audio Description On is selected basic audio and Audio Description are provided only for those programmes that have Audio Description included Volume Changes the Audio Description volume Beep Beeps when a programme with Audio Description information is selected Power Indicator Only LED LCD TV Sets to turn on or off the indicator...

Страница 108: ...e y y In Lock System On if you forget your password press 0 3 2 5 on the remote control handset NOTE Set ID Adds an ID to the connected devices Mode Setting Default selection is Home Use We recommend setting the TV to Home Use mode for the best picture in your home environment Option Home Use Selects it for the home environment Store Demo Selects it for the retail environment Demo Mode Sets to sho...

Страница 109: ...Set the region for which weather forecast is provided and manage the IDs added to the TV Setting Country Setting Set the country for premium services Different premium services are provided depending on the country you set Weather Effect Sets the region for the weather to be displayed on the background of the premium service Select your region Premium Version Display the version of the premium ser...

Страница 110: ...f this test has no errors check the connection status of external devices and refer to the manual of external devices Sound Test Signal Test Shows the MUX and Service information etc y y This displays the information and signal strength of the tuned MUX y y This displays the signal information and service name of the selected MUX MUX A higher directory of channels in digital broadcasting a single ...

Страница 111: ...rs VCRs audio systems USB storage devices PC gaming devices and other external devices y y If you record a TV programme on a DVD recorder or VCR make sure to connect the TV signal input cable to the TV through a DVD recorder or VCR For more information on recording refer to the manual provided with the connected device y y The external device connection may differ from the model y y Connect extern...

Страница 112: ... p 114 Composite See p 115 Digital See p 118 HDMI See p 116 DVI See p 116 RGB See p 117 HDMI See p 113 DVI See p 113 Component See p 114 Composite See p 115 Euro Scart See p 114 Composite See p 115 Euro Scart See p 114 Memory storage See p 119 Memory card reader See p 119 HDMI See p 113 Component See p 114 Composite See p 115 HD Receiver DVD VCR Speaker USB PC Gaming device y y If you connect a ga...

Страница 113: ... and select an appropriate input mode HDMI Connection Transmits the digital video and audio signals from an external device to the TV Connect the external device and the TV with the HDMI cable as shown in the following illustration y y Use the latest High Speed HDMI Cable with CEC Customer Electronics Control function y y High Speed HDMI Cables are tested to carry an HD signal up to 1080p and high...

Страница 114: ...tput through the SCART cable and the recording cannot be performed Only 3D models NOTE y y If cables are installed incorrectly it could case the image to display in black and white or with distorted colour Check to ensure the cable are matched with the corresponding colour connection NOTE Component Connection Transmits the analogue video and audio signals from an external device to the TV Connect ...

Страница 115: ... external device and the TV with the composite cable as shown in the following illustration y y If you have a mono VCR connect the audio cable from the VCR to the AUDIO L MONO jack of the TV NOTE Connecting to a PC y y It is recommended to use the TV set with the HDMI connection for the best image quality NOTE Downloaded From TV Manual com Manuals ...

Страница 116: ...and the TV with the DVI HDMI cable as shown in the following illustration To transmit an audio signal connect an audio cable HDMI Connection Transmits the digital video and audio signals from your PC to the TV Connect the PC and the TV with the HDMI cable as shown in the following illustrations Downloaded From TV Manual com Manuals ...

Страница 117: ...encies are separate y y We recommend using 1920x1080 60 Hz for the PC mode this should provide the best picture quality y y Connect the signal cable from the monitor output port of the PC to the RGB PC port of the TV or the signal cable from the HDMI output port of the PC to the HDMI IN or HDMI DVI IN port on the TV y y Connect the audio cable from the PC to the Audio input on the TV Audio cables ...

Страница 118: ... shown in the following illustration Connecting to Headphone Connection Depending on model Listen to the sound through a headphone y y AUDIO menu items are disabled when connecting a headphone y y When changing AV MODE with a headphone connected the change is applied to video but not to audio y y Optical Digital Audio Out is not available when connecting a headphone y y Headphone impedance 16 y y ...

Страница 119: ... storage devices and see Browsing files Connecting to a CI Module View the encrypted pay services in digital TV mode This feature is not available in all countries See p 38 Check this point as shown and insert the CI Module y y Check if the CI module is inserted into the PCMCIA card slot in the right direction If the module is not inserted properly this can cause damage to the TV and the PCMCIA ca...

Страница 120: ...TE LG Wireless Media Box SIMPLINK Connection Play and control the AV device connected with the HDMI cable through HDMI CEC This TV may work with the devices that support HDMI CEC but only devices with the logo are fully sup ported Connect one end of the HDMI cable to the HDMI DVI IN or HDMI IN terminal on the rear of the TV and the other end to the SIMPLINK device y y If the connected device does ...

Страница 121: ...es and play media without additional settings Select AV device Enables you to select one of the AV devices connected to the TV Disc playback Control connected AV de vices by pressing the Navigation buttons OK and Power off all devices When you power off the TV all connected devices are turned off Switch audio out Offers an easy way to switch audio out Sync Power on When the equipment with SIMPLINK...

Страница 122: ...e previous mode reappears Simple Text 1 Enter the desired page number as a three digit number with the NUMBER buttons If during selection you press a wrong number you must complete the three digit number and then re enter the correct page number 2 The P button can be used to select the preceding or following page Page selection Top Text The user guide displays four fields red green yellow and blue...

Страница 123: ...ht hand corner of the screen In the teletext mode press this button to select a sub page number The sub page number is displayed at the bottom of the screen To hold or change the sub page press the Red button Green button or NUMBER buttons Time Stops the automatic page change which will occur if a teletext page consists of 2 or more sub pages The number of sub pages and the sub page displayed is u...

Страница 124: ...avigation button Red button Green button Yellow button Blue button or NUMBER buttons and etc 3 To change digital teletext service select a dif ferent service by the numeric or P button Teletext in digital service 1 Press the numeric or P button to select a certain service which broadcasts digital tele text 2 Press the TEXT or coloured button to switch on teletext 3 Follow the indications on digita...

Страница 125: ...firmware thorugh DTV signal y y While updating the firmware do not dis connect the LAN cable turn the TV off or unplug the power cord y y If you change the channel during the firmware update via OTA the update stops The process resumes when you go back to the original programme The update continues even when the power is switched off using the remote control In this case it is normal that the colo...

Страница 126: ...larly y y Do not spray liquid onto the surface If water enters the TV it may result in fire electric shock or malfunction y y Do not use any chemicals as this may dete riorate the surface CAUTION y y Do not push rub or hit the surface with your fingernail or a sharp object as this may result in scratches on the screen and image distortions y y Do not use any chemicals such as waxes benzene alcohol...

Страница 127: ...ent on the screen This is image burn or burn in and not covered by the warranty y y If the aspect ratio of the TV is set to 4 3 for a long period of time image burn may occur on the letterboxed area of the screen y y Avoid displaying a fixed image on the TV screen for a long period of time 2 or more hours for LCD 1 or more hours for the Plasma TV to prevent image burn Downloaded From TV Manual com...

Страница 128: ...act the authorized service centre in your local area Cannot connect external devices y y Refer to the Connection overview and connect an external device The TV turns off suddenly y y Check the power control settings The power supply may be interrupted y y Check if the Auto sleep feature is activated in the Time settings Refer to the Sleep Timer y y If there is no signal while the TV is on the TV w...

Страница 129: ...creen y y Check if the signal cable is connected between the TV and products properly y y Check the selected input source by pressing INPUT Black spots appear on the screen y y Several pixels in red green white or black may appear on the screen that can attribute to the characteristics of the LCD panel This is normal The display offset is wrong y y Adjust the position setting in the menu option y ...

Страница 130: ...C 100 240 V 50 60 Hz Power consumption 80 W 100 W MODELS 42LV37 47LV37 42LV3700 ZA 42LV3700 ZC 42LV370S ZB 42LV3750 ZA 42LV3750 ZC 42LV375G ZC 42LV375S ZB 42LV375S ZC 42LV375T ZA 42LV375T ZC 42LV375W ZC 47LV3700 ZA 47LV3700 ZC 47LV370S ZB 47LV3750 ZA 47LV3750 ZC 47LV375G ZC 47LV375S ZB 47LV375S ZC 47LV375T ZA 47LV375T ZC 47LV375W ZC Dimensions W x H x D With stand 998 0 mm x 684 0 mm x 256 0 mm 11...

Страница 131: ... 9 mm x 289 8 mm 1391 1 mm x 905 2 mm x 334 7 mm Without stand 1172 3 mm x 712 2 mm x 52 5 mm 1391 1 mm x 835 5 mm x 52 5 mm Weight With stand 29 8 kg 42 6 kg Without stand 27 5 kg 38 5 kg Product specifications shown above may be changed without prior notice due to upgrade of product functions For the power supply and power consumption refer to the label attached to the product Downloaded From TV...

Страница 132: ... 6 mm x 317 2 mm 1404 0 mm x 911 4 mm x 364 4 mm Without stand 1185 2 mm x 714 0 mm x 49 6 mm 1404 0 mm x 837 8 mm x 49 6 mm Weight With stand 31 5 kg 46 3 kg Without stand 27 9 kg 40 3 kg Product specifications shown above may be changed without prior notice due to upgrade of product functions For the power supply and power consumption refer to the label attached to the product Downloaded From TV...

Страница 133: ...mmes 6 000 1 200 External Antenna Impedance 75 Ω 1 Only Satellite models 2 Only DVB T2 support models 3 Except for DVB T2 support models MODELS 50PZ95 60PZ95 50PZ950 ZA 50PZ950G ZA 50PZ950S ZA 50PZ950T ZA 50PZ950W ZA 60PZ950 ZA 60PZ950G ZA 60PZ950S ZA 60PZ950T ZA 60PZ950W ZA Dimensions W x H x D With stand 1175 2 mm x 787 6 mm x 317 2 mm 1393 4 mm x 916 4 mm x 364 4 mm Without stand 1175 2 mm x 72...

Страница 134: ...0 1360x768 47 72 59 80 1280x1024 HDMI PC 63 981 60 02 1920x1080 RGB PC 66 587 59 93 1920x1080 HDMI PC 67 5 60 00 HDMI DVI DTV supported mode Resolution Horizontal Frequency kHz Vertical Frequency Hz 720x480 31 469 31 5 59 94 60 720x576 31 25 50 1280x720 37 5 44 96 45 50 59 94 60 1920x1080 33 72 33 75 28 125 26 97 27 33 716 33 75 56 25 67 43 67 5 59 94 60 50 23 97 24 29 976 30 00 50 59 94 60 Signal...

Страница 135: ...ion estimation does not sup ported Streams using this syntax are not supported MPEG 4 Part 2 Advanced Simple Profile e g 720p 1080i Audio AAC AAC LC and HE AAC mkv Video H 264 AVC Main Profile Level 4 1 High Profile Level 4 1 e g 720p60 1080i60 1080p30 Most of the MKV content available is encoded by the open source x264 codec Audio HE AAC HE AAC LC and HE AAC Dolby Digital ts trp tp Video H 264 AV...

Страница 136: ...ecker Board HDMI 3D Top Bottom 54 24 HDMI 3D Frame Packing 33 75 30 Side by Side Top Bottom Checker Board RGB 1080p 1920X1080 66 587 59 934 Side by Side Top Bottom Component 720p 1280X720 37 5 50 Side by Side Top Bottom 45 60 1080i 1920X1080 28 125 33 75 50 60 USB 1080p 1920X1080 33 75 30 Side by Side Top Bottom Checker Board MPO Photo DLNA 1080p 1920X1080 33 75 30 Side by Side Top Bottom Checker ...

Страница 137: ... For TV by using a 2 4 GHz bandwidth radio frequency RF y y Output 1 dBm or lower y y Maximum Communication Distance 10 m in an open space y y Bandwidth 2 4 GHz 2 4035 GHz to 2 4783 GHz y y Transfer Rate 250 kbps y y FCC ID of RF module inside TV FCC ID BEJLDS201 Downloaded From TV Manual com Manuals ...

Отзывы: