background image

15

ENGLISH

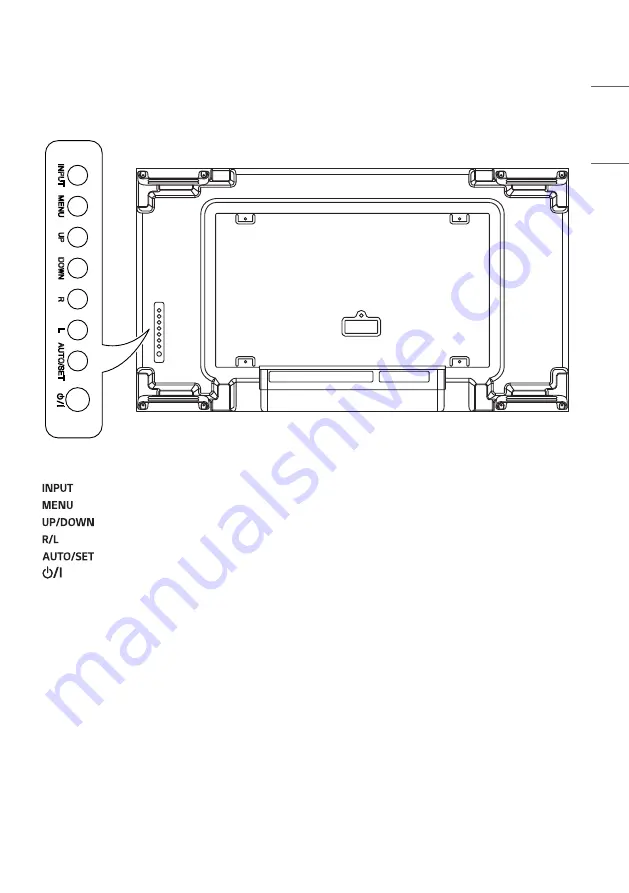
Parts and Buttons


: Change the input signal.


: Accesses the main menus, or saves your input and exits the menus.


: Adjust the up and down.


: Moves left and right.


: Displays the current signal and mode.


: Turns the power on or off.

Содержание 55VSH7J

Страница 1: ...AL LG Digital Signage MONITOR SIGNAGE www lg com Copyright 2021 LG Electronics Inc All Rights Reserved 55VSH7J 55VSM5J Please read this manual carefully before operating your set and retain it for future reference ...

Страница 2: ... Retention 13 Product Disposal 13 ASSEMBLY AND PREPARATION 14 Optional Accessories 14 Parts and Buttons 15 Portrait Layout 16 Remove protection pads before Installation 16 Storage Method for Panel Protection 17 Safety and Precaution Guide for Installation 19 Installing on a Wall 21 External Equipment Setup 23 Tiling Displays 24 REMOTE CONTROL 28 MAKING CONNECTIONS 30 Connecting to a PC 30 External...

Страница 3: ...ping the user to use the product safely and for its intended purpose WARNING If you ignore the warning message you may be seriously injured or there is a possibility of accident or death CAUTION If you ignore the caution message you may be slightly injured or the product may be damaged WARNING Indoor Use Only ...

Страница 4: ...rmly so it cannot come loose Poor connection may cause a fire or electric shock In the presence of thunder and lightning never touch the power cord and signal cable because it can be very dangerous It can cause electric shock Be careful not to step or place heavy objects electronic appliances clothing etc on the power cord or AC adapter Additionally do not bend or pull out the power cord or AC ada...

Страница 5: ...he AC power source even if the unit is turned off Power consumption will be 0 only when the power plug is unplugged Use the appliance coupler as the disconnect device CAUTION If the outlet pins of the power plug or AC adapter is covered with dust be sure to wipe them and keep them clean Overheating due to layers of dust may cause a fire or electric shock If the outlet pins of the power plug or AC ...

Страница 6: ... panel You may be electrocuted or the product can be damaged Use the correct number of people according to the weight of the product Under 25 kg per person use lifting equipment when exceeding 100 kg If use the damaged product again contact the service center because it can cause electric shock or fire Do not hold it upside down while holding only the stand It is for stand supported models only Th...

Страница 7: ...unction may occur Do not install this product by yourself as you may injure yourself or cause damage to the product Please contact service engineer authorised by service center Do not install this product on a wall if it could be exposed to oil or oil mist This may damage the product and cause it to fall Do not leave the power or signal cable etc on the pathway This could cause a trip or fall whic...

Страница 8: ...internal heat buildup Do not cover the product with a tablecloth or a curtain or other materials e g plastic while plugged in Do not block the ventilation hole of the product The product can be deformed or fire can break out due to overheating inside the product Do not install the product in an area with poor ventilation e g on a bookshelf in a closet or outside and avoid placing on cushions or ca...

Страница 9: ...tric shock may occur or damage to the screen if its scratched When you want to clean the front frame spray water onto a soft cloth 2 to 4 times and wipe in one direction only Too much moisture may cause staining CAUTION When cleaning the product or the screen unplug the power cord and wipe it gently with a soft cloth Do not spray water or other liquids directly on the product Especially do not cle...

Страница 10: ...hock Do not drop an object or impact on the product or screen It can cause injury to human problem to product and damage the screen If you can smell smoke or other odors or hear a strange sound unplug the power cord and contact the service center If you continue to use the product without taking proper measures it may cause electrical shock or fire Do not attempt to disassemble repair or modify th...

Страница 11: ...uct Also do not throw toys or objects at the product or screen It can cause injury to human problem to product and damage the screen All the power sources must be disconnected by removing the power cables to remove all power from the unit CAUTION This panel is an advanced product that contains millions of pixels You may occasionally see pixel spots when viewing the screen Since these deactivated p...

Страница 12: ... Used batteries which include rechargeable batteries should be recycled separately from waste Please dispose used batteries and rechargeable batteries at a local recycling center or a retail store that handles batteries CAUTION Do not short circuit and disassemble of batteries It may cause electrical shock or fire The remote control may not function properly in sunlight or under a strong lamp Move...

Страница 13: ...tention Most third party products have the same issue The resulting damage is not covered by the product warranty Use a screen saver when using the monitor for a prolonged period of time Product Disposal Do not dispose of this product with general household waste Disposal of this product must be carried out in accordance to the regulations of your local authority ...

Страница 14: ...the LG Electronics website http partner lge com and download the latest software for your model The warranty will not cover any damage caused by using the product in an excessively dusty environment Optional Accessories Without prior notice optional accessories are subject to change to improve the performance of the product and new accessories may be added The illustrations in this manual may diff...

Страница 15: ...Parts and Buttons Change the input signal Accesses the main menus or saves your input and exits the menus Adjust the up and down Moves left and right Displays the current signal and mode Turns the power on or off ...

Страница 16: ...the monitor clockwise 90 degrees when facing the screen Remove protection pads before Installation Make sure that the protection pads are removed from each corner before installing the product NOTE Keep the removed protection pads in case you need to move the product again ...

Страница 17: ...el to touch the floor Panel 2 When laying down the product lay a cushion on a flat floor Put the product on it with the panel of the product facing down Cushion Panel 3 If there is not a cushion available ensure the floor is clean and then lay the product down carefully with the panel facing either upward or downward At this time be careful for objects not to fall on the panel Panel ...

Страница 18: ...SH Incorrect Method 1 If the product is tilted onto the bezel the bottom of the panel may be damaged Panel 2 If the product is tilted toward the corner of the panel the bottom of the panel may be damaged Panel ...

Страница 19: ...ve materials metals etc do not enter through the gaps or vent holes between the panel and the back cover Covering the back of the product with a cloth may prevent foreign substances from entering the product and causing malfunction Make sure to remove the cloth after the installation is complete ...

Страница 20: ...20 ENGLISH ...

Страница 21: ...wall mount and contact your local dealer or qualified personnel to assist with the installation Do not over tighten the screws as this may damage the monitor and void your warranty Use only screws and wall mounting brackets that meet the VESA standard Any damage or injuries caused by misuse or use of improper accessories are not covered by the warranty NOTE Do not install the product in a place wi...

Страница 22: ...king simple precautions such as Only using furniture that can safely support the monitor Ensuring the monitor is not overhanging the edge of the supporting furniture Not placing the monitor on tall furniture for example cupboards or bookcases without anchoring both the furniture and the monitor to a suitable support Not placing cloth or other materials between the monitor and supporting furniture ...

Страница 23: ...23 ENGLISH External Equipment Setup IR Receiver This allows a remote control sensor to be placed in a custom location Then that display can control other displays via an RS 232C cable ...

Страница 24: ...ng Displays How to Mount the Set Example of 2 x 2 Tiling Using the screws for attaching the VESA wall mount mount the set to the wall mount plate or the wall Screws for attaching the VESA wall mount M6 Unit mm 600 400 ...

Страница 25: ...NGLISH How to Join Sets Lay the protective sheet on top before installing additional sets 1 Install the additional sets using the VESA wall mounting screws by using the same method mentioned before M4 x L6 ...

Страница 26: ...otective sheet 1 mm 3 Complete the 2 x 2 tiling You can use various options of tiling including 3 x 3 by using the same method Completeness of the Set 2 x 2 tiling complete CAUTION Failure to lay the protective sheet on top before installing additional sets may result in damage to the panel ...

Страница 27: ...pplied to each set should be supported by the wall mount plate using a VESA wall mount Each set must be firmly mounted to the wall mount plate or the wall You may mount the set without using the tiling guide this does not affect the performance of the device The screws are enclosed with the other components in the box including the tiling guides ...

Страница 28: ... product s internal and external batteries should not be exposed to excessive heat such as direct sunlight fire or the like POWER Turns the monitor on or off Turns the monitor on Turns the monitor off Adjusts the brightness of the picture to reduce energy consumption INPUT Selects the input mode Used for viewing 3D video This function is not supported Number and Alphabet buttons Enters numerical o...

Страница 29: ...ous level Closes the menu Allows you to control various multimedia devices to enjoy multimedia simply by using the remote control through the SimpLink menu You can choose to turn TILE Mode on off Control Buttons Controls media playback This function is not supported When the Picture ID number matches the Set ID number you can control whichever monitor you want in multi display format Individually ...

Страница 30: ...C Some of the cables are not provided This monitor supports the feature a feature that enables a PC to recognize devices attached by the user without device configuration or user intervention when powering up External Device Connection Connect a HD receiver DVD or VCR player to the monitor and select an appropriate input mode Some of the cables are not provided For the best picture and sound quali...

Страница 31: ... You may experience compatibility issues if you use HDMI PC mode Make sure the power cable is disconnected If you connect a gaming device to the monitor use the cable provided with the gaming device Use the standard Macintosh adapter since an incompatible adapter is available in the market Different signaling system Apple computers may require an adapter to connect to this monitor Call or visit th...

Страница 32: ...ect to DP OUT DP IN DP OUT DP IN DP OUT DP IN RS 232C IN RS 232C OUT RS 232C IN RS 232C OUT RS 232C IN RS 232C OUT DVI IN DP OUT DP OUT DP IN DP OUT DP IN DP OUT HDMI IN DP OUT DP IN DP OUT DP IN LAN OUT LAN IN LAN OUT LAN IN LAN OUT LAN IN NOTE If the signal cable between the product and your PC is too long make sure to use the Booster or optical cable Daisy chaining the video output may be limit...

Страница 33: ...d frequency are supported by the product If the frequency exceeds the supported range use PC settings to set the resolution to the recommended value D Sub analog signal Press the button in the remote control to automatically select the optimal screen status that fits into the current mode If the adjustment is not satisfactory adjust the display settings manually in the OSD menu The screen is displ...

Страница 34: ...ust brightness and contrast again Backlight may need repair Issues Related to Sound There is no sound output See if the audio cable is connected properly Adjust the volume of the product or external device See if the sound is set properly Sound is too dull Select the appropriate equalizer sound Sound is too low Adjust the volume of the product or external device For some models you will need to pu...

Страница 35: ...ins visible This phenomenon is referred to as image sticking Image sticking does not occur when using constantly changing images but may occur when using a fixed image for an extended period of time Therefore it is recommended that you use the instructions below to decrease the likelihood of image sticking occurring when using a fixed image It is recommended that you change the screen at least onc...

Страница 36: ...rted on some OS or graphics card types Horizontal frequency HDMI1 HDMI2 DisplayPort DVI D OPS PC 30 kHz to 83 kHz HDMI1 HDMI2 DisplayPort PC 30 kHz to 136 kHz Vertical frequency DVI D PC 56 Hz to 60 Hz HDMI1 HDMI2 DisplayPort OPS PC 58 Hz to 62 Hz Synchronization Separate Sync Digital Input output ports Embedded battery Applied Environmental Conditions Operating Temperature 0 C to 40 C Operating H...

Страница 37: ...37 879 60 317 1024 x 768 48 363 60 1280 x 720 44 772 59 855 1280 x 1024 63 981 60 02 1680 x 1050 65 29 59 954 1920 x 1080 67 5 60 3840 x 2160 67 5 30 HDMI1 2 DisplayPort OPS 3840 x 2160 135 60 HDMI 1 2 DisplayPort HDMI DisplayPort OPS DTV Support Mode Resolution Horizontal frequency kHz Vertical frequency Hz Remarks 480 60p 31 5 60 576 50p 31 25 50 720 50p 37 5 50 720 60p 45 60 1080 50i 28 1 50 10...

Страница 38: ... PC mode Horizontal frequency The horizontal interval is the time taken to display one horizontal line When 1 is divided by the horizontal interval the number of horizontal lines displayed every second can be tabulated as the horizontal frequency The unit is kHz Vertical frequency The product display functions by the screen image changing dozens of times every second like a fluorescent lamp The ve...

Страница 39: ...actured under license from Dolby Laboratories Dolby Dolby Vision Dolby Audio Dolby Atmos and the double D symbol are trademarks of Dolby Laboratories For DTS patents see http patents dts com Manufactured under license from DTS Licensing Limited DTS the Symbol DTS and the Symbol together DTS 2 0 Channel DTS 2 0 Digital Out DTS HD and DTS Virtual X are registered trademarks or trademarks of DTS Inc ...

Страница 40: ...hem below in case you ever need service MODEL SERIAL NO This product qualifies for ENERGY STAR Changing the factory default configuration and settings or enabling certain optional features and functionalities may increase energy consumption beyond the limits required for ENERGY STAR certification Refer to ENERGYSTAR gov for more information on the ENERGY STAR program ...

Отзывы: