background image

APPENDIX

113

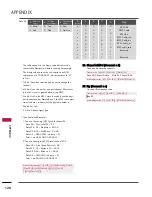
Configuration of frame 

1st frame

Repeat frame

Lead code

Repeat code

B

Biitt   d

deessccrriip

pttiio

on

n

FFrraam

mee   iin

ntteerrvvaall::   T

Tff  

The waveform is transmitted as long as a key is depressed.

C0 C1 C2 C3 C4 C5 C6 C7 C0 C1 C2 C3 C4 C5 C6 C7 D0 D1 D2 D3 D4 D5 D6 D7 D0 D1 D2 D3 D4 D5 D6 D7

 Lead code

Low custom code

High custom code

Data code 

Data code 

Repeat  code

Tf

4.5 ms

9 ms 

2.25 ms 

9 ms 

0.55 ms 

0.56 ms

1.12 ms

0.56 ms

2.24 ms

Tf

Tf

Tf=108ms @455KHz

Bit ”0” 

Bit ”1”

1. How to Connect

Connect your wired remote control to the Remote Control port on the TV. 

2. Remote Control IR Codes

Output waveform 

Single pulse, modulated with 37.917KHz signal at 455KHz   

T1

Tc

Carrier frequency

FCAR = 1/TC = fOSC/12

Duty ratio = T1/TC = 1/3

IR CODES

Содержание 42PQ20 Series

Страница 1: ...ality for Energy Star rating Please read this manual carefully before operating your set and retain it for future reference The model and serial number of the TV is located on the back and one side of the TV Record it below should you ever need service PLASMA TV OWNER S MANUAL 42PQ20 50PQ20 42PQ30 50PQ30 42PQ31 50PQ31 42PQ60 50PQ60 50PS30 50PS60 60PS60 42PQ30C 50PQ30C 50PS60C 60PS60C 50PS70 60PS70...

Страница 2: ...nd 2 this device must accept any interference received including interference that may cause undesired operation of the device Any changes or modifications not expressly approved by the party responsible for compliance could void the user s authority to operate the equipment CAUTION Do not attempt to modify this product in any way without written authorization from LG Electronics Unauthorized modi...

Страница 3: ...o your outlet consult an electrician for replacement of the obsolete outlet Protect the power cord from being walked on or pinched particularly at plugs convenience receptacles and the point where they exit from the apparatus Only use attachments accessories specified by the manufacturer Use only with the cart stand tripod bracket or table specified by the manufacturer or sold with the apparatus W...

Страница 4: ...icular attention to plugs wall outlets and the point where the cord exits the appliance Do not make the TV with the power cord plugged in Do not use a damaged or loose power cord Be sure do grasp the plug when unplugging the power cord Do not pull on the power cord to unplug the TV WARNING To reduce the risk of fire or electrical shock do not expose this product to rain moisture or other liquids D...

Страница 5: ...cleaning unplug the power cord and scrub gently with a soft cloth to prevent scratching Do not spray water or other liquids directly on the TV as electric shock may occur Do not clean with chemicals such as alcohol thinners or benzene M Mo ov vi in ng g Make sure the product is turned off unplugged and all cables have been removed It may take 2 or more people to carry larger TVs Do not press again...

Страница 6: ... Functions 30 Turning On TV 34 Channel Selection 34 Volume Adjustment 34 Initial Setting 35 On Screen Menus Selection 37 Quick Menu 38 Channel Setup Auto Scan Auto Tuning 39 Add Delete Channel Manual Tuning 40 Channel Editing 41 Channel List 42 Favorite Channel Setup 43 Favorite Channel List 43 Brief Information 44 Input List 45 Input Label 46 AV Mode 47 SIMPLINK 48 USB Entry Modes 50 Photo List 5...

Страница 7: ...asting System Captions 87 Digital Broadcasting System Captions 88 Caption Option 89 TIME SETTING Clock Setting Auto Clock Setup 90 Manual Clock Setup 91 Auto On Off Time Setting 92 Sleep Timer Setting 93 PARENTAL CONTROL RATINGS Set Password Lock System 94 Channel Blocking 97 Movie TV Rating 98 Downloadable Rating 103 External Input Blocking 104 Key lock 105 APPENDIX Troubleshooting 106 Maintenanc...

Страница 8: ...watching movies Designed for use in a dark room This feature is not available for all models This TV contains the detailed calibrations necessary for professional certification by the Imaging Science Foundation The resulting ISF day and night modes will then be accessible by the user to experience the best their LG HDTV has to offer CALIBRATE LIKE A PRO Sophisticated and detailed calibrations can ...

Страница 9: ... not wipe roughly when removing stain Excessive pressure may cause scratch or discoloration Polishing Cloth Not included with all models D sub 15 pin Cable When using the VGA D sub 15 pin cable PC connection the user must use shielded signal interface cables with ferrite cores to maintain stan dards compliance x 2 FA V MAR K Q ME NU MEN U LIS T 1 2 3 4 5 6 7 8 0 9 FLASHBK MUTE VOL CH P A G E RE TU...

Страница 10: ...rol press the power button on the TV The remote control will not work when the power button on the TV is switched off CAUTION Except 42 50PQ30C 50 60PS60C CH VOL MENU INPUT ENTER CH VOL CHANNEL Buttons VOLUME Buttons ENTER Button MENU Button INPUT Button POWER Button 50 60PS70 50 60PS80 Power Standby Indicator Illuminates red in standby mode The LED is off while the TV remains on Remote Control Se...

Страница 11: ...nsor Intelligent Sensor Adjusts picture according to the surrounding conditions POWER Button Power Standby Indicator Illuminates red in standby mode Illuminates white when the TV is switched on and goes out slowly 42 50PQ60 50 60PS60 50 60PS60C CH VOL MENU INPUT ENTER CH VOL CHANNEL Buttons VOLUME Buttons ENTER Button MENU Button INPUT Button POWER Button Remote Control Sensor Intelligent Sensor A...

Страница 12: ...r use with amps and home theater systems Note In standby mode this port doesn t work RS 232C IN CONTROL SERVICE PORT Used by third party devices AUDIO IN RGB DVI 1 8 headphone jack for analog PC audio input RGB IN PC Analog PC Connection Uses a D sub 15 pin cable VGA cable REMOTE CONTROL IN PORT For a wired remote control COMPONENT IN Analog Connection Supports HD Uses a red green and blue cable f...

Страница 13: ...ded p pr ro ot te ec ct ti io on n c co ov ve er r over the hole for the stand Press the P PR RO OT TE EC CT TI IO ON N C CO OV VE ER R into the TV until you hear it click Protection Cover G G When assembling the desk type stand check whether the bolt is fully tightened If not tight ened fully the product can tilt forward after the product installation If you tighten the bolt with excessive force ...

Страница 14: ...EXTERNAL EQUIPMENT SETUP section 1 Install the CABLE MANAGEMENT CLIP as shown 2 CABLE MANAGEMENT CLIP G G Hold the CABLE MANAGEMENT CLIP with both hands and pull it upward CABLE HOLDER HOW TO REMOVE THE CABLE MANAGEMENT CLIP Only 60PS60 60PS60C 50 60PS70 50 60PS80 Only 60PS60 60PS60C 50 60PS70 50 60PS80 CABLE MANAGEMENT Image shown may differ from your TV ...

Страница 15: ... the TV G G For wall mounts that do not comply with the VESA standard screw specifications the length of the screws may differ depending on their specifica tions G G Do not use screws that do not comply with the VESA standard screw specifications Do not use fasten the screws too strongly this may damage the TV or cause the TV to a fall leading to personal injury LG is not liable for these kinds of...

Страница 16: ...he upper holes Secure the wall brackets with the bolts sold separately to the wall Match the height of the bracket that is mounted on the wall to the holes in the product Ensure the eye bolts or brackets are tightened securely Use a sturdy rope sold separately to tie the product It is safer to tie the rope so it becomes horizontal between the wall and the product You should purchase necessary comp...

Страница 17: ...ial Wire 75 ohm Single family Dwellings Houses Connect to wall jack for outdoor antenna Be careful not to bend the copper wire when connecting the antenna Copper Wire To improve the picture quality in a poor signal area please purchase a signal amplifier and install properly If the antenna needs to be split for two TV s install a 2 Way Signal Splitter If the antenna is not installed properly conta...

Страница 18: ...nual for the digital set top box operation Select the C Co om mp po on ne en nt t1 1 input source on the TV using the I IN NP PU UT T button on the remote control If connected to C CO OM MP PO ON NE EN NT T I IN N 2 2 input select the C Co om mp po on ne en nt t2 2 input source on the TV To prevent the equipment damage never plug in any power cords until you have finished connecting all equipment ...

Страница 19: ...S60 50 60PS60C 50 60PS70 50 60PS80 input source on the TV using the I IN NP PU UT T button on the remote control 2 1 HDMI DTV Horizontal Vertical Frequency KHz Frequency Hz 31 469 59 94 31 50 60 00 44 96 59 94 45 00 60 00 33 72 59 94 33 75 60 00 27 00 24 00 33 75 30 00 67 43 59 94 67 50 60 00 Resolution 720x480p 1280x720p 1920x1080i 1920x1080p HDMI DVI IN 2 1 HDMI DTV OUTPUT RGB PC RS 232C IN CONT...

Страница 20: ...I output of the digital set top box to the H HD DM MI I D DV VI I I IN N 1 1 2 2 3 3 or 4 4 Only 42 50PQ60 50 60PS60 50 60PS60C 50 60PS70 50 60PS80 jack on the TV Connect the audio output of the digital set top box to the A AU UD DI IO O I IN N R RG GB B D DV VI I jack on the TV 1 How to connect 2 How to use Turn on the digital set top box Refer to the owner s man ual for the digital set top box S...

Страница 21: ...en PB blue and PR red Connect the audio outputs of the DVD to the C CO OM MP PO ON NE EN NT T I IN N A AU UD DI IO O 1 1 jacks on the TV 1 How to connect 2 How to use Turn on the DVD player insert a DVD Select the C Co om mp po on ne en nt t1 1 input source on the TV using the I IN NP PU UT T button on the remote control If connected to C CO OM MP PO ON NE EN NT T I IN N 2 2 input select the C Co ...

Страница 22: ...using the I IN NP PU UT T button on the remote control Refer to the DVD player s manual for operating instructions 2 1 1 2 VIDEO AUDIO L R RGB PC REMOTE CONTROL IN AN CA COMPONENT IN L R S VIDEO AUDIO AUDIO AV IN 1 S VIDEO MONO VIDEO 1 2 HDMI DVI IN 2 1 CONTROL SERVICE HDMI DVD OUTPUT 1 Connect the S VIDEO output of the DVD to the S S V VI ID DE EO O input on the TV Connect the audio outputs of th...

Страница 23: ...F antenna out socket of the VCR to the A AN NT TE EN NN NA A C CA AB BL LE E I IN N socket on the TV Connect the antenna cable to the RF antenna in socket of the VCR 1 How to connect 2 How to use Set VCR output switch to 3 or 4 and then tune TV to the same channel number Insert a video tape into the VCR and press PLAY on the VCR Refer to the VCR owner s manual 2 1 ...

Страница 24: ...e control G G If you have a mono VCR connect the audio cable from the VCR to the A AU UD DI IO O L L M MO ON NO O jack of the TV NOTE 1 2 VIDEO AUDIO L R RGB IN PC UDIO IN GB DVI REMOTE CONTROL IN ANTE CAB S VIDEO COMPONENT IN AUDIO AV IN 1 VIDEO MONO L R S VIDEO VIDEO OUTPUT SWITCH ANT IN ANT OUT 1 S Video Connection Connect the S VIDEO output of the VCR to the S S V VI ID DE EO O input on the TV...

Страница 25: ...L AUDIO OUT AUDIO RGB DVI C HDMI DVI IN 2 1 1 2 G G When connecting with external audio equipment such as amplifiers or speakers you can turn the TV speakers off in the menu G G p p 8 82 2 NOTE G Do not look into the optical output port Looking at the laser beam may damage your vision G G Audio with ACP Audio Copy Protection function may block digital audio output CAUTION Connect one end of the op...

Страница 26: ...SB CONNECTION AV IN 2 L MONO R AUDIO VIDEO USB IN HDMI DVI IN 3 Connect the USB device to the U US SB B I IN N jack on the side of TV 1 How to connect 1 2 How to use After connecting the U US SB B I IN N jack you use the USB func tion G G p p 5 50 0 1 i e ...

Страница 27: ...ource on the TV using the I IN NP PU UT T button on the remote control Connect the VGA output of the PC to the R RG GB B I IN N P PC C jack on the TV Connect the PC audio output to the A AU UD DI IO O I IN N R RG GB B D DV VI I jack on the TV 1 How to connect 2 1 2 How to use Turn on the PC and the TV Select the H HD DM MI I1 1 2 2 3 3 or 4 4 Only 42 50PQ60 50 60PS60 50 60PS60C 50 60PS70 50 60PS80...

Страница 28: ...he PC output to another resolution change the refresh rate to another rate or adjust the brightness and contrast on the PICTURE menu until the picture is clear G G Avoid keeping a fixed image on the screen for a long period of time The fixed image could become permanently imprinted on the screen G G The synchronization input form for Horizontal and Vertical frequencies is separate G G Depending on...

Страница 29: ...ustment again If picture needs to be adjusted again after Auto adjustment in RGB PC you can adjust the P Po os si it ti io on n S Si iz ze e or P Ph ha as se e Yes No Screen Setup for PC mode Selecting Resolution You can choose the resolution in RGB PC mode The P Po os si it ti io on n P Ph ha as se e and S Si iz ze e can also be adjusted Select P PI IC CT TU UR RE E Select S Sc cr re ee en n R RG...

Страница 30: ...Move 3 ENTER 4 ENTER P Po os si it ti io on n This function is to adjust pic ture to left right and up down as you prefer S Si iz ze e This function is to minimize any vertical bars or stripes visible on the screen background And the horizontal screen size will also change P Ph ha as se e This function allows you to remove any horizontal noise and clear or sharpen the image of characters Select P ...

Страница 31: ... RGB PC mode Select R Re es se et t 3 ENTER Select P PI IC CT TU UR RE E Select S Sc cr re ee en n R RG GB B P PC C 1 MENU 2 ENTER Select Y Ye es s 4 ENTER 5 ENTER Auto config Position Resolution Size Phase Reset G Screen Move Initialize Settings Enter Move PICTURE Picture Mode Standard Contrast 90 Brightness 50 Sharpness 60 Color 60 Tint 0 Advanced Control Reset Screen RGB PC R G E Yes No Prev ME...

Страница 32: ...pens the list of Quick Menu options G G p p 3 38 8 Displays the main menu or clears all on screen displays and returns to TV viewing Rotates through inputs Also switches the TV on from standby G G p p 4 45 5 Used to enter a program number for multiple program channels such as 2 1 2 2 etc Displays the channel list Tunes to the last channel viewed Controls USB menu PHOTO LIST and MUSIC LIST Controls...

Страница 33: ... Navigates the on screen menus and adjusts the system settings to your preference Allows the user to move return one step in an interactive application or other user interaction function Displays channel information at the top of the screen Toggles through preset Video and Audio modes G G p p 4 47 7 Adjusts the volume Scroll through the programmed Favorite channels G G p p 4 43 3 Use to mark or un...

Страница 34: ...es through inputs Also switches the TV on from standby G G p p 4 45 5 Adjusts the Energy Saving Adjusts the volume Switch the sound on or off G G p p 3 34 4 Changes the channel Moves from one full set of screen information to the next one Controls USB menu PHOTO LIST and MUSIC LIST Controls the SIMPLINK compatible devices Opens the list of Quick Menu options G G p p 3 38 8 See a list of AV devices...

Страница 35: ... main menu or clears all on screen displays and returns to TV viewing Allows the user to move return one step in an interactive application or other user interac tion function DASH LIST FLASHBK THUMBSTICK Up Down Left Right ENTER MENU RETURN NUMBER button Installing Batteries Open the battery compartment cover on the back and install the batteries matching correct polarity Install two 1 5V AAA bat...

Страница 36: ... NP PU UT T C CH H or N Nu um mb be er r 0 0 9 9 button on the remote control Select the viewing source by using the I IN NP PU UT T button on the remote control When finished using the TV press the P PO OW WE ER R button on the remote control The TV reverts to standby mode 1 2 Press the C CH H or or N NU UM MB BE ER R buttons to select a channel number 1 VOLUME ADJUSTMENT CHANNEL SELECTION Adjust...

Страница 37: ... in your home environment S St to or re e D De em mo o Mode is only intended for use in retail environments Customers can adjust the P Pi ic ct tu ur re e menu P Pi ic ct tu ur re e m mo od de e manually while inspecting the TV but the TV will automatically return to preset in store mode after 5 minutes You can also adjust I In ni it ti ia al l S Se et tt ti in ng g in the O OP PT TI IO ON N menu ...

Страница 38: ...urrent Time Setting 2007 Month 11 Date 15 Hour 5 PM Minute 52 Time Zone Eastern Daylight Saving Off F F Auto G G Time Setting Step3 Time setting Previous Next Start A Au ut to o T Tu un ni in ng g 1 ENTER Check your antenna connection The previous channel information will be updated during Auto Tuning Previous Next Auto Tuning Step4 Auto Tuning ...

Страница 39: ...TruSurround XT Off Treble 50 Bass 50 Reset AUDIO E Enter Move Clock Off Time Off On Time Off Sleep Timer Off TIME Enter Move Photo List Music List USB Enter Move TV AV1 AV2 Component1 Component2 RGB PC HDMI1 HDMI2 HDMI3 INPUT E Enter Move Lock System Off Set Password Block Channel Movie Rating TV Rating Children TV Rating General Downloadable Rating Input Block LOCK Lock System Off Set Password Bl...

Страница 40: ...guage Digital signal S SA AP P Selects MTS sound Analog signal S Sl le ee ep p T Ti im me er r Select the amount of time before your TV turns off automatically D De el l A Ad dd d F Fa av v Select channel you want to add delete or add the channel to the Favorite List E Ej je ec ct t U US SB B Select Eject in order to eject a USB device Your TV s OSD On Screen Display may differ slightly from what ...

Страница 41: ...rd you set up in the Lock Menu to allow a channel search When setting the Auto tuning or Manual tuning the number of maximum channel you can store is 900 It is subject to change depending on the broadcasting signal environment 5 RETURN Return to the previous menu MENU Return to TV viewing Enter Move CHANNEL Auto Tuning Manual Tuning Channel Edit Enter Move CHANNEL Auto Tuning Manual Tuning Channel...

Страница 42: ...Ad dd d or D De el le et te e 5 ENTER The TV will ask for a password if parental control has been activated Lock Menu Use the password you set up in the Lock Menu to allow a channel search When setting the Auto tuning or Manual tuning the number of maximum channel you can store is 900 It is subject to change depending on the broadcasting signal environment 6 RETURN Return to the previous menu MENU...

Страница 43: ...u wish to select the deleted channel directly enter the channel number with the NUMBER buttons or select it in the Channel Edit menu Channel Editing Select C CH HA AN NN NE EL L 1 MENU 2 ENTER Select C Ch ha an nn ne el l E Ed di it t Enter Move CHANNEL Auto Tuning Manual Tuning Channel Edit Ch Change Move Page CH Move Previous Add Delete 5 RETURN Return to the previous menu MENU Return to TV view...

Страница 44: ...h ha an nn ne el l L Li is st t 1 LIST Displaying Channel List Select a channel 1 Switch to the chosen channel number 2 ENTER Selecting a channel in the channel list Turn the pages 1 CH P A G E Return to TV viewing 2 RETURN Paging through a channel list Channel List Exit DTV DTV 15 1 83 0 18 2 DTV This padlock is displayed when the channel is locked with parental control ...

Страница 45: ...4 5 6 7 8 0 9 2 3 Select your desired channel or 3 Select F Fa av vo or ri it te e 4Q MENU Return to TV viewing Q Menu Close Vivid Standard Off English Off Eject Aspect Ratio Picture Mode Sound Mode Caption Multi Audio Sleep Timer Del Add Fav Eject USB CH F F Favorite G G 16 9 FAVORITE CHANNEL LIST Select a channel 1 Switch to the chosen channel number 2 ENTER Selecting a channel in the favorite c...

Страница 46: ...nu to select wanted Closed caption The original aspect ratio of the video is 4 3 The original aspect ratio of the video is 16 9 wide The video resolution is 720x480i The video resolution is 720x480p The video resolution is 1280x720p The video resolution is 1920x1080i The video resolution is 1920x1080p V V C Ch hi ip p The program contains V Chip information Refer to the LOCK menu A Age D Dialogue ...

Страница 47: ...t them to watch high defi nition devices HDMI4 or HDMI3 INPUT INPUT or When new external device is connected this popup menu is displayed automatically If selecting Y Ye es s you can select input source that you want to appreciate But when selecting S SI IM MP PL LI IN NK K O On n popup menu for HDMI input will not be displayed No Yes New external device is connected Do you want to enjoy this Sele...

Страница 48: ...elect the label 1 2 3 RETURN Return to the previous menu MENU Return to TV viewing With using INPUT button Enter Move OPTION Menu Language Language English Audio Language English Input Label SIMPLINK On Key Lock Off Caption Off Demo Mode Off ISM Method Normal Set ID 1 Enter Move OPTION Menu Language Language English Audio Language English Input Label SIMPLINK On Key Lock Off Caption Off Demo Mode ...

Страница 49: ...d both for PICTURE menu Picture Mode and AUDIO menu Sound Mode respectively If you select O Of ff f in AV mode the P Pi ic ct tu ur re e M Mo od de e and S So ou un nd d M Mo od de e return to previous selected value O Of ff f Disables the AV MODE C Ci in ne em ma a Optimizes video and audio for watching movies S Sp po or rt t Optimizes video and audio for watching sports events G Ga am me e Optim...

Страница 50: ... button on the remote control the SIMPLINK device will stop G G When you select a device with home theater functionality the sound output automatically switches to the home theater speakers and the TV speakers are turned off G G If a connected SIMPLINK home theater system doesn t play the audio from the TV connect the DIGITAL AUDIO OUT terminal on the back of the TV to the DIGITAL AUDIO IN termina...

Страница 51: ...an HDMI cable over Version 1 3 with CEC function should be used CEC Consumer Electronics Control SIMPLINK Menu T TV V v vi ie ew wi in ng g Switch to the previous TV channel regardless of the current mode D DI IS SC C p pl la ay yb ba ac ck k Select and play discs When multiple discs are available the titles of discs are conveniently displayed at the bottom of the screen V VC CR R p pl la ay yb ba...

Страница 52: ...upply If not the device may not be recognized G G Please connect a USB storage device with cable is offered by USB maker If connected with cable is not offered by USB maker or an excessively long cable the device may not be recognized G G Some USB storage devices may not be supported or operate properly G G The TV will display up to 1 28 characters of a files name G G Please backup important files...

Страница 53: ... page Total pages Total number of marked photos Usable USB memory Corresponding buttons on the remote control Supported photo file JPG You can play JPG files only Only baseline scan is supported among JPG USB Device Page 1 1 No Marked PHOTO LIST Up Folder Free Space 150MB Move PopUp Menu Move Page Mark 0 folder 4 file s 3 4 5 1 1 2 Select U US SB B Select P Ph ho ot to o L Li is st t 2 Top Folder ...

Страница 54: ...otos If no photos are marked you can view all photos individually or all pho tos in the folder in a slide show Top Folder DriveA 4 Select the desired Popup menu ENTER ENTER ENTER Move Move Page Mark CH MARK PopUp Menu Move Move Page Mark CH MARK PopUp Menu DriveA DriveA Butterfly Up Folder Photo X Box 1366x768 125KB View Mark All Delete Close When you select a file not folder this PopUp menu is di...

Страница 55: ...older or drive Select the desired photos Show the Popup menu 5 Select V Vi ie ew w The selected photo is displayed in full size 2 3 1 4 ENTER ENTER ENTER USB Device Page 1 1 No Marked PHOTO LIST Up Folder Free Space 150MB 0 folder 4 file s USB Device Page 1 1 No Marked PHOTO LIST Up Folder Free Space 150MB 1366x768 125KB Top Folder DriveA DriveA DriveA Butterfly 1366x768 125KB View Mark All Delete...

Страница 56: ...lide show in O Op pt ti io on n G G B BG GM M Listen to music while viewing photos in full size Set the BGM device and album in O Op pt ti io on n G G R Ro ot ta at te e Rotate photos Rotates the photo 90 180 270 360 clockwise G G D De el le et te e Delete photos G G O Op pt ti io on n Set values for S Sl li id de e S Sp pe ee ed d and M Mu us si ic c F Fo ol ld de er r Use button and E EN NT TE E...

Страница 57: ...ic Max Length 999 59 Sec Moves to upper level file Preview Display the title folder name of the music in the selected folder Current page Total pages Total number of marked musics Usable USB memory Corresponding buttons on the remote control 1 3 4 5 2 Select U US SB B Select M Mu us si ic c L Li is st t 1 2 MENU ENTER ENTER USB Device MUSIC LIST Up Folder Free Space 150MB A A 00 00 04 16 Title Dur...

Страница 58: ...ve Move Page Mark CH MARK PopUp Menu Duration Title Up Folder Good Bye Arirang 05 30 04 12 3945 KB 128 Kbps Play Play with Photo Mark All Delete Close G G P Pl la ay y During stop Play the selected music Once a song finishes playing the next selected one will be played When there are no selected musics to play the next one in the current fold er will be played If you go to a different folder and p...

Страница 59: ...ended period of time NOTE G G When music is playing is displayed in front of the music play time G G A damaged or corrupted music file that does not play displays 00 00 as the play time G G Music files with copy protection will not play G G Press E EN NT TE ER R A A or R RE ET TU UR RN N button to stop the screen saver G G This TV can not play music files less than 16 Kbytes ...

Страница 60: ...pace 150MB 704 x 396 668 MB Title Duration Up Folder Good Bye Scent of a waman 1992 04 12 05 30 2 3 4 1 Move PopUp Menu Move Page Mark CH MARK 5 Page 1 1 No Marked Movie Scent of a waman 1992 Exit AVI m4v Divx Video Codec MPEG4 DivX 3 XX DivX 4 XX DivX 5 XX DivX 6 XX Xvid 1 00 Xvid 1 01 Xvid 1 02 Xvid 1 03 Xvid 1 10 Beta1 2 MPEG1 MPEG2 AC3 Bit rate range 32Kbps 640Kbps Sampling rate 32KHz 44 1KHz ...

Страница 61: ... ll l Mark all movies in the folder G G U Un nm ma ar rk k A Al ll l Deselect all marked movie G G D De el le et te e Delete the selected movie G G C Cl lo os se e Close the pop up menu USB Device Up Folder Free Space 150MB Move Move Page Mark CH MARK PopUp Menu Duration Title Exit Page 1 1 No Marked MOVIE LIST 704 x 396 668 MB Movie Scent of a waman 1992 Scent of a waman 1992 Up Folder Lost 22 13...

Страница 62: ...he screen 320 x 250 USB MPEG4 AC3 Scent of a woman 1992 MPEG4 AC3 MPEG4 AC3 Option Playing the Movie You can adjust various method during the movie play USB Device Up Folder Free Space 150MB Move Move Page Mark CH MARK PopUp Menu Duration Title Exit Page 1 1 No Marked MOVIE LIST 704 x 396 668 MB Movie Scent of a waman 1992 Scent of a waman 1992 Up Folder Lost 22 13 20 22 30 20 USB Device Up Folder...

Страница 63: ...ranteed for smooth playback G G DTS Audio codec is not supported G G A DivX movie file and its subtitle file must be located in the same folder At this time a movie file name and its subtitle file name must be identical for it to be displayed G G Playing a video via a USB connection that doesn t support high speed may not work properly 9 MENU Return to movie viewing G G P Pi ic ct tu ur re e S Si ...

Страница 64: ...from other TV playback of rented or purchased DivX file is not allowed Only DivX files matched with the registration code of the purchased TV are playable G G The video or audio of a file converted based on a standard other than the DivX codec standard may be corrupted or unable to be played Enter Move USB Photo List Music List Movie List DivX Reg Code Deactivation Enter Move USB Photo List Music ...

Страница 65: ...nce this function is executed a DivX user authentication is required again to see DivX DRM files Close Enter Move USB Photo List Music List Movie List DivX Reg Code Deactivation Enter Move USB Photo List Music List Movie List DivX Reg Code Deactivation Yes No DivX R Video On Demand This device is deactivated Your deactivation code is xxxxxxxxx To learn more visit www divx com vod DivX R Video On D...

Страница 66: ...st Scan 4 3 Q Menu Close F F 16 9 G G Vivid Standard Off English Off Add Eject Aspect Ratio Picture Mode Sound Mode Caption Multi Audio Sleep Timer Del Add Fav Eject USB CH Select the A As sp pe ec ct t R Ra at ti io o Select the desired picture format 1Q MENU 2 3Q MENU Return to TV viewing Set By Program Only DTV CADTV Component HDMI DTV DVI DTV 720p 1 080i 1 080p You can also press the R RA AT T...

Страница 67: ...DTV CADTV Component HDMI DTV DVI DTV 720p 1080i 1080p input source Set by program Selects the proper picture proportion to match the source s image 4 3 Choose 4 3 when you want to view a picture with an original 4 3 aspect ratio Zoom Choose Zoom when you want to view the picture without any alteration However the top and bot tom portions of the picture will be cropped Cinema Zoom Choose Cinema Zoo...

Страница 68: ...te Level Set the screen above identical to the Recommended sample below Next Previous Low High Recommended Contrast 90 E E E E Tint Set the screen above identical to the Recommended sample below Next Previous Low High Recommended Tint 0 E E E E R G This feature lets you adjust the picture quality of the original image Use this to calibrate the screen quality by adjusting the Black and White Level ...

Страница 69: ...ded sample below Next Previous H Sharpness 50 E E E E Low High Recommended Vertical Sharpness Set the screen above identical to the Recommended sample below Next Previous V Sharpness 50 E E E E Low High Recommended DTV TV AV1 AV2 Component1 Component2 RGB HDMI1 HDMI2 HDMI3 HDMI4 Select an input s to apply the settings Warning The picture quality may vary according to the different types of signal ...

Страница 70: ...icture Mode Standard Contrast 90 Brightness 50 Sharpness 60 Color 60 Tint 0 Advanced Control It reduces the TV s power consumption The default factory setting complies with the E En ne er rg gy y S St ta ar r requirements and is adjusted to the comfort able level to be viewed at home You can increase the brightness of your screen by adjusting the Energy Saving level or by setting the P Pi ic ct tu...

Страница 71: ... the mode to adjust the video in detail for video quality expert and general user Cinema Only 42 50PQ60 50 60PS60 50 60PS60C 50 60PS70 50 60PS80 This is cinema quality mode to provide you the experience of watching a movie at home The user will be able enjoy the best level of satisfactory screen quali ty in any movie without any separate adjust ments Cinema expresses the optimal screen quality whe...

Страница 72: ...TER 4 ENTER 5 ENTER 6 RETURN Return to the previous menu MENU Return to TV viewing Enter Move PICTURE E Aspect Ratio 16 9 Energy Saving Intelligent Sensor Picture Mode Standard Contrast 90 Brightness 50 Sharpness 60 Color 60 Tint 0 Advanced Control Contrast 80 E E E E E E E E Enter R G C Co on nt tr ra as st t Increase or decrease the gradient of the video signal You may use Contrast when the brig...

Страница 73: ...sired options 1 MENU 3 2 ENTER ENTER 5 RETURN Return to the previous menu MENU Return to TV viewing Make appropriate adjustments 4 Enter Move PICTURE Enter Move PICTURE E Aspect Ratio 16 9 Energy Saving Intelligent Sensor Picture Mode Standard Contrast 90 Brightness 50 Sharpness 60 Color 60 Tint 0 Advanced Control R G E Aspect Ratio 16 9 Energy Saving Intelligent Sensor Picture Mode Standard Contr...

Страница 74: ...s This may also be used be a professional to help optimize the TV performance in the environment the TV is in 7 RETURN Return to the previous menu MENU Return to TV viewing Enter Move PICTURE E Aspect Ratio 16 9 Energy Saving Intelligent Sensor Picture Mode Expert1 Contrast 80 Brightness 50 H Sharpness 50 V Sharpness 50 Color 50 Tint 0 R G Enter Move PICTURE Energy Saving Intelligent Sensor Pictur...

Страница 75: ...uction Gamma Black Level Film Mode Standard Displays standard color area Wide Mode to use and set the rich color area of the display Maximize the utilization of color to increase color quality In Advanced Control mode this feature is enabled in C Co ol lo or r T Te em mp pe er ra at tu ur re e W Wa ar rm m Show clearer and distinctive yet natural corners of the video Convert the color of a differe...

Страница 76: ...lize the adjusted value 1 MENU 3 2 ENTER ENTER 4 MENU Return to TV viewing Enter Move PICTURE E R G Picture Mode Standard Contrast 90 Brightness 50 Sharpness 60 Color 60 Tint 0 Advanced Control Reset Screen RGB PC Enter Move PICTURE E R G Picture Mode Standard Contrast 90 Brightness 50 Sharpness 60 Color 60 Tint 0 Advanced Control Reset Screen RGB PC Resetting video configuration i i ...

Страница 77: ... white pat tern are alternately displayed It is diffi cult to see the after image on all colors Once it has been corrected it will not be visible in any color W Wh hi it te e W Wa as sh h White Wash removes ghost images from the screen Use spar ingly Watch the TV normally for a while before using this feature to see if the ghost image disappears on its own Select O OP PT TI IO ON N Select I IS SM ...

Страница 78: ...PLINK On Key Lock Off Caption Off Demo Mode Off ISM Method Normal Set ID 1 E E Off On Select O OP PT TI IO ON N 1 MENU Select D De em mo o M Mo od de e 2 ENTER Select O On n Only 50 60PS70 50 60PS80 Select L LE ED D O Of ff f or L LE ED D O On n 3 ENTER Return to TV viewing After a while D De em mo o M Mo od de e starts If you want to stop the demo press any button except VOL or MUTE 4 MENU Show t...

Страница 79: ...lows users to enjoy stable volume levels by making automatic adjustments for each program Select A AU UD DI IO O Select A Au ut to o V Vo ol lu um me e Select O On n or O Of ff f 1 MENU 3 2 ENTER ENTER 4 RETURN Return to the previous menu MENU Return to TV viewing Enter Move AUDIO Auto Volume On Clear Voice II On Level 0 Balance 0 Sound Mode Standard SRS TruSurround XT Off Treble 50 Bass 50 Reset ...

Страница 80: ...II I Select O On n or O Of ff f 1 MENU 3 2 ENTER ENTER Enter Move AUDIO Auto Volume Off Clear Voice II On Level 0 Balance 0 Sound Mode Standard SRS TruSurround XT Off Treble 50 Bass 50 Reset Enter Move AUDIO Auto Volume Off Clear Voice II On Level 0 Balance 0 Sound Mode Standard SRS TruSurround XT Off Treble 50 Bass 50 Reset L R L R E E Adjustment for Clear Voice II Level With selecting On Select ...

Страница 81: ...2 Select S St ta an nd da ar rd d M Mu us si ic c C Ci in ne em ma a S Sp po or rt t or G Ga am me e 3Q MENU Return to TV viewing Q Menu Close F F 16 9 G G Vivid Off English Off Add Eject Aspect Ratio Picture Mode Sound Mode Caption Multi Audio Sleep Timer Del Add Fav Eject USB CH F F Standard G G 16 9 You can also adjust S So ou un nd d M Mo od de e in the A AU UD DI IO O menu S St ta an nd da ar...

Страница 82: ... ENTER ENTER If you select C Cl le ea ar r V Vo oi ic ce e I II I O On n S SR RS S T Tr ru uS Su ur rr ro ou un nd d X XT T feature will not work S SR RS S T Tr ru uS Su ur rr ro ou un nd d X XT T TruSurround XT is a patented SRS technology that solves the prob lem of playing 5 1 multichannel content over two speakers 6 RETURN Return to the previous menu MENU Return to TV viewing 4 RETURN Return t...

Страница 83: ...e and room situations 4 RETURN Return to the previous menu MENU Return to TV viewing Enter Move AUDIO Auto Volume Off Clear Voice II On Level 0 Balance 0 Sound Mode Standard SRS TruSurround XT Off Treble 50 Bass 50 Reset Enter Move AUDIO Auto Volume Off Clear Voice II On Level 0 Balance 0 Sound Mode Standard SRS TruSurround XT Off Treble 50 Bass 50 Reset L R L R E E Close E E E E Balance 0 L R ...

Страница 84: ... DI IO O Select T TV V S Sp pe ea ak ke er r Select O On n or O Of ff f 1 MENU 3 2 ENTER ENTER 4 RETURN Return to the previous menu MENU Return to TV viewing Enter Move AUDIO Clear Voice II On Level 0 Balance 0 Sound Mode Standard SRS TruSurround XT Off Treble 50 Bass 50 Reset TV Speaker On Enter Move AUDIO Clear Voice II On Level 0 Balance 0 Sound Mode Standard SRS TruSurround XT Off Treble 50 Ba...

Страница 85: ...ialize the adjusted value 3 ENTER 4 MENU Return to TV viewing Enter Move AUDIO Auto Volume Off Clear Voice II On Level 0 Balance 0 Sound Mode Standard SRS TruSurround XT Off Treble 50 Bass 50 Reset Enter Move AUDIO Auto Volume Off Clear Voice II On Level 0 Balance 0 Sound Mode Standard SRS TruSurround XT Off Treble 50 Bass 50 Reset L R L R E E Resetting audio configuration i i ...

Страница 86: ...automatically used if the broadcast is only in Mono Select S SA AP P Select M Mo on no o S St te er re eo o or S SA AP P Return to TV viewing 1Q MENU 3 2 Q MENU Select M Mu ul lt ti i A Au ud di io o Select other languages Return to TV viewing 1Q MENU 3 2 Q MENU Analog TV Digital TV F F English G G Q Menu Close F F 16 9 G G Vivid Off Off Add Eject Aspect Ratio Picture Mode Sound Mode Caption Multi...

Страница 87: ...t your desired language 1 MENU 3 2 ENTER ENTER 4 RETURN Return to the previous menu MENU Return to TV viewing Enter Move OPTION Menu Language Language English Audio Language English Input Label SIMPLINK On Key Lock Off Caption Off Demo Mode Off ISM Method Normal Set ID 1 Enter Move OPTION Menu Language Language English Audio Language English Input Label SIMPLINK On Key Lock Off Caption Off Demo Mo...

Страница 88: ... on screen menus will be shown in the selected language 1 MENU 3 2 ENTER ENTER 4 RETURN Return to the previous menu MENU Return to TV viewing Enter Move OPTION Menu Language Language English Audio Language English Input Label SIMPLINK On Key Lock Off Caption Off Demo Mode Off ISM Method Normal Set ID 1 Enter Move OPTION Menu Language Language English Audio Language English Input Label SIMPLINK On ...

Страница 89: ...1 4 4 or T Te ex xt t1 1 4 4 4 Analog Broadcasting System Captions When selecting O Of ff f Sub menus for Analog DTV and Digital Option become disabled C CA AP PT TI IO ON N The term for the words that scroll across the bottom of the TV screen usually the audio portion of the pro gram provided for the hearing impaired T TE EX XT T The term for the words that appear in a large black frame and almos...

Страница 90: ...on n Select O On n 1 MENU 3 2 ENTER ENTER Select C CC C1 1 4 4 T Te ex xt t1 1 4 4 or S Se er rv vi ic ce e1 1 6 6 4 5 RETURN Return to the previous menu MENU Return to TV viewing Enter Move OPTION Menu Language Language English Audio Language English Input Label SIMPLINK On Key Lock Off Caption Off Demo Mode Off ISM Method Normal Set ID 1 Enter Move OPTION Menu Language Language English Audio Lan...

Страница 91: ... the text T Te ex xt t O Op pa ac ci it ty y Specify the opacity for the text color B Bg g B Ba ac ck kg gr ro ou un nd d C Co ol lo or r Select a background color B Bg g B Ba ac ck kg gr ro ou un nd d O Op pa ac ci it ty y Select the opacity for the background color 7 RETURN Return to the previous menu MENU Return to TV viewing Enter Move OPTION Menu Language Language English Audio Language Engli...

Страница 92: ...en nt tr ra al l M Mo ou un nt ta ai in n P Pa ac ci if fi ic c A Al la as sk ka a or H Ha aw wa ai ii i Canada E Ea as st te er rn n C Ce en nt tr ra al l M Mo ou un nt ta ai in n P Pa ac ci if fi ic c N Ne ew w F F l la an nd d or A At tl la an nt ti ic c 4 Select A Au ut to o O On n or O Of ff f depending on whether or not your viewing area observes Daylight Saving time 5 6 RETURN Return to the...

Страница 93: ...ption 4 Set the Year Month Date Hour or Minutes option 5 6 RETURN Return to the previous menu MENU Return to TV viewing Enter Move TIME Clock Off Time Off On Time Off Sleep Timer Off Enter Move TIME Clock Off Time Off On Time Off Sleep Timer Off Year Month 2 Date 21 Hour 2 AM 2008 Minute 10 Time Zone Eastern Daylight Saving Auto Close F F Manual G G G G If you unplug the TV once or turn the main p...

Страница 94: ... Select I In np pu ut t Select the desired input source Select T TI IM ME E Select O Of ff f t ti im me e or O On n t ti im me e Select R Re ep pe ea at t 1 MENU 3 2 ENTER ENTER Select O Of ff f O On nc ce e D Da ai il ly y M Mo on n F Fr ri i M Mo on n S Sa at t W We ee ek ke en nd d or S Su un nd da ay y 4 Select and set H Ho ou ur r or M Mi in nu ut te e 5 1 ENTER 3 4 2 When Selecting T TV V se...

Страница 95: ...Ti im me er r in the T TI IM ME E menu Q Menu Close F F 16 9 G G Vivid Off English Off Add Eject Aspect Ratio Picture Mode Sound Mode Caption Multi Audio Sleep Timer Del Add Fav Eject USB CH 16 9 F F Off G G Standard Select S Sl le ee ep p T Ti im me er r 1Q MENU 2 Select O Of ff f 1 10 0 2 20 0 3 30 0 6 60 0 9 90 0 1 12 20 0 1 18 80 0 or 2 24 40 0 minutes 3Q MENU Return to TV viewing ...

Страница 96: ...ies Movies that have been shown at the theaters or direct to video movies use the Movie Rating System MPAA only Ratings for Television programs including made for TV movies TV G General audience TV PG Parental guidance suggested TV 14 Parents strongly cautioned TV MA Mature audience only TV Y All children TV Y7 Children 7 years older Set up blocking schemes to block specific channels ratings and e...

Страница 97: ...e Select L LO OC CK K 1 MENU ENTER Input the password 21 4 5 6 7 8 0 9 2 3 5 RETURN Return to the previous menu MENU Return to TV viewing Enter Move LOCK Lock System Off Set Password Block Channel Movie Rating TV Rating Children TV Rating General Downloadable Rating Input Block Enter Move LOCK Lock System On Set Password Block Channel Movie Rating TV Rating Children TV Rating General Downloadable ...

Страница 98: ...n nf fi ir rm m 4 3 ENTER 1 4 5 6 7 8 0 9 2 3 Select L LO OC CK K 1 MENU ENTER Input the password 21 4 5 6 7 8 0 9 2 3 5 RETURN Return to the previous menu MENU Return to TV viewing Enter Move LOCK Lock System Off Set Password Block Channel Movie Rating TV Rating Children TV Rating General Downloadable Rating Input Block Enter Move LOCK Lock System Off Set Password Block Channel Movie Rating TV Ra...

Страница 99: ...do not want to watch or that you do not want your children to watch Select L LO OC CK K 1 MENU ENTER Input the password 21 4 5 6 7 8 0 9 2 3 6 RETURN Return to the previous menu MENU Return to TV viewing Enter Move LOCK Lock System Off Set Password Block Channel Movie Rating TV Rating Children TV Rating General Downloadable Rating Input Block Ch Change Move Page CH Move Previous Block Unblock ...

Страница 100: ...ER G General audience PG Parental guidance suggested PG 13 Parents strongly cautioned R Restricted NC 17 No one 17 and under admitted X Adult only Blocking Off Permits all programs G G If you set PG 13 G and PG movies will be available PG 13 R NC 17 and X will be blocked Select L LO OC CK K 1 MENU ENTER Input the password 21 4 5 6 7 8 0 9 2 3 5 RETURN Return to the previous menu MENU Return to TV ...

Страница 101: ...not apply to other TV programs Unless you block certain TV programs intended for mature audi ences in the TV Rating sub menu your children can view those programs Select L LO OC CK K 1 MENU ENTER Input the password 21 4 5 6 7 8 0 9 2 3 6 RETURN Return to the previous menu MENU Return to TV viewing Enter Move LOCK Lock System Off Set Password Block Channel Movie Rating TV Rating Children TV Rating ...

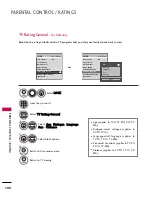
Страница 102: ...dialogue applies to TV PG TV 14 Language adult language applies to TV PG TV 14 TV MA Sex sexual situations applies to TV PG TV 14 TV MA Violence applies to TV PG TV 14 TV MA Select L LO OC CK K 1 MENU ENTER Input the password 21 4 5 6 7 8 0 9 2 3 6 RETURN Return to the previous menu MENU Return to TV viewing Enter Move LOCK Lock System Off Set Password Block Channel Movie Rating TV Rating Children...

Страница 103: ...rental Guidance 14 Viewers 14 years and older 18 Adult programming Blocking Off Permits all programs Select L LO OC CK K 1 MENU ENTER Input the password 21 4 5 6 7 8 0 9 2 3 5 RETURN Return to the previous menu MENU Return to TV viewing Enter Move LOCK Lock System Off Set Password Block Channel TV Rating English TV Rating French Downloadable Rating Input Block Enter Move LOCK Lock System Off Set P...

Страница 104: ... years and younger 16ans Not convenient for children of 16 years and younger 18ans This programs is only for adults Blocking off Permits all programs Select L LO OC CK K 1 MENU ENTER Input the password 21 4 5 6 7 8 0 9 2 3 5 RETURN Return to the previous menu MENU Return to TV viewing Enter Move LOCK Lock System Off Set Password Block Channel TV Rating English TV Rating French Downloadable Rating ...

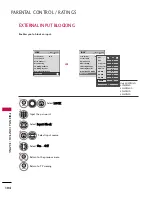
Страница 105: ... oa ad da ab bl le e R Ra at ti in ng g option 4 3 ENTER Select desired option and block it 5 ENTER Select L LO OC CK K 1 MENU ENTER Input the password 21 4 5 6 7 8 0 9 2 3 6 RETURN Return to the previous menu MENU Return to TV viewing Enter Move LOCK Lock System Off Set Password Block Channel Movie Rating TV Rating Children TV Rating General Downloadable Rating Input Block Enter Move LOCK Lock Sy...

Страница 106: ...to the previous menu MENU Return to TV viewing Enter Move LOCK Lock System Off Set Password Block Channel Movie Rating TV Rating Children TV Rating General Downloadable Rating Input Block Enter Move LOCK Lock System Off Set Password Block Channel Movie Rating TV Rating Children TV Rating General Downloadable Rating Input Block AV1 F F Off G G AV2 Off Component1 Off HDMI1 Off RGB PC Off Component2 ...

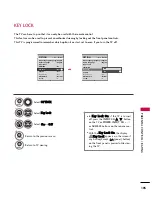
Страница 107: ...e INPUT CH D D E E button on the TV or POWER INPUT CH or NUMBER buttons on the remote con trol With the K Ke ey y L Lo oc ck k O On n the display K Ke ey y L Lo oc ck k appears on the screen if any button Except power button on the front panel is pressed while view ing the TV 4 RETURN Return to the previous menu MENU Return to TV viewing Enter Move OPTION Menu Language Language English Audio Langu...

Страница 108: ...on Try another channel The problem may be with the broadcast Is the power cord inserted into wall power outlet Check your antenna direction and or location Test the wall power outlet plug another product s power cord into the outlet where the product s power cord was plugged in This is normal the image is muted during the product startup process Please contact your service center if the picture ha...

Страница 109: ...icture OK No sound Unusual sound from inside the product No sound when connecting HDMI USB No output from one of the speakers T Th he e a au ud di io o f fu un nc ct ti io on n d do oe es s n no ot t w wo or rk k Press the VOL or VOLUME button Sound muted Press MUTE button Try another channel The problem may be with the broadcast Are the audio cables installed properly Adjust Balance in menu optio...

Страница 110: ... water and a little fabric softener or dish washing detergent Wring the cloth until it s almost dry and then use it to wipe the screen Make sure the excess water is off the screen and then let it air dry before you turn on your TV Cleaning the Cabinet To remove dirt or dust wipe the cabinet with a soft dry lint free cloth Please be sure not to use a wet cloth Extended Absence G G If you expect to ...

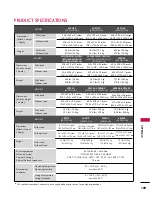
Страница 111: ... inches 1 228 8 x 824 6 x 353 0 mm 48 3 x 30 3 x 3 1 inches 1 228 8 x 772 0 x 78 9 mm 80 0 lbs 36 3 kg 74 5 lbs 33 8 kg 57 6x38 6x1 5 5inches 1 465 4x982 6x395 5mm 57 6x35 5x3 2inches 1 465 4x903 2x82 1mm 1 1 3 0lbs 5 1 3kg 1 00 3lbs 45 5kg MODEL 42PQ20 42PQ20 UA 40 5x28 3x1 2 1inches 1 03 1 2x720 9x308 0mm 40 5x25 8x3 1inches 1 03 1 2x656 7x80 8mm 54 6lbs 24 8kg 50 0lbs 22 7kg 50PQ20 50PQ20 UA 47...

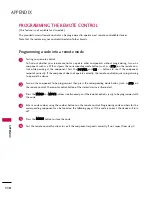
Страница 112: ...f the component responds correctly If the component does not operate correctly the remote control requires programming to operate the device Turn on the component to be programmed then press the corresponding mode button such as S ST TB B on the remote control The remote control button of the desired device is illuminated Press the M ME EN NU U and M MU UT TE E buttons simultaneously and the remot...

Страница 113: ...5 046 059 MINOLTA 013 020 MITSUBISHI 013 020 045 046 049 051 059 061 151 MTC 034 040 MULTITECH 024 034 NEC 012 023 039 043 048 NORDMENDE 043 OPTONICA 053 054 PANASONIC 066 070 074 083 133 140 145 PENTAX 013 020 031 033 063 PHILCO 031 034 067 PHILIPS 031 033 034 054 067 071 101 PILOT 101 PIONEER 013 021 048 PORTLAND 108 PULSAR 072 QUARTZ 01 1 014 QUASAR 033 066 075 145 RCA 013 020 033 034 040 041 0...

Страница 114: ... 070 PACE SKY SATELLITE 143 PANASONIC 060 142 PANSAT 121 PERSONAL CABLE 1 17 PHILIPS 071 PICO 105 PRESIDENT 019 102 PRIMESTAR 030 1 10 1 1 1 PROSAT 072 RCA 066 106 REALISTIC 043 074 SAMSUNG 123 SATELLITE SERVICE CO 028 035 047 057 085 SCIENTIFIC ATLANTA 032 138 SONY 103 STARCAST 041 SUPER GUIDE 020 124 125 TEECOM 023 026 075 087 088 090 107 130 137 TOSHIBA 002 127 UNIDEN 016 025 042 043 044 045 04...

Страница 115: ...D0 D1 D2 D3 D4 D5 D6 D7 D0 D1 D2 D3 D4 D5 D6 D7 Lead code Low custom code High custom code Data code Data code Repeat code Tf 4 5 ms 9 ms 2 25 ms 9 ms 0 55 ms 0 56 ms 1 12 ms 0 56 ms 2 24 ms Tf Tf Tf 108ms 455KHz Bit 0 Bit 1 1 How to Connect Connect your wired remote control to the Remote Control port on the TV 2 Remote Control IR Codes Output waveform Single pulse modulated with 37 917KHz signal ...

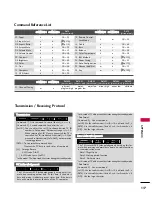
Страница 116: ...PS60C 50 60PS70 50 60PS80 08 POWER Remote control Button Power On Off 45 Q MENU Remote control Button 43 MENU Remote control Button 0B INPUT Remote control Button 10 19 Number Key 0 9 Remote control Button 4C Dash List Remote control Button 1A FLASHBK Remote control Button 09 MUTE Remote control Button 02 VOL Remote control Button 03 VOL Remote control Button 00 CH Remote control Button 01 CH Remo...

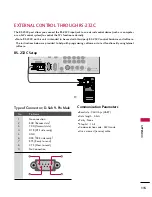
Страница 117: ... help with programming software or to test functionality using telenet software 1 2 L R RGB IN PC REMOTE CONTROL IN AUDIO VIDEO S VIDEO MONO AV IN 1 HDMI DVI IN 2 1 ANTENNA CABLE IN RS 232C IN CONTROL SERVICE Type of Connector D Sub 9 Pin Male No Pin Name 1 No connection 2 RXD Receive data 3 TXD Transmit data 4 DTR DTE side ready 5 GND 6 DSR DCE side ready 7 RTS Ready to send 8 CTS Clear to send 9...

Страница 118: ...ct O OP PT TI IO ON N Select S Se et t I ID D Choose the desired TV ID number The adjustment range of Set ID is 1 99 1 MENU 3 2 ENTER ENTER 4 RETURN Return to the previous menu MENU Return to TV viewing Enter Move OPTION Menu Language Language English Audio Language English Input Label SIMPLINK On Key Lock Off Caption Off Demo Mode Off ISM Method Normal Set ID 1 Enter Move OPTION Menu Language Lan...

Страница 119: ... functions or communication errors Data1 Illegal Code Data2 Not supported function Data3 Wait more time In this model TV will not send the status during the standby mode Data Format Command 2 Use as command Set ID Use the small character if set ID is 10 it will send the 0 a DATA Use the small character if data is 0 x ab it will send the a b NG Use the large character C Co om mm ma an nd d1 1 C Co ...

Страница 120: ...ing the MUTE button on remote control Transmission k e Set ID Data Cr Data 00 Volume mute on Volume off Data 01 Volume mute off Volume on Acknowledgement e Set ID OK NG Data x 0 06 6 V Vo ollu um me e C Co on nt tr ro oll C Co om mm ma an nd d k k f f To adjust volume You can also adjust volume with the volume buttons on remote control Transmission k f Set ID Data Cr Data Min 00 Max 64 transmit by...

Страница 121: ...mission k u Set ID Data Cr Data 00 Medium 01 Cool 02 Warm Acknowledgement u Set ID OK NG Data x 1 18 8 I IS SM M M Me et th ho od d C Co om mm ma an nd d jj p p To avoid having a fixed image remain on screen Transmission j p Set ID Data Cr Data 02 Orbiter 04 White Wash 08 Normal 20 Color Wash Acknowledgement p Set ID OK NG Data x 1 19 9 P Po ow we er r s sa av viin ng g C Co om mm ma an nd d jj q ...

Страница 122: ...0 00 01 2 Tune to the digital ATSC local channel 30 3 Data 00 Don t know Physical 00 Data 01 02 Major is 30 00 1E Data 03 04 Minor is 3 00 03 Data 05 0010 0010 in binary 22 Total ma 00 00 00 1E 00 03 22 Acknowledgement a Set ID OK Data00 Data01 Data02 Data03 Data04 x a Set ID NG Data00 x 2 22 2 C Ch ha an nn ne ell A Ad dd d D De ell C Co om mm ma an nd d m m b b To add and delete the channels Tra...

Страница 123: ......

Отзывы: