background image

62

TO USE THE USB DEVICE 

(Except  42/50PQ2***)

T

O

 USE 

THE 

USB 

DEVICE

OK

Move

Photo List

Music List

Movie List

DivX Reg. Code 

Deactivation

USB

• Official DivX® Certified Product

• Plays all version of DivX® video (including DivX® 6) with standard playback of

DivX® media files

•DivX, DivX Certified, and associated logos are trademarks of DivX, and are under

license.

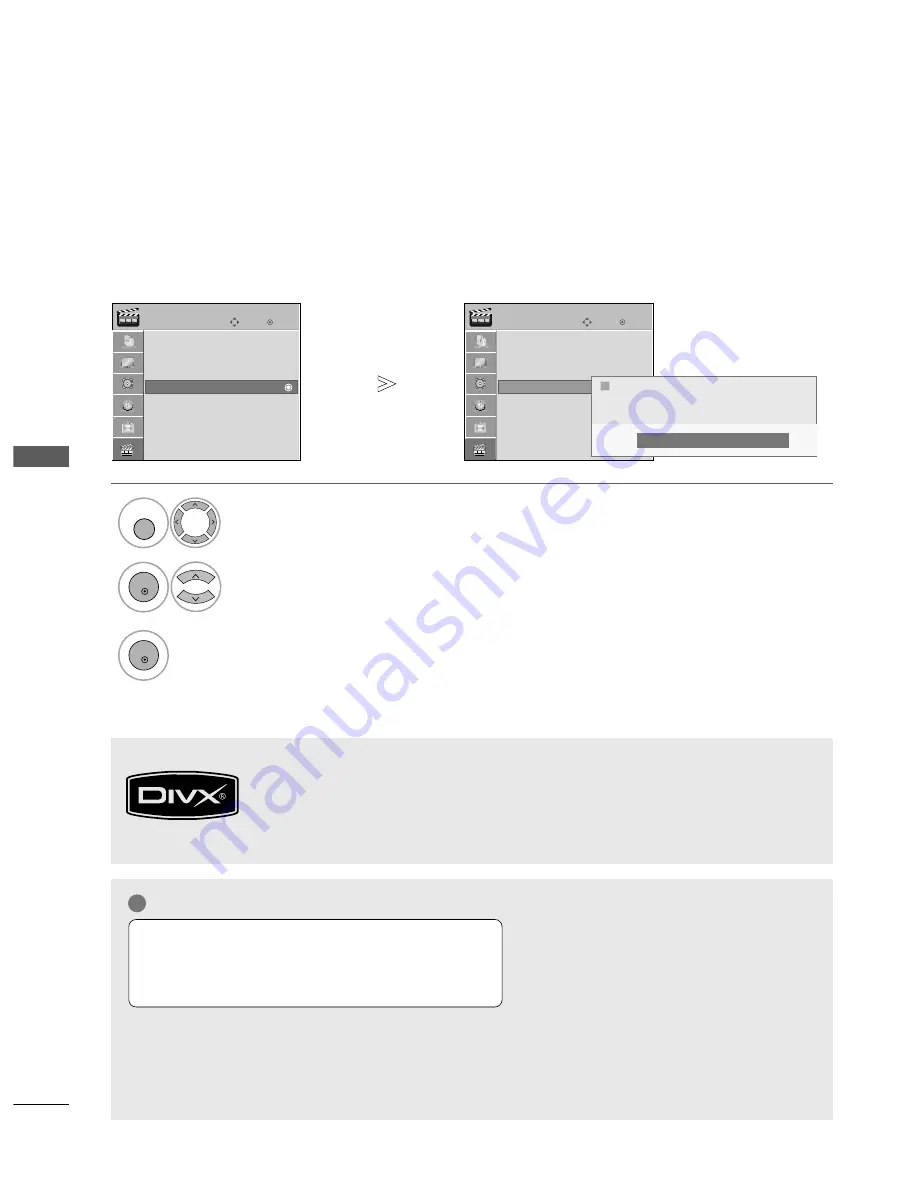
DIVX REGISTRATION CODE 

(Only  42/50PQ6***)

Confirm the DivX registration code number of the TV. Using the registration number, movies can be rented or
purchased at www.divx.com/vod.

With a DivX registration code from other TV, playback of rented or purchased DivX file is not allowed. (Only DivX
files matched with the registration code of the purchased TV are playable.)

Select U

US

SB

B.

Select D

Diivvxx  R

Reeg

g..  C

Co

od

dee.

Display D

Diivvxx   R

Reeg

g..   C

Co

od

dee.

1

MENU

3

2

OK 

OK 

• 

Press the M

ME

EN

NU

U button to return to normal TV viewing.

• 

Press the R

RE

ET

TU

UR

RN

N button to move to the previous menu screen.

DivX Reg. Code 

DivX Reg. Code 

OK

Move

Photo List

Music List

Movie List

DivX Reg. Code 

Deactivation

USB

DivX Reg. Code 

DivX(R) Video On Demand
Your registration code is : xxx xxxxxxx
To learn more visit www.divx.com/vod

Close

ii

NOTE

!

G

G

Video Codec : MPEG1, MPEG2, MPEG4

(Doesn’t support Microsoft MPEG4-V2, V3)

, DivX3.xx, DivX4.xx, 

DivX5.xx, DivX VOD(DRM), XviD

, DivX 6.xx(Playback)

G

G

When loading, some buttons may not work.

G

G

If you use the DivX registration code of another device, the rented or purchased DivX file cannot be 
played. Therefore always use the DivX registration code assigned to this product. 

Supported movie file

Resolution : under 720x480(720x576) WxH pixels.

Frame rate : under 30 frames/sec

Содержание 42PQ2 series

Страница 1: ...cover and quote this information To your dealer when requiring any service ENGLISH This feature is not available for all models This product qualifies for ENERGY STAR in the factory default Home Use mode setting and this is the setting in which power savings will be achieved Changing the factory default picture setting or enabling other features will increase power consumption that could exceed th...

Страница 2: ......

Страница 3: ...y wipe any stains or fingerprints on the surface of the TV with the polishing cloth Do not use excessive force This may cause scratching or discolouration FAV MUTE MARK POWER Q MENU MENU FREEZE AV MODE RETURN OK 1 2 3 4 5 6 7 8 0 9 Q VIEW LIST P A G E RATIO SLEEP ENERGY SAVING Protection cover Refer to p 9 Cable Holder Refer to P 9 Bolts for stand assembly Refer to P 7 x 4 x 2 or FAV MARK MENU LIS...

Страница 4: ...ode 72 Picture Reset 73 Image Sticking Minimization ISM Method 74 Demo mode 75 Mode setting 76 AV Mode 47 key Lock 48 Initializing Reset to original factory settings 49 EXTERNAL EQUIPMENT SETUP HD Receiver Setup 12 DVD Setup 15 VCR Setup 18 Other A V Source Setup 21 Usb in Setup 21 PC Setup 22 Screen Setup for PC Mode 24 WATCHING TV PROGRAMME CONTROL REMOTE CONTROL KEY FUNCTIONS 28 Turning on the ...

Страница 5: ...up 83 I II Stereo Dual Reception 84 NICAM Reception 85 Speaker Sound Output Selection 85 On Screen Menu Language Country Selection 86 TELETEXT Switch on off 90 SIMPLE Text 90 TOP Text 90 FASTEXT 91 Special Teletext Functions 91 APPENDIX Troubleshooting 92 Maintenance 94 Product Specifications 95 IR Codes 97 External Control Device Setup 99 TIME SETTING Clock Setup 87 Auto on off timer setting 88 S...

Страница 6: ...uminates red in standby mode Illuminates blue when the TV is switched on Intelligent Sensor Adjusts picture according to the surrounding conditions Remote Control Sensor G G When the TV cannot be turned on with the remote control press the main power button on the TV When the power is turned off with the main power button on the TV it will not be turned on with the remote control CAUTION ...

Страница 7: ... conditions R Re em mo ot te e C Co on nt tr ro ol l S Se en ns so or r P Po ow we er r S St ta an nd db by y I In nd di ic ca at to or r Illuminates red in standby mode Illuminates blue when the TV is switched on Power Standby Indicator Illuminates red in standby mode The LED is off while the TV remains on 42 50PQ6 I In nt te el ll li ig ge en nt t S Se en ns so or r Adjusts picture according to ...

Страница 8: ... used for Service or Hotel mode RGB Input Connect the output from a PC Antenna Input Connect RF antenna to this jack RGB DVI Audio Input Connect the audio from a PC or DTV USB Input 42 50PQ2 Service only 42 50PQ3 Used for Photo and Music 42 50PQ6 Used for Photo Music and Movie Audio Video Input AV3 Connect audio video output from an external device to these jacks 1 6 7 8 9 10 2 3 4 4 5 R R AV 1 AV...

Страница 9: ... If you tighten the bolt with excessive force the boltcan deviate from abrasion of the tightening part of the bolt Carefully place the TV screen side down on a cushioned surface to protect the screen from damage Assemble the TV as shown Fix the 4 bolts securely using the holes in the back of the TV 1 2 3 G G When assembling the stand make sure to distinguish and assemble the front and rear side of...

Страница 10: ...m the TV NOTE G When moving the TV undo the cords first G Use a platform or cabinet strong and large enough to support the size and weight of the TV G To use the TV safely make sure that the height of the bracket on the wall and on the TV is the same 2 3 1 1 2 Use the eye bolts or TV brackets bolts to fix the product to the wall as shown in the picture If your TV has bolts in the eyebolts loosen t...

Страница 11: ... R into the TV until clicking sound NOT USING THE DESK TYPE STAND Protection cover Power Supply Circuit breaker EARTHING Ensure that you connect the earth wire to prevent possible electric shock If grounding methods are not possible have a qualified electrician install a separate circuit breaker Do not try to earth the TV by connecting it to telephone wires lightening rods or gas pipes BACK COVER ...

Страница 12: ...ural rock brick and hollow block G Installing screw type and length depends on the wall mount used Further information refer to the instructions included with the mount G LG is not liable for any accidents or damage to property or TV due to incorrect installation Where a non compliant VESA wall mount is used Incorrect fastening of screws to surface which may cause TV to fall and cause personal inj...

Страница 13: ...ade between the devices Multi family Dwellings Apartments Connect to wall antenna socket Single family Dwellings Houses Connect to wall jack for outdoor antenna Outdoor Antenna VHF UHF Wall Antenna Socket RF Coaxial Wire 75 ohm Antenna UHF Signal Amplifier VHF In poor signal areas to achieve better picture quality it may be necessary to install a signal amplifier to the antenna as shown above If s...

Страница 14: ...ideo outputs Y PB PR of the digital set top box to the C CO OM MP PO ON NE EN NT T I IN N V VI ID DE EO O jacks on the TV Connect the audio output of the digital set top box to the C CO OM MP PO ON NE EN NT T I IN N A AU UD DI IO O jacks on the TV Turn on the digital set top box Refer to the owner s manual for the digital set top box Select C Co om mp po on ne en nt t input source using the I IN N...

Страница 15: ...N NP PU UT T button on the remote control Turn on the digital set top box Refer to the owner s manual for the digital set top box 2 3 1 AV 1 V 1 AV 2 V 2 RGB PC RS 232C IN CONTROL SERVICE HDMI 1 2 HDMI DVI IN HDMI IN 1 G G Check your HDMI cable is over version 1 3 If the HDMI cables don t support HDMI version 1 3 it can cause flickers or no screen display In this case use the latest cables that su...

Страница 16: ...V VI I I IN N 1 1 jack on the TV Connect the audio output of the digital set top box to the A AU UD DI IO O I IN N R RG GB B D DV VI I jack on the TV Turn on the digital set top box Refer to the owner s manual for the digital set top box Select H HD DM MI I1 1 input source using the I IN NP PU UT T button on the remote control 2 3 4 1 Connecting with a HDMI to DVI cable G G Audio format was resete...

Страница 17: ...eo outputs Y PB PR of the DVD to the C CO OM MP PO ON NE EN NT T I IN N V VI ID DE EO O jacks on the TV Connect the audio outputs of the DVD to the C CO OM MP PO ON NE EN NT T I IN N A AU UD DI IO O jacks on the TV Turn on the DVD player insert a DVD Select C Co om mp po on ne en nt t input source using the I IN NP PU UT T button on the remote control Refer to the DVD player s manual for operating...

Страница 18: ...efer to the DVD player s manual for operating instructions 2 3 4 1 ANTENNA IN RGB PC R L Y PB PR VIDEO AUDIO COMPONENT 32C IN L SERVICE IN AUDIO IN RGB DVI HDMI 1 2 MI DVI IN HDMI IN AV 1 AV 2 R AUDIO L AUDIO VIDEO AV 1 AV 2 1 NOTE G G Any Euro scart cable used must be signal shielded Scart AV1 AV2 Input Video Audio RGB Output Video Audio ATV only ATV output is available O O O O O X Analogue TV AV...

Страница 19: ... button on the remote control Refer to the DVD player s manual for operating instructions 1 2 3 G G The TV can receive video and audio signals simultaneously when using a HDMI cable G G If the DVD does not support Auto HDMI you must set the output resolution appropriately G G Check HDMI cable over version 1 3 If the HDMI cables don t support HDMI version 1 3 it can cause flickers or no screen disp...

Страница 20: ... To avoid picture noise interference allow adequate distance between the VCR and TV Connect the A AN NT T O OU UT T socket of the VCR to the A AN NT TE EN NN NA A I IN N socket on the TV Connect the antenna cable to the A AN NT T I IN N socket of the VCR Press the P PL LA AY Y button on the VCR and match the appropriate programme between the TV and VCR for viewing 1 2 2 3 1 ...

Страница 21: ...ro scart socket select A AV V2 2 input source 2 3 1 NOTE G G Any Euro scart cable used must be signal shielded ANTENNA IN RGB PC R L Y PB PR VIDEO AUDIO COMPONENT 32C IN SERVICE IN AUDIO IN RGB DVI HDMI 1 2 MI DVI IN HDMI IN AV 1 AV 2 R AUDIO L AUDIO VIDEO AV 1 AV 2 1 Scart AV1 AV2 Input Video Audio RGB Output Video Audio ATV only ATV output is available O O O O O X Analogue TV AV1 2 3 Component R...

Страница 22: ...O O jacks between TV and VCR Match the jack colours Video yellow Audio Left white and Audio Right red Insert a video tape into the VCR and press PLAY on the VCR Refer to the VCR owner s manual Select A AV V3 3 input source using the I IN NP PU UT T button on the remote control 1 2 3 G G If you have a mono VCR connect the audio cable from the VCR to the A AU UD DI IO O L L M MO ON NO O jack of the ...

Страница 23: ...G p p 5 50 0 2 1 1 OTHER A V SOURCE SETUP Connect the A AU UD DI IO O V VI ID DE EO O jacks between TV and external equipment Match the jack colours Video yellow Audio Left white and Audio Right red Select A AV V3 3 input source using the I IN NP PU UT T button on the remote control Operate the corresponding external equipment Refer to external equipment operating guide 1 2 3 AV IN 3 L MONO R AUDI...

Страница 24: ...This TV provides Plug and Play capability meaning that the PC adjusts automatically to the TV s settings Connecting with a D sub 15 pin cable Connect the RGB output of the PC to the R RG GB B P PC C jack on the TV Connect the PC audio output to the A AU UD DI IO O I IN N R RG GB B D DV VI I jack on the TV Turn on the TV and the PC Select R RG GB B input source using the I IN NP PU UT T button on t...

Страница 25: ...ing to resolution vertical pattern contrast or brightness in PC mode Change the PC mode to another resolu tion or change the refresh rate to another rate or adjust the brightness and contrast on the menu until the picture is clear If the refresh rate of the PC graphic card can not be changed change the PC graphic card or consult the manufacturer of the PC graphic card G G The synchronization input...

Страница 26: ...T TU UR RE E Select S Sc cr re ee en n 3 Select R Re es se et t OK Move Contrast 100 Brightness 50 Sharpness 70 Colour 70 Tint 0 Advanced Control Picture Reset Screen PICTURE E Screen 2 OK OK R G Press the M ME EN NU U button to return to normal TV viewing Press the R RE ET TU UR RN N button to move to the previous menu screen Select Y Ye es s Run R Re es se et t 4 OK 5 OK To Set Auto Config Scree...

Страница 27: ...e P Ph ha as se e operate only in RGB mode Adjustment for screen Position Size Phase Select P PI IC CT TU UR RE E Select S Sc cr re ee en n Select P Po os si it ti io on n S Si iz ze e or P Ph ha as se e Make appropriate adjustments 1MENU 3 4 2 OK OK Press the M ME EN NU U button to return to normal TV viewing Press the R RE ET TU UR RN N button to move to the previous menu screen OK Move Contrast...

Страница 28: ...esolution Except 42PQ2 42PQ3 42PQ6 Select P PI IC CT TU UR RE E Select S Sc cr re ee en n Select R Re es so ol lu ut ti io on n Select the desired resolution 1024 x 768 1280 x 768 1360 x 768 1MENU 3 4 2 OK OK Press the M ME EN NU U button to return to normal TV viewing Press the R RE ET TU UR RN N button to move to the previous menu screen OK Move Contrast 100 Brightness 50 Sharpness 70 Colour 70 ...

Страница 29: ...till not correct try Auto adjustment again If picture needs to be adjusted again after Auto adjustment in RGB PC you can adjust the P Po os si it ti io on n S Si iz ze e or P Ph ha as se e Select P PI IC CT TU UR RE E Select S Sc cr re ee en n Select A Au ut to o C Co on nf fi ig g 1MENU 3 2 OK OK Press the M ME EN NU U button to return to normal TV viewing Press the R RE ET TU UR RN N button to m...

Страница 30: ...to standby External input mode rotate in regular sequence Switches the TV on from standby Adjust the power saving mode of the TV 0 9 number button LIST Q VIEW VOLUME UP DOWN MUTE Programme UP DOWN PAGE UP DOWN Selects a programme Selects numbered items in a menu Displays the programme table Returns to the previously viewed programme Adjusts the volume Switches the sound on or off Selects a program...

Страница 31: ... control buttons FAV MARK Q MENU FREEZE Controls SIMPLINK or USB menu Displays the selected favourite programme Check and un check programmes in the USB menu Except 42 50PQ2 See a list of AV devices connected to TV When you toggle this button the Simplink menu appears at the screen G G p p 4 43 3 Select the desired quick menu source G G p p 3 33 3 Pause the present picture at the screen It doesn t...

Страница 32: ... 3 Selects a menu Clears all on screen displays and returns to TV viewing from any menu Pause the present picture at the screen It doesn t work at USB Mode The TV returns to normal viewing automatically if no signal is received or no operation is performed for 5 minutes THUMBSTICK Up Down Left Right OK Allows you to navigate the on screen menus and adjust the system settings to your preference Acc...

Страница 33: ...vourite programme Switches the sound on or off Selects a programme Move from one full set of screen information to the next one Selects a programme Selects numbered items in a menu Displays the programme table Returns to the previously viewed programme Installing Batteries Open the battery compartment cover on the back and install the batteries matching correct polarity with with Install two 1 5V ...

Страница 34: ...re Demo mode is the optimal setting for store environments If a user modifies image quality data Store Demo mode initializes the product to the image quality set by us after a certain period of time e The mode Home Use Store Demo can be changed by executing Mode Setting in the OPTION menu If the OSD On Screen Display is displayed on the screen after turning on the TV you can adjust the L La an ng ...

Страница 35: ...ti io o Selects your desired picture format For Zoom Setting select 16 9 Original 4 3 14 9 Zoom et Cinema Zoom1 in Ratio Menu After completing Zoom Setting the display goes back to Q Menu P Pi ic ct tu ur re e M Mo od de e Selects your desired Picture Mode S So ou un nd d M Mo od de e It is a feature to automatically set the sound combination which it deems the best for the images being watched Se...

Страница 36: ...e Edit SETUP SETUP OPTION PICTURE AUDIO TIME USB INPUT OK Move Aspect Ratio 16 9 Energy Saving On Picture Mode Vivid Contrast 100 Brightness 50 Sharpness 70 Colour 70 Tint 0 PICTURE E OK Move AUDIO OK Move Clock Off Time Off On Time Off Sleep Timer Off TIME OK Move Photo List Music List Movie List DivX Reg Code Deactivation or or USB OK Move TV AV1 AV2 AV3 Component RGB HDMI1 HDMI2 INPUT OK Move M...

Страница 37: ...No o Select S SE ET TU UP P Select A Au ut to o T Tu un ni in ng g Select Y Ye es s Run A Au ut to o t tu un ni in ng g OK Move Auto Tuning Manual Tuning Programme Edit SETUP Auto Tuning OK Move Auto Tuning Manual Tuning Programme Edit SETUP Auto Tuning 1MENU 3 2 OK OK 4 OK Press the M ME EN NU U button to return to normal TV viewing Press the R RE ET TU UR RN N button to move to the previous menu...

Страница 38: ... l T Tu un ni in ng g Select the desired pro gramme number on Select a TV system Select V V U UH HF F or C Ca ab bl le e Commence searching Select the desired channel number or OK Move Auto Tuning Manual Tuning Programme Edit SETUP Manual Tuning OK Move Auto Tuning Manual Tuning Programme Edit SETUP Manual Tuning Storage F F 1 G G System BG Band V UHF Channel Fine F F G G F F G G Search 0 Name C 0...

Страница 39: ...al Tuning OK Move Auto Tuning Manual Tuning Programme Edit SETUP Manual Tuning Select S St to or re e Select S St to or re e 5 Fine tune for the best picture and sound 1MENU 2 OK 1MENU 2 OK 3 4 OK 4 Select the position and make your choice of the second character and so on You can use an the alphabet A A to Z Z the number 0 0 to 9 9 and blank OK OK Press the M ME EN NU U button to return to normal...

Страница 40: ... programmes Select S SE ET TU UP P Select P Pr ro og gr ra am mm me e E Ed di it t Enter the P Pr ro og gr ra am mm me e E Ed di it t Select a programme to be stored or skipped C05 6 Pr Change Page Change P TV 0 1 C 01 2 C 04 3 C 05 4 BLN 2 5 S02 6 C05 7 C06 8 C07 9 C12 10 BBC1 11 C25 12 C40 13 C50 14 C52 15 C61 Navigation Previous Skip OK Move Auto Tuning Manual Tuning Programme Edit SETUP Progra...

Страница 41: ...ed programme 1 The selected programme is deleted all the following programmes are shifted up one position A Moving a programme Select a programme number to be moved Turn the moved programme number to YELLOW 3 YELL YELLO OW W Release the moved programme 1 When a programme number is skipped it means that you will be unable to select it using the P button during normal TV viewing If you wish to selec...

Страница 42: ...number 1 LIST A Displaying programme list A Selecting a programme in the programme list You may find some blue programmes These have been set up to be skipped by auto pro gramming or in the programme edit mode Some programmes with the channel number shown in the programme list indicate there is no station name assigned Turn the pages 2 Return to normal TV viewing A Paging through a programme list ...

Страница 43: ...e List A Displaying the favourite programme list FAV MARK Select your desired programme Select F Fa av vo ou ur ri it te e A Selecting favourite programme 1 4 5 6 7 8 0 9 2 3 2Q MENU 4Q MENU 3 1 or P P A G E Select F Fa av vo ou ur ri it te e Return to TV viewing This will automatically include the selected programme into your favourite programme list Favourite List 1 C 01 2 C 02 2 C 02 Exit Q Men...

Страница 44: ...he TV A AV V Select it when watching the VCR or external equipment C Co om mp po on ne en nt t Select it when using DVD or Digital set top box depends on connector R RG GB B Select it when using PC depends on connector H HD DM MI I Select it when using DVD or Digital set top box depend on connector You can also adjust I IN NP PU UT T menu Only 42 50PQ2 OK Move TV AV1 AV2 AV3 Component RGB HDMI1 HD...

Страница 45: ...quire the SIMPLINK menu select Off Select O OP PT TI IO ON N Select S SI IM MP PL LI IN NK K Select O On n or O Of ff f Save OK Move Menu Language English Country Austria Input Label SIMPLINK On Key Lock Off Set ID 1 ISM Method Normal Demo Mode Off OPTION SIMPLINK On OK Move Menu Language English Country Austria Input Label SIMPLINK On Key Lock Off Set ID 1 ISM Method Normal Demo Mode Off OPTION S...

Страница 46: ...h off the TV all connected devices are turned off S Sw wi it tc ch h a au ud di io o o ou ut t Offers an easy way to switch audio out Sync Power on When the equipment with Simplink function connected HDMI terminal starts to play The TV will change automatically to turn on mode A A d de ev viic ce e w wh hiic ch h iis s c co on nn ne ec ct te ed d t to o t th he e T TV V t th hr ro ou ug gh h a a H...

Страница 47: ... the H HD DM MI I D DV VI I I IN N 1 1 H HD DM MI I I IN N 2 2 or H HD DM MI I I IN N3 3 Except 42 50PQ2 42 50PQ3 terminal on the back of the TV and the HDMI output terminal of the Home Theater using HDMI cables Connect the Audio output terminal on the back of the TV and the Audio input terminal of the Home Theater using optical cables Select Home Theater in the Speaker menu by pushing the S SI IM...

Страница 48: ... N Select I In np pu ut t L La ab be el l Select the source Select the label Input Label OK Move Menu Language English Country Austria Input Label SIMPLINK On Key Lock Off Set ID 1 ISM Method Normal Demo Mode Off OPTION Input Label AV1 AV2 AV3 Component RGB HDMI1 HDMI2 HDMI3 F F G G Close 1MENU 3 2 OK OK 4 Press the M ME EN NU U button to return to normal TV viewing Press the R RE ET TU UR RN N bu...

Страница 49: ...o for playing games 1AV MODE 2 If you select C Ci in ne em ma a in AV mode C Ci in ne em ma a will be selected both for P Pi ic ct tu ur re e M Mo od de e and S So ou un nd d M Mo od de e in P PI IC CT TU UR RE E menu and A AU UD DI IO O menu respectively If you select O Of ff f in A AV V m mo od de e the picture and image which you ini tially set will be selected Off Cinema Game Sport Press the A...

Страница 50: ... the previous menu screen OK Move Menu Language English Country Austria Input Label SIMPLINK On Key Lock Off Set ID 1 ISM Method Normal Demo Mode Off OPTION Key Lock Off OK Move Menu Language English Country Austria Input Label SIMPLINK On Key Lock Off Set ID 1 ISM Method Normal Demo Mode Off OPTION Key Lock Off Off On On E E In K Ke ey y L Lo oc ck k O On n if the TV is turned off to turn on the ...

Страница 51: ...ti in ng g 1MENU 2 OK Press the M ME EN NU U button to return to normal TV viewing Press the R RE ET TU UR RN N button to move to the previous menu screen OK Move Input Label SIMPLINK On Key Lock Off Set ID 1 ISM Method Normal Demo Mode Off Mode Setting Home Use Initial Setting OPTION Initial Setting OK Move Input Label SIMPLINK On Key Lock Off Set ID 1 ISM Method Normal Demo Mode Off Mode Setting...

Страница 52: ...If connected with cable is not offered by USB maker or an excessively long cable the device may not be recognized G G Some USB storage devices may not be supported or operated smoothly G G Maximum of 999 files and folders can be recognized G G Data in a USB storage device cannot be aligned Up to 128 English characters can be recognized as a file name G G Please back up the important file because a...

Страница 53: ...KY103 2009 11 11 KY104 2009 11 11 KY105 2009 11 11 KY106 2009 11 11 KY107 2009 11 11 KY108 2009 11 11 KY109 2009 11 11 KY110 2009 11 11 KY111 2009 11 11 KY112 2009 11 11 KY113 2009 11 11 USB Device Page 2 3 No Marked PHOTO LIST Up Folder Free Space 150MB 1366x768 125KB Up Folder 2 3 4 1 Select U US SB B Select P Ph ho ot to o L Li is st t 2 Drive1 1MENU OK OK Navigation Option Page Change Mark Exi...

Страница 54: ... 11 KY110 2009 11 11 KY111 2009 11 11 KY112 2009 11 11 KY113 2009 11 11 USB Device Page 2 3 No Marked PHOTO LIST Up Folder Free Space 150MB 1366x768 125KB Up Folder Drive1 KY101 Navigation Option Page Change Mark Exit MARK P KY101 2009 11 11 KY102 2009 11 11 KY103 2009 11 11 KY104 2009 11 11 KY105 2009 11 11 KY106 2009 11 11 KY107 2009 11 11 KY108 2009 11 11 KY109 2009 11 11 KY110 2009 11 11 KY111...

Страница 55: ...he previous menu screen 1 17 Slideshow BGM Delete Option Hide Select the target folder or drive Select the desired photos Show the PopUp menu 5 Select V Vi ie ew w The selected photo is displayed in full size 2 3 1 4 OK OK OK P KY101 2009 11 11 KY102 2009 11 11 KY103 2009 11 11 KY104 2009 11 11 KY105 2009 11 11 KY106 2009 11 11 KY107 2009 11 11 KY108 2009 11 11 KY109 2009 11 11 KY110 2009 11 11 KY...

Страница 56: ...n Set values for S Sl li id de e S Sp pe ee ed d and M Mu us si ic c F Fo ol ld de er r Use button and O OK K button to set values Then go to and press O OK K to save the settings You cannot change M Mu us si ic c F Fo ol ld de er r while BGM is playing G G H Hi id de e Hide the menu on the full sized screen To see the menu again on the full sized screen press O OK K button to display OK Select th...

Страница 57: ... opera tion Screen Components MUSIC MP3 supporting file Bit rate 32k 320kbps Sampling rate MPEG1 layer 3 32k 48kHz P Moves to upper level folder Current page Total pages Total number of marked music title Usable USB memory Corresponding buttons on the remote control 1 3 4 5 2 Select U US SB B Select M Mu us si ic c L Li is st t 1 2 1MENU OK OK USB Device Page 2 3 No Marked MUSIC LIST Up Folder Fre...

Страница 58: ... music titles and then move to the Photo List G G M Ma ar rk k A Al ll l Mark all music titles in the folder G G U Un nm ma ar rk k A Al ll l Deselect all marked music titles G G D De el le et te e Delete the selected music titles G G C Cl lo os se e Close the pop up menu Use the P P button to navigation in the music page Use M MA AR RK K button to mark or unmark a music When one or more music fil...

Страница 59: ...tle G G A damaged or corrupted music does not play but displays 00 00 in playtime G G A music downloaded from a paid service with copyright protection does not start but displays inappropri ate information in playtime G G If you press O OK K A A buttons screen saver is stopped G G This TV can not play music files less than 32 Kbytes G G The P PL LA AY Y G G P Pa au us se e I II I A A G GG G F FF F...

Страница 60: ...format smi srt sub MicroDVD SubViewer 2 0 ass ssa txt DVD Subtitle System DivX may not be played depending on its types or recording methods If the video and audio structure of recorded file is not interleaved either video or audio is outputted M Ma ax x b bi it tr ra at te e o of f p pl la ay ya ab bl le e D Di iv vX X i is s 4 4M Mb bp ps s Maximum FPS Frame Per Second can be reached only at SD ...

Страница 61: ...o Marked MOVIE LIST Up Folder Free Space 150MB Navigation Option Page Change Mark Exit 720x576 120KB Up Folder 2 3 4 5 1 Movie MARK Title Duration NOTE G G A DivX movie file and its subtitle file must be located in the same folder G G A video file name and its subtitle file name must be identical for it to be displayed G G Use the left right keys to move to a specific frame forward or backward whi...

Страница 62: ... playback Stop the play ing movie titles G G M Ma ar rk k A Al ll l Mark all movie titles in the folder G G U Un nm ma ar rk k A Al ll l Deselect all marked movie titles G G D De el le et te e Delete the selected movie titles G G C Cl lo os se e Close the pop up menu In the case of files not supported a message regarding non supported file is displayed This file is invalid As shown up to 6 movie t...

Страница 63: ...ng gu ua ag ge e S Su ub bt ti it tl le e L La an ng gu ua ag ge e S Sy yn nc c or P Po os si it ti io on n Using the remote control When playing repeatedly press the R RE EW W F FF F button to speed up F FF F F FF FF F F FF FF FF F F FF FF FF FF F F FF FF FF FF FF F repeatedly press the F FF F G GG G button to speed up G GG G G GG GG G G GG GG GG G G GG GG GG GG G G GG GG GG GG GG G Pressing thes...

Страница 64: ...Select D Di iv vx x R Re eg g C Co od de e Display D Di iv vx x R Re eg g C Co od de e 1MENU 3 2 OK OK Press the M ME EN NU U button to return to normal TV viewing Press the R RE ET TU UR RN N button to move to the previous menu screen DivX Reg Code DivX Reg Code OK Move Photo List Music List Movie List DivX Reg Code Deactivation USB DivX Reg Code DivX R Video On Demand Your registration code is x...

Страница 65: ...elect D De ea ac ct ti iv va at ti io on n 1MENU 2 OK Select Y Ye es s or N No o 3 OK 4 OK Press the M ME EN NU U button to return to normal TV viewing Press the R RE ET TU UR RN N button to move to the previous menu screen OK Move Photo List Music List Movie List DivX Reg Code Deactivation USB Deactivation OK Move Photo List Music List Movie List DivX Reg Code Deactivation USB Deactivation Yes Di...

Страница 66: ...e format broadcast 4 4 3 3 The following selection will allow you to view a picture with an original 4 3 aspect ration gray bars will appear on both the left and right of the screen PICTURE SIZE ASPECT RATIO CONTROL You can watch the screen in various picture formats 1 16 6 9 9 J Ju us st t S Sc ca an n O Or ri ig gi in na al l 4 4 3 3 1 14 4 9 9 Z Zo oo om m and C Ci in ne em ma a Z Zo oo om m1 1...

Страница 67: ...om of the picture will be cropped C Ci in ne em ma a Z Zo oo om m1 1 Choose Cinema Zoom when you wish the pic ture to be altered both horizontally extended and vertically cropped The picture adopting a compromise between alteration and screen coverage The adjustment range is 1 16 NOTE G G You can only select 4 4 3 3 1 16 6 9 9 Wide 1 14 4 9 9 Z Zo oo om m C Ci in ne em ma a Z Zo oo om m1 1 in Comp...

Страница 68: ... button to return to normal TV viewing Press the R RE ET TU UR RN N button to move to the previous menu screen Energy Saving Intelligent Sensor Energy Saving Intelligent Sensor Intelligent Sensor Off Minimum Medium Maximum F F High G G When the Intelligent sensor function is on the most suitable picture is automatically adjusted according to the surrounding conditions I In nt te el ll li ig ge en ...

Страница 69: ... You can also adjust P Pi ic ct tu ur re e M Mo od de e in the Q Q M Me en nu u 1MENU 3 2 OK OK Press the M ME EN NU U button to return to normal TV viewing Press the R RE ET TU UR RN N button to move to the previous menu screen V Vi iv vi id d Strengthen the contrast brightness colour and sharpness for vivid picture S St ta an nd da ar rd d The most general screen display status C Ci in ne em ma ...

Страница 70: ... enhance hotter colours such as red or set to cool to see less intense colours with more blue Select P PI IC CT TU UR RE E Select A Ad dv va an nc ce ed d C Co on nt tr ro ol l Select C Co ol lo ou ur r T Te em mp pe er ra at tu ur re e Select either C Co oo ol l M Me ed di iu um m or W Wa ar rm m Colour Temperature F F Medium G G Dynamic Contrast High Dynamic Colour High Noise Reduction Medium Ga...

Страница 71: ...s the amount of white in the picture S Sh ha ar rp pn ne es ss s Adjusts the level of crispness in the edges between the light and dark areas of the picture The lower the level the softer the image C Co ol lo ou ur r Adjusts intensity of all colours T Ti in nt t Adjusts the balance between red and green levels 1MENU 3 2 OK OK 4 OK 5 OK Press the M ME EN NU U button to return to normal TV viewing P...

Страница 72: ... Mosquito Block G Ga am mm ma a L Lo ow w M Me ed di iu um m H Hi ig gh h You can adjust brightness of dark area and middle gray level area of the picture Low Make dark and middle gray level area of the picture brighten Medium Express original picture gradation High Make dark and middle gray level area of the picture darken Select P PI IC CT TU UR RE E Select A Ad dv va an nc ce ed d C Co on nt tr...

Страница 73: ...izing the black level of the screen and set it to High or Low automatically 1MENU 3 2 OK OK 4 Press the M ME EN NU U button to return to normal TV viewing Press the R RE ET TU UR RN N button to move to the previous menu screen OK Move Contrast 100 Brightness 50 Sharpness 70 Colour 70 Tint 0 Advanced Control Picture Reset Screen PICTURE Advanced Control OK Move Contrast 100 Brightness 50 Sharpness ...

Страница 74: ...e M ME EN NU U button to return to normal TV viewing Press the R RE ET TU UR RN N button to move to the previous menu screen OK Move Contrast 100 Brightness 50 Sharpness 70 Colour 70 Tint 0 Advanced Control Picture Reset Screen PICTURE Advanced Control OK Move Contrast 100 Brightness 50 Sharpness 70 Colour 70 Tint 0 Advanced Control Picture Reset Screen PICTURE E E Advanced Control R G 5 OK Colour...

Страница 75: ...K Press the M ME EN NU U button to return to normal TV viewing Press the R RE ET TU UR RN N button to move to the previous menu screen OK Move Contrast 100 Brightness 50 Sharpness 70 Colour 70 Tint 0 Advanced Control Picture Reset Screen PICTURE Picture Reset OK Move Contrast 100 Brightness 50 Sharpness 70 Colour 70 Tint 0 Advanced Control Picture Reset Screen PICTURE E E Picture Reset R G R G Res...

Страница 76: ...Co ol lo ou ur r W Wa as sh h The colour block with the screen moved a little and the white pattern are alternately displayed It is difficult to sense the afterimage occurred while the temporary afterimage is removed and the colour pattern is operating Select O OP PT TI IO ON N Select I IS SM M M Me et th ho od d Select N No or rm ma al l O Or rb bi it te er r C Co ol lo ou ur r W Wa as sh h or W ...

Страница 77: ...m mo o M Mo od de e Select O On n or O Of ff f To stop the D De em mo o M Mo od de e press any button 1MENU 3 2 OK OK OK Move Menu Language English Country Austria Input Label SIMPLINK On Key Lock Off Set ID 1 ISM Method Normal Demo Mode Off OPTION Demo Mode Off OK Move Menu Language English Country Austria Input Label SIMPLINK On Key Lock Off Set ID 1 ISM Method Normal Demo Mode Off OPTION E E De...

Страница 78: ...ect S St to or re e D De em mo o or H Ho om me e U Us se e Save 1MENU 3 2 OK OK OK Press the R RE ET TU UR RN N button to return to normal TV viewing Selecting the environment Choose the setting mode you want Store Demo Home Use Select Home Use to use this TV at home To use this TV at store select Store Demo Mode Setting OK Move Input Label SIMPLINK On Key Lock Off Set ID 1 ISM Method Normal Demo ...

Страница 79: ...ents for each programme Select A AU UD DI IO O Select A Au ut to o V Vo ol lu um me e Select O On n or O Of ff f 1MENU 3 2 OK OK Press the M ME EN NU U button to return to normal TV viewing Press the R RE ET TU UR RN N button to move to the previous menu screen Auto Volume Off Clear Voice II Off Level 3 Balance 0 Sound Mode Standard SRS TruSurround XT Off Treble 50 Bass 50 OK Move AUDIO E Auto Vol...

Страница 80: ...m ma a Optimizes sound for watching movies S Sp po or rt t Optimizes sound for watching sports events G Ga am me e Optimizes sound for playing games Select A AU UD DI IO O Select S So ou un nd d M Mo od de e Select S St ta an nd da ar rd d M Mu us si ic c C Ci in ne em ma a S Sp po or rt t or G Ga am me e You can also adjust S So ou un nd d M Mo od de e in the Q Q M Me en nu u 1MENU 3 2 OK OK 4 OK...

Страница 81: ... On n or O Of ff f 1MENU 3 2 OK OK 4 OK 1MENU 3 2 OK OK 4 OK Make appropriate adjustments 5 OK 6 OK S SR RS S T Tr ru uS Su ur rr ro ou un nd d X XT T TruSurround XT is a patented SRS technology that solves the prob lem of playing 5 1 multicannel content over two speakers Auto Volume Off Clear Voice II Off Level 3 Balance 0 Sound Mode Standard SRS TruSurround XT Off Treble 50 Bass 50 OK Move AUDIO...

Страница 82: ...o human voices better Select A AU UD DI IO O Select C Cl le ea ar r V Vo oi ic ce e I II I Clear Voice II Off Clear Voice II Off Off On Off Select O On n or O Of ff f 1MENU 3 2 OK OK Press the M ME EN NU U button to return to normal TV viewing Press the R RE ET TU UR RN N button to move to the previous menu screen If you select O On n for C Cl le ea ar r V Vo oi ic ce e I II I S SR RS S T Tr ru uS...

Страница 83: ...ton to return to normal TV viewing Press the R RE ET TU UR RN N button to move to the previous menu screen Auto Volume Off Clear Voice II Off Level 3 Balance 0 Sound Mode Standard SRS TruSurround XT Off Treble 50 Bass 50 OK Move AUDIO E Balance 0 L R Auto Volume Off Clear Voice II Off Level 3 Balance 0 Sound Mode Standard SRS TruSurround XT Off Treble 50 Bass 50 OK Move AUDIO E Balance 0 L R Close...

Страница 84: ... OK Press the M ME EN NU U button to return to normal TV viewing Press the R RE ET TU UR RN N button to move to the previous menu screen E Level 3 Balance 0 Sound Mode Standard SRS TruSurround XT Off Treble 50 Bass 50 Reset TV Speaker On OK Move AUDIO L R Reset E Level 3 Balance 0 Sound Mode Standard SRS TruSurround XT Off Treble 50 Bass 50 Reset TV Speaker On OK Move AUDIO L R Reset Resetting sou...

Страница 85: ...HDMI to DVI cable the TV speaker can be operational even when there is no video signal If you wish to use an external Hi Fi system turn off the TV internal speakers Select A AU UD DI IO O Select T TV V S Sp pe ea ak ke er r Select O On n or O Of ff f 1MENU 3 2 OK OK Press the M ME EN NU U button to return to normal TV viewing Press the R RE ET TU UR RN N button to move to the previous menu screen ...

Страница 86: ...switch to DUAL I DUAL II or DUAL I II D DU UA AL L I I Sends the primary broadcast language to the loudspeakers D DU UA AL L I II I Sends the secondary broadcast language to the loudspeakers D DU UA AL L I I I II I Sends a separate language to each loudspeaker B Br ro oa ad dc ca as st t Mono Stereo Dual O On n S Sc cr re ee en n D Di is sp pl la ay y M MO ON NO O S ST TE ER RE EO O D DU UA AL L I...

Страница 87: ...audio L input is sent to the left loudspeaker and audio signal from audio R input is sent to the right loudspeaker L L L L Audio signal from audio L input is sent to left and right loudspeakers R R R R Audio signal from audio R input is sent to left and right loudspeakers When NICAM mono is received you can select N NI IC CA AM M M MO ON NO O When NICAM stereo is received you can select N NI IC CA...

Страница 88: ... N button or time out of OSD On Screen Display display it will continuously appear until completing set up whenever the set is turned on G G If you select wrong local country the teletext may not appear correctly on the screen and some problem may happen during teletext operation Select your desired language Select your country Select O OP PT TI IO ON N Select M Me en nu u L La an ng gu ua ag ge e...

Страница 89: ...E E Select C Cl lo oc ck k Select H Ho ou ur r or M Mi in nu ut te e OK Move Clock Off Time Off On Time Off Sleep Timer Off TIME OK Move Clock Off Time Off On Time Off Sleep Timer Off TIME Clock Clock Hour 16 Minute 09 Close 1MENU 3 2 OK OK Press the M ME EN NU U button to return to normal TV viewing Press the R RE ET TU UR RN N button to move to the previous menu screen Set the H Ho ou ur r or M ...

Страница 90: ...imer to work OK Move Clock Off Time Off On Time Off Sleep Timer Off TIME OK Move Clock Off Time Off On Time Off Sleep Timer Off TIME On Time Off On Time Off F F Off G G Hour 00 Minute 00 Close Press the M ME EN NU U button to return to normal TV viewing Press the R RE ET TU UR RN N button to move to the previous menu screen Programme 1 Volume 30 23 59 Select T TI IM ME E Select O Of ff f T Ti im m...

Страница 91: ...itches the TV to standby after the preset time has elapsed When you switch the TV off the preset sleep timer is cancelled You can also adjust S Sl le ee ep p T Ti im me er r in the T TI IM ME E menu Select S Sl le ee ep p T Ti im me er r Select O Of ff f 1 10 0 2 20 0 3 30 0 6 60 0 9 90 0 1 12 20 0 1 18 80 0 or 2 24 40 0 M Mi in n 1Q MENU 2 ...

Страница 92: ...Two page numbers TV station name date and time are displayed on the screen headline The first page number indicates your selection while the second shows the current page displayed Press the T TE EX XT T button to switch off teletext The previous mode reappears SWITCH ON OFF A A Page selection Enter the desired page number as a three digit number with the NUMBER buttons If during selection you pre...

Страница 93: ...he sub page number is displayed at the bottom of the screen To hold or change the sub page press the RED GREEN P P or NUMBER buttons Press again to exit this function A A H Ho ol ld d Stops the automatic page change which will occur if a teletext page consists of 2 or more sub pages The num ber of sub pages and the sub page displayed is usually shown on the screen below the time When this button i...

Страница 94: ...cast A Is the power cord inserted correctly into the mains A Check your antenna direction and or location A Test the mains outlet by plugging another TV into the same outlet A This is normal the image is muted during the TV startup process Please contact your service centre if the picture has not appeared after five minutes A Adjust Colour in menu option A Allow a sufficient distance between the T...

Страница 95: ... e in menu option A A change in ambient humidity or temperature may result in an unusual noise when the TV is switched on or off and does not indicate a fault with the TV A Check HDMI cable over version 1 3 A Check USB cable over version 2 0 Picture OK No sound Unusual sound from inside the TV No sound when connecting HDMI or USB No output from one of the speakers This feature is not available for...

Страница 96: ...er and a little fabric softener or dish washing detergent Wring the cloth until it is almost dry and then use it to wipe the screen Ensure there is no excess water on the screen Allow any water or dampness to evaporate before switching on Cleaning the Cabinet A To remove dirt or dust wipe the cabinet with a soft dry lint free cloth A Do not to use a wet cloth Extended Absence G If you expect to le...

Страница 97: ...dth x Height x Depth Weight Power requirement Power Consumption with stand without stand with stand without stand 1031 2 x 720 9 x 308 0 mm 40 5 x 28 3 x 12 1 inches 1031 2 x 656 7 x 80 8mm 40 5 x 25 8 x 3 1 inches 24 8 kg 54 6 lbs 22 7 kg 50 0 lbs AC100 240V 50 60Hz 320W 42PQ2 42PQ200R ZA 50PQ2 50PQ200R ZA MODELS 1031 2 x 720 9 x 308 0 mm 40 5 x 28 3 x 12 1 inches 1031 2 x 656 7 x 80 8 mm 40 5 x ...

Страница 98: ... S20 HYPER S21 S47 75 Ω 0 40 C 32 104 F Less than 80 20 60 C 4 140 F Less than 85 1040 8 x 725 8 x 308 0 mm 40 9 x 28 5 x 12 1 inches 1040 8 x 669 2 x 76 8 mm 40 9 x 26 3 x 3 0 inches 25 3 kg 55 7 lbs 23 3 kg 51 3 lbs AC100 240V 50 60Hz 320W 1228 8 x 824 6 x 353 0 mm 48 3 x 32 4 x 13 8 inches 1228 8 x 772 x 78 9 mm 48 3 x 30 39 x 3 1 inches 35 0 kg 77 1lbs 32 5 kg 71 6 lbs AC100 240V 50 60Hz 400W ...

Страница 99: ...4 C5 C6 C7 D0 D1 D2 D3 D4 D5 D6 D7 D0 D1 D2 D3 D4 D5 D6 D7 Lead code Low custom code High custom code Data code Data code Repeat code Tf 4 5 ms 9 ms 2 25 ms 9 ms 0 55 ms 0 56 ms 1 12 ms 0 56 ms 2 24 ms Tf Tf Tf 108ms 455KHz Bit 0 Bit 1 1 How to Connect A Connect your wired remote control to the Remote Control port on the TV 2 Remote Control IR Codes A Output waveform Single pulse modulated with 37...

Страница 100: ... R C BUTTON POWER ON OFF R C BUTTON R C BUTTON R C BUTTON R C BUTTON R C BUTTON R C BUTTON R C BUTTON R C BUTTON R C BUTTON R C BUTTON R C BUTTON R C BUTTON R C BUTTON R C BUTTON R C BUTTON R C BUTTON R C BUTTON R C BUTTON R C BUTTON R C BUTTON R C BUTTON R C BUTTON R C BUTTON R C BUTTON R C BUTTON R C BUTTON R C BUTTON R C BUTTON R C BUTTON R C BUTTON 95 08 0B 79 45 43 07 06 40 41 44 28 30 02 03 ...

Страница 101: ...he product Type of Connector D Sub 9 Pin Male No Pin Name 1 No connection 2 RXD Receive data 3 TXD Transmit data 4 DTR DTE side ready 5 GND 6 DSR DCE side ready 7 RTS Ready to send 8 CTS Clear to send 9 No Connection RS 232C IN CONTROL SERVICE 1 5 6 9 RS 232C Configurations 7 Wire Configurations Standard RS 232C cable PC TV RXD 2 3 TXD TXD 3 2 RXD GND 5 5 GND DTR 4 6 DSR DSR 6 4 DTR RTS 7 8 CTS CT...

Страница 102: ... adjustment range of SET ID is 1 99 OK Move 1MENU 3 2 OK OK OK Move Menu Language English Country Austria Input Label SIMPLINK On Key Lock Off Set ID 1 ISM Method Normal Demo Mode Off OPTION OK Move Menu Language English Country Austria Input Label SIMPLINK On Key Lock Off Set ID 1 ISM Method Normal Demo Mode Off OPTION Set ID 1 F F 1 G G Close Set ID 1 E E Press the R RE ET TU UR RN N button to m...

Страница 103: ...ond command to control the set Set ID You can adjust the set ID to choose desired TV ID number in Setup menu Adjustment range is 1 99 When selecting Set ID 0 every connected TV is controlled Set ID is indicated as decimal 1 99 on menu and as Hexa decimal 0x0 0x63 on transmission receiving protocol DATA To transmit command data Transmit FF data to read status of comand Cr Carriage Return ASCII code...

Страница 104: ... k k e e To control volume mute on off You can also adjust mute using the MUTE button on remote control In case of Video Out mute on only TV will display On Screen Display OSD But In case of Screen Mute On TV will not display OSD Data 00 Volume mute on Volume off Data 01 Volume mute off Volume on Transmission k e Set ID Data Cr Acknowledgement e Set ID OK NG Data x 0 05 5 V Vo ollu um me e C Co on...

Страница 105: ...Warm Transmission k u Set ID Data Cr Acknowledgement u Set ID OK NG Data x 1 15 5 T Tr re eb blle e C Co om mm ma an nd d k k r r To adjust treble Data Min 00 Max 64 Refer to Real data mapping 1 See page 104 Transmission k r Set ID Data Cr Acknowledgement r Set ID OK NG Data x 1 16 6 B Ba as ss s C Co om mm ma an nd d k k s s To adjust bass Data Min 00 Max 64 Refer to Real data mapping 1 See page ...

Страница 106: ...vi in ng g C Co om mm ma an nd d j j q q To reduce the power consumption of the TV Data 00 Low Power Off Data 01 Low Power Minimum Data 02 Low Power Medium Data 03 Low Power Maximum Data 10 Intelligent Sensor Low Data 1 1 Intelligent Sensor Middle Data 12 Intelligent Sensor High Transmission j q Set ID Data Cr Acknowledgement q Set ID OK NG Data x 1 18 8 I IS SM M M Me et th ho od d C Co om mm ma ...

Страница 107: ...m mm ma an nd d m m a a Tune Channel to following Physical number Data0 Data1 Program Nunber Data0 High byte Data1 Low byte Data2 Attribute x don t care A Ai ir r Transmission m a Set ID Data0 Data1 Data2 Cr Acknowledgement a Set ID OK Data0 Data1 x a Set ID NG Data0 x 7 Reserved 0 0 0 0 6 Reserved x x x x 5 Reserved 0 0 1 1 4 Reserved 0 1 0 1 RF Source ATV DTV Radio Reserved 3 Reserved x x 2 Rese...

Страница 108: ...External Input Input Number Acknowledgement b Set ID OK NG Data x 2 24 4 I In np pu ut t s se elle ec ct t C Co om mm ma an nd d x x b b M Ma aiin n P Piic ct tu ur re e I In np pu ut t To select input source for TV Data Structure Transmission x b Set ID Data Cr Input Number Data 0 0 0 0 Input1 0 0 1 1 Input4 0 0 1 0 Input3 0 0 0 1 Input2 ...

Страница 109: ......

Страница 110: ......

Отзывы: