background image

CONEXIONES DE EQ

UIPO EXTERNO

A

31

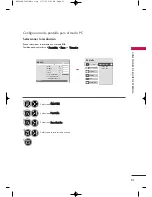
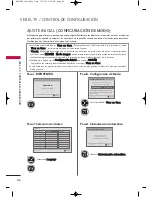
Seleccionar la resolución

Puede seleccionar la resolución en el modo RGB.

También pueden ajustarse la P

Po

ossiicciió

ón

n, la FFaasse

e y el T

Taam

maañ

ño

o.

Seleccione IIM

MA

AG

GE

EN

N.

Seleccione P

Paan

nttaallllaa.

Seleccione R

Reesso

ollu

ucciió

ón

n.

Seleccione la resolución deseada.

1

MENU

3

4

2

ENTER

5

Configuración de pantalla para el modo PC

Auto config.

Resolución

G

Posición

Tamaño

Fase

Restablecer

Pantalla

Mover

Prev.

1024 x 768

1280 x 768

1360 x 768

Ingresar

Mover

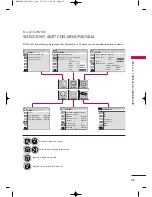
IMAGEN

E

W

C

• Brillo

50

• Nitidez

70

• Color

70

• Tinte

0

• Color Temperature

0

• Control Avanzado

•  Restablecer imagen

Pantalla

ENTER

ENTER

ENTER

MFL62883001-Edit1-sp  3/17/10 3:52 PM  Page 31

Содержание 42PJ250R

Страница 1: ...COLOR BLACK 3 Stock Paper Cover Coated paper S White 150 g Inside Uncoated paper 백상지 60 g 4 Printing Method Off set 5 Bindery Perfect bind 6 Language English Spanish 2 7 Number of pages 240 Changes REV NO MM DD YY SIGNATURE CHANGE NO CHANGE CONTENTS 1 2 3 4 5 7 6 8 9 This part contain Eco hazardous substances Pb Cd Hg Cr6 PBB PBDE etc within LG standard level Details should be followed Eco SCM man...

Страница 2: ...Pagination sheet Pagination sheet P NO MFL62883003 Total pages 240 2 Front cover LG EN P NO Rear cover LG EN 119 118 2 LG SP LG SP 118 119 ...

Страница 3: ...03 1003 REV01 www lg com OWNER S MANUAL PLASMA TV Please read this manual carefully before operating your set and retain it for future reference 42PJ250R 50PJ250R 42PJ260R 50PJ260R 42PJ350R 50PJ350R 50PK550R 60PK550R ...

Страница 4: ... exclamation point within an equilateral triangle is intended to alert the user to the presence of important operating and maintenance servicing instructions in the litera ture accompanying the appliance TO REDUCE THE RISK OF ELECTRIC SHOCK DO NOT REMOVE COVER OR BACK NO USER SERVICEABLE PARTS INSIDE REFER TO QUALIFIED SERVICE PERSONNEL WARNING CAUTION TO REDUCE THE RISK OF FIRE AND ELECTRIC SHOCK...

Страница 5: ...lt an electrician for replacement of the obsolete outlet Protect the power cord from being walked on or pinched particularly at plugs convenience receptacles and the point where they exit from the apparatus Only use attachments accessories specified by the manufacturer Use only with the cart stand tripod bracket or table specified by the manufacturer or sold with the apparatus When a cart is used ...

Страница 6: ...ttention to plugs wall outlets and the point where the cord exits the appliance Do not make the TV with the power cord plugged in Do not use a damaged or loose power cord Be sure do grasp the plug when unplugging the power cord Do not pull on the power cord to unplug the TV WARNING To reduce the risk of fire or electrical shock do not expose this product to rain moisture or other liquids Do not to...

Страница 7: ... on the front panel of the TV V Ve en nt ti il la at ti io on n Install your TV where there is proper ventila tion Do not install in a confined space such as a bookcase Do not cover the product with cloth or other materials e g plastic while plugged in Do not install in excessively dusty places If you smell smoke or other odors coming from the TV or hear strange sounds unplug the power cord contac...

Страница 8: ...ng On TV 40 Channel Selection 41 Volume Adjustment 41 Initializing Setup Mode Setting 42 On Screen Menus Selection 43 Quick Menu 45 Channel Setup Auto Scan Auto Tuning 46 Add Delete Channel Manual Tuning 47 Channel Editing 48 Input List 49 Input Label 50 Channel List 51 Favorite Channel Setup 52 Favorite Channel List 53 AV Mode 54 Key Lock 55 SIMPLINK 56 USB Entry Modes 58 Photo List 60 Music List...

Страница 9: ... Off Setup 94 Selecting Audio Out 95 Audio Reset 96 Stereo SAP Broadcast Setup 97 On Screen Menus Language Selection 98 Closed Captions 99 TIME SETTING Clock Setting Clock Setup 100 On Off Time Setting 101 Sleep Timer Setting 102 APPENDIX Troubleshooting 103 Maintenance 105 Product Specifications 106 IR Codes 108 External Control Through RS 232C 1 10 MFL62883001 Edit1 en 3 17 10 3 46 PM Page 7 ...

Страница 10: ...T INFORMATION TO PREVENT IMAGE BURN BURN IN ON YOUR TV SCREEN This feature is not available for all models HDMI the HDMI logo and High Definition Multimedia Interface are trademarks or registered trademarks of HDMI Licensing LLC ABOUT DIVX VIDEO DivX is a digital video for mat created by DivX Inc This is an official DivX Certified device that plays DivX video Visit www divx com for more informatio...

Страница 11: ... 2 ENE RG Y CH VOL 1 2 3 4 5 0 6 7 8 9 LI ST FRE EZE SAV ING TV AV MO DE INP UT FA V RA TI O MU TE ME NU Q ME NU EX IT EN TE R Q VIE W POW ER BA CK P A G E or M4x28 Except 60PK550R x 3 M5x14 Ferrite Core Black This feature is not available for all models close to the wall plug Ferrite core can be used to reduce the elec tromagnetic waves that may interfere with the TV Install the Ferrite core on t...

Страница 12: ... damaged CAUTION 42 50PJ250R 42 50PJ260R ENTER CH VOL ENTER CH VOL POWER Button CHANNEL E E D D Buttons INPUT Button MENU Button ENTER Button VOLUME Buttons ENTER CH VOL Intelligent Sensor Adjusts picture accord ing to the surrounding conditions Power Standby Indicator Illuminates red in standby mode The LED is off while the TV remains on Remote Control Sensor You can operate the button just by to...

Страница 13: ...ns Intelligent Sensor Adjusts picture accord ing to the surrounding conditions CH VOL ENTER CH VOL ENTER Power Standby Indicator Illuminates red in standby mode The LED is off while the TV remains on Remote Control Sensor ENTER CH VOL POWER Button CHANNEL E E D D Buttons INPUT Button MENU Button ENTER Button VOLUME Buttons 50 60PK550R You can operate the button just by touching the button lightly ...

Страница 14: ...IO OUT VIDEO AUDIO R L MONO VARIABLE AUDIO OUT VIDEO AUDIO R L MONO AV IN 2 3 7 1 3 4 5 6 R VARIABLE AUDIO OUT VIDEO AUDIO R L MONO VARIABLE AUDIO OUT VIDEO AUDIO R L MONO 8 R R ANTENNA IN RGB IN PC AUDIO IN RGB DVI VIDEO IN1 VARIABLE AUDIO OUT VARIABLE AUDIO OUT R L Y P B P R VIDEO AUDIO 2 1 COMPONENT IN 1 2 RS 232C IN CONTROL SERVICE HDMI DVI IN HDMI IN Mono AUDIO AV L R L MONO R AUDIO VIDEO USB...

Страница 15: ...pports SD HD Uses a red green and blue cable for video red and white for audio ANTENNA IN Connect over the air signals to this jack Connect cable signals to this jack USB IN Except 42 50PJ250R Used for photo music and movie USB IN SERVICE ONLY For 42 50PJ250R Used for software updates Power Cord Socket For operation with AC power Caution Never attempt to operate the TV on DC power RGB PC Except 42...

Страница 16: ...n If you tighten the bolt with excessive force the bolt can deviate from abrasion of the tightening part of the bolt NOTE Carefully place the TV screen side down on a cushioned surface to protect the screen from damage Assemble the parts of the S St ta an nd d B Bo od dy y with the S St ta an nd d B Ba as se e of the TV 1 2 Assemble the TV as shown 3 Installation Except 60PK550R Assemble the TV as...

Страница 17: ... stand install the included p pr ro ot te ec ct ti io on n c co ov ve er r over the hole for the stand Press the P PR RO OT TE EC CT TI IO ON N C CO OV VE ER R into the TV until you hear it click PROTECTION COVER Detachment PROTECTION COVER Fix a Guide to the Outsides M4x28 x 4 M4x30 x 4 60PK550R 42 50PJ250R 42 50PJ350R 42 50PJ260R 50PK550R MFL62883001 Edit1 en 3 17 10 3 46 PM Page 15 ...

Страница 18: ...lation manual and all parts necessary for assembly are provided G G Do not use screws longer then the standard dimen sion as they may cause damage to the inside to the TV G G For wall mounts that do not comply with the VESA standard screw specifications the length of the screws may differ depending on their specifica tions G G Do not use screws that do not comply with the VESA standard screw speci...

Страница 19: ...n may differ from your TV After connecting the cables as necessary install CABLE HOLDER as shown and bundle the cables To connect additional equipment see EXTERNAL EQUIPMENT SETUP section CABLE HOLDER MFL62883001 Edit1 en 3 17 10 3 46 PM Page 17 ...

Страница 20: ...ches 4 inches 4 inches SWIVEL STAND After installing the TV you can adjust the TV manually to the left or right direction by 20 degrees to suit your viewing position This feature is not available for all models G G Ensure adequate ventilation by following the clearance recommendations G G Do not mount near or above any type of heat source CAUTION MFL62883001 Edit1 en 3 17 10 3 46 PM Page 18 ...

Страница 21: ...the eye bolts or TV brackets bolts and tighten them securely in the upper holes Secure the wall brackets with the bolts sold separately to the wall Match the height of the bracket that is mounted on the wall to the holes in the product Ensure the eye bolts or brackets are tightened securely Use a sturdy rope sold separately to tie the product It is safer to tie the rope so it becomes horizontal be...

Страница 22: ... family Dwellings Apartments Connect to wall antenna socket RF Coaxial Wire 75 ohm RF Coaxial Wire 75 ohm Single family Dwellings Houses Connect to wall jack for outdoor antenna Be careful not to bend the copper wire when connecting the antenna Copper Wire ANTENNA IN ANTENNA IN To improve the picture quality in a poor signal area please purchase a signal amplifier and install properly If the anten...

Страница 23: ...2 input select the C Co om mp po on ne en nt t2 2 input source on the TV To prevent the equipment damage never plug in any power cords until you have finished connecting all equipment Image shown may differ from your TV ANTEN IN L R IN1 AV VARIABLE AUDIO OUT VIDEO AUDIO R L MONO RS 232C IN CONTROL SERVICE AUDIO IN RGB DVI 1 2 HDMI DVI IN HDMI IN RGB PC VIDEO AUDIO L Y P B P R R 1 2 COMPONENT IN Y ...

Страница 24: ...UT 1 G G Check HDMI cable over version 1 3 If the HDMI cables don t support HDMI version 1 3 it can cause flickers or no screen display In this case use the latest cables that support HDMI version 1 3 G G HDMI mode supports PCM audio format only G G If the Audio setting is set to Dolby DTS Bitstream in some DVDP STB make sure to change the set ting to PCM NOTE H HD DM MI I I IN N 1 1 H HD DM MI I ...

Страница 25: ...o a separate audio connection is necessary NOTE Connect the DVI output of the digital set top box to the H HD DM MI I D DV VI I I IN N 1 1 jack on the TV Connect the audio output of the digital set top box to the A AU UD DI IO O I IN N R RG GB B D DV VI I jack on the TV 1 How to connect 2 How to use Turn on the digital set top box Refer to the owner s man ual for the digital set top box Select the...

Страница 26: ...to the C CO OM MP PO O N NE EN NT T I IN N A AU UD DI IO O 1 1 jacks on the TV 1 How to connect 2 How to use Turn on the DVD player insert a DVD Select the C Co om mp po on ne en nt t1 1 input source on the TV using the I IN NP PU UT T button on the remote control If connected to C CO OM MP PO ON NE EN NT T I IN N 2 2 input select the C Co om mp po on ne en nt t2 2 input source on the TV Refer to ...

Страница 27: ...N HDMI IN HDMI OUTPUT 1 Composite RCA Connection VIDEO AUDIO L R IN1 1 AV VARIABLE AUDIO OUT VIDEO AUDIO R L MONO RS 232C IN CONTROL SERVICE AUDIO IN RGB DVI 1 2 HDMI DVI IN HDMI IN RGB PC IN1 VIDEO VIDEO AUDIO AUDIO R R L MONO L MONO AV L R VIDEO AUDIO Connect the A AU UD DI IO O V VI ID DE EO O jacks between TV and DVD Match the jack colors Video yellow Audio Left white and Audio Right red 1 How...

Страница 28: ...V VI ID DE EO O jacks between TV and VCR Match the jack colors Video yellow Audio Left white and Audio Right red 1 How to connect 2 How to use Insert a video tape into the VCR and press PLAY on the VCR Refer to the VCR owner s manual Select the A AV V1 1 input source on the TV using the I IN NP PU UT T button on the remote control If connected to A AV V I IN N 2 2 select A AV V2 2 input source on ...

Страница 29: ...ment Match the jack colors Video yellow Audio Left white and Audio Right red 1 How to connect 2 How to use Select the A AV V2 2 input source on the TV using the I IN NP PU UT T button on the remote control If connected to A AV V I IN N 1 1 input select the A AV V1 1 input source on the TV Operate the corresponding external equipment 1 1 Image shown may differ from your TV MFL62883001 Edit1 en 3 17...

Страница 30: ...NO R AUDIO VIDEO USB IN HDMI IN VARIABLE AUDIO OUT AV IN 2 1 i e Connect the USB device to the U US SB B I IN N jack on the side of TV 1 How to connect 1 2 How to use After connecting the U US SB B I IN N jack you use the USB function G G p p 5 58 8 MFL62883001 Edit1 en 3 17 10 3 46 PM Page 28 ...

Страница 31: ...DVI OUTPUT 1 2 2 How to use Turn on the PC and the TV Select the R RG GB B P PC C input source on the TV using the I IN NP PU UT T button on the remote control Connect the VGA output of the PC to the R RG GB B I IN N P PC C jack on the TV Connect the PC audio output to the A AU UD DI IO O I IN N R RG GB B D DV VI I jack on the TV 1 How to connect 2 1 2 How to use Turn on the PC and the TV Select t...

Страница 32: ...on the PICTURE menu until the picture is clear G GAvoid keeping a fixed image on the screen for a long period of time The fixed image could become per manently imprinted on the screen G GThe synchronization input form for Horizontal and Vertical frequencies is separate G GDepending on the graphics card some resolution settings may not allow the image to be positioned on the screen properly Support...

Страница 33: ...cr re ee en n Select R Re es so ol lu ut ti io on n Select the desired resolution 1 MENU 3 4 2 ENTER 5 Screen Setup for PC mode Auto config Resolution G Position Size Phase Reset Screen Move Prev 1024 x 768 1280 x 768 1360 x 768 Enter Move PICTURE E W C Brightness 50 Sharpness 70 Color 70 Tint 0 Color Temperature 0 Advanced Control Picture Reset Screen ENTER ENTER ENTER MFL62883001 Edit1 en 3 17 1...

Страница 34: ...t Y Ye es s 4 ENTER Start Auto Configuration 5 ENTER Select P PI IC CT TU UR RE E 1 MENU If the position of the image is still not correct try Auto adjustment again If picture needs to be adjusted again after Auto adjustment in RGB you can adjust the P Po os si it ti io on n S Si iz ze e or P Ph ha as se e Auto config G Resolution Position Size Phase Reset Screen Move Prev To Set Yes No Enter Move...

Страница 35: ... This function is to adjust pic ture to left right and up down as you prefer S Si iz ze e This function is to minimize any vertical bars or stripes visible on the screen background And the horizontal screen size will also change P Ph ha as se e This function allows you to remove any horizontal noise and clear or sharpen the image of characters Select P PI IC CT TU UR RE E Select S Sc cr re ee en n...

Страница 36: ... Component except 480i 576i and RGB mode Select R Re es se et t 3 ENTER Select P PI IC CT TU UR RE E Select S Sc cr re ee en n 1 MENU 2 ENTER Select Y Ye es s 4 ENTER 5 ENTER Auto config Position Resolution Size Phase Reset G Screen Move Prev To Set Yes No Enter Move PICTURE E W C Brightness 50 Sharpness 70 Color 70 Tint 0 Color Temperature 0 Advanced Control Picture Reset Screen MFL62883001 Edit1...

Страница 37: ...UDIO OUT VARIABLE AUDIO OUT L R AUDIO 1 G G When connecting with external audio equipments such as amplifiers or speakers you can turn the TV speakers off in the menu G G p p 9 95 5 NOTE Connect audio outputs to the TV s V VA AR RI IA AB BL LE E A AU UD DI IO O O OU UT T jacks Set up your speakers through your analog stereo ampli fier according to the instructions provided with the amplifier 1 How...

Страница 38: ...ggles through preset Video and Audio modes G G p p 5 54 4 Rotates through inputs Also switches the TV on from standby G G p p 4 49 9 Select the remote operating mode TV Select a Channel Selects numbered items in a menu Displays the channel list Tunes to the last channel viewed Program edit FF Rewind GG Fast Forward G Playback l ll l Pause Controls the SIMPLINK compatible devices Freezes the curren...

Страница 39: ... 2 Changes the aspect ratio Switches the sound on or off G G p p 4 41 1 Changes the channel Moves from one full set of screen information to the next one Navigates the on screen menus and adjusts the system settings to your preference Displays the main menu or clears all on screen displays and returns to TV viewing Select the Photo Music Movie list Opens the list of Quick Menu options Allows the u...

Страница 40: ...Audio modes G G p p 5 54 4 Rotates through inputs Also switches the TV on from standby G G p p 4 49 9 Select the remote operating mode TV Select a Channel Selects numbered items in a menu Displays the channel list Tunes to the last channel viewed Program edit FF Rewind GG Fast Forward G Playback l ll l Pause Controls the SIMPLINK compatible devices Freezes the current frame POWER ENERGY SAVING AV ...

Страница 41: ... Changes the aspect ratio Switches the sound on or off G G p p 4 41 1 Changes the channel Moves from one full set of screen information to the next one Navigates the on screen menus and adjusts the system settings to your preference Displays the main menu or clears all on screen displays and returns to TV viewing It helps users listen to human voices better Opens the list of Quick Menu options All...

Страница 42: ... PU UT T C CH H or N Nu um mb be er r 0 0 9 9 button on the remote control Select the viewing source by using the I IN NP PU UT T button on the remote control This TV is programmed to remember which power state it was last set to even if the power cord is out 1 2 Turning on TV just after installation NOTE G G If you intend to be away on vacation disconnect the power plug from the wall power outlet...

Страница 43: ...L SELECTION Press the V VO OL L or button to adjust the volume If you want to switch the sound off press the M MU UT TE E button You can cancel the Mute function by pressing the M MU UT TE E V VO OL L or or A AV V M MO OD DE E button Adjust the volume to suit your personal preference 1 2 3 MFL62883001 Edit1 en 3 17 10 3 46 PM Page 41 ...

Страница 44: ...in store mode after 5 minutes S St to or re e D De em mo o Mode is an optimal setting for displaying at stores Store Demo mode initializes the TV to set the image quality You can also adjust M Mo od de e S Se et tt ti in ng g in the O OP PT TI IO ON N menu Factory defaults are set when you choose H Ho om me e U Us se e Select L La an ng gu ua ag ge e 1 2 ENTER Step2 Selecting Language Step3 Mode S...

Страница 45: ... Brightness 50 Sharpness 60 Colour 60 Tint 0 PICTURE E Enter Move Auto Volume Off Clear Voice ll Off Level 3 Balance 0 Sound Mode Standard Infinite Sound Off Treble 50 Bass 50 AUDIO E L R Enter Move Clock Off Time Off On Time Off Sleep Timer Off TIME Enter Move TV AV1 AV2 Component 1 Component 2 HDMI1 HDMI2 INPUT Enter Move Menu Language English Input Label SIMPLINK On Key Lock Off Caption Off Set...

Страница 46: ...URE OPTION AUDIO Enter Move Aspect Ratio 16 9 Energy Saving Off Picture Mode Standard Contrast 90 Brightness 50 Sharpness 60 Color 60 Tint 0 PICTURE E Enter Move Auto Volume Off Clear Voice ll Off Level 3 Balance 0 Sound Mode Standard Infinite Sound Off Treble 50 Bass 50 AUDIO E L R Enter Move Clock Off Time Off On Time Off Sleep Timer Off TIME Enter Move Menu Language English Input Label SIMPLINK...

Страница 47: ...t the amount of time before your TV turns off automatically D De el l A Ad dd d F Fa av v Select channel you want to add delete or add the channel to the Favorite List U US SB B E Ej je ec ct t Select Eject in order to eject a USB device Your TV s OSD On Screen Display may differ slightly from what is shown in this manual Q Menu Quick Menu is a menu of features which users might use frequently 1 Q...

Страница 48: ...uto Tuning Manual Tuning Channel Edit Enter Move CHANNEL Auto Tuning Manual Tuning Channel Edit Check your antenna connection The previous channel information will be updated during Auto Tuning Start Close The TV will ask for a password if parental control has been activated LOCK Menu Use the password you set up in the LOCK Menu to allow a channel search When setting the Auto tuning or Manual tuni...

Страница 49: ...el Edit Enter Move CHANNEL Auto Tuning Manual Tuning Channel Edit Channel Select channel type and RF channel number F F TV G G 2 Close Add TV 2 The TV will ask for a password if parental control has been activated LOCK Menu Use the password you set up in the LOCK Menu to allow a channel search When setting the Auto tuning or Manual tuning the number of maximum channel you can store is 900 It is su...

Страница 50: ...ange Page Change CH Move Previous Add Delete Enter Move CHANNEL Auto Tuning Manual Tuning Channel Edit Keep pressing the button and use the or buttons to move between DTV TV CADTV and CATV If the channel list is too long use the C CH H or button to move between pages Select a channel Add or delete the channel 3 ENTER 4 Select C CH HA AN NN NE EL L 1 MENU 2 ENTER Select C Ch ha an nn ne el l E Ed d...

Страница 51: ...r and digital cable broadcasts A AV V Select them to watch a VCR or other external equipment C Co om mp po on ne en nt t Select them to watch DVD or a Digital set top box R RG GB B P PC C Select it to view PC input H HD DM MI I Select them to watch high definition devices 1 ENTER INPUT HDMI3 42 50PJ350R 50 60PK550R AV1 AV2 AV3 Component HDMI2 HDMI1 RGB TV MFL62883001 Edit1 en 3 17 10 3 46 PM Page ...

Страница 52: ... Method Normal Demo Mode Off E E AV1 AV2 Component1 Component2 HDMI1 HDMI2 F F G G Close 42 50PJ250R AV1 AV2 AV3 Component RGB HDMI1 HDMI2 HDMI3 F F G G Close 50 60PK550R Select O OP PT TI IO ON N Select I In np pu ut t L La ab be el l Select the label 1 MENU 2 ENTER Select the source 3 ENTER 4 5 Return to the previous menu Return to TV viewing With using OPTION menu Select the source except T TV ...

Страница 53: ...list TV2 TV5 TV6 Channel List Exit Display the C Ch ha an nn ne el l L Li is st t 1 LIST Displaying Channel List Select a channel 1 Switch to the chosen channel number 2 ENTER Selecting a channel in the channel list Turn the pages 1 CH P A G E 2 Paging through a channel list EXIT MFL62883001 Edit1 en 3 17 10 3 46 PM Page 51 ...

Страница 54: ...annel press the F FA AV V favorite button repeatedly FAVORITE CHANNEL SETUP Q Menu Close F F 16 9 G G Off Standard STEREO Off Delete Eject Aspect Ratio Picture Mode Sound Mode Caption SAP Sleep Timer Del Add Fav USB Eject CH Vivid Except 42 50PJ250R Select D De el l A Ad dd d F Fa av v 2Q MENU 1 CH P A G E 1 2 3 4 5 0 6 7 8 9 Select your desired channel or 3 Select F Fa av vo or ri it te e 4 Retur...

Страница 55: ...h to the chosen channel number 2 ENTER Selecting a channel in the favorite channel list Turn the pages 1 CH P A G E Return to TV viewing 2 Paging through a favorite channel list Display the Favorite channel list 1 Displaying the favorite channel list MARK FAV EXIT MFL62883001 Edit1 en 3 17 10 3 46 PM Page 53 ...

Страница 56: ...ll be selected both for PIC TURE menu Picture Mode and AUDIO menu Sound Mode respectively If you select O Of ff f in AV mode the P Pi ic ct tu ur re e M Mo od de e and S So ou un nd d M Mo od de e return to previous selected value O Of ff f Disables the AV MODE C Ci in ne em ma a Optimizes video and audio for watching movies S Sp po or rt t Optimizes video and audio for watching sports events G Ga...

Страница 57: ...on the TV press the INPUT CH button on the TV or POWER INPUT CH or NUMBER buttons on the remote control With the K Ke ey y L Lo oc ck k O On n the display K Ke ey y L Lo oc ck k appears on the screen if any button on the front panel is pressed while viewing the TV Except power botton 4 BACK Return to the previous menu Return to TV viewing Enter Move OPTION Menu Language English Input Label SIMPLIN...

Страница 58: ...eater functionality the sound output automatically switches to the home theater speakers and the TV speakers are turned off G G When the unit is connected to SIMPLINK Home Theater set to Variable Out and turn off the TV Speaker to operate the Home Theater Speaker At this time the maximum volume of the Home Theater Speaker is set to the TV volume Enter Move OPTION Menu Language English Input Label ...

Страница 59: ... SIMPLINK an HDMI cable over Version 1 3 with CEC function should be used CEC Consumer Electronics Control SIMPLINK Functions SIMPLINK Menu T TV V v vi ie ew wi in ng g Switch to the previous TV channel regardless of the current mode D DI IS SC C p pl la ay yb ba ac ck k Select and play discs When multiple discs are available the titles of discs are conveniently displayed at the bottom of the scre...

Страница 60: ...played automatically POP UP MENU will not be displayed while the OSD including Menu is activated In USB device you can not add a new folder or delete the existing folder Here shown may be somewhat different from your TV When removing the USB device Connect the USB device to the U US SB B I IN N jacks on the side of TV 3 Select P PH HO OT TO O L LI IS ST T M MU US SI IC C L LI IS ST T or M MO OV VI...

Страница 61: ...ge device which requires an external power supply If not the device may not be recognized G G Please connect a USB storage device with cable is offered by USB maker If connected with cable is not offered by USB maker or an excessively long cable the device may not be recognized G G Some USB storage devices may not be supported or operated smoothly G G Maximum of 200 files and folders can be recogn...

Страница 62: ... Total pages Total number of marked photos Corresponding buttons on the remote control 1 3 4 2 Select U US SB B Select P Ph ho ot to o L Li is st t 2 1 MENU ENTER ENTER Page 2 3 No Marked Photo List Up Folder 1366x768 125KB KY101 09 10 2008 KY102 09 10 2008 JMJ001 09 10 2008 JMJ002 09 10 2008 JMJ003 09 10 2008 JMJ004 09 10 2008 KY103 09 10 2008 KY104 09 10 2008 KY105 09 10 2008 JMJ005 09 10 2008 J...

Страница 63: ...JMJ005 09 10 2008 JMJ006 09 10 2008 JMJ007 09 10 2008 JMJ008 09 10 2008 Up Folder Drive1 JMJ001 E E Popup Menu Navigation Page Change Mark Exit CH MARK Page 2 3 No Marked Photo List Up Folder 1366x768 125KB KR101 09 10 2008 KR102 09 10 2008 JMJ001 09 10 2008 JMJ002 09 10 2008 JMJ003 09 10 2008 JMJ004 09 10 2008 KR103 09 10 2008 KR104 09 10 2008 KR105 09 10 2008 JMJ005 09 10 2008 JMJ006 09 10 2008 ...

Страница 64: ...e Q MENU Page 2 3 No Marked Photo List Up Folder 1366x768 125KB KR101 09 10 2008 KR102 09 10 2008 JMJ001 09 10 2008 JMJ002 09 10 2008 JMJ003 09 10 2008 JMJ004 09 10 2008 KR103 09 10 2008 KR104 09 10 2008 KR105 09 10 2008 JMJ005 09 10 2008 JMJ006 09 10 2008 JMJ007 09 10 2008 JMJ008 09 10 2008 Up Folder Drive1 JMJ001 E Popup Menu Navigation Page Change Mark Exit CH MARK Page 2 3 No Marked Photo List...

Страница 65: ...n n G G R Ro ot ta at te e Rotate photos Rotates the photo 90 180 270 360 clockwise G G D De el le et te e Delete photos G G H Hi id de e Hide the menu on the full sized screen To see the menu again on the full sized screen press O OK K but ton to display Select the S Sl li id de es sh ho ow w B BG GM M R Ro ot ta at te e D De el le et te e or H Hi id de e Use button to select the previous or next...

Страница 66: ...u select the S Se et t P Ph ho ot to o V Vi ie ew w You cannot change M Mu us si ic c F Fo ol ld de er r while BGM is playing Press F F G G to set the time interval between slides Slide Speed Music Album Fast Prev Show the S Sl li id de e S Sp pe ee ed d or M Mu us si ic c A Al lb bu um m Make appropriate adjustments 2 1 ENTER ENTER NOTE G G If you select Off for TV speaker S Se et t A Au ud di io...

Страница 67: ...ou select the S Se et t V Vi id de eo o G G When you select the S Se et t A Au ud di io o Show the P Pi ic ct tu ur re e M Mo od de e Make appropriate adjustments 2 1 ENTER ENTER Show the S So ou un nd d M Mo od de e A Au ut to o V Vo ol lu um me e C Cl le ea ar r V Vo oi ic ce e I II I and B Ba al la an nc ce e Make appropriate adjustments 2 1 ENTER ENTER Tint 100 50 70 70 0 0 0 MFL62883001 Edit2...

Страница 68: ...Components Select U US SB B Select M Mu us si ic c L Li is st t 2 1 MENU ENTER ENTER Page 2 3 No Marked Music List Up Folder 00 00 01 34 Up Folder Music Title Duration 1 S003 E E 001 S001 003 S002 004 S003 006 S004 007 S005 03 33 04 45 01 30 02 37 01 58 4 Popup Menu Navigation Page Change Exit CH Mark MARK Option Q MENU Moves to upper level folder Current page Total pages Total number of marked mu...

Страница 69: ... page Use M MA AR RK K button to mark or unmark a music When one or more music files are marked the marked music title will be played in sequence For example if you want to listen to only one music repeatedly just mark the music only and play it If no music is marked all the music in the folder will be played in sequence As shown up to 6 music titles are listed per page Select the target folder or...

Страница 70: ... play music files less than 32 Kbytes G G The P PL LA AY Y G G P Pa au us se e I II I A A G GG G F FF F buttons on the remote control are also available in this mode G G You can use the G GG G button to select the next music and the F FF F button to select the previous music G G If you select Off for TV speaker S Se et t A Au ud di io o features in Choose Options will not work L R Set Audio Sound ...

Страница 71: ... video and audio structure of recorded file is not interleaved either video or audio is outputted Playing a video via a USB connection that does not support high speed may not work properly USB storage devices below USB 2 0 are supported as well But they may not work properly in the movie list DivX may not be played depending on its types or recording methods If the video and audio structure of re...

Страница 72: ... video file name and its subtitle file name must be identical for it to be displayed G G Use the left right keys to move to a specific frame forward or backward while playing a movie The left right keys may not work properly for some files while playing a movie Page 2 3 No Marked Movie List Up Folder 640x480 720KB Up Folder 2 3 1 Movie Title Duration H003 E E H001 H002 H003 H004 H005 00 03 33 00 0...

Страница 73: ... supported file is displayed This file is invalid As shown up to 6 movie titles are listed per page Select the target folder or drive Select the desired movie titles Show the PopUp menu Select the desired PopUp menu 2 3 1 4 ENTER ENTER ENTER Page 2 3 No Marked Movie List Up Folder 640x480 720KB Movie Title Duration H003 Up Folder H001 H002 H003 H004 H005 00 03 33 00 04 45 00 01 30 00 03 13 00 02 5...

Страница 74: ...ng gu ua ag ge e Changes the Language Group of the audio subtitle during movie play G G S Sy yn nc c Adjusts the time synchronisation of the subtitle from 10 secs 10 secs by steps of 0 5 secs during movie play G G P Po os si it ti io on n Changes the position of the subtitle either up or down during movie play Show the P Pi ic ct tu ur re e S Si iz ze e A Au ud di io o L La an ng gu ua ag ge e or ...

Страница 75: ...nish Catalan Basque Portuguese Italian Albanian Rhaeto Romanic Dutch German Danish Swedish Norwegian Finnish Faroese Icelandic Irish Scottish English Latin1 Czech Hungarian Ploish Romanian Croatian Slovak Slovenian Sorvian Estonian the Baltic languages Latvian Lettish and Lithuanian Greenlandic and Lappish English Trukish Bulgarian Byelorussian Macedonian Russian Serbian and pre 1990 no ghe with u...

Страница 76: ...e I II I button Still screen is displayed When using the or button during playback a cursor indicating the position can be viewed on the screen Press the P PL LA AY Y G G button to return to normal playback F FF F G GG G P PL LA AY Y G G I II I G G When you select the S Se et t A Au ud di io o Show the S So ou un nd d M Mo od de e A Au ut to o V Vo ol lu um me e C Cl le ea ar r V Vo oi ic ce e I I...

Страница 77: ...ation code of the purchased TV are playable Select U US SB B Select D Di iv vx x R Re eg g C Co od de e Display D Di iv vx x R Re eg g C Co od de e 1 MENU 3 2 ENTER ENTER Press the M ME EN NU U E EX XI IT T button to return to normal TV viewing Press the B BA AC CK K button to move to the previous menu screen DivX Reg Code DivX Reg Code ENTER Move Photo List Music List Movie List DivX Reg Code Dea...

Страница 78: ...about DivX VOD DivX Certified to play DivX video including premium content Pat 7 295 673 7 460 688 7 519 274 NOTE G G Video Codec MPEG1 MPEG2 MPEG4 Doesn t support Microsoft MPEG4 V2 V3 DivX3 xx DivX4 xx DivX5 xx DivX VOD DRM XviD DivX 6 xx Playback G G When loading some buttons may not work G G If you use the DivX registration code of another device the rented or purchased DivX file cannot be pla...

Страница 79: ... 2 ENTER Select Y Ye es s or N No o 3 ENTER 4 ENTER Press the M ME EN NU U E EX XI IT T button to return to normal TV viewing Press the B BA AC CK K button to move to the previous menu screen OK Move Photo List Music List Movie List DivX Reg Code Deactivation USB Deactivation OK Move Photo List Music List Movie List DivX Reg Code Deactivation USB Deactivation Yes DivX R Video On Demand Do you want...

Страница 80: ...Move PICTURE E R G Aspect Ratio 16 9 Energy Saving Intelligent Sensor Picture Mode Vivid Contrast 100 Brightness 50 Sharpness 70 Color 70 Tint 0 16 9 Just Scan 4 3 Zoom Cinema Zoom 1 You can also adjust A As sp pe ec ct t R Ra at ti io o in the Q Q M ME EN NU U Press the R RA AT TI IO O button repeatedly to select the desired picture format Select P PI IC CT TU UR RE E Select A As sp pe ec ct t R ...

Страница 81: ...t HDMI DVI 720p 1080i 1080p input source 4 3 Choose 4 3 when you want to view a picture with an original 4 3 aspect ratio Zoom Choose Zoom when you want to view the picture without any alteration However the top and bottom portions of the picture will be cropped Cinema Zoom1 Choose Cinema Zoom when you want to enlarge the picture in correct proportion Note When enlarging or reducing the pictrue th...

Страница 82: ...to TV viewing V Vi iv vi id d S St ta an nd da ar rd d C Ci in ne em ma a S Sp po or rt t and G Ga am me e Settings are preset for the optimum picture quality at the facto ry You can also adjust P Pi ic ct tu ur re e M Mo od de e in the Q Q M Me en nu u V Vi iv vi id d This is the mode to maximize the effect of the video in the retail store Strengthen the contrast brightness sharpness and color fo...

Страница 83: ...ensor Picture Mode Vivid Contrast 100 Brightness 50 Sharpness 70 Color 70 Tint 0 Contrast 80 E E E E E E E E Enter R G C Co on nt tr ra as st t Increase or decrease the gra dient of the vidoe signal You may use Contrast when the bright part of picture is saturated B Br ri ig gh ht tn ne es ss s Increases or decreases the black level of video signal You may use Brightness when the black level of th...

Страница 84: ...E Select A Ad dv va an nc ce ed d C Co on nt tr ro ol l Select your desired options 1 MENU 3 2 ENTER ENTER 5 BACK Return to the previous menu Return to TV viewing Select your desired options 4 Enter Move PICTURE E W C Brightness 50 Sharpness 70 Color 70 Tint 0 Color Temperature 0 Advanced Control Picture Reset Screen Enter Move PICTURE E W C Brightness 50 Sharpness 70 Color 70 Tint 0 Color Tempera...

Страница 85: ...ginal picture levels High Make dark and middle gray level area of the picture darker You can adjust brightness of dark area and middle gray level area of the picture Makes video clips recorded in film look more natural DVD and Blu ray movies are filmed at 24 frames per second Dynamic Contrast Dynamic Color Noise Reduction Gamma Film Mode Color Temperature Except 42 50PJ250R Low The reflection of t...

Страница 86: ...I IC CT TU UR RE E Select I In nt te el ll li ig ge en nt t S Se en ns so or r O Of ff f M Mi in ni im mu um m M Me ed di iu um m M Ma ax xi im mu um m or S Sc cr re ee en n o of ff f 4 BACK Return to the previous menu Return to TV viewing Select E En ne er rg gy y S Sa av vi in ng g I In nt te el ll li ig ge en nt t s se en ns so or r This function automatically adjusts the brightness of screen t...

Страница 87: ...the adjusted value 3 ENTER 4 Return to TV viewing 1 MENU 2 ENTER Enter Move PICTURE E W C Brightness 50 Sharpness 70 Color 70 Tint 0 Color Temperature 0 Advanced Control Picture Reset Screen Enter Move PICTURE E W C Brightness 50 Sharpness 70 Color 70 Tint 0 Color Temperature 0 Advanced Control Picture Reset Screen Resetting video configuration i EXIT MFL62883001 Edit3 en 3 17 10 3 47 PM Page 85 ...

Страница 88: ...d a little and the white pat tern are alternately displayed It is diffi cult to sense the afterimage occurred while the temporary afterimage is removed and the color pattern is operat ing W Wh hi it te e W Wa as sh h White Wash removes ghost images from the screen Use spar ingly Watch the TV normally for a while before using this feature to see if the ghost image disappears on its own Select O OP ...

Страница 89: ... Off Caption Off Set ID 1 ISM Method Normal Demo Mode Off Enter Move OPTION Menu Language English Input Label SIMPLINK On Key Lock Off Caption Off Set ID 1 ISM Method Normal Demo Mode Off E E Select O OP PT TI IO ON N Select D De em mo o M Mo od de e Select O On n D De em mo o M Mo od de e starts 4 Return to TV viewing If you want to stop the demo press any button Off On 1 MENU 2 ENTER 3 ENTER EXI...

Страница 90: ... All user settings and channel settings will be reset Select O OP PT TI IO ON N Select I In ni it ti ia al l S Se et tt ti in ng g Select Y Ye es s or N No o 4 BACK Return to the previous menu Return to TV viewing Enter Move OPTION SIMPLINK On Key Lock Off Caption Off Set ID 1 ISM Method Normal Demo Mode Off Mode Setting Home Use Initial Setting E All user settings and channel settings will be res...

Страница 91: ... enjoy stable volume levels by making automatic adjustments for each program Select A AU UD DI IO O Select A Au ut to o V Vo ol lu um me e Select O On n or O Of ff f Return to the previous menu Return to TV viewing Enter Move AUDIO Auto Volume Off Clear Voice ll Off Level 3 Balance 0 Sound Mode Standard Infinite Sound Off Treble 50 Bass 50 L R E Enter Move AUDIO L R E Auto Volume Off Clear Voice l...

Страница 92: ...ct O On n or O Of ff f Enter Move AUDIO Auto Volume Off Clear Voice ll Off Level 3 Balance 0 Sound Mode Standard Infinite Sound Off Treble 50 Bass 50 L R E Enter Move AUDIO L R E Auto Volume Off Clear Voice ll Off Level 3 Balance 0 Sound Mode Standard Infinite Sound Off Treble 50 Bass 50 6 BACK Return to the previous menu Return to TV viewing Select L Le ev ve el l 4 ENTER Make appropriate adjustm...

Страница 93: ...urn to TV viewing Enter Move AUDIO Auto Volume Off Clear Voice ll Off Level 3 Balance 0 Sound Mode Standard Infinite Sound Off Treble 50 Bass 50 L R E Enter Move AUDIO L R E Auto Volume Off Clear Voice ll Off Level 3 Balance 0 Sound Mode Standard Infinite Sound Off Treble 50 Bass 50 Standard Music Cinema Sport Game You can also adjust S So ou un nd d M Mo od de e in the Q Q M ME EN NU U S St ta an...

Страница 94: ... po or rt t or G Ga am me e ENTER Make appropriate adjustments 5 ENTER 6 BACK Return to the previous menu Return to TV viewing Enter Move AUDIO Auto Volume Off Clear Voice ll Off Level 3 Balance 0 Sound Mode Standard Infinite Sound Off Treble 50 Bass 50 L R E Enter Move AUDIO L R E Auto Volume Off Clear Voice ll Off Level 3 Balance 0 Sound Mode Standard Infinite Sound Off Treble 50 Bass 50 Close E...

Страница 95: ...e previous menu Return to TV viewing Select this option to sound realistic 1 MENU 2 ENTER 3 ENTER Adjust the sound to suit your taste and room situations Enter Move AUDIO Auto Volume Off Clear Voice ll Off Level 3 Balance 0 Sound Mode Standard Infinite Sound Off Treble 50 Bass 50 L R E Enter Move AUDIO L R E Auto Volume Off Clear Voice ll Off Level 3 Balance 0 Sound Mode Standard Infinite Sound Of...

Страница 96: ...turn to the previous menu Return to TV viewing Enter Move AUDIO Auto Volume Off Clear Voice ll Off Level 3 Balance 0 Sound Mode Standard Infinite Sound Off Treble 50 Bass 50 L R E Enter Move AUDIO L R E Auto Volume Off Clear Voice ll Off Level 3 Balance 0 Sound Mode Standard Infinite Sound Off Treble 50 Bass 50 Close E E E E Balance 0 L R 4 BACK 1 MENU 2 ENTER 3 ENTER EXIT MFL62883001 Edit3 en 3 1...

Страница 97: ...revious menu Return to TV viewing Enter Move AUDIO Balance 0 Sound Mode Standard Infinite Sound Off Treble 50 Bass 50 Reset TV Speaker On L R E Enter Move AUDIO L R E Balance 0 Sound Mode Standard Infinite Sound Off Treble 50 Bass 50 Reset TV Speaker On Off On NOTE G G When the TV speaker is turned off while the Simplink home theater is operating the sound output auto matically switches to the hom...

Страница 98: ... t Initialize the adjusted value 3 ENTER 4 Return to TV viewing Enter Move AUDIO Balance 0 Sound Mode Standard Infinite Sound Off Treble 50 Bass 50 Reset TV Speaker On L R E Enter Move AUDIO L R E Balance 0 Sound Mode Standard Infinite Sound Off Treble 50 Bass 50 Reset TV Speaker On 1 MENU 2 ENTER i Resetting sound configuration EXIT MFL62883001 Edit3 en 3 17 10 3 47 PM Page 96 ...

Страница 99: ...ditional sound signal Mono sound is automatically used if the broadcast is only in Mono Select S SA AP P Select M MO ON NO O S ST TE ER RE EO O or S SA AP P Return to TV viewing 1Q MENU 3 2 Q Menu Close F F 16 9 G G Off Standard STEREO Off Delete Eject Aspect Ratio Picture Mode Sound Mode Caption SAP Sleep Timer Del Add Fav USB Eject CH Vivid Except 42 50PJ250R EXIT MFL62883001 Edit3 en 3 17 10 3 ...

Страница 100: ...M Method Normal Demo Mode Off Enter Move OPTION Menu Language English Input Label SIMPLINK Off Key Lock Off Caption Off Set ID 1 ISM Method Normal Demo Mode Off Menu Language English Español Portugués Confirm E E ON SCREEN MENUS LANGUAGE SELECTION Select your desired language From this point on the on screen menus will be shown in the selected language Return to the previous menu Return to TV view...

Страница 101: ...eaching language skills The picture at left shows a typical caption C Ca ap pt ti io on n T Ti ip ps s Not all TV broadcasts include closed caption signals Sometimes TV stations broadcast four different caption signals on the same channel By selecting Mode1 to Mode2 you can choose which signal you view Mode1 is usually the signal with the captions while another mode might show demonstration or pro...

Страница 102: ...Minute Close Select T TI IM ME E Select C Cl lo oc ck k Select and set H Ho ou ur r or M Mi in nu ut te e Return to the previous menu Return to TV viewing If this TV is unplugged once or turn off with the power button on the TV reset the Clock function You must set the time correctly before using on off timer function 1 MENU 2 ENTER 3 ENTER 4 BACK EXIT MFL62883001 Edit3 en 3 17 10 3 47 PM Page 100...

Страница 103: ...o standby mode To cancel O On n O Of ff f T Ti im me e function select O Of ff f Select T TI IM ME E Select O Of ff f t ti im me e or O On n t ti im me e Select and set H Ho ou ur r or M Mi in nu ut te e 5 BACK Return to the previous menu Return to TV viewing Enter Move TIME Clock Off Time Off On Time Off Sleep Timer Off Enter Move TIME Clock Off Time Off On Time 2 10 AM Sleep Timer Off F F On G G...

Страница 104: ...ous menu Return to TV viewing Enter Move TIME Clock Off Time Off On Time Off Sleep Timer Off Enter Move TIME Clock Off Time Off On Time Off Sleep Timer Off Off 10 min 20 min 30 min 60 min 90 min 120 min 180 min 240 min You can also adjust S Sl le ee ep p T Ti im me er r in the Q Q M ME EN NU U Press the S SL LE EE EP P button repeatedly to select the number of minutes Except 42 50PJ250R 1 MENU 2 E...

Страница 105: ...may be with the broadcast Is the power cord inserted into wall power outlet Check your antenna direction and or location Test the wall power outlet plug another product s power cord into the outlet where the product s power cord was plugged in This is normal the image is muted during the product startup process Please contact your service center if the picture has not appeared after five minutes A...

Страница 106: ...K No sound Unusual sound from inside the product No sound when connecting HDMI or USB No output from one of the speakers T Th he e a au ud di io o d do oe es s n no ot t w wo or rk k Press the VOL or VOLUME button Sound muted Press MUTE button Try another channel The problem may be with the broadcast Are the audio cables installed properly Adjust Balance in menu option A change in ambient humidity...

Страница 107: ...oftener or dish washing detergent Wring the cloth until it s almost dry and then use it to wipe the screen Make sure the excess water is off the screen and then let it air dry before you turn on your TV Cleaning the Cabinet To remove dirt or dust wipe the cabinet with a soft dry lint free cloth Please be sure not to use a wet cloth Extended Absence G G If you expect to leave your TV dormant for a ...

Страница 108: ...V 1 125 75 ohm 32 104 F 0 40 C Less than 80 4 140 F 20 60 C Less than 85 Dimensions Width x Height x Depth Weight Power requirement Television System Program Coverage External Antenna Impedance Environment condition With stand Without stand With stand Without stand Operating Temperature Operating Humidity Storage Temperature Storage Humidity 988x688 5x260mm 38 9x27 1x1 0 2inches 988x61 7 8x55 3mm ...

Страница 109: ... UHF 14 69 CATV 1 125 75 ohm 32 104 F 0 40 C Less than 80 4 140 F 20 60 C Less than 85 Dimensions Width x Height x Depth Weight Power requirement Television System Program Coverage External Antenna Impedance Environment condition With stand Without stand With stand Without stand Operating Temperature Operating Humidity Storage Temperature Storage Humidity 1171 4 x 786 2 x 309 7 mm 46 1 x 30 9 x 12...

Страница 110: ...5 D6 D7 Lead code Low custom code High custom code Data code Data code Repeat code Tf 4 5 ms 9 ms 2 25 ms 9 ms 0 55 ms 0 56 ms 1 12 ms 0 56 ms 2 24 ms Tf Tf Tf 108ms 455KHz Bit 0 Bit 1 1 How to Connect Connect your wired remote control to the Remote Control port on the TV 2 Remote Control IR Codes Output waveform Single pulse modulated with 37 917KHz signal at 455KHz T1 Tc Carrier frequency FCAR 1...

Страница 111: ...TER Remote control Button 28 BACK Remote control Button 7E SIMPLINK Remote control Button 30 AV MODE Remote control Button 79 RATIO Remote control Button 95 ENERGY SAVING Remote control Button 53 LIST Remote control Button 1A Q VIEW Remote control Button BA FREEZE Remote control Button 72 RED Remote control Button 63 YELLOW PLAY Remote control Button 61 BLUE PAUSE Remote control Button 71 GREEN ST...

Страница 112: ...uetooth mode it doesn t support RS 232C function ANTENNA IN VIDEO AUDIO L L R IN1 Y P B P R R 1 2 AV COMPONENT IN VARIABLE AUDIO OUT VIDEO AUDIO R L MONO AUDIO IN RGB DVI 1 2 HDMI DVI IN HDMI IN RGB PC RS 232C IN CONTROL SERVICE Type of Connector D Sub 9 Pin Male No Pin Name 1 No connection 2 RXD Receive data 3 TXD Transmit data 4 DTR DTE side ready 5 GND 6 DSR DCE side ready 7 RTS Ready to send 8...

Страница 113: ...f Set ID ISM Method Normal Demo Mode Off Enter Move OPTION Menu Language English Input Label SIMPLINK On Key Lock Off Caption Off Set ID ISM Method Normal Demo Mode Off F F 1 G G Close Select O OP PT TI IO ON N Select S Se et t I ID D Choose the desired TV ID number The adjustment range of Set ID is 1 99 1 MENU 3 2 ENTER ENTER 4 BACK Return to the previous menu Return to TV viewing E E R Re ea al ...

Страница 114: ...menu Adjustment range is 1 99 When selecting Set ID 0 every connected TV is controlled Set ID is indicated as decimal 1 99 on menu and as Hexadecimal 0x0 0x63 on transmission receiving protocol DATA To transmit command data Transmit FF data to read status of command Cr Carriage Return ASCII code 0x0D ASCII code space 0x20 O OK K A Ac ck kn no ow wl le ed dg ge em me en nt t The TV transmits ACK ac...

Страница 115: ...ol volume mute on off You can also adjust mute using the MUTE button on remote control In case of Video Out mute on only TV will display On Screen Display OSD But In case of Screen Mute On TV will not display OSD Data 00 Volume mute on Volume off Data 01 Volume mute off Volume on Transmission k e Set ID Data Cr Acknowledgement e Set ID OK NG Data x 0 05 5 V Vo ollu um me e C Co on nt tr ro oll C C...

Страница 116: ... in the PICTURE menu Data W50 00 C50 64 Transmission x u Set ID Data Cr Acknowledgement u Set ID OK NG Data x 1 15 5 T Tr re eb blle e C Co om mm ma an nd d k k r r To adjust treble Data Min 00 Max 64 Refer to Real data mapping 1 Transmission k r Set ID Data Cr Acknowledgement r Set ID OK NG Data x 1 16 6 B Ba as ss s C Co om mm ma an nd d k k s s To adjust bass Data Min 00 Max 64 Refer to Real da...

Страница 117: ...G Data x 1 18 8 I IS SM M M Me et th ho od d C Co om mm ma an nd d j j p p To avoid having a fixed image remain on screen Transmission j p Set ID Data Cr Acknowledgement p Set ID OK NG Data x 0 0 0 0 0 0 0 0 Color Wash Orbiter White Wash Normal 4 3 2 1 0 Function 0 0 0 0 0 0 1 0 0 1 0 0 5 6 7 1 0 0 0 Color Wash Orbiter White Wash Normal MSB LSB More two kinds of function can not be set at a time 1...

Страница 118: ...part Data1 High byte Data2 Low Byte Two part channel number Major number Minor number One part channel number In case of using one part channel number minor channel does not need Data3 Data4 Minor Channel Number Not needed for NTSC Data3 High byte Data4 Low Byte Data5 Attribute Transmission Data0 m a Set ID Data0 Data1 Data2 Cr Acknowledgement a Set ID OK Data0 Data1 Data2 Data3 Data4 Data5 x a Se...

Страница 119: ...gement b Set ID OK NG Data x 2 24 4 I In np pu ut t s se elle ec ct t C Co om mm ma an nd d x x b b M Ma aiin n P Piic ct tu ur re e I In np pu ut t To select input source for TV Data Structure Transmission x b Set ID Data Cr Input Number Data 0 0 0 0 Input1 0 0 1 1 Input4 0 0 1 0 Input3 0 0 0 1 Input2 Except 42 50PJ250R MFL62883001 Edit3 en 3 17 10 3 47 PM Page 117 ...

Страница 120: ...MFL62883001 Edit3 en 3 17 10 3 47 PM Page 118 ...

Страница 121: ...MFL62883001 Edit3 en 3 17 10 3 47 PM Page 119 ...

Страница 122: ...The model and serial number of the TV is located on the back and one side of the TV Record it below should you ever need service MODEL SERIAL ...

Страница 123: ...3 REV01 www lg com MANUAL DE USUARIO TELEVISOR PLASMA Lea atentamente este manual antes de poner en marcha su equipo y guárdelo para futuras consultas 42PJ250R 50PJ250R 42PJ260R 50PJ260R 42PJ350R 50PJ350R 50PK550R 60PK550R ...

Страница 124: ... trian guloequilátero indicaalusuarioqueelman ual que acompaña a este aparato contiene instrucciones referentes a su funcionamiento y man tenimiento PARA REDUCIR EL RIESGO DE DESCARGA ELECTRICA NO RETIRE LA CUBIERTA NI LA PARTE POSTERIOR DE ESTE APARATO ADVERTENCIA PRECAUCION PARA REDUCIR EL RIESGO DE INCENDIO O DESCARGA ELECTRICA NO EXPONGA EL TELE VISOR A LA LLUVIA O HUMEDAD ADVERTENCIA PRECAUCI...

Страница 125: ...toma obsoleta Proteja el cable de alimentación para que no lo pisen ni aplasten especialmente en las clavijas las tomas y el punto de salida del aparato Utilice únicamente acoplamientos y accesorios especificados por el fabricante Utilícelo sólo con el estante fijo o con ruedas trípode soporte o mesa especificados por el fabricante o con el accesorio suministrado con el aparato Si utiliza un carri...

Страница 126: ...le del aparato No manipule la TV con el cable de alimentación enchufado No utilice cables de alimentación dañados o mal conectados Asegúrese de des enchufar el cable de alimentación sujetando el enchufe No tire del cable de alimentación para desenchufar la TV ADVERTENCIA A fin de reducir el riesgo de incendio o choque eléctrico no exponga este aparato a la lluvia humedad u otros líquidos No toque ...

Страница 127: ...eta el panel frontal de la TV a presiones o esfuerzos excesivos V Ve en nt ti il la ac ci ió ón n Instale su TV en un lugar que disponga de ven tilación apropiada No la instale en espacios cerrados como por ejemplo una estantería No cubra el producto con paños u otros materiales como plásticos mientras esté enchufada No instale la unidad en lugares con exceso de polvo Si percibe olor a quemado o d...

Страница 128: ...del Canal 41 Ajuste del volumen 41 Ajuste Inicial Configuración de Modo 42 Selección y ajuste del menú pantalla 43 Menú Rápido 45 Búsqueda de canales Escaneo automático Sintonización automática 46 Agregar Eliminar los Canales Sintonización manual 47 Edición de Canal 48 Lista de entradas 49 Etiqueta de entrada 50 Lista de Canales 51 Configuración de los canales favoritos 52 Lista de favoritos 53 Mo...

Страница 129: ...96 Disfrute de la transmisión Estéreo SAP 97 Selección del lenguaje en la pantalla 98 Subtitulaje 99 CONFIGURACIÓN HORARIA Programacion del reloj Ajuste del reloj 100 Ajustes de Encendido Apagado del temporizador 101 Configuración del temporizador de apagado automático 102 APÉNDICE Lista de verificación de problemas 103 Mantenimiento 105 Especificaciones del producto 106 Códigos de IR 108 Configur...

Страница 130: ...VITAR EL EFECTO DEGRADACIÓN DE LA IMAGEN POR SOBRE EXPOSICIÓN QUEMADO EN LA PANTALLA DE SU TELEVISOR Esta característica no se encuentra disponible para todos los modelos HDMITM tel logotipo HDMI y el interfaz multimedia de alta definición son marcas comerciales o registradas de HDMI Licensing LLC DivX Certificado para reproducir DivX video incluyendo contenido premium ACERCA DEL VÍDEO EN DIVX Div...

Страница 131: ...n Argentina x 2 ENE RG Y CH VOL 1 2 3 4 5 0 6 7 8 9 LI ST FRE EZE SAV ING TV AV MO DE INP UT FA V RA TI O MU TE ME NU Q ME NU EX IT EN TE R Q VIE W POW ER BA CK P A G E o M4x28 Excepto 60PK550R x 3 M5x14 Núcleo de ferrita Negro Esta característica no se encuentra disponible para todos los modelos Introduzca firmemente el enchufe en el tomacorriente El núcleo de ferrita puede usarse para reducir la...

Страница 132: ...roducto puede dañarse CUIDADO 42 50PJ250R ENTER CH VOL ENTER CH VOL Botón POWER Botones de CANAL E E D D Botón INPUT Botón MENU Botón ENTER Botones de VOLUMEN ENTER CH VOL Sensor inteligente Ajusta la imagen según las condiciones del entorno Indicador de Encendido Stand by Se ilumina en rojo en el modo de espera El LED está apagado mientras el televisor permanece prendido Sensor de Control Remoto ...

Страница 133: ...LUMEN Sensor inteligente Ajusta la imagen según las condiciones del entorno CH VOL ENTER CH VOL ENTER Indicador de Encendido Stand by Se ilumina en rojo en el modo de espera El LED está apagado mientras el televisor permanece prendido Sensor de Control Remoto ENTER CH VOL Botón POWER Botones de CANAL E E D D Botón INPUT Botón MENU Botón ENTER Botones de VOLUMEN 50 60PK550R Puede encender el televi...

Страница 134: ...VARIABLE AUDIO OUT VIDEO AUDIO R L MONO VARIABLE AUDIO OUT VIDEO AUDIO R L MONO AV IN 2 3 7 1 3 4 5 6 R VARIABLE AUDIO OUT VIDEO AUDIO R L MONO VARIABLE AUDIO OUT VIDEO AUDIO R L MONO 8 R R ANTENNA IN RGB IN PC AUDIO IN RGB DVI VIDEO IN1 VARIABLE AUDIO OUT VARIABLE AUDIO OUT R L Y P B P R VIDEO AUDIO 2 1 COMPONENT IN 1 2 RS 232C IN CONTROL SERVICE HDMI DVI IN HDMI IN Mono AUDIO AV L R L MONO R AUD...

Страница 135: ...video y uno rojo y blanco para audio ANTENNA IN Conecte las señales de la transmisión a este puerto Conecte los cables de señal a este conector USB IN Excepto 42 50PJ250R Utilizado para la foto la música y la película USB IN SERVICE ONLY Para 42 50PJ250R Utilizado para la actualización de software Socket del Cordón de Alimentación Esta TV funciona con alimentación de corriente alterna ca Cuidado N...

Страница 136: ...u instalación Si por el contrario apretara el perno en exceso podría deformarse por abrasión en el área de apriete del mismo No sobreapriete los tornillos NOTA Coloque con cuidado la pantalla de la TV sobre una superficie acolchada que la proteja de posibles daños Coloque las piezas del soporte sobre la base de apoyo del televisor 1 2 Monte la TV como se ilustra 3 INSTALACIÓN Excepto 60PK550R Ajus...

Страница 137: ... BI IE ER RT TA A D DE E P PR RO OT TE EC CC CI IÓ ÓN N incluida sobre el hueco dejado por este Inserte la C CU UB BI IE ER RT TA A D DE E P PR RO OT TE EC CC CI IÓ ÓN N en el televisor hasta que escuche un sonido de chasquido CUBIERTA DE PROTECCIÓN SEPARACIÓN CUBIERTA DE PROTECCIÓN Fijar una guía para los exteriores M4x28 x 4 M4x30 x 4 60PK550R 42 50PJ250R 42 50PJ350R 42 50PJ260R 50PK550R MFL6288...

Страница 138: ...l de instrucciones detallado y todas las piezas necesarias para la instalación G G No utilice tornillos más largos que los de dimensión estándar mostrados ya que podría dañar el interior de la TV G G Para montajes murales que no cumplan con las especificaciones para tornillos del estándar VESA la longitud de estos puede diferir dependiendo de sus especificaciones G G No utilice tornillos que no cu...

Страница 139: ... televisor Tras conectar los cables como resulte necesario instale el S SU UJ JE ET TA AC CA AB BL LE ES S y una los cables como se muestra Para conectar un equipo adicional vea la sección de CONEXIONES DE EQUIPO EXTERNO SUJETACABLES MFL62883001 Edit1 sp 3 17 10 3 52 PM Page 17 ...

Страница 140: ...10 1 cm 10 1 cm 10 1 cm 10 1 cm SOPORTE DEL ESLABON GIRATORIO Despues de instalar la TV puede ajustar el TV manualmente 20 grados a la izquierda y derecha para satisfacer su angulo de vision Esta característica no se encuentra disponible para todos los modelos G G Asegure la ventilación adecuada dejando el espacio recomendado G G No instale la unidad próxima o sobre ninguna fuente de calor CUIDADO...

Страница 141: ...ar estos últimos afloje los pernos Asegúrese de los soportes con los pernos De venta por separado en la pared que estén ajustados firmemente Para usar el producto seguramente asegúrese de que la altura de los soportes montados en la pared sea la misma que la del producto Asegúrese de que los pernos de ojo o soportes estén apretados en forma segura Use un cordón fuerte De venta por separado para aj...

Страница 142: ... TV de Cable en la pared Viviendas Apartamentos Conectar al enchufe de antena en la pared Cable Coaxial RF 75 ohm Cable Coaxial RF 75 ohm Casa privada Conectar a un enchufe de pared de la ante na exterior Asegúrese de no doblar el cable de cobre cuando conecte la antena Alambre de bronce ANTENNA IN ANTENNA IN En áreas de señal deficiente puede obtener una mejor calidad en la imagen si instala un a...

Страница 143: ... Para evitar daños en el equipo no enchufe ningún cable de alimentación hasta haber finalizado la conexión completa de todo el equipo La imagen puede ser diferente a la de su televisor ANTEN IN L R IN1 AV VARIABLE AUDIO OUT VIDEO AUDIO R L MONO RS 232C IN CONTROL SERVICE AUDIO IN RGB DVI 1 2 HDMI DVI IN HDMI IN RGB PC VIDEO AUDIO L Y P B P R R 1 2 COMPONENT IN Y L R PB PR 1 2 Y CB PB CR PR Resoluc...

Страница 144: ...1 3 Los cables HDMI que no admiten la versión 1 3 de HDMI provocan parpadeos o no muestran la imagen en pantalla Si este es el caso utilice cables recientes que soporten la versión 1 3 de HDMI G G El modo HDMI soporta solamente el formato de audio PCM G G Si el audio esta ajustada a Dolby DTS Bitstream en algunos DVDP STB asegúrese de cambiar la configuración a PCM NOTA H HD DM MI I I IN N 1 1 H H...

Страница 145: ...ece saria una conexión de audio separada NOTA Conecte la salida de DVI del decodificador digital al puer to de H HD DM MI I D DV VI I I IN N 1 1 en la unidad Conecte las salidas de audio del decodificador al puer to de A AU UD DI IO O I IN N R RG GB B D DV VI I en la unidad 1 Cómo conectar 2 Cómo usar Encienda el decodificador digital Refiérase al manual de usuario del decodificador digital Selecc...

Страница 146: ...R Rojo Conecte las salidas de audio del DVD a los puertos de C CO OM MP PO ON NE EN NT T I IN N A AU UD DI IO O 1 1 en la unidad 1 Cómo conectar 2 Cómo usar Encienda el reproductor de DVD inserte un DVD Seleccione la entrada de la fuente C Co om mp po on ne en nt t1 1 usando el botón I IN NP PU UT T del control remoto Si está conectado al C CO OM MP PO ON NE EN NT T I IN N 2 2 seleccione la entrad...

Страница 147: ...UT 1 Cuando lo conecta con el cable RCA VIDEO AUDIO L R IN1 1 AV VARIABLE AUDIO OUT VIDEO AUDIO R L MONO RS 232C IN CONTROL SERVICE AUDIO IN RGB DVI 1 2 HDMI DVI IN HDMI IN RGB PC IN1 VIDEO VIDEO AUDIO AUDIO R R L MONO L MONO AV L R VIDEO AUDIO Conecte las salidas de A AU UD DI IO O V VI ID DE EO O entre la TV y el VCR Coincida los colores de salidas Video amar illo Audio izquierdo blanco Audio de...

Страница 148: ... A AU UD DI IO O V VI ID DE EO O entre la TV y el VCR Coincida los colores de salidas Video amarillo Audio izquierdo blanco Audio derecho rojo 1 Cómo conectar 2 Cómo usar Inserte una cinta de video en el VCR y presione el botón PLAY del VCR Vea el manual de usuario del VCR Seleccione la entrada de la fuente A AV V1 o A AV V2 2 usando el botón I IN NP PU UT T del control remoto Si está conectado a ...

Страница 149: ...marillo Audio izquierdo blanco Audio derecho rojo 1 Cómo conectar 2 Cómo usar Seleccione la fuente de entrada del A AV V2 2 en el televisor con el botón de I IN NP PU UT T en el control remoto Si está conectado a la entrada A AV V I IN N 1 1 selec cione la fuente de entrada del A AV V1 1 en el televi sor Opere el equipo externo correspondiente Refiérase a la guía de la operación de equipo externo ...

Страница 150: ...DIO VIDEO USB IN HDMI IN VARIABLE AUDIO OUT AV IN 2 1 i e Conecte el dispositivo USB a los conectores U US SB B I IN N Entrada de USB en el televisor 1 Cómo conectar 1 2 Cómo usar Una vez conectados los conectores U US SB B I IN N use la función USB G G p p 5 58 8 MFL62883001 Edit1 sp 3 17 10 3 52 PM Page 28 ...

Страница 151: ... 1 2 2 Cómo usar Encienda la unidad y la PC Seleccione la fuente de entrada del R RG GB B en el televisor con el botón de I IN NP PU UT T en el control remoto Conecte la salida de VGA de la PC al puerto de R RG GB B P PC C en la unidad Conecte las salidas de audio de la PC al puerto de A AU UD DI IO O I IN N R RG GB B D DV VI I en la unidad 1 Cómo conectar 2 1 2 Cómo usar Encienda la PC y la unida...

Страница 152: ...l menú de IMA GEN hasta que la imagen se vea clara G G Evite mantener una imagen fija en pantalla durante largos periodos de tiempo La imagen fija podría grabarse permanentemente en pantalla G G Las formas de la entrada de sincronización para la frecuencia horizontal y vertical están separadas G G Según la tarjeta de gráficos que posea algunas resoluciones podrían no posicionarse adecuada mente en...

Страница 153: ... al ll la a Seleccione R Re es so ol lu uc ci ió ón n Seleccione la resolución deseada 1 MENU 3 4 2 ENTER 5 Configuración de pantalla para el modo PC Auto config Resolución G Posición Tamaño Fase Restablecer Pantalla Mover Prev 1024 x 768 1280 x 768 1360 x 768 Ingresar Mover IMAGEN E W C Brillo 50 Nitidez 70 Color 70 Tinte 0 Color Temperature 0 Control Avanzado Restablecer imagen Pantalla ENTER EN...

Страница 154: ...eccione S Sí í 4 ENTER Iniciar la auto configuración 5 ENTER Seleccione I IM MA AG GE EN N 1 MENU Si la posición de la imagen aún no está cor recta intente otra vez el ajuste automático Si la imagen debe ajustarse nuevamente luego del auto ajuste en RGB puede ajus tar la P Po os si ic ci ió ón n el T Ta am ma añ ño o o la F Fa as se e Auto config G Resolución Posición Tamaño Fase Restablecer Panta...

Страница 155: ... ic ci ió ón n Esta función es para ajustar la imagen a la izquierda derecha y arriba abajo a su preferencia T Ta am ma añ ño o Esta función es para minimizar cualquier barra vertical o rayas visibles en el fondo de pantalla Y también cambiará el tamaño de pantalla F Fa as se e Esta función le deja remover cualquier ruido horizontal y hace clara o nitida la imagen de caracteres Seleccione I IM MA ...

Страница 156: ...onente Excepto 480entrelazado 576entrelazado y RGB Seleccione R Re es st ta ab bl le ec ce er r 3 ENTER Seleccione I IM MA AG GE EN N Seleccione P Pa an nt ta al ll la a 1 MENU 2 ENTER Seleccione S Sí í 4 ENTER 5 ENTER Auto config Posición Resolución Tamaño Fase Restablecer G Pantalla Mover Prev Para ajustar Si No Ingresar Mover IMAGEN E W C Brillo 50 Nitidez 70 Color 70 Tinte 0 Color Temperature ...

Страница 157: ... AUDIO OUT VARIABLE AUDIO OUT L R AUDIO 1 G G Cuando conecte equipos de audio externos como amplificadores obocinas puede apagar los altoparlantes del televisor desde el menú G G p p 9 95 5 NOTA Conecte la Salida de Audio a los conectores V VA AR RI IA AB BL LE E A AU UD DI IO O O OU UT T del televisor Ajuste sus altoparlantes a través su amplificador analógico estéreo según las instrucciones incl...

Страница 158: ...a entre modos preestablecidos de video y audio G G p p 5 54 4 Alterna entre las entradas También prende el televisor desde el modo de espera G G p p 4 49 9 Selecciona los modos de operación remoto TV Seleccione un canal Selecciona elementos numerados en un menú Muestra la lista de canales Regresa al último canal visto Edición de programa FF Retroceso GG Avance rápido G Reproducción l ll l Pausa Co...

Страница 159: ...eo Enciende y apaga el sonido G G p p 4 41 1 Cambia el canal Se mueve de un conjunto de información en pantalla al siguiente Navega por los menús en pantalla y ajusta la configuración del sistema a su gusto Muestra el menú principal o cierra todas las visualizaciones en pantalla y regresa al visionado del televisor Selecciona la lista de fotografías Música Películas Abre la lista de opciones del m...

Страница 160: ... G G p p 5 54 4 Alterna entre las entradas También prende el televisor desde el modo de espera G G p p 4 49 9 Selecciona los modos de operación remoto TV Seleccione un canal Selecciona elementos numerados en un menú Muestra la lista de canales Regresa al último canal visto Edición de programa FF Retroceso GG Avance rápido G Reproducción l ll l Pausa Controla los dispositivos compatibles con la fun...

Страница 161: ...iende y apaga el sonido G G p p 4 41 1 Cambia el canal Se mueve de un conjunto de información en pantalla al siguiente Le permite navegar a través de los menús en la pantalla y ajustar el sistema de acuerdo a sus preferencias Muestra el menú principal o cierra todas las visualizaciones en pantalla y regresa al visionado del televisor Permite al usuario escuchar mejor los diálogos Abre la lista de ...

Страница 162: ...UT T C CH H o y n nú úm me er ro os s 0 0 9 9 del control remoto Seleccione la fuente de visualización utilizando el botón I IN NP PU UT T en el control remoto Esta TV está programada para recordar qué estado de energía se configuró por última vez incluso si el cable de alimentación se desconecta 1 2 Encendido de la TV tras la instalación NOTA G G Si usted va a estar ausente en vacaciones desconec...

Страница 163: ...L VOLUMEN AJUSTE DEL CANAL Presione el botón V VO OL L o para ajustar el volumen Si ud quiere apagar el sonido presione el botón M MU UT TE E Ud puede cancelar esta función presionando el botón M MU UT TE E V VO OL L o o A AV V M MO OD DE E Ajuste el volumen según su preferencia personal 1 2 3 MFL62883001 Edit1 sp 3 17 10 3 52 PM Page 41 ...

Страница 164: ... ud puede hacer la C Co on nf fi ig gu ur ra ac ci ió ón n I In ni ic ci ia al l con el menú O OP PC CI IÓ ÓN N Se ajustarán los valores predeterminados de fábrica al escoger U Us sa ar r e en n C Ca as sa a Si no completa los ajustes iniciales estos aparecerán cada vez que prenda el televisor hasta que complete dicho proceso Seleccione L Le en ng gu ua aj je e 1 2 ENTER Paso2 Selección de idioma ...

Страница 165: ... 100 Brillo 50 Nitidez 70 Color 70 Tinte 0 IMAGEN E Ingresara Mover Volumen automático Apagado Voz Clara II Apagado Nivel 3 Balance 0 Modo de audio Estándar Infinite Sound Apagado Agudos 50 Graves 50 AUDIO E L R Ingresara Mover Reloj Hora de Apagado Apagado Hora de Encendido Apagado Temporizador de Apagado Apagado HORA Ingresara Mover TV AV1 AV2 Componente 1 Componente 2 HDMI1 HDMI2 ENTRADAS Ingre...

Страница 166: ...ntalla 16 9 Ahorrodeenergía Sensor inteligente Modo imagen Estándar Contraste 100 Brillo 50 Nitidez 70 Color 70 Tinte 0 IMAGEN E Ingresar Mover Volumen automático Apagado Voz Clara II Apagado Nivel 3 Balance 0 Modo de audio Estándar Sonido infinito Apagado Agudos 50 Graves 50 AUDIO E L R Ingresar Mover Reloj Hora de Apagado Apagado Hora de Encendido Apagado Temporizador de Apagado Apagado HORA Ing...

Страница 167: ...eccione el plazo de tiempo antes de que su TV se apague automáti camente B Bo or rr r A Ag gr r F Fa av v Seleccione el canal que desee agre gar o eliminar o agregue el canal a la lista de favoritos U US SB B E Ex xp pu ul ls sa ar r Seleccione Expulsar para expulsar el dispositivo USB Los menús de visualización en pantalla de su TV pueden diferir ligeramente de las ilustraciones mostradas en este...

Страница 168: ...át ti ic ca a Seleccione I In ni ic ci io o Ejecutar la S Si in nt to on ni iz za ac ci ió ón n a au ut to om má át ti ic ca a 1 MENU 3 2 ENTER ENTER 4 ENTER 5 BACK Regresar al menú anterior Regresar a la pantalla del televisor Ingresar Mover CANAL Sintonización automática Sintonización manual Edición de Canales Ingresar Mover CANAL Sintonización automática Sintonización manual Edición de Canales ...

Страница 169: ...gar o borrar 3 ENTER 4 Seleccione A Ag gr re eg ga ar r o B Bo or rr ra ar r 5 ENTER 6 BACK Regresar al menú anterior Regresar a la pantalla del televisor Ingresar Mover CANAL Sintonización automática Sintonización manual Edición de Canales Ingresar Mover CANAL Sintonización automática Sintonización manual Edición de Canales Canal Seleccione el tipo de canal y el número de canal de RF F F TV G G 2...

Страница 170: ... el menú Edición de canales Edición de canal Cambio de Canal Cambio de página CH Mover Previo Agregar Borrar Ingresar Mover CANAL Sintonización automática Sintonización manual Edición de Canales Seleccione un canal Seleccione el canal que desee agregar o borrar 3 ENTER 4 Seleccione C CA AN NA AL L 1 MENU 2 ENTER Seleccione E Ed di ic ci ió ón n d de e C Ca an na al le es s 5 Regresar al menú anter...

Страница 171: ...taciones de aire y cable A AV V Selecciónelo para mirar una video casetera u otro equipo externo C Co om mp po on ne en nt te e Selecciónelos para mirar un DVD o un decodificador digital R RG GB B Selecciónelo para ver la PC H HD DM MI I Selecciónelo para ver en dispositivos de alta definición 1 ENTER INPUT HDMI3 42 50PJ350R 50 60PK550R AV1 AV2 AV3 Componente HDMI2 HDMI1 RGB TV MFL62883001 Edit1 s...

Страница 172: ...tulo Apagado ID del Televisor 1 Método de ISM Normal Modo Demo Apagado E E AV1 AV2 Componente1 Componente2 HDMI1 HDMI2 F F G G Close 42 50PJ250R AV1 AV2 AV3 Componente RGB HDMI1 HDMI2 HDMI3 F F G G Close 50 60PK550R Seleccione O OP PC CI IÓ ÓN N Seleccione E Et ti iq qu ue et ta a d de e e en nt tr ra ad da a Seleccione la etiqueta 1 MENU 2 ENTER Seleccione la fuente 3 ENTER 4 5 Regresar al menú a...

Страница 173: ...ista de canales Salir Visualización de la L Li is st ta a d de e c ca an na al le es s 1 LIST Visualización de la lista de canales Escoja un canal 1 Cambie al número de canal escogido 2 ENTER Selección de un canal de la lista de canales Pase las páginas 1 CH P A G E 2 Paso de páginas de una lista de canales EXIT MFL62883001 Edit1 sp 3 17 10 3 52 PM Page 51 ...

Страница 174: ...leccionar canales favoritos almacenados CONFIGURACIÓN DE LOS CANALES FAVORITOS Menú rápido Cerrar F F 16 9 G G Apagado Estándar STEREO Apagado Favorito Expulsar Aspectodepantalla Modo imagen Modo de audio Subtítulo SAP Temporizador de Apagado Borr Agr Fav USB Expulsar CH Vivo Excepto 42 50PJ250R Seleccione B Bo or r A Ag gr r F Fa av v 2Q MENU 1 CH P A G E 1 2 3 4 5 0 6 7 8 9 Escoja el canal que p...

Страница 175: ...l escogido 2 ENTER Selección de un canal de la lista de canales favoritos Pase las páginas 1 CH P A G E Regresar a la pantalla del televisor 2 Paso de páginas de la lista de canales favoritos Muestre la lista de canales favoritos 1 Visualización de la lista de canales favoritos MARK FAV EXIT MFL62883001 Edit1 sp 3 17 10 3 52 PM Page 53 ...

Страница 176: ... IMAGEN Modo imagen y para el menú AUDIO Modo de audio respectivamente Si selecciona A Ap pa ag ga ad do o en modo AV el M Mo od do o i im ma ag ge en n y el M Mo od do o d de e a au ud di io o volverán a tener el valor seleccionado anteriormente A Ap pa ag ga ad do o Desactiva el MODO AV C Ci in ne e Optimiza video y audio para dis frutar películas D De ep po or rt te e Optimiza video y audio par...

Страница 177: ...e la unidad o los botones de POWER INPUT CH o números del con trol remoto ConB Bl lo oq qu ue eo o d de e T Te ec cl la as s E En nc ce en nd di id do oseapare cerá B Bl lo oq qu ue eo o d de e T Te ec cl la as s en la pan talla si cualquier botón del panel frontal ha presionado cuando mira la unidad Excepto botón de Encendido 4 BACK Regresar al menú anterior Regresar a la pantalla del televisor I...

Страница 178: ... en casa desactivándose los del televisor G G Cuando la unidad esté conectada a un sistema de cine en casa SIMPLINK ajuste la toma Salida Variable y apague los altoparlantes del televisor para poner en funcionamiento los altoparlantes del sistema de cine en casa En este momento el volumen máximo de los altoparlantes del sistema de cine en casa está ajus tado al volumen del televisor Ingresara Move...

Страница 179: ...a función Nota Paraactivarelenlacesimple debeemplearelcableHDMIconeldispositivo CEC CEC ConsumerElectronicsControl Funciones de SIMPLINK Menú Simplink V Vi is su ua al li iz za ac ci ió ón n d de el l t te el le ev vi is so or r Cambie al canal del televisor anterior sin importar el modo actual R Re ep pr ro od du uc cc ci ió ón n d de e D DI IS SC C D Di is sc co o Seleccione y reproduzca los dis...

Страница 180: ...ará mientras esté activado el OSD incluyendo el menú En el dispositivo USB no puede agregar una nueva carpeta ni borrar la carpeta existente El conjunto que aquí se muestra puede tener algunas diferencias con su TV Cuando desconecte el dispositivo USB Conecte el dispositivo USB a las tomas U US SB B I IN N en el lateral de la TV 3 Seleccione F FO OT TO OS S M MÚ ÚS SI IC CA A o P PE EL LÍ ÍC CU UL...

Страница 181: ...excesivamente largo el dispositivo podría no ser reconocido G G Algunos dispositivos de almacenamiento USB podrían no ser compatibles o no funcionar adecuadamente G G Realice copias de seguridad de sus archivos importantes ya que los datos almacenados en el dispositivo USB podrían resultar daña dos La gestión de datos es responsabilidad del cliente y en consecuencia el fabricante no cubre en garan...

Страница 182: ...ágina actual Total de páginas Número total de fotos en miniatura marcadas Botones correspondientes en el control remoto 1 3 4 2 Seleccione U US SB B Seleccione L Li is st ta a d de e f fo ot to os s 2 1 MENU ENTER ENTER Página 1 1 No marcado LISTA DE FOTOS Carpeta arriba 1366x768 125KB KY101 09 10 2008 KY102 09 10 2008 JMJ001 09 10 2008 JMJ002 09 10 2008 JMJ003 09 10 2008 JMJ004 09 10 2008 KY103 0...

Страница 183: ...09 10 2008 JMJ006 09 10 2008 JMJ007 09 10 2008 JMJ008 09 10 2008 Carpeta arriba Drive1 JMJ001 E E Optión Mover Cambio de página Marcar Salir CH MARK Página 1 1 No marcado LISTADEFOTOS Carpeta arriba 1366x768 125KB KR101 09 10 2008 KR102 09 10 2008 JMJ001 09 10 2008 JMJ002 09 10 2008 JMJ003 09 10 2008 JMJ004 09 10 2008 KR103 09 10 2008 KR104 09 10 2008 KR105 09 10 2008 JMJ005 09 10 2008 JMJ006 09 1...

Страница 184: ... LISTADEFOTOS Carpeta arriba 1366x768 125KB KR101 09 10 2008 KR102 09 10 2008 JMJ001 09 10 2008 JMJ002 09 10 2008 JMJ003 09 10 2008 JMJ004 09 10 2008 KR103 09 10 2008 KR104 09 10 2008 KR105 09 10 2008 JMJ005 09 10 2008 JMJ006 09 10 2008 JMJ007 09 10 2008 JMJ008 09 10 2008 Carpeta arriba Drive1 JMJ001 E Optión Mover Cambio de página Marcar Salir CH MARK Página 1 1 No marcado LISTADEFOTOS Carpeta ar...

Страница 185: ... Gi ir ra ar r Girar fotos Gira la foto 90 180 270 360 en el sentido de las agujas del reloj G G B Bo or rr ra ar r Borre las fotos G G E Es sc co on nd de er r Oculte el menú en la pantalla de tamaño completo Para ver nuevamente el menú en pantalla completa presione el botón E EN NT TE ER R Seleccione P Pr re es se en nt ta ac ci ió ón n B BG GM M G Gi ir ra ar r B Bo or rr ra ar r o E Es sc co o...

Страница 186: ...eleccionar Visualización de fotos No puede cambiar a la carpeta de música durante la reproducción de BGM Pulse F F G G para ajustar el intervalo de tiempo entre diapositivas Veloc de presentación Carpeta de música Rápido Previo Mostrar Veloc de presentación o Carpeta de música Realice los ajustes apropiados 2 1 ENTER ENTER NOTA G G Si selecciona off para el altavoz del televisor ajustar las caract...

Страница 187: ... automático Voz clara II Balance Cine Apagado Apagado Previo G G Al seleccionar Establecer vídeo G G Al seleccionar Establecer audio Mostrar el Modo imagen Realice los ajustes apropiados 2 1 ENTER ENTER Mostrar Modo de audio Volumen automático Voz clara II y Balance Realizar los ajustes apropiados 2 1 ENTER ENTER Matiz 100 50 70 70 0 0 0 MFL62883001 Edit2 usb sp 3 17 10 3 53 PM Page 65 ...

Страница 188: ...8 kHz Componentes de la pantalla Seleccione U US SB B Seleccione L Li is st ta a D De e M Mú ús si ic ca a 2 1 MENU ENTER ENTER Página 1 1 No marcado LISTA DE MÚSICA Carpeta arriba 00 00 01 34 Carpeta arriba Music Título Duración 1 S003 E E S001 S002 S003 S004 S005 03 33 04 45 01 30 02 37 01 58 4 Menú emergente Mover Cambio de página Salir CH Marcar MARK Optión Q MENU Se desplaza a la carpeta del ...

Страница 189: ...Bo or rr ra ar r Borrar la música seleccionada G G C Ce er rr ra ar r Cierre el pop up menú Use el botón C CH H para navegar en la página de títulos de música Use el botón M MA AR RK K para marcar o desmarcar una música Si no se marca ninguna música toda la música en la carpeta se reproducirá en secuencia Cuando uno o más archivos de músi ca estén marcados la música marcada se repro ducirá en secu...

Страница 190: ...etener el protector de pantalla G G Este televisor no puede reproducir archivos de música de menos de 32 kbytes G G Los botones P PL LA AY Y G G P Pa au us se e I II I A A G GG G F FF F en el control remoto también están disponibles en este modo G G Puede utilizar el botón G GG G para seleccionar la música siguiente y el botón F FF F para seleccionar la música anterior G G Si selecciona Off para T...

Страница 191: ...i la estructura de vídeo y audio del archivo grabado no está intercalada se emitirá vídeo o audio Al leer un video a través de una conexión USB no compatible con transmisión de datos de alta velocidad podría no funcionar correctamente Los dispositivos de almacenamiento USB de versión inferior a USB 2 0 también son compatibles Pero podrían no funcionar correctamente en la lista de películas El DivX...

Страница 192: ...nombre del archivo de vídeo y el de su archivo de subtítulos deben ser idénticos para poder mostrarse G G Use los botones para desplazarse a un fotograma específico hacia adelante o hacia atrás mientras se lee una película Los botones podrían no funcionar correctamente con algunos archivos mientras se lee una película Página 1 1 No marcado LISTA DE PELÍCULAS Carpeta arriba 640x480 720KB Carpeta ar...

Страница 193: ...up menú En el caso de archivos no admitidos se muestra un mensaje sobre archivos no admitidos Como se indica aparecen hasta 6 títulos de películas por página Seleccione la carpeta o el disco de destino Seleccione todas las películas Visualice el menú emergente Seleccione el menú emergente deseado 2 3 1 4 ENTER ENTER ENTER Página 1 1 No marcado LISTA DE PELÍCULAS Carpeta arriba 640x480 720KB Movie ...

Страница 194: ...varse Ante dos o más opciones de subtítulos podrá escoger uno de ellos G G L Le en ng gu ua aj je e d de e A Au ud di io o Escoja el idioma deseado Pero no puede escogerse el archivo que sólo contenga un canal de audio S Si in nc c Cuando el video no está sincronizado con los subtítulos éstos pueden ajustarse por unidades de 0 5 segundos U Ub bi ic ca ac ci ió ón n Desplace el emplazamiento de los...

Страница 195: ...70 0 0 Francés Español Catalán Vasco Portugués Italiano Albano Reto Romance Holandés Alemán Danés Sueco Noruego Finlandés Feroés Islandés Irlandés Escocés Inglés Latino1 Checo Húngaro Polaco Rumano Croata Eslovaco Esloveno Serbio Estonio Idiomas Bálticos Letón Latvio y Lituano Groenlandés y Lapón Inglés Turco Búlgaro Bielorruso Macedonio Ruso Serbio y pre 1990 no ghe con recu peración Ucraniano In...

Страница 196: ...retroceso rápido Durante la lectura pulse el botón P Pa au us se e I II I Se mostrará una pantalla fija Al usar el botón ó durante la lectura el cursor podrá visualizarse en pantalla indicando la posición Pulse el botón P PL LA AY Y G G para volver a la lectura normal F FF F G GG G P PL LA AY Y G G I II I G G Al seleccionar Configurar Audio Mostrar Modo audio Volumen automático Voz clara II y Bala...

Страница 197: ...dientes con el código de registro del televisor adquirido Seleccione U US SB B Seleccione R Re eg g D Di iv vX X C Có ód di ig go o Visualizar el R Re eg g D Di iv vX X C Có ód di ig go o 1 MENU 3 2 ENTER ENTER Pulse el botón MENU EXIT para volver a un visionado normal del TV Pulse el botón B BA AC CK K para volver a la pantalla de menú anterior DivX Reg Code DivX Reg Code Ingresar Mover Lista de ...

Страница 198: ...s no pueden funcionar Si usa el código de registro DivX de otro dispositivo el archivo DivX alquilado o adquirido no podrá leerse Por lo tanto use siempre el código de registro DivX asignado a este producto Archivo de película compatible Resolución inferior a 720x480 720x576 píxeles An x Al Velocidad de cuadros inferior a 30 cuadros segundo MFL62883001 Edit2 usb sp 3 17 10 3 53 PM Page 76 ...

Страница 199: ...n 1 MENU 2 ENTER Seleccione S Sí í o N No o 3 ENTER 4 ENTER Pulse el botón MENU EXIT para volver a un visionado normal del TV Pulse el botón B BA AC CK K para volver a la pantalla de menú anterior Ingresar Mover Lista de fotos Lista de música Lista de películas Reg DivX Código Desactivación USB Deactivation Ingresar Mover Lista de fotos Lista de música Lista de películas Reg DivX Código Desactivac...

Страница 200: ... 16 9 Ahorrodeenergía Sensor inteligente Modo imagen Vivo Contraste 100 Brillo 50 Nitidez 70 Color 70 Tinte 0 16 9 Sólo búsqueda 4 3 Zoom Zoom cine 1 También ud puede ajustar el A As sp pe ec ct to o d de e p pa an nt ta al ll la a con el menú M Me en nú ú r rá áp pi id do o Presione el botón R RA AT TI IO O repetida mente para seleccionar el formato de la imagen deseado Seleccione I IM MA AG GE E...

Страница 201: ...os de Componente HDMI DVI 720progresivo 1 080entre lazado 1 080progresivo fuente de entrada 4 3 La selección siguiente le dejará ver una imagen con la proporción original de aspecto 4 3 Zoom Seleccione cuando desea ver la imagen sin ninguna alteración Sin embargo las porciones superior e inferior de la imagen serán cortadas Zoom cine 1 Seleccione Cine Zoom cuando desee ampliar la imagen en la prop...

Страница 202: ... o E Es st tá án nd da ar r C Ci in ne e D De ep po or rt te e y J Ju ue eg go o son preestablecidos en fábrica para lograr la mejor calidad de imagen También ud puede ajustar el M Mo od do o i im ma ag ge en n con el menú M Me en nú ú r rá áp pi id do o V Vi iv vo o Este es el modo para maximizar el efecto del video en el expositor de la tien da Intensifica el contraste brillo la nitidez y color ...

Страница 203: ...ivo Contraste 100 Brillo 50 Nitidez 70 Color 70 Tinte 0 Contraste 80 E E E E E E E E Ingresar R G C Co on nt tr ra as st te e Aumenta o disminuye el gradiente de la señal de video Podría usar el mando de contraste cuando las partes brillantes de la imagen queden saturadas B Br ri il ll lo o Aumenta o disminuye el nivel de negro de la señal de video Deberá usar la función Brillo cuando el nivel de ...

Страница 204: ...E EN N Seleccione C Co on nt tr ro ol l A Av va an nz za ad do o Seleccione sus opciones deseadas 1 MENU 3 2 ENTER ENTER 5 BACK Regresar al menú anterior Regresar a la pantalla del televisor Seleccione sus opciones deseadas 4 Ingresar Move IMAGEN E W C Contraste 100 Brillo 50 Nitidez 70 Color 70 Tinte 0 Control Avanzado Restablecer imagen Pantalla Ingresar Move IMAGEN E W C Contraste 100 Brillo 50...

Страница 205: ... la imagen original Alto oscurece la zona de nivel oscuro y gris de la imagen Puede ajustar el brillo de la zona oscura y la zona del nivel de gris de la imagen Hace que los videoclips grabados se vean de forma más natural Las películas en DVD y Blu ray están filmadas a 24 fotogramas por segundo Contraste Dinámico Color Dinámico Reducción de ruido Gamma Modo película Temperatura de Color Except 42...

Страница 206: ...i ig ge en nt te e A Ap pa ag ga ad do o M Mí ín ni im mo o M Me ed di ia a M Má áx xi im mo o o D De es sc co on ne ex xi ió ón n d de e p pa an nt ta al ll la a 4 BACK Regresar al menú anterior Regresar a la pantalla del televisor Seleccione A Ah ho or rr ro o d de e e en ne er rg gí ía a S Se en ns so or r I In nt te el li ig ge en nt te e Si esta función está activa la imagen se ajusta automát...

Страница 207: ...e en n Inicialice el valor ajustado 3 ENTER 4 Regresar a la pantalla del televisor 1 MENU 2 ENTER Ingresar Mover IMAGEN E W C Brillo 50 Nitidez 70 Color 70 Tinte 0 Temperatura de Color 0 Control Avanzado Restablecer imagen Pantalla Ingresar Mover IMAGEN E W C Brillo 50 Nitidez 70 Color 70 Tinte 0 Temperatura de Color 0 Control Avanzado Restablecer imagen Pantalla Restableciendo configuración de vi...

Страница 208: ...r con la pan talla desplazada ligeramente y el patrón blanco Es difícil detectar la imagen superpuesta temporal generada durante su eliminación y el funcionamiento del patrón de color B Bl la an nq qu ue ea ar r Es la función que remueve las imágenes permanentes de la pantalla Use moderadamente Mire el televisor normalmente durante un momento antes de utilizar esta función para ver si desa parece ...

Страница 209: ... Normal Modo Demo Apagado Ingresar Mover OPCIÓN Idiomadelmenú Language Español Etiqueta de entrada SIMPLINK Encendido Bloqueo de Teclas Apagado Subtítulo Apagado ID del Televisor 1 Método de ISM Normal Modo Demo Apagado E E Seleccione O OP PC CI IÓ ÓN N Seleccione M Mo od do o D De em mo o Seleccione E En nc ce en nd di id do o Comenzará el M Mo od do o D De em mo o 4 Regresar a la pantalla del te...

Страница 210: ...caracteristicas de usuarion y de canal seran reiniciadas Seleccione O OP PC CI IÓ ÓN N Seleccione C Co on nf fi ig gu ur ra ac ci ió ón n I In ni ic ci ia al l Seleccione S Sí í o N No o 4 BACK Regresar al menú anterior Regresar a la pantalla del televisor Ingresar Mover OPCIÓN SIMPLINK Encendido Bloqueo de Teclas Apagado Subtítulo Apagado ID del Televisor 1 Método de ISM Normal Modo Demo Apagado ...

Страница 211: ...ajustes automáticos para cada canal Seleccione A AU UD DI IO O Seleccione V Vo ol lu um me en n a au ut to om má át ti ic co o Seleccione E En nc ce en nd di id do o o A Ap pa ag ga ad do o Regresar al menú anterior Regresar a la pantalla del televisor Ingresar Mover AUDIO Volumen automático Apagado Voz Clara II Apagado Nivel 3 Balance 0 Modo de audio Estándar Infinite Sound Apagado Agudos 50 Grav...

Страница 212: ...pa ag ga ad do o Enter Move AUDIO Volumen automático Apagado Voz Clara II Apagado Nivel 3 Balance 0 Modo de audio Estándar Infinite Sound Apagado Agudos 50 Graves 50 L R E Enter Move AUDIO L R E Volumen automático Apagado Voz Clara II Apagado Nivel 3 Balance 0 Modo de audio Estándar Infinite Sound Apagado Agudos 50 Graves 50 6 BACK Regresar al menú anterior Regresar a la pantalla del televisor Sel...

Страница 213: ...sor Ingresar Mover AUDIO Volumen automático Apagado Voz Clara II Apagado Nivel 3 Balance 0 Modo de audio Estándar Infinite Sound Apagado Agudos 50 Graves 50 L R E Ingresar Mover AUDIO L R E Volumen automático Apagado Voz Clara II Apagado Nivel 3 Balance 0 Modo de audio Estándar Infinite Sound Apagado Agudos 50 Graves 50 Estándar Música Cine Deporte Juego También ud puede ajustar el M Mo od do o d ...

Страница 214: ... e o J Ju ue eg go o ENTER Realice los ajustes adecuados 5 ENTER 6 BACK Regresar al menú anterior Regresar a la pantalla del televisor Ingresar Mover AUDIO Volumen automático Apagado Voz Clara II Apagado Nivel 3 Balance 0 Modo de audio Estándar Infinite Sound Apagado Agudos 50 Graves 50 L R E Ingresar Mover AUDIO L R E Volumen automático Apagado Voz Clara II Apagado Nivel 3 Balance 0 Modo de audio...

Страница 215: ...resar al menú anterior Regresar a la pantalla del televisor Escoja esta opción para obtener un sonido realista 1 MENU 2 ENTER 3 ENTER Ajuste el sonido que mejor se adapte a sus necesidades Enter Move AUDIO Volumen automático Apagado Voz Clara II Apagado Nivel 3 Balance 0 Modo de audio Estándar Infinite Sound Apagado Agudos 50 Graves 50 L R E Enter Move AUDIO L R E Volumen automático Apagado Voz Cl...

Страница 216: ... Regresar a la pantalla del televisor Ingresar Mover AUDIO Volumen automático Apagado Voz Clara II Apagado Nivel 3 Balance 0 Modo de audio Estándar Infinite Sound Apagado Agudos 50 Graves 50 L R E Ingresar Mover AUDIO L R E Volumen automático Apagado Voz Clara II Apagado Nivel 3 Balance 0 Modo de audio Estándar Infinite Sound Apagado Agudos 50 Graves 50 Cerrar E E E E Balance 0 L R 4 BACK 1 MENU 2...

Страница 217: ...la pantalla del televisor Enter Move AUDIO Balance 0 Modo de audio Estándar Infinite Sound Apagado Agudos 50 Graves 50 Restablecer Parlantes de TV Encendido L R E Enter Move AUDIO L R E Balance 0 Modo de audio Estándar Infinite Sound Apagado Agudos 50 Graves 50 Restablecer Parlantes de TV Encendido Apagado Encendido NOTA G G Al apagar el altoparlante del televisor mientras el sistema de cine en ca...

Страница 218: ... r Inicialice el valor ajustado 3 ENTER 4 Regresar a la pantalla del televisor Ingresar Mover AUDIO Balance 0 Modo de audio Estándar Infinite Sound Apagado Agudos 50 Graves 50 Restablecer Parlantes de TV Encendido L R E Ingresar Mover AUDIO L R E Balance 0 Modo de audio Estándar Infinite Sound Apagado Agudos 50 Graves 50 Restablecer Parlantes de TV Encendido 1 MENU 2 ENTER i Restableciendo configu...

Страница 219: ...sonido adicional El sonido mono se utiliza automáticamente si se transmite solo en mono Seleccione S SA AP P Seleccione M MO ON NO O S ST TE ER RE EO O o S SA AP P Regresar a la pantalla del televisor 1Q MENU 3 2 Menú rápido Close F F 16 9 G G Off Standard STEREO Off Delete Eject Aspecto de pantalla Modo imagen Modo de audio Subtítulo SAP Temporizador de Apagado Borr Agr Fav USB Expulsar CH Vivid ...

Страница 220: ...r 1 Método de ISM Normal Modo Demo Apagado Ingresar Mover OPCIÓN Idioma del menú Language Español Etiqueta de entrada SIMPLINK Encendido Bloqueo de Teclas Apagado Subtítulo Apagado ID del Televisor 1 Método de ISM Normal Modo Demo Apagado Idioma del menú Language Ingles Español Español Portugués Confirmar E E SELECCIÓN DEL LENGUAJE EN LA PANTALLA Seleccione su idioma deseado De aquí en adelante la...

Страница 221: ...s s p pa ar ra a e el l S Su ub bt ti it tu ul la aj je e No todas las transmisiones de TV incluyen señales de subtitulaje Algunas veces las estaciones de Televisión transmiten cuatro señales de subtitulaje diferentes en el mismo canal Seleccionando Modo 1 o el Modo 2 usted puede escoger cuál señal visualizar Modo 1 es la señal usual con subtítulos mientras que otro modo puede desplegar demostraci...

Страница 222: ...a F F 2AM G G Minuto Cerrar Seleccione H HO OR RA A Seleccione R Re el lo oj j Seleccione y ajustar H Ho or ra a o M Mi in nu ut to o Regresar al menú anterior Regresar a la pantalla del televisor Si este televisor se desenchufa o se apaga mediante el principal de prendido la función R Re el lo oj j quedará reiniciada Deberá realizar correctamente la configuración horaria antes de utilizar la func...

Страница 223: ...Ho or ra a d de e E En nc ce en nd di id do o seleccionar A Ap pa ag ga ad do o Seleccione H HO OR RA A Seleccione H Ho or ra a d de e A Ap pa ag ga ad do o o H Ho or ra a d de e E En nc ce en nd di id do o Seleccione y ajustar H Ho or ra a o M Mi in nu ut to o 5 BACK Regresar al menú anterior Regresar a la pantalla del televisor Ingresar Mover HORA Reloj Hora de Apagado Apagado Hora de Encendido ...

Страница 224: ...40 0 Regresar al menú anterior Regresar a la pantalla del televisor Ingresar Mover HORA Reloj Hora de Apagado Apagado Hora de Encendido Apagado Temporizador de Apagado Apagado Ingresar Mover HORA Reloj Hora de Apagado Apagado Hora de Encendido Apagado Temporizador de Apagado Apagado Apagado 10 min 20 min 30 min 60 min 90 min 120 min 180 min 240 min También ud puede hacer el T Te em mp po or ri iz ...

Страница 225: ...imentación dentro del tomacorriente de la pared Verifique la dirección y o la ubicación de su antena Pruebe el tomacorriente enchufe un cordón de alimentación de otro producto en el tomacorriente donde estaba enchufado el cordón de alimentación del producto Es normal la imagen es muda durante el proceso de inicio del producto Favor de contactar a su centro de servicio si la imagen no aparece cinco...

Страница 226: ...ido Sonido raro desde interior del producto No hay sonido al conec tar tomas HDMI USB No salida de una de las bocinas N No o s si ir rv ve e l la a f fu un nc ci ió ón n d de e a au ud di io o Presione el botón VOL o Volumen Sonido mudo Presione el botón MUTE Intente otro canal El problema puede ser con la transmisión Están instalados apropiadamente los cables de audio Ajuste el Balance en la opci...

Страница 227: ...ante de ropa o detergente de platos Escurra la tela hasta que esté casi seca luego limpie la pantalla con ella Asegurese que no haya exceso de agua por la pantalla luego dejela secar por el aire antes de encender su TV Limpiando el gabinete Para remover la suciedad o polvo limpie el gabinete con una tela suave seca y sin pelusa Favor de asegurarse no usar una tela mojada Ausencia Extendida G G Si ...

Страница 228: ...V 1 125 75 ohm 32 104 F 0 40 C Menos de 80 4 140 F 20 60 C Menos de 85 Dimensiones Ancho x Altura x Profundidad Peso Potencia requerida Sistema de la TV Cobertura de programas Impedancia de Antena Externa Condición de ambiente incluyendo la base excluyendo la base incluyendo la base excluyendo la base Temp de operación Humedad de operación Temp para almacenar Humedad para almacenar 988x688 5x260mm...

Страница 229: ...UHF 14 69 CATV 1 125 75 ohm 32 104 F 0 40 C Menos de 80 4 140 F 20 60 C Menos de 85 Dimensiones Ancho x Altura x Profundidad Peso Potencia requerida Sistema de la TV Cobertura de programas Impedancia de Antena Externa Condición de ambiente incluyendo la base excluyendo la base incluyendo la base excluyendo la base Temp de operación Humedad de operación Temp para almacenar Humedad para almacenar 11...

Страница 230: ...a code Data code Repeat code Tf 4 5 ms 9 ms 2 25 ms 9 ms 0 55 ms 0 56 ms 1 12 ms 0 56 ms 2 24 ms Tf Tf Tf 108ms 455KHz Bit 0 Bit 1 1 Cómo conectar Conecte su control remoto de cable al puerto de control remoto en la TV 2 Códigos de IR de Control Remoto Salida de la forma de onda Pulso simple modulado con la señal de 37 917 kHz en 455 kHz T1 Tc Frecuencia de transportador FCAR 1 TC fOSC 12 Proporci...

Страница 231: ...44 ENTER Botón control Remoto 28 BACK Botón control Remoto 7E SIMPLINK Botón control Remoto 30 AV MODE Botón control Remoto 79 RATIO Botón control Remoto 95 ENERGY SAVING Botón control Remoto 53 LIST Botón control Remoto 1A Q VIEW Botón control Remoto BA FREEZE Botón control Remoto 72 ROJO Botón control Remoto 63 AMARILLO PLAY Botón control Remoto 61 AZUL PAUSE Botón control Remoto 71 VERDE STOP B...

Страница 232: ... telenet En modo USB y Bluetooth no es compatible con función RS 232C ANTENNA IN VIDEO AUDIO L L R IN1 Y P B P R R 1 2 AV COMPONENT IN VARIABLE AUDIO OUT VIDEO AUDIO R L MONO AUDIO IN RGB DVI 1 2 HDMI DVI IN HDMI IN RGB PC RS 232C IN CONTROL SERVICE Tipo del Conector Macho D Sub 9 Pines No Nombre de Pin 1 No conexión 2 RXD Recepción de datos 3 TXD Transmisión de datos 4 DTR Lado DTE listo 5 GND 6 ...

Страница 233: ...ormal Modo Demo Apagado Ingresar Mover OPCIÓN Idioma del menú Language Español Etiqueta de entrada SIMPLINK Encendido Bloqueo de Teclas Apagado Subtítulo Apagado ID del Televisor 1 Método de ISM Normal Modo Demo Apagado F F 1 G G Cerrar Seleccione O OP PC CI IÓ ÓN N Seleccione I ID D d de el l T Te el le ev vi is so or r Seleccione el número deseado de ID del monitor Rango de ajuste de I ID D d de...

Страница 234: ... de ID de la TV en el menú Especial Rango de ajuste es de 1 a 99 Cuando seleccione la ID de unidad 0 cada TV conectada será controlada ID de unidad está indicado en decimal 1 99 en el menú en Hexadecimal 0x0 0x63 en la transmisión recibiendo el protocolo DATO Para transmitir los datos de comando Transmite el dato FF a leer estados de comando Cr Retorno Código ASCII como 0x0D Código ASCII como espa...

Страница 235: ...men También puede ajustar el silenciador utilizando el botón MUTE en el control remoto Sólo en el caso de que la función Silencio de video esté activada el televisor mostrará la visualización en pantalla OSD Pero en el caso de que la función Silencio de video esté desactivada el televisor no mostrará la visualización en pantalla OSD Dato 00 Encendidodelsilenciadordevolumen Sinvolumen Dato 01 Apaga...

Страница 236: ...nto u ID del Televisor OK NG Dato x 1 15 5 A Ag gu ud do os s C Co om ma an nd do o k k r r Para ajustar los agudos También puede ajustar los agudos en el menú audio Dato Min 00 Máx 64 Refiérase a Mapeo de datos reales1 Transmisión k r ID del Televisor Dato Cr Reconocimiento r ID del Televisor OK NG Dato x 1 16 6 G Gr ra av ve es s C Co om ma an nd do o k k s s Para ajustar los graves También pued...

Страница 237: ... OK NG Dato x 1 18 8 M Mé ét to od do o d de e I IS SM M C Co om ma an nd do o jj p p Para evitar tener una imagen fija permanente en pantalla Transmisión j p ID del Televisor Dato Cr Reconocimiento p ID del Televisor OK NG Dato x 0 0 0 0 0 0 0 0 Lavado de Color Orbiter Blanquear Normal 4 3 2 1 0 Función 0 0 0 0 0 0 1 0 0 1 0 0 5 6 7 1 0 0 0 Lavado de Color Orbiter Blanquear Normal MSB LSB Nopuede...

Страница 238: ... de canal Dato1 Bytes altos Dato2 Bytes bajos Númerodecanalendospartes Númeromayor Númeromenor Número de canal en una parte En caso de utilizar un número de canal en una parte el canal menor no será necesario Dato3 4 Número de canal menor No se necesita para NTSC Dato3 Bytes altos Dato4 Bytes bajos Dato5 Atributo Transmisión m a ID del Televisor Dato0 Dato1 Dato2 Dato3 Dato4 Dato5 Cr Reconocimient...

Страница 239: ...S Se elle ec cc ciió ón n d de e e en nt tr ra ad da a C Co om ma an nd do o x x b b E En nt tr ra ad da a d de e lla a iim ma ag ge en n p pr riin nc ciip pa all Para seleccionar la fuente de entrada para la TV Dato Estructura Transmisión x b ID del Televisor Dato Cr Número de entrada Dato 0 0 0 0 Input1 0 0 1 1 Input4 0 0 1 0 Input3 0 0 0 1 Input2 Excepto 42 50PJ250R MFL62883001 Edit3 sp 3 17 10...

Страница 240: ...MFL62883001 Edit3 sp 3 17 10 3 56 PM Page 118 ...

Страница 241: ...MFL62883001 Edit3 sp 3 17 10 3 56 PM Page 119 ...

Страница 242: ...ero de modelo y serie del televisor se encuentra en la parte posterior y en un lateral del televisor respectivamente Anótelo a continuación para tenerlo disponible en caso de necesitar asistencia Modelo Serie ...

Отзывы: