background image

42

WATCHING TV / PROGRAMME CONTROL
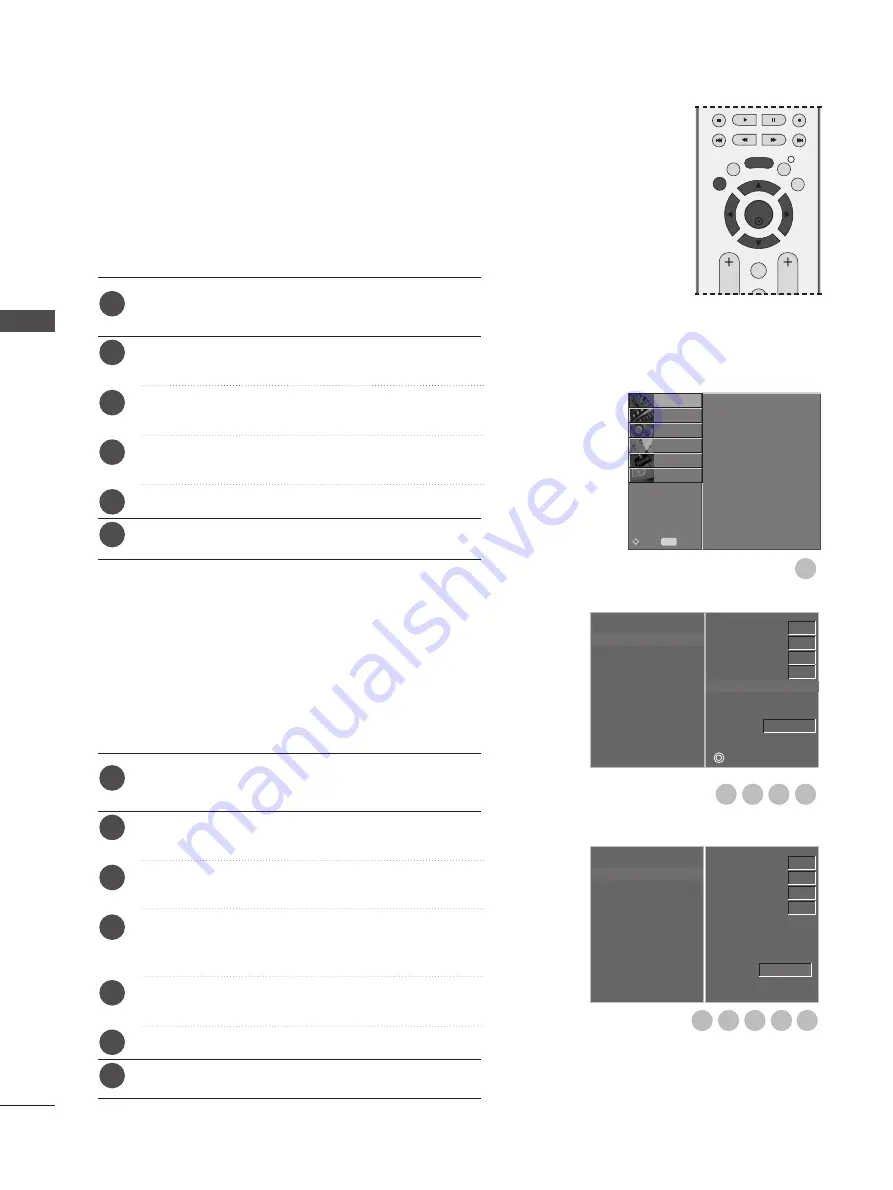
Press the 

MENU

button and then 

D

or 

E

button to

select the 

SETUP

menu.

Press the 

G

button and then 

D

or 

E

button to select

Manual Tuning

.

Press the 

G

button and then 

D

or 

E

button to select

Name

Press the 

G

button and then 

D

or 

E

button. You can

use the alphabet A to Z, numbers 0 to 9, +/ -, and
blank.

Press the 

F

or 

G

button to select the position and

make your choice of the second character, and so on. 

Press the 

OK

button to store it.

Press the 

EXIT

button to return to normal TV viewing.

Normally fine tuning is only necessary if reception is poor.

Press the 

MENU

button and then 

D

or 

E

button to

select the 

SETUP

menu.

Press the 

G

button and then 

D

or 

E

button to select

Manual Tuning

.

Press the 

G

button and then 

D

or 

E

button to select

Fine

.

Press the 

G

button and then 

F

or 

G

button to fine

tune for the best picture and sound.

Press the 

OK

button to store settings.

Press the 

EXIT

button to return to normal TV viewing.

FINE TUNING (IN ANALOGUE MODE)

ASSIGNING A STATION NAME 
(IN ANALOGUE MODE)

You can assign a station name with five characters to each
programme number.

Auto Tuning
Manual Tuning
Programme Edit

1

1

2

3

4

5

6

1

2

3

4

5

6

7

Auto Tuning
Manual Tuning
Programme Edit

PICTURE

O

AUDIO

O

TIME

O

OPTION

O

SCREEN

O

Prev.

MENU

Move

SETUP 

G

5

4

3

2

5

4

3

2

6

OK 

EXIT

VOL

PR

GUIDE

BACK

MENU

INFO   i

FAV

Storage

System

Band

Channel

Fine

Search

Name

C     01

F

G

D
E

Auto Tuning
Manual Tuning
Programme Edit

1

1

C     01

BG

V/UHF

Storage

System

Band

Channel

Fine

Search

Name

F G

Store

1

BG

V/UHF

1

W

A

TCHING 

TV 

PR
OGR

AMME 

CONTR

OL

Содержание 42PG60D-GE

Страница 1: ...l number of the TV Refer to the label on the back cover and quote this information To your dealer when requiring service OWNER S MANUAL PLASMA TV MODELS 4 42 2P PG G6 6 5 50 0P PG G6 6 Trade Mark of the DVB Digital Video Broadcasting Project 1991 to 1996 I ID D N Nu um mb be er r s s 5277 42PG60D 5293 50PG60D PLASMA TV ...

Страница 2: ...cted by U S and foreign patents including patent numbers 5 315 448 and 6 836 549 and other intellectual property rights The use of Macrovision s copy protection technology in the product must be authorized by Macrovision Reverse engineering or disassembly is prohibited ...

Страница 3: ... INDEX SLEEP HOLD REVEAL SUBTITLE TEXT INPUT BRIGHT MUTE TV RADIO UPDATE SIMPLINK INFO i FAV TIME Remote Control Power Cord Cable management clip 50PG6 Cable Holder 42PG6 Protection Cover When installing the wall mounted unit use the protection cover for desk type stand installation NOT USING THE DESK TYPE STAND 4 Bolts for stand assembly Refer to p 6 Only 42PG6 x 4 A Image shown may differ from y...

Страница 4: ...e Only 38 Diagnostics In Digital Mode Only 39 Auto Programme Tuning In Analogue Mode 40 Manual Programme Tuning In Analogue Mode 41 Fine Tuning In Analogue Mode 42 Assigning a Station Name In Analogue Mode 42 Programme Edit In Analogue Mode 43 Selecting the Programme Table 45 Input Source Selection 46 SIMPLINK Function 47 EPG ELECTRONIC PROGRAMME GUIDE IN DIGITAL MODE Switch On Off EPG 49 Select P...

Страница 5: ...election 72 Language Selection In Digital Mode Only 73 TIME SETTING Clock Setup 74 Auto On Off Timer Setting 75 Auto Shut Off Setting 76 Time Zone Setup 77 Sleep Timer Setting 77 PARENTAL CONTROL RATINGS Set Password Lock System 78 Parental Control 79 TELETEXT Switch On Off 80 SIMPLE Text 80 TOP Text 80 FASTEXT 81 Special Teletext Functions 81 APPENDIX Troubleshooting 82 Maintenance 84 Product Spe...

Страница 6: ...r TV has a protection film attached remove the film and then wipe the TV with a polishing cloth PROGRAMME VOLUME MENU OK INPUT PR VOL OK MENU INPUT Remote Control Sensor POWER Power Standby Indicator illuminates red in standby mode illuminates green when the TV is switched on PR VOL VOL OK OK MENU MENU INPUT INPUT ...

Страница 7: ...ct a HDMI signal to HDMI IN or DVI VIDEO signal to HDMI DVI port with DVI to HDMI cable RGB IN PC Connect the output from a PC RS 232C IN CONTROL SERVICE PORT Connect to the RS 232C port on a PC Antenna Input Connect RF antenna to this jack AV Audio Video IN Connect audio video output from an external device to these jacks S VIDEO Connect S Video out from an S VIDEO device 5 BACK PANEL INFORMATION...

Страница 8: ...Swivel Stand After installing the TV you can adjust the TV set manually to the left or right direction by 20 degrees to suit your viewing position PREPARATION A When assembling the desk type stand check whether the bolt is fully tightened If not tightened fully the product can tilt forward after the product installation If you tighten the bolt with excessive force the bolt can deviate from abrasio...

Страница 9: ...m the TV NOTE G When moving the TV undo the cords first G Use a platform or cabinet strong and large enough to support the size and weight of the TV G To use the TV safely make sure that the height of the bracket on the wall and on the TV is the same 3 1 2 Use the eye bolts or TV brackets bolts to fix the TV to the wall as shown in the picture If your TV has bolts in the eyebolts loosen these bolt...

Страница 10: ...e TV may be damaged H Ho ow w t to o r re em mo ov ve e t th he e c ca ab bl le e m ma an na ag ge em me en nt t c cl li ip p Image shown may differ from your TV CABLE MANAGEMENT CLIP Connect the cables as necessary To connect additional equipment see the E Ex xt te er rn na al l e eq qu ui ip pm me en nt t S Se et tu up p section 1 Install the C CA AB BL LE E M MA AN NA AG GE EM ME EN NT T C CL L...

Страница 11: ...ightening rods or gas pipes Power Supply Circuit breaker The TV can be installed in various ways such as on a wall or on a desktop etc The TV is designed to be mounted horizontally 4 inches 4 inches 4 inches 4 inches WALL MOUNT HORIZONTAL INSTALLATION For adequate ventilation allow a clearance of 4 10cm all around the TV We recommend that you use a wall mounting bracket of LG brand when mounting t...

Страница 12: ...ntenna socket Single family Dwellings Houses Connect to wall jack for outdoor antenna Outdoor Antenna VHF UHF Wall Antenna Socket RF Coaxial Wire 75 ohm ANTENNA CONNECTION Antenna UHF Signal Amplifier VHF In poor signal areas to achieve better picture quality it may be necessary to install a signal amplifier to the antenna as shown above If signal needs to be split for two TVs use an antenna signa...

Страница 13: ... PO ON NE EN NT T I IN N1 1 V VI ID DE EO O jacks on the TV Connect the audio output of the digital set top box to the C CO OM MP PO ON NE EN NT T I IN N1 1 A AU UD DI IO O jacks on the TV Turn on the digital set top box Refer to the owner s manual for the digital set top box Select Component1 input source using the I IN NP PU UT T button on the remote control If connected to C CO OM MP PO ON NE E...

Страница 14: ...IN N 3 3 or H HD DM MI I I IN N 4 4 jack select HDMI3 or HDMI4 input source 2 3 1 AUDIO IN RGB DVI VIDEO AUDIO COMPONE RGB IN PC RS 232C IN CONTROL SERVICE OPTICAL DIGITAL AUDIO OUT 1 1 2 Connect the digital set top box to H HD DM MI I D DV VI I I IN N 1 1 jack on the TV Connect the audio output of the digital set top box to the A AU UD DI IO O I IN N R RG GB B D DV VI I jack on the TV Turn on the...

Страница 15: ...V VI ID DE EO O jacks on the TV Connect the audio outputs of the DVD to the C CO OM MP PO ON NE EN NT T I IN N1 1 A AU UD DI IO O jacks on the TV Turn on the DVD player insert a DVD Select Component1 input source using the I IN NP PU UT T button on the remote control If connected to C CO OM MP PO ON NE EN NT T I IN N2 2 select Component2 input source Refer to the DVD player s manual for operating ...

Страница 16: ...T button on the remote control Refer to the DVD player s manual for operating instructions 2 3 4 5 1 1 2 Connecting with a RCA cable Connect the A AU UD DI IO O V VI ID DE EO O jacks between TV and DVD player Match the jack colours Video yellow Audio Left white and Audio Right red Insert a DVD into the DVD player and press PLAY on the DVD player Refer to the DVD player owner s manual Select AV inp...

Страница 17: ...IN NP PU UT T button on the remote control If connected to H HD DM MI I I IN N 3 3 or H HD DM MI I I IN N 4 4 jack select HDMI3 or HDMI4 input source Refer to the DVD player s manual for operating instructions 1 2 3 G G The TV can receive video and audio signals simultaneously when using a HDMI cable G G If the DVD does not support Auto HDMI you must set the output resolution appropriately NOTE 1 ...

Страница 18: ...ain visible ANTENNA IN AUDIO RGB IN PC RS 232C IN CONTROL SERVICE OUTPUT SWITCH ANT IN R S VIDEO VIDEO ANT OUT L Wall Jack Antenna Connect the A AN NT T O OU UT T socket of the VCR to the A AN NT TE EN NN NA A I IN N socket on the TV Connect the antenna cable to the A AN NT T I IN N socket of the VCR Press the PLAY button on the VCR and match the appropriate channel between the TV and VCR for view...

Страница 19: ... sockets have been connected to the S VHS VCR simultaneously only the S VIDEO can be received NOTE S VIDEO L R VIDEO OUTPUT SWITCH ANT IN ANT OUT Connecting with a S Video cable Connect the S VIDEO output of the VCR to the S S V VI ID DE EO O input on the TV The picture quality is improved compared to normal composite RCA cable input Connect the audio outputs of the VCR to the A AU UD DI IO O inpu...

Страница 20: ... OPTICAL DIGITAL AUDIO OUT VIDEO AUDIO COMPONENT IN RGB IN PC RS 232C IN CONTROL SERVICE AUDIO IN RGB DVI Connect one end of an optical cable to the TV Digital Audio Optical Output port Connect the other end of the optical cable to the digital audio optical input on the audio equipment Set the TV Speaker option Off in the AUDIO menu G p p 6 69 9 Refer to the external audio equipment instruction ma...

Страница 21: ...nt Match the jack colors Video yellow Audio Left white and Audio Right red Select AV input source using the I IN NP PU UT T button on the remote control Operate the corresponding external equipment Refer to external equipment operating guide L R VIDEO Camcorder Video Game Set 1 1 2 3 EXTERNAL EQUIPMENT SETUP ...

Страница 22: ...ton on the remote control 2 3 4 1 Connecting with a HDMI to DVI cable G G If the PC has a DVI output and no HDMI output a separated audio connection is necessary G G If the PC does not support Auto DVI you need to set the output resolution appropriately NOTE AUDIO IN RGB DVI VIDEO AUDIO COMPONENT IN RGB IN PC RS 232C IN CONTROL SERVICE OPTICAL DIGITAL AUDIO OUT AUDIO DVI PC OUTPUT Connect the DVI ...

Страница 23: ...e RGB PC port of the TV or the signal cable from the HDMI output port of the PC to the HDMI IN or HDMI DVI IN port on the TV G Connect the audio cable from the PC to the Audio input on the TV Audio cables are not included with the TV G If using a sound card adjust PC sound as required G This TV uses a VESA Plug and Play Solution The TV provides EDID data to the PC system with a DDC protocol The PC...

Страница 24: ...0x1080 31 469 31 469 31 47 31 50 31 25 37 50 44 96 45 00 33 72 33 75 28 125 27 00 56 25 67 433 67 500 HDMI DTV mode Resolution Horizontal Frequency kHz Vertical Frequency Hz 31 468 31 469 37 500 37 879 46 875 49 725 48 363 56 476 60 023 47 693 47 649 70 08 59 94 75 00 60 31 75 00 74 55 60 00 70 00 75 03 59 99 59 94 59 94 60 00 59 94 60 00 50 00 50 00 59 94 60 00 59 94 60 00 50 00 24 00 50 00 59 94...

Страница 25: ...e G button and then D or E button to select Auto Config Press the G button to start Auto Config When Auto Config has finished OK will be shown on screen If the position of the image is still not correct try Auto adjustment again If picture needs to be adjusted again after Auto adjustment in RGB PC you can adjust the Manual Config Press the EXIT button to return to normal TV viewing Auto Configure ...

Страница 26: ...adjust picture to left right and up down as you prefer Press the MENU button and then D or E button to select the SCREEN menu Press the G button and then D or E button to select Manual Config Press the G button and then D or E button to select Phase Clock H Position or V Position Press the F or G button to make appropriate adjustments Press the EXIT button to return to normal TV viewing Adjustment...

Страница 27: ...ct XGA Mode Press the G button and then D or E button to select the desired XGA resolution Press the EXIT button to return to normal TV viewing Selecting Wide XGA mode Auto Config Manual Config XGA Mode G Aspect Ratio Reset 1024 X 768 1280 X 768 1360 X 768 1 1 2 3 4 Auto Config Manual Config XGA Mode Aspect Ratio Reset SETUPO PICTUREO Prev MENU Move AUDIOO TIMEO OPTIONO SCREEN G 3 2 EXTERNAL EQUIP...

Страница 28: ...ns to input a 4 digit password Initializing Reset to original factory settings 1 2 3 4 5 Language Country Lock System Parental Control Input Label SIMPLINK Factory Mode G Set ID Factory Reset ISM Method Low Power 1 2 Language Country Lock System Parental Control Input Label SIMPLINK Factory Mode SETUPO PICTUREO SCREENO Prev MENU Move AUDIOO TIMEO OPTION G Language Country Lock System Parental Cont...

Страница 29: ...justs screen brightness This returns to the default settings brightness by changing mode source Coloured buttons These buttons are used for teletext on TELETEXT models only or P Pr ro og gr ra am mm me e e ed di it t EXIT BACK MENU INFO i GUIDE Clears all on screen displays and returns to TV viewing from any menu Allows the user to move back one step in an interactive application EPG or other user...

Страница 30: ... you toggle this button the Simplink menu appears at the screen G p 47 These buttons are used for teletext For further details see the Teletext section Selects your desired picture format Selects the sound output THUMBSTICK Up Down Left Right OK Allows you to navigate the on screen menus and adjust the system settings to your preference Accepts your selection or displays the current mode SLEEP SUB...

Страница 31: ...EP HOLD REVEAL SUBTITLE UPDATE TIME WATCHING TV PROGRAMME CONTROL Initializing setup Note It will automatically disappear after approx 30 seconds unless a button is pressed Press the BACK button to change the current OSD to the previous OSD Home mode is the optimal setting for home environ ments and is the TV s default mode In Store mode is the optimal setting for store environ ments If a user mod...

Страница 32: ...the volume If you wish to switch the sound off press the MUTE button You can cancel this function by pressing the MUTE VOL or or I II button 1 OK INPUT MODE TV D A DVD EXIT VOL PR GUIDE BACK MENU RATIO I II VCR POWER 1 2 3 4 5 6 7 8 9 0 LIST TEXT INPUT BRIGHT MUTE TV RADIO SIMPLINK INFO i FAV Q VIEW INDEX SLEEP HOLD REVEAL SUBTITLE UPDATE TIME WATCHING TV PROGRAMME CONTROL ...

Страница 33: ...NO SCREENO Prev MENU Move Picture Mode Colour Temperature Advanced Picture Reset Demo SETUPO AUDIOO TIMEO OPTIONO SCREENO Prev MENU Move Sound Mode Auto Volume Balance 0 TV Speaker Digital Audio SETUPO PICTUREO TIMEO OPTIONO SCREENO Prev MENU Move SETUP G PICTURE G AUDIO G Clock Off Time On Time Auto Sleep Time Zone SETUPO PICTUREO OPTIONO SCREENO Prev MENU Move AUDIOO TIME G Auto Config Manual Co...

Страница 34: ... the G button to begin auto tuning Use NUMBER buttons to input a 4 digit password in Lock System On The message All service information will be updated Continue will appear If you want to keep on auto tuning select YES using the F or G button Then press the OK button Otherwise select NO To stop auto tuning press the MENU button Press the EXIT button to return to normal TV viewing 2 3 4 1 Auto Tuni...

Страница 35: ...l Tuning Press the G button and then D or E button or NUM BER buttons to select the desired channel number Use NUMBER buttons to input a 4 digit password in Lock System On Press the OK button to save When the channel number you want to add is already in the programme list the message Setup information for the channel will be updated Continue will appear If you wish to continue manual tuning select...

Страница 36: ...n D or E button to select Programme Edit menu Press the G button to enter the Programme Edit menu Use NUMBER buttons to input a 4 digit password in Lock System On Select a programme to be stored or skipped with the D or E or F or G button Press the BLUE button repeatedly to have the pro gramme skipped or stored When programmes are to be skipped skipped programme shows in blue and these programmes ...

Страница 37: ...lock symbol will appear in front of that programme number Press the GREEN button again to release this function Note G To watch a locked programme input a 4 digit password in Lock system Be sure to remember this number G If you forget your password press 7 7 7 7 on the remote control handset G If you select another programme after releasing a locked programme and then return to the locked programm...

Страница 38: ...he set is short cir cuit it will automatically return to Off The message Antenna feed overloaded Automatically switched off will appear Press the EXIT button to return to normal TV viewing 5V ANTENNA POWER IN DIGITAL MODE ONLY 1 2 3 4 Auto Tuning Manual Tuning Programme Edit 5V Antenna Power G Booster Software Update Diagnostics 1 3 2 Auto Tuning Manual Tuning Programme Edit 5V Antenna Power Boost...

Страница 39: ...lect On or Off Press the EXIT button to return to normal TV viewing BOOSTER IN DIGITAL MODE ONLY Auto Tuning Manual Tuning Programme Edit 5V Antenna Power Booster G Software Update Diagnostics Off On 1 3 2 1 2 3 4 Auto Tuning Manual Tuning Programme Edit 5V Antenna Power Booster Software Update Diagnostics PICTUREO AUDIOO TIMEO OPTIONO SCREENO Prev MENU Move SETUP G OK EXIT VOL PR GUIDE BACK MENU ...

Страница 40: ...ting Software Update Occasionally a transmission of updated digital software information will result in the OSD On Screen Display on the TV screen Select YES using the F or G button The OSD will be disappeared on the TV screen and you can watch the current TV viewing G When you change the TV to standby mode using the POWER button while watching the TV it will be started Software update G Turn on t...

Страница 41: ...l TV viewing DIAGNOSTICS IN DIGITAL MODE ONLY Auto Tuning Manual Tuning Programme Edit 5V Antenna Power Booster Software Update Diagnostics G To Set 1 2 3 1 2 3 4 Auto Tuning Manual Tuning Programme Edit 5V Antenna Power Booster Software Update Diagnostics PICTUREO AUDIOO TIMEO OPTIONO SCREENO Prev MENU Move SETUP G Engineering Diagnostics Menu Prev Manufacturer LG Electronics Inc Model Type 37LC2...

Страница 42: ... programme number with the F or G button or NUMBER buttons on the Storage From menu Press the E button to select Start The station name is stored for stations which broadcast VPS Video Programme Service PDC Programme Delivery Control or TELETEXT data If no station name can be assigned to a station the channel number is assigned and stored as C V UHF 01 69 or S Cable 01 47 followed by a number To s...

Страница 43: ...select Band Press the F or G button to select V UHF or Cable as required Press the E button to select Channel You can select the desired channel number with the F or G button or NUMBER buttons If possible select the channel number directly with the NUMBER buttons Press the E button to select Search Press the F or G button to commence searching If a station is found the search will stop Press the O...

Страница 44: ...hen D or E button to select Manual Tuning Press the G button and then D or E button to select Fine Press the G button and then F or G button to fine tune for the best picture and sound Press the OK button to store settings Press the EXIT button to return to normal TV viewing FINE TUNING IN ANALOGUE MODE ASSIGNING A STATION NAME IN ANALOGUE MODE You can assign a station name with five characters to...

Страница 45: ...ng a programme Select a programme to be copied with the D or E or F or G button Press the GREEN button All the following programmes are shifted down one position This function enables you to delete or skip the stored programmes You can also move some channels to other programme numbers or copy blank channel data into a selected programme number PROGRAMME EDIT IN ANALOGUE MODE 1 2 Auto Tuning Manua...

Страница 46: ...n to release the skipped programme When a programme number is skipped it means that you will be unable to select it using the PR or button during normal TV viewing If you wish to select the skipped programme directly enter the programme number with the NUMBER buttons or select it in the programme edit or table menu A Selecting a Favourite Programme Select your favourite programme number with D or ...

Страница 47: ... Digital Mode Only Press the PR or button repeatedly to turns the pages Press the LIST button to return to normal TV viewing A Displaying the favourite programme table Press the FAV button to display the Favourite Programme table menu You can check which programmes are stored in the memory by displaying the programme table SELECTING THE PROGRAMME TABLE Displayed when the Favourite Programme Displa...

Страница 48: ...e Press the F or G button to select the label Press the EXIT button to return to normal TV viewing INPUT SOURCE SELECTION Language Country Lock System Parental Control Input Label G SIMPLINK Factory Mode AV Comp1 Comp2 RGB HDMI1 HDMI2 HDMI3 HDMI4 1 1 2 3 4 5 Language Country Lock System Parental Control Input Label SIMPLINK Factory Mode SETUPO PICTUREO SCREENO Prev MENU Move AUDIOO TIMEO OPTION G ...

Страница 49: ...SIMPLINK Factory Mode SETUPO PICTUREO SCREENO Prev MENU Move AUDIOO TIMEO OPTION G FUNCTION This function operates only with devices with the SIMPLINK logo Please check the SIMPLINK logo This TV might not function properly when using it with other products with HDMI CEC function This allows you to control and play other AV devices connected to the display through HDMI cable without additional cabl...

Страница 50: ...ec ct t A AV V d de ev vi ic ce e Enables you to select one of the AV devices connected to the TV and operate it P Po ow we er r o of ff f a al ll l d de ev vi ic ce es s When you switch off the TV all connected devices are turned off S Sw wi it tc ch h a au ud di io o o ou ut t Offers an easy way to switch audio out A device which is connected to the TV through a HDMI cable but does not support S...

Страница 51: ...ailability and amount of these programme details will vary depending on the particular broadcaster This function can be used only when the EPG information is broadcast by broadcasting companies The EPG displays the programme details for next 8 days Switch On Off EPG Select Programme 1 2 1 Programme Guide D E 6 BBC Channel 14 35 3 Apr E DTV 14 30 15 00 15 30 11 Apr 6 BBC Channel The Tre Story Of Tr...

Страница 52: ...mer Schedule List Favourite FAV Information INFO PR Change DTV NOW NEXT 6 BBC Channel Mona The Vampire The Wild Thornberrys 1 BBC ONE Racing From Aintree BBC News Special 2 BBC TWO This is BBC THREE Welcome To BBC THREE 3 BBC THREE BBC News BBC News 4 BBC NEWS 24 BBCi BBCi 5 BBCi The Story Of Tracy oooo Animadness 7 BBC1 London BBC News BBC News Programme Guide D E 6 BBC Channel 14 35 3 Apr E DTV ...

Страница 53: ...WO 08 00 Fri 23 Feb Remind 14 35 3 Apr Delete Edit New Guide Title Programme Date Time Friends 01 BBC TWO Wed 23 Feb 08 00 Newsnight review 02 BBC TWO Fri 25 Feb 23 00 Road trip 02 BBC TWO Set 26 Feb 00 35 BBC News 07 BBC THREE Fri 25 Feb 12 00 Carrott Gold 01 BBC ONE Mon 28 Feb 22 35 Information Friends 14 35 3 Apr Manual Timer Info Exit INFO Mona The Vampire Record 14 00 15 20 3 Apr Miss Gotto s...

Страница 54: ... programme in the 14 9 mode The 14 9 screen is viewed in the same way as in 4 3 but is magnified to the left and right 52 PICTURE CONTROL PICTURE CONTROL 14 9 DE 4 3 16 9 You can watch the screen in various picture formats 1 16 6 9 9 O Or ri ig gi in na al l 4 4 3 3 1 14 4 9 9 and Z Zo oo om m1 1 2 2 If a fixed image is displayed on the screen for a long time that fixed image may become imprinted ...

Страница 55: ... picture will be cropped Z Zo oo om m2 2 Choose Zoom 2 when you wish the picture to be altered both horizontally extended and vertically cropped The picture adopting a compromise between alteration and screen coverage NOTE G You can only select Original 14 9 in DTV TV or AV mode G You can not select Zoom1 2 in RGB HDMI PC mode only Zoom1 DE Zoom2 DE PICTURE CONTROL ...

Страница 56: ...d Cinema are programmed for optimum picture reproduction at the factory and cannot be changed Vivid Select this option to display a sharp image Standard The most general and natural screen display status Cinema Select this option to display a cinema image User 1 2 Select this option to use a user defined setting PRESET PICTURE SETTINGS Picture Mode Preset Picture Mode G Colour Temperature Advanced...

Страница 57: ...ol option Choose one of three automatic colour adjustments Set to warm to enhance hotter colours such as red or set to cool to see less intense colours with more blue It s available to use this function in User mode Auto Colour Tone Control Warm Medium Cool Picture Mode Colour Temperature G Advanced Picture Reset Demo Cool Medium Warm User 1 1 2 3 4 Picture Mode Colour Temperature Advanced Picture...

Страница 58: ... menu Press the G G button and then D D or E E button to select Picture Mode Press the G button and then D or E button to select User 1 or User 2 Press the G G button and then D D or E E button to select the desired picture option Contrast Brightness Colour Sharpness and Tint Press the G G button and then F F or G G button to make appropriate adjustments Press the EXIT button to return to normal T...

Страница 59: ...r Option Press the MENU button and then D or E button to select the PICTURE menu Press the G G button and then D D or E E button to select Colour Temperature Press the G G button and then D D or E E button to select User Press the G G button and then D D or E E button to select Red Green or Blue Press the G G button and then F F or G G button to make appropriate adjustments Press the EXIT button t...

Страница 60: ...v MENU Move PICTURE G XD PICTURE IMPROVEMENT TECHNOLOGY 3 Press the MENU button and then D or E button to select the PICTURE menu Press the G G button and then D D or E E button to select XD Press the G G button and then D D or E E button to select Auto or Manual Press the EXIT button to return to normal TV viewing Manual Selection This menu is activated after selecting User1 or User2 in the Pictu...

Страница 61: ... D or E E button to select XD Demo Press the G G button to begin XD Demo To stop XD Demo press the M ME EN NU U or E EX XI IT T button 1 2 3 4 Picture Mode Colour Temperature Advanced Picture Reset Demo G To Start 1 Picture Mode Colour Temperature Advanced Picture Reset Demo SETUPO AUDIOO TIMEO OPTIONO SCREENO Prev MENU Move PICTURE G XD Demo XD Off XD On Exit Menu 3 2 OK EXIT VOL PR GUIDE BACK ME...

Страница 62: ...A To set the TV up for the best picture quality for viewing films This feature operates only in DTV TV AV S Video and Component 480i 576i mode Press the MENU button and then D or E button to select the PICTURE menu Press the G G button and then D D or E E button to select Advanced Press the G G button and then D D or E E button to select Cinema Press the F F or G G button to select On or Off Press...

Страница 63: ... A L Lo ow w The reflection of the screen gets darker A A H Hi ig gh h The reflection of the screen gets brighter Press the EXIT button to return to normal TV viewing 1 2 3 4 5 Picture Mode Colour Temperature Advanced G Picture Reset Demo Cinema Black Level Off Low Picture Mode Colour Temperature Advanced Picture Reset Demo Cinema Black Level 1 Picture Mode Colour Temperature Advanced Picture Rese...

Страница 64: ...on to initialize the adjusted value Returns to the default factory setting for Picture Mode Colour Temperature XD and Advanced 1 2 3 Picture Mode Colour Temperature Advanced Picture Reset G Demo To Set 1 Picture Mode Colour Temperature Advanced Picture Reset Demo SETUPO AUDIOO TIMEO OPTIONO SCREENO Prev MENU Move PICTURE G 3 2 OK EXIT VOL PR GUIDE BACK MENU 1 2 3 MUTE INFO i FAV PICTURE CONTROL ...

Страница 65: ... MENU button and then D or E button to select the OPTION menu Press the G button and then D or E button to select Factory Mode Press the G button and then D or E button to select ISM Method Press the F F or G G button to select either Normal Orbiter White Wash or Inversion If you do not need this function set Normal Press the EXIT button to return to normal TV viewing IMAGE STICKING MINIMIZATION I...

Страница 66: ...return to normal TV viewing LOW POWER PICTURE MODE 1 2 3 4 5 Language Country Lock System Parental Control Input Label SIMPLINK Factory Mode G Set ID Factory Reset ISM Method Low Power 1 2 Language Country Lock System Parental Control Input Label SIMPLINK Factory Mode SETUPO PICTUREO SCREENO Prev MENU Move AUDIOO TIMEO OPTION G Language Country Lock System Parental Control Input Label SIMPLINK Fac...

Страница 67: ...lect Auto Volume Press the G button and then D or E button to select On or Off Press the EXIT button to return to normal TV viewing AUTO VOLUME LEVELER Sound Mode Auto Volume G Balance 0 TV Speaker Digital Audio Off On 1 2 3 4 Sound Mode Auto Volume Balance 0 TV Speaker Digital Audio SETUPO PICTUREO TIMEO OPTIONO SCREENO Prev MENU Move AUDIO G 3 2 OK EXIT VOL PR GUIDE BACK MENU 1 2 3 MUTE INFO i F...

Страница 68: ... MAX Standard Music Cinema san Sport are preset for optimum sound quality at the factory and are not adjustable Surround MAX Select this option for the most realistic sound Standard Commanding and natural audio Music Select this option to enjoy the original sound when listening to music Cinema Select this option to enjoy sublime sound Sport Select this option to watch sport broadcasting User Selec...

Страница 69: ...E Press the MENU button and then D or E button to select the AUDIO menu Press the G G button and then D D or E E button to select Sound Mode Press the G G button and then D D or E E button to select User Press the G G button Select a frequency band by pressing the F F or G G button Set the desired sound level with the D D or E E button Press the EXIT button to return to normal TV viewing Adjusting...

Страница 70: ...ed adjustment Press the EXIT button to return to normal TV viewing You can adjust the sound balance of the speakers to preferred levels BALANCE Sound Mode Auto Volume Balance 0 G TV Speaker Digital Audio 1 2 3 4 Sound Mode Auto Volume Balance 0 TV Speaker Digital Audio SETUPO PICTUREO TIMEO OPTIONO SCREENO Prev MENU Move AUDIO G 3 2 OK EXIT VOL PR GUIDE BACK MENU 1 2 3 MUTE INFO i FAV L R SOUND LA...

Страница 71: ...status In AV COMPONENT RGB and HDMI mode the TV speaker can be operational even when there is no video sig nal If you wish to use an external hi fi system turn off the TV internal speakers TV SPEAKERS ON OFF SETUP Sound Mode Auto Volume Balance 0 TV Speaker G Digital Audio Off On 1 1 2 3 4 Sound Mode Auto Volume Balance 0 TV Speaker Digital Audio SETUPO PICTUREO TIMEO OPTIONO SCREENO Prev MENU Mov...

Страница 72: ...dio G It is a feature to set input and output of TV sound In order to deliver sound data intact you should transform TV sound into digital signals and transfer them to audio decoder or digital speaker This feature is not available in ordinary analogue speakers and is available only for audio decoders or digital speakers embedded with audio decoder SELECTING DIGITAL AUDIO Manufactured under license...

Страница 73: ...a as st t If a programme can be received in two languages dual language you can switch to DUAL I DUAL II or DUAL I II by pressing the I II button repeatedly DUAL I Sends the primary broadcast language to the loudspeakers DUAL II Sends the secondary broadcast language to the loudspeakers DUAL I II Sends a separate language to each loudspeaker Broadcast Mono Stereo Dual On Screen Display MONO STEREO...

Страница 74: ...lex digital sound can be received Sound output can be selected according to the type of broadcast received by pressing the I II button repeatedly Speaker Sound Output Selection In AV S Video Component RGB and HDMI mode you can select output sound for the left and right loudspeakers Repeatedly press the I II button to select the sound output L R Audio signal from audio L input is sent to the left l...

Страница 75: ...red Dolby Digital Audio HE AAC Audio Dolby Digital Plus Audio Display N A TEXT Status Not Available Teletext Subtitle Subtitle for Hard of Hearing Display N A Language Country Lock System Parental Control Input Label SIMPLINK Factory Mode SETUPO PICTUREO SCREENO Prev MENU Move AUDIOO TIMEO OPTION G Language G Country Lock System Parental Control Input Label SIMPLINK Factory Mode Menu Audio Subtitl...

Страница 76: ...tions Press the EXIT button to return to normal TV viewing The clock is set automatically when receiving a digital signal You can set the clock manually only if the TV has no DTV signal You must set the time correctly before using on off timer function CLOCK SETUP Clock Off Time On Time Auto Sleep Time Zone Time Date Year 12 2008 Apr 20 14 1 1 2 3 4 Clock Off Time On Time Auto Sleep Time Zone SETU...

Страница 77: ...vel at switch on Press the EXIT button to return to normal TV viewing The Off time function automatically switches the TV to standby at a preset time Two hours after the TV is switched on by the on time function it will automatically switch back to standby mode unless a button has been pressed Once the on time off time is set these functions operate daily at the preset time The Off time function o...

Страница 78: ...d then D or E button to select Auto Sleep Press the G button and then D or E button to select On or Off Press the EXIT button to return to normal TV viewing AUTO SHUT OFF SETTING Clock Off Time On Time Auto Sleep G Time Zone Off On 1 2 3 4 Clock Off Time On Time Auto Sleep Time Zone SETUPO PICTUREO OPTIONO SCREENO Prev MENU Move AUDIOO TIME G 3 2 OK EXIT VOL PR GUIDE BACK MENU 1 2 3 MUTE INFO i FA...

Страница 79: ...ore you go to sleep The sleep timer automatically switches the TV to standby after the preset time has elapsed SLEEP TIMER SETTING 1 TV time is set Singapore GMT 8 when time is set auto matically by a digital signal You can not select another time zone Press the MENU button and then D or E button to select the TIME menu Press the G button and then D or E button to select Time Zone It will be displ...

Страница 80: ...on and then F or G button to select On To set the password Press the E button and then use the NUMBER buttons to input a 4 digit password Be sure to remember this number Re enter new password for confirm If you forget your password press 7 7 7 7 on the remote control handset Press the EXIT button to return to normal TV viewing 1 2 3 4 Language Country Lock System Parental Control Input Label SIMPL...

Страница 81: ...mes according to the ratings limit set Key Lock The TV can be set so that the remote control is required to control it This feature can be used to prevent unauthorized viewing Press the F or G button to make appropriate adjustments Press the EXIT button to return to normal TV viewing PARENTAL CONTROL Language Country Lock System Parental Control G Input Label SIMPLINK Factory Mode 1 1 2 3 4 5 Lang...

Страница 82: ...h to teletext The initial page or last page viewed appears on the screen Two page numbers TV station name date and time are displayed on the screen headline The first page number indicates your selection while the second shows the current page displayed Press the T TE EX XT T or E EX XI IT T button to switch off teletext The previous mode reappears SWITCH ON OFF A A Page selection Enter the desire...

Страница 83: ... or change the sub page press the RED GREEN PR or or NUMBER buttons Press again to exit this function A A H HO OL LD D Stops the automatic page change which will occur if a teletext page consists of 2 or more sub pages The number of sub pages and the sub page displayed is usually shown on the screen below the time When this button is pressed the stop symbol is displayed at the top left hand corner...

Страница 84: ...ch as an electrical appliance or power tool A Station or cable channel experiencing problems tune to another station A Station signal is weak reposition the antenna to receive weaker stations A Check for sources of possible interference A Check antenna Change the position of the antenna A Check HDMI cable over version 1 3 If the HDMI cables don t support HDMI version 1 3 it can cause flickers or n...

Страница 85: ...l noise when the TV is switched on or off and does not indicate a fault with the TV A Check HDMI cable over version 1 3 A Check USB cable over version 2 0 Picture OK No sound Unusual sound from inside the TV No sound when connect ing HDMI or USB No output from one of the speakers A Adjust resolution horizontal frequency or vertical frequency A Check the input source A Use Auto configure or adjust ...

Страница 86: ...little fabric softener or dish washing detergent Wring the cloth until it is almost dry and then use it to wipe the screen Ensure there is no excess water on the screen Allow any water or dampness to evaporate before switching on Cleaning the Cabinet A To remove dirt or dust wipe the cabinet with a soft dry lint free cloth A Do not to use a wet cloth Extended Absence G If you expect to leave your ...

Страница 87: ... 79 6 mm 48 6 x 31 2 x 3 1 inches 43 7 kg 96 3 lbs 39 7 kg 87 5 lbs AC100 240V 50 60Hz MODELS Dimensions Width x Height x Depth Weight Operating Temperature Operating Humidity Storage Temperature Storage Humidity Environment condition Power requirement Television System Program Coverage External Antenna Impedance PAL BG DK I PAL I II VHF E2 E12 UHF E21 E69 CATV S1 S20 HYPER S21 S47 75 Ω 0 40 C 32 ...

Страница 88: ... ready to be programmed with the code Enter a code number using the number buttons on the remote control Programming code numbers for the corresponding component can be found on the following pages If the code is correct the device will turn off Press the M ME EN NU U button to store the code Test the remote control functions to see if the component responds correctly If not repeat from step 2 The...

Страница 89: ...13 020 MITSUBISHI 013 020 045 046 049 051 059 061 151 MTC 034 040 MULTITECH 024 034 NEC 012 023 039 043 048 NORDMENDE 043 OPTONICA 053 054 PANASONIC 066 070 074 083 133 140 145 PENTAX 013 020 031 033 063 PHILCO 031 034 067 PHILIPS 031 033 034 054 067 071 101 PILOT 101 PIONEER 013 021 048 PORTLAND 108 PULSAR 072 QUARTZ 01 1 014 QUASAR 033 066 075 145 RCA 013 020 033 034 040 041 062 063 107 109 140 ...

Страница 90: ... C6 C7 D0 D1 D2 D3 D4 D5 D6 D7 D0 D1 D2 D3 D4 D5 D6 D7 Lead code Low custom code High custom code Data code Data code Repeat code Tf 4 5 ms 9 ms 2 25 ms 9 ms 0 55 ms 0 56 ms 1 12 ms 0 56 ms 2 24 ms Tf Tf Tf 108ms 455KHz Bit 0 Bit 1 1 How to Connect A Connect your wired remote control to the Remote Control port on the TV 2 Remote Control IR Codes A Output waveform Single pulse modulated with 37 917...

Страница 91: ...C BUTTON R C BUTTON POWER ON OFF R C BUTTON R C BUTTON R C BUTTON R C BUTTON R C BUTTON R C BUTTON R C BUTTON R C BUTTON R C BUTTON R C BUTTON R C BUTTON R C BUTTON R C BUTTON R C BUTTON R C BUTTON R C BUTTON R C BUTTON R C BUTTON R C BUTTON R C BUTTON R C BUTTON R C BUTTON R C BUTTON R C BUTTON R C BUTTON R C BUTTON R C BUTTON R C BUTTON R C BUTTON R C BUTTON R C BUTTON R C BUTTON R C BUTTON R C ...

Страница 92: ...tor D Sub 9 Pin Male No Pin Name 1 No connection 2 RXD Receive data 3 TXD Transmit data 4 DTR DTE side ready 5 GND 6 DSR DCE side ready 7 RTS Ready to send 8 CTS Clear to send 9 No Connection RS 232C IN CONTROL SERVICE AUDIO ANTENNA IN RGB IN PC 1 5 6 9 RS 232C Configurations 7 Wire Configurations Standard RS 232C cable PC TV RXD 2 3 TXD TXD 3 2 RXD GND 5 5 GND DTR 4 6 DSR DSR 6 4 DTR RTS 7 8 CTS ...

Страница 93: ...unction to specify a set ID number Refer to Real Data Mapping G p 95 Set ID 2 3 4 5 1 Language Country Lock System Parental Control Input Label SIMPLINK Factory Mode G Set ID Factory Reset ISM Method Low Power 1 2 Language Country Lock System Parental Control Input Label SIMPLINK Factory Mode SETUPO PICTUREO SCREENO Prev MENU Move AUDIOO TIMEO OPTION G Language Country Lock System Parental Control...

Страница 94: ... or x Command 2 Second command to control the TV Set ID You can adjust the set ID to choose desired monitor ID number in option menu Adjustment range is 1 99 When selecting Set ID 0 every connected TV is controlled Set ID is indicated as decimal 1 99 on menu and as Hexa decimal 0x0 0x63 on transmission receiving protocol DATA To transmit command data Transmit FF data to read status of command Cr C...

Страница 95: ...5 V Vo ol lu um me e C Co on nt tr ro ol l C Co om mm ma an nd d k k f f G To adjust volume You can also adjust volume with the VOLUME buttons on remote control Transmission Data Min 00 Max 64 Refer to Real data mapping 1 See page 95 k f Set ID Data Cr Ack f Set ID OK NG Data x 0 06 6 C Co on nt tr ra as st t C Co om mm ma an nd d k k g g G To adjust screen contrast You can also adjust contrast in...

Страница 96: ...CTURE menu Transmission Data Min 00 Max 64 Refer to Real data mapping 1 See page 95 k i Set ID Data Cr Ack i Set ID OK NG Data x 0 09 9 T Ti in nt t C Co om mm ma an nd d k k j j G To adjust the screen tint You can also adjust tint in the PICTURE menu Transmission Data Red 00 Green 64 Refer to Real data mapping 1 See page 95 k j Set ID Data Cr Ack j Set ID OK NG Data x G To adjust the screen sharp...

Страница 97: ... Co om mm ma an nd d j j q q G To reduce the power consumption of the TV You can also adjust Low Power in OPTION menu Transmission Data 00 Off 01 On j q Set ID Data Cr Ack q Set ID OK NG Data x R Re ea al l d da at ta a m ma ap pp pi in ng g 1 1 00 Step 0 A Step 10 Set ID 10 F Step 15 Set ID 15 10 Step 16 Set ID 16 64 Step 100 6E Step 1 10 73 Step 1 15 74 Step 1 16 C7 Step 199 FE Step 254 FF Step ...

Страница 98: ...nimize image shaking automatically It works only in RGB PC mode Transmission Data 01 To set j u Set ID Data Cr Ack u Set ID OK NG Data x 2 22 2 T Tu un ne e C Co om mm ma an nd d P Pr ro og gr ra am mm me e S Se el le ec ct ti io on n C Co om mm ma an nd d m m a a G Select channel to following physical number Transmission Data00 High channel data Data01 Low channel data ex No 47 00 2F 2FH No 394 0...

Страница 99: ......

Страница 100: ......

Отзывы: