background image

CONNECTIONS 


SETUP

17

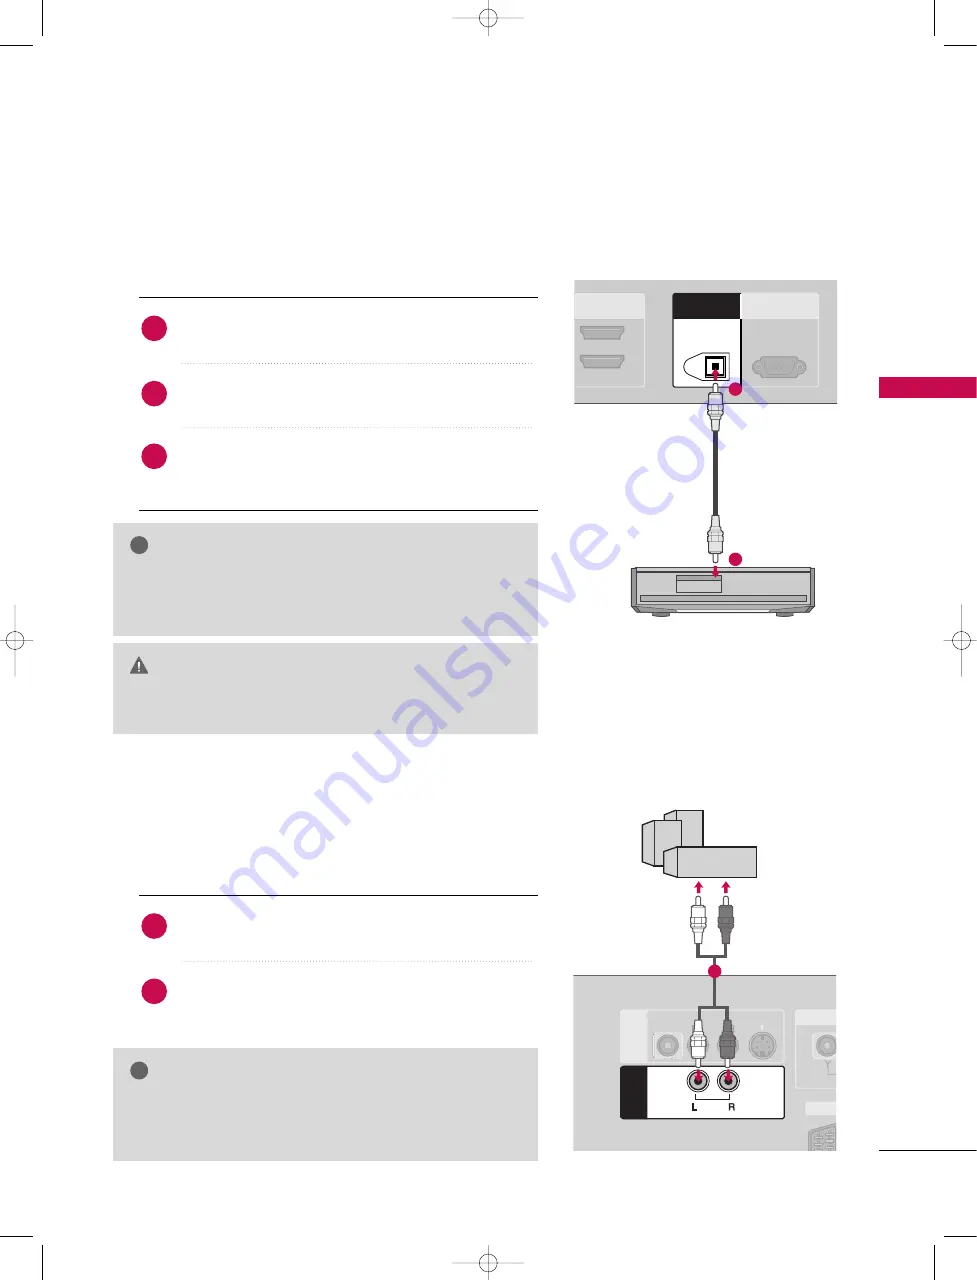
DIGITAL AUDIO OUTPUT

Send the TV’s audio to external audio equipment via the Digital Audio Output (Optical) port.

HDMI IN

2

1(DVI)

RS-232C IN

(CONTROL


&


SERVICE)

AV 1

AV 2

DTV OUT

ANTENNA

OUT

ANTENNA

IN

DIGITAL AUDIO 

OUT

OPTICAL

VIDEO

AUDIO

MONO

(            )

S-VIDEO

A

V

 IN 3

AV 1

AV 1

AV 2

DTV OUT

ANTENNA

OUT

ANTENNA

IN

VARIABLE AUDIO OUT

G

G

When connecting with external audio equipments, such as
amplifiers or speakers, please turn the TV speakers off. 
(

G

p

p..6

69

9

)

NOTE

!

G

G

When connecting with external audio equipments, such as
amplifiers or speakers, please turn the TV speakers off. 
(

G

p

p..6

69

9

)

NOTE

!

G

G

Do not look into the optical output port. Looking at the
laser beam may damage your vision.

CAUTION

Connect one end of an optical cable to the TV Digital
Audio (Optical) Output port.

Connect the other end of the optical cable to the
digital audio (optical) input on the audio equipment.

Set the “TV Speaker option - Off” in the SOUND
menu. (

G

G

p

p..6

69

9

). See the external audio equipment

instruction manual for operation.

1. How to connect

2

3

1

EXTERNAL STEREO

Use to connected either an external amplifier, or add a sub-woofer to
your surround sound system.

Connect the input jack of the stereo’s amplifier to the
V

VA

AR

RIIA

AB

BLLEE  A

AU

UD

DIIO

O  O

OU

UT

T jacks on the set.

Set up your speakers through your analog stereo
amplifier, according to the instructions provided with
the amplifier. 

1. How to connect

2

1

1

1

2

9U1004A_01  06/6/27 2:10 PM  Page 17

Содержание 37LB1D

Страница 1: ...mbers 4096 32LB1D 4097 37LB1D 4095 42LB1D 4298 32LB1DB 4299 37LB1DB 4297 42LB1DB LCD TV 32LB1D 37LB1D 42LB1D 32LB1DB 37LB1DB 42LB1DB P NO 38289U1004A 0608 REV02 Printed in Korea Please read Information Manual included together before reading this manual and operating your set ...

Страница 2: ......

Страница 3: ...T VO L PR M UT E FA V TE XT K EX IT O K SLE EP PIP INPU T i SI ZE PO SIT IO N l ll TI ME IN DE X RE VE AL 1 2 3 4 5 6 7 8 0 9 Q V IE W LI S T VO L PR M UT E FA V ME NU TE XT SW AP PIP PR BA CK IN FO i EX IT O K P O W E R PIP PR PIP SLE EP PIP INPU T VC R TV DV D GU ID E AR C D A TV IN PU T SUB TITL E i SI ZE PO SIT IO N Remote Control Batteries 2 TV brackets 2 Wall brackets 2 bolts Twister Holder ...

Страница 4: ...ure 29 Input Source Selection for Sub Picture 30 Sub Picture Size Adjustment 30 Moving the Sub Picture PIP mode only 30 Adjusting PIP Transparency PIP mode only 31 Swapping between main and sub pictures 31 POP Picture out of Picture Programme Scan 31 TELETEXT In Digital mode Teletext within Digital Service 32 Teletext in Digital Service 32 TELETEXT In Analogue mode Switch on off 33 SIMPLE Text 33 ...

Страница 5: ...on 61 Advanced 62 63 Advanced Cinema 62 Advanced Black Level 63 Reset 64 SOUND MENU OPTIONS Sound Status Memory SSM 65 Sound Frequency Adjustment SSM User option 66 Auto Volume Leveler AVL 67 Balance Adjustment 68 TV Speaker 69 Audio Language In Digital mode only 70 Stereo Dual Reception In Analogue mode only 71 NICAM Reception In Analogue mode only 71 Speaker Sound Output Selection 71 TIME MENU O...

Страница 6: ... F F G G Buttons PROGRAMME E E D D Buttons Intelligent Eye Adjusts picture according to the surrounding conditions PR VOL MENU OK INPUT R Remote Control Sensor Power Standby Indicator illuminates red in standby mode illuminates white when the set is switched on INDEX TV mode AV mode Component mode RGB PC mode HDMI1 DVI or HDMI2 mode Intelligent Eye 9U1004A_01 06 6 27 2 09 PM Page 4 ...

Страница 7: ...o signal from a video device PCMCIA CARD SLOT Personal Computer Memory Card International Association Card Slot AV Audio Video IN 1 3 Connect audio video output from an external device to these jacks S VIDEO Connect S Video out from an S VIDEO device VARIABLE AUDIO Connect a external stereo amplifier COMPONENT IN Connect a component video audio device to these jacks HDMI IN Connect a HDMI signal t...

Страница 8: ...s the set on from standby Displays on screen menus one by one Exits the current menu Memorizes menu changes Clears all on screen displays and returns to TV viewing from any menu Adjusts menu settings Selects menu item Accepts your selection or displays the current mode They are used as per the indications or functions dis played on TV screen in case of Text displays Teletext EPG and programme edit...

Страница 9: ... back one step in an interactive application EPG or other user inter action function Sets the sleep timer G G p p 7 75 5 These buttons are used for teletext Text button is used to enable teletext services while other buttons are for teletext functions For further details see the Teletext section G G p p 3 32 2 3 35 5 Open the battery compartment cover on the back side and install the batteries mat...

Страница 10: ...INFO i button or EXIT button to exit l ll TIME INDEX REVEAL 1 2 3 4 5 6 7 8 0 9 Q VIEW LIST VOL PR MUTE FAV MENU TEXT SWAP PIP PR BACK INFO i EXIT OK POWER PIP PR PIP SLEEP PIPINPUT VCR TV DVD GUIDE ARC D ATV INPUT SUBTITLE i SIZE POSITION Remote Control Buttons Function F G Change to Now Next D E The detail information on or off Icon Function in Info description Box MHEG Programme Subtitle Progra...

Страница 11: ... each side from the wall 4 inches 4 inches G G Ensure adequate ventilation by following the clearance recommendations CAUTION 4 inches 4 inches The TV can be conveniently swivelled on its stand 30 to the left or right to provide the optimum viewing angle SWIVEL STAND 9U1004A_01 06 6 27 2 09 PM Page 9 ...

Страница 12: ...ion Install the CABLE MANAGEMENT as shown How to remove the CABLE MANAGEMENT G G Hold the CABLE MANAGEMENT with both hands and pull it upward CABLE MANAGEMENT G G Do not hold the CABLE MANAGEMENT when moving the product If the product is dropped you may be injured or the product may be broken NOTE CABLE HOLDER 1 2 Bundle the cables using the supplied twister holder 3 TWISTER HOLDER 9U1004A_01 06 6...

Страница 13: ...he TV Insert the TV brackets and bolts to tighten the product to the wall as shown in the picture Secure the wall brackets with the bolts not provided as parts of the product must purchase separately on the wall Match the height of the bracket that is mounted on the wall to the holes in the product Ensure the brackets are tightened securely Use a sturdy rope not provided as parts of the product mu...

Страница 14: ...gs Houses Connect to wall jack for outdoor antenna Outdoor Antenna VHF UHF Wall Antenna Socket RF Coaxial Wire 75 ohm PCMCIA CARD SLOT HDMI IN 2 1 DVI DIGITAL AUDIO OUT OPTICAL RS 232C IN CONTROL SERVICE AV 1 AV 2 DTV OUT VIDEO AUDIO RGB PC DTV OUT RGB IN AUDIO RGB DVI IN ANTENNA OUT ANTENNA IN REMOTE CONTROL G G The TV will let you know when the analogue cable and digital programme scans are comp...

Страница 15: ... cover the product bearing this phenomenon AV 1 AV 2 DTV OUT RGB PC DTV AUDIO RGB DVI OUT IN REMOTE CONTROL RGB IN REMOTE CONTROL ANTENNA ANTENNA IN IN L R S VIDEO VIDEO ANT IN ANT OUT ANTENNA ANTENNA OUT OUT Wall Jack Antenna 1 2 Connect the RF antenna out socket of the VCR to the A An nt te en nn na a socket on the set Connect the antenna cable to the RF antenna in socket of the VCR 1 How to con...

Страница 16: ...Right red 1 How to connect 2 How to use Insert a video tape into the VCR and press PLAY on the VCR Refer to the VCR owner s manual Select A AV V3 3 input source with using the I IN NP PU UT T button on the remote control If connected to A AV V I IN N4 4 select A AV V4 4 input source When connecting with an S Video cable Connect the S VIDEO output of the VCR to the S S V VI ID DE EO O input on the ...

Страница 17: ...t on the set 1 2 How to use Insert a video tape into the VCR and press PLAY on the VCR Refer to the VCR owner s manual Select A AV V1 1 input source with using the I IN NP PU UT T button on the remote control If connected to A AV V2 2 select A AV V2 2 input source G G If the S VIDEO Y C signal is received through the Euro scart socket 2 AV2 you must change to the SAV2 mode G G Please use the shiel...

Страница 18: ...N NP PU UT T button on the remote control If connected to A AV V I IN N3 3 input select A AV V3 3 input source Operate the corresponding external equipment 1 1 PICTURE OUT SETUP VIDEO AUDIO COMPONENT IN AV 1 AV 2 AV 2 DTV OUT DTV OUT L R VIDEO AUDIO AUDIO The set has a special signal output capability which allows you to hook up a second TV or monitor 1 Connect the second TV or monitor to the TV s...

Страница 19: ...g at the laser beam may damage your vision CAUTION Connect one end of an optical cable to the TV Digital Audio Optical Output port Connect the other end of the optical cable to the digital audio optical input on the audio equipment Set the TV Speaker option Off in the SOUND menu G G p p 6 69 9 See the external audio equipment instruction manual for operation 1 How to connect 2 3 1 EXTERNAL STEREO ...

Страница 20: ...b Pb PR R Y Cr Pr Connect the video outputs Y PB PR of the DVD to the C CO OM MP PO ON NE EN NT T I IN N V VI ID DE EO O jacks on the set Match the jack colors Y green PB blue and PR red Connect the audio outputs of the DVD to the C CO OM MP PO ON NE EN NT T I IN N A AU UD DI IO O jacks on the set 1 How to connect 2 How to use Turn on the DVD player insert a DVD Select C CO OM MP PO ON NE EN NT T ...

Страница 21: ...elect A AV V4 4 input source Refer to the DVD player s manual for operating instructions When connecting with a HDMI cable Connect the HDMI output of the DVD to the H HD DM MI I I IN N 1 1 D DV VI I or 2 2 jack on the set No separated audio connection is necessary 1 How to connect 2 How to use Select H HD DM MI I1 1 D DV VI I or H HD DM MI I2 2 input source with using the I IN NP PU UT T button on...

Страница 22: ...e DVD player insert a DVD Select A AV V1 1 input source with using the I IN NP PU UT T button on the remote control If connected to A AV V2 2 select A AV V2 2 input source Refer to the DVD player s manual for operating instruc tions G G Please use the shield scart cable NOTE VIDEO AUDIO COMPONENT IN EO AV 2 DTV OUT ANTENNA OUT ANTENNA IN AV 1 L R VIDEO AUDIO AUDIO 1 9U1004A_01 06 6 27 2 10 PM Page...

Страница 23: ... the digital set top box to the C CO OM MP PO ON NE EN NT T I IN N V VI ID DE EO O jacks on the set Match the jack colors Y green PB blue and PR red Connect the audio output of the digital set top box to the C CO OM MP PO ON NE EN NT T I IN N A AU UD DI IO O jacks on the set 2 1 2 How to use Turn on the digital set top box Refer to the owner s manual for the digital set top box Select C CO OM MP P...

Страница 24: ...ow to use Turn on the digital set top box Refer to the owner s manual for the digital set top box Select H HD DM MI I1 1 D DV VI I or H HD DM MI I2 2 input source with using the I IN NP PU UT T button on the remote control 2 1 2 1 A ANTENNA OUT A ANTENNA IN OUT IN REMOTE CONTROL REMOTE CONTROL RGB IN RGB PC DTV AUDIO RGB DVI AUDIO RGB DVI L R RGB OUTPUT 1 2 AV 1 AV 2 DTV OUT ANTENNA OUT ANTENNA IN...

Страница 25: ... DV VI I jack on the set Connect the audio output of the digital set top box to the A AU UD DI IO O R RG GB B D DV VI I jack on the set 1 How to connect Turn on the digital set top box Refer to the owner s manual for the digital set top box Select H HD DM MI I1 1 D DV VI I input source with using the I IN NP PU UT T button on the remote control 2 How to use 2 1 1 2 G G HDMI2 source does not suppor...

Страница 26: ...VIDEO menu until the picture is clear If the refresh rate of the PC graphic card can not be changed change the PC graphic card or consult the manufacturer of the PC graphic card NOTE AV 1 AV 2 DTV OUT NNA ANTENNA T OUT NNA ANTENNA IN OUT IN REMOTE CONTROL REMOTE CONTROL RGB IN RGB PC DTV AUDIO RGB DVI AUDIO RGB DVI RGB OUTPUT AUDIO Connect the RGB output of the PC to the R RG GB B P PC C D DT TV V...

Страница 27: ...60Hz NOTE DIGITAL AUDIO OUT OPTICAL RS 232C IN CONTROL SERVICE AV 1 AV 2 DTV OUT ANTENNA OUT ANTENNA IN OUT IN REMOTE CONTROL REMOTE CONTROL RGB IN AUDIO RGB DVI AUDIO RGB DVI RGB PC DTV HDMI IN 1 DVI DVI PC OUTPUT AUDIO 2 Connect the DVI output of the PC to the H HD DM MI I I IN N 1 1 D DV VI I jack on the set Connect the PC audio output to the A AU UD DI IO O R RG GB B D DV VI I jack on the set ...

Страница 28: ...et G If graphic card on the PC does output analog and digital RGB simultaneously set the set to either RGB or HDMI the other mode is set to Plug and Play automatically by the set G DOS mode may not work depending on video card if you use a HDMI to DVI cable G When you use too long RGB PC cable there might be a noise on the screen We recommend using under 5m of the cable It provides the best pictur...

Страница 29: ... VOL POWER 1 2 3 4 5 6 7 8 0 9 GUIDE PIP PR PIP MENU FAV MUTE EXIT VCR TV DVD ARC TEXT SWAP BACK PIP PR INFO i OK PIP INPUT SLEEP SUBTITLE TURNING ON THE SET Initializing setup Note It will automatically disappear after approx 40 seconds unless a button is pressed If the OSD On Screen Display is displayed on the screen as figure after turning on the set you can adjust the Auto Programme tuning CHA...

Страница 30: ...me If you want to switch the sound off press the M MU UT TE E button You can cancel this function by pressing the M MU UT TE E V VO OL L D D E E or I I I II I button Adjust the volume to suit your personal preference 1 VOL PR LIST Q VIEW 1 2 3 4 5 6 7 8 0 9 MENU MUTE FAV EXIT TEXT OK VOL PR INDEX POSITION SIZE REVEAL I II TIME MUTE FAV i LIST Q VIEW 1 2 3 4 5 6 7 8 0 9 1 9U1004A_02 06 6 27 2 11 PM...

Страница 31: ...ptions as shown below Programme Selection for Sub Picture Press the P PI IP P button Press the P PI IP P P PR R button to select a programme for the sub picture You can t select DTV for main and sub picture simultaneously PIP lets you view 2 different inputs sources on the screen at the same time One source will be large and the other source will show a smaller inset image Double window mode split...

Страница 32: ... DTV or HDMI mode the sub picture isn t available to select DTV and HDMI modes G G When the main picture is RGB mode the sub picture isn t available to select HDMI modes G G When the main picture is HDMI mode the sub picture isn t available to select RGB modes G G It s not available to use this function in Vertical Frequency 85Hz for sub picture Press the S SI IZ ZE E button and then F or G button...

Страница 33: ...ng Input DW PIP PIP Input Win Size Win Position PIP Transparency G PIP System MENU Prev STATION PICTURE SOUND TIME SPECIAL SCREEN PIP DW 0 1 2 3 4 Swapping between main and sub pictures Press the S SW WA AP P button to exchange the main and sub pictures POP Picture out of Picture Programme Scan Use POP to search the programmes of all the memorized channels one by one on the 3 PIP screen display wh...

Страница 34: ...t Follow the indications on digital teletext and move onto the next step by pressing O OK K DE F G R RE ED D G GR RE EE EN N Y YE EL LL LO OW W B BL LU UE E or N NU UM MB BE ER R buttons and so on Press the T TE EX XT T or colour button to switch off digital teletext and return to TV viewing Some services may allow you to access text services by pressing the R RE ED D button If pressing the M ME E...

Страница 35: ...ather television programmes share prices and many other topics The teletext decoder of this set can support the SIMPLE TOP and FASTEXT systems SIMPLE standard teletext consists of a number of pages which are selected by directly entering the corresponding page number TOP and FASTEXT are more modern methods allowing quick and easy selection of teletext information A Page selection Enter the desired...

Страница 36: ... 1 1 2 3 4 The teletext pages are colour coded along the bottom of the screen and are selected by pressing the corresponding coloured button i FASTEXT A Block group page selection With the B BL LU UE E button you can progress from block to block Use the Y YE EL LL LO OW W button to proceed to the next group with automatic overflow to the next block With the G GR RE EE EN N button you can proceed t...

Страница 37: ...w teletext page The display will appear at the top left hand corner of the screen When the updated page is available then display will change to the page number Press this button to view the updated teletext page T TI IM ME E When viewing a TV programme press this button to display the time at the top right hand cor ner of the screen Press this button again to remove the display In the teletext mo...

Страница 38: ...l the possible viewing options The EPG supplies information such as programme listings start and end times for all available services In addition detailed information about the programme is often available in the EPG the availability and amount of these programme details will vary depending on the particular broadcaster This function can be used only when the EPG information is broadcasted by broa...

Страница 39: ...Enter Date Change mode YELLOW Enter Timer Record Remind setting mode BLUE Enter Timer Record Remind list mode Change to the selected channel F or G Select NOW or NEXT Programme D or E Select the Broadcasting Programme PR D or E Page Up Down GUIDE EXIT Switch off EPG FAV Displayed when the Favourite Programme i The detail information on or off Button Function in NOW NEXT Guide Mode Button Function ...

Страница 40: ...ording signalling has been connected to the DTV OUT terminal using a SCART cable Button Function in Record Remind Setting Mode Remote Control Buttons Function RED Change to Guide or Timer list mode Save Timer Record Remind F or G Select Type Service Date or Start End time D or E Function setting Button Function in Timer List Mode Remote Control Buttons Function RED Add new Manual Timer setting mod...

Страница 41: ...ICTURE SOUND G TIME SPECIAL SCREEN PIP DW Input DW PIP PIP Input Win Size Win Position PIP Transparency PIP System STATION PICTURE SOUND TIME SPECIAL SCREEN PIP DW G Clock Off time On time Auto sleep STATION PICTURE SOUND TIME G SPECIAL SCREEN PIP DW Lock system Child lock Set ID Factory reset Software update Subtitle language Index STATION PICTURE SOUND TIME SPECIAL G SCREEN PIP DW Auto config Ma...

Страница 42: ...Manual programme Programme edit CI information 5V antenna power Booster Diagnostics MENU Prev Start STATION PICTURE SOUND TIME SPECIAL SCREEN PIP DW Press the M ME EN NU U button and then D or E button to select the S ST TA AT TI IO ON N menu Press the G button and then D or E button to select button to select A Au ut to o p pr ro og gr ra am mm me e Press the G button and then G button to begin a...

Страница 43: ...ostics MENU Prev Your receiver will add this channel to your channel list STATION PICTURE SOUND TIME SPECIAL SCREEN PIP DW UHF CH 35 Press the M ME EN NU U button and then D or E button to select the S ST TA AT TI IO ON N menu Press the G button and then D or E button to select M Ma an nu ua al l p pr ro og gr ra am mm me e Press the G button and then D or E button or N NU UM MB BE ER R buttons to...

Страница 44: ...oster Diagnostics STATION PICTURE SOUND TIME SPECIAL SCREEN PIP DW VOL LIST Q VIEW PR 1 2 3 4 5 6 7 8 0 9 I II MENU MUTE FAV EXIT TEXT OK Press the M ME EN NU U button and then D or E button to select the S ST TA AT TI IO ON N menu Press the G button and then D or E button to select P Pr ro og gr ra am mm me e e ed di it t Press the G button to enter the Programme edit menu Select a programme to b...

Страница 45: ...will appear in front of that programme number Press the G GR RE EE EN N button again to release this function Note G G To watch a locked programme input a 4 digit password in Lock system Be sure to remember this number G G If you forgot your password press 7 7 7 7 on the remote control handset G G If you select other programme after releasing a locked programme and then return to the locked progra...

Страница 46: ...ton Press the D or E button to select the desired item Module information smart card information lan guage or software download etc Press the O OK K button Press the E EX XI IT T button to return to TV viewing Main Menu Press OK to select or Exit to quit Module information Smart card information Language Software Download Auto programme Manual programme Programme edit CI information G 5V antenna p...

Страница 47: ...ill automatically return to Off The message A An nt te en nn na a f fe ee ed d o ov ve er rl lo oa ad de ed d A Au ut to om ma at ti ic ca al ll ly y s sw wi it tc ch he ed d o of ff f will appear Press the E EX XI IT T button to return to TV viewing Auto programme Manual programme Programme edit CI information 5V antenna power G Booster Diagnostics MENU Prev Off On STATION PICTURE SOUND TIME SPEC...

Страница 48: ...select the S ST TA AT TI IO ON N menu Press the G button and then use D or E button to select B Bo oo os st te er r Press the G button and then use D or E button to select On or Off Press the E EX XI IT T button to return to TV viewing Auto programme Manual programme Programme edit CI information 5V antenna power Booster G Diagnostics MENU Prev Off On STATION PICTURE SOUND TIME SPECIAL SCREEN PIP ...

Страница 49: ... ia ag gn no os st ti ic cs s Press the G button to display Manufacturer Model Type Serial Number and Software Version Press the E EX XI IT T button to return to TV viewing Auto programme Manual programme Programme edit CI information 5V antenna power Booster Diagnostics G MENU Prev To set STATION PICTURE SOUND TIME SPECIAL SCREEN PIP DW Auto programme Manual programme Programme edit CI informatio...

Страница 50: ...o select S St to or ra ag ge e f fr ro om m Select the beginning programme number with the F or G button or N NU UM MB BE ER R buttons on the Storage from menu Press the E button to select S St ta ar rt t The station name is stored for stations which broad cast VPS Video Programme Service PDC Programme Delivery Control or TELETEXT data If no station name can be assigned to a station the channel nu...

Страница 51: ...E button to select B Ba an nd d Press the F or G button to select V V U UH HF F or C Ca ab bl le e as required Press the E button to select C Ch ha an nn ne el l You can select the desired channel number with the F or G button or N NU UM MB BE ER R buttons If possible select the channel number directly with the N NU UM MB BE ER R buttons Press the E button to select Search Press the F or G button ...

Страница 52: ...e G button and then F or G button to fine tune for the best picture and sound Press the O OK K button to store it Press the E EX XI IT T button to return to TV viewing or press the M ME EN NU U button to return to the previous menu Auto programme Manual programme Programme edit Favourite programme F G Store Storage System Band Channel Fine Search Name STATION PICTURE SOUND TIME SPECIAL SCREEN PIP ...

Страница 53: ...haracter and so on Press the O OK K button to store it Press the E EX XI IT T button to return to TV viewing or press the M ME EN NU U button to return to the previous menu You can assign a station name with five characters to each programme number Auto programme Manual programme Programme edit Favourite programme Prev Storage System Band Channel Fine Search Name STATION PICTURE SOUND TIME SPECIAL...

Страница 54: ... are shifted down one position MENU Prev FAV Favourite 0 C 01 3 C 01 15 12 9 6 C 01 1 C 03 4 C 01 16 13 10 7 C 01 2 C 06 5 C 01 17 14 11 8 Delete Copy Move Skip This function enables you to delete or skip the stored programmes Also you can move some stations to other programme numbers or copy a blank station data into the selected programme number Programme edit D D F F G G E E Auto programme Manu...

Страница 55: ...the skipped programme When a programme number is skipped it means that you will be unable to select it using the P PR R D or E button during normal TV viewing If you want to select the skipped programme directly enter the programme number with the N NU UM MB BE ER R buttons or select it in the programme edit or table menu A Selecting Favourite Programme Select your favourite programme number with ...

Страница 56: ...tton or N NU UM MB BE ER R buttons Any number under 10 is entered with a numeric 0 in front of it i e 05 for 5 To store another programme repeat steps 3 to 4 You can store up to 18 programmes Press the E EX XI IT T button to return to TV viewing or press the M ME EN NU U button to return to the previous menu Auto programme Manual programme Programme edit Favourite programme G STATION PICTURE SOUND...

Страница 57: ...ber A Paging through a programme list There are 6 programme LIST pages which total contain 100 programmes Press the D E F G button repeatedly to turns the pages Press the L LI IS ST T button to return to TV viewing A Displaying favourite programme table Press the F FA AV V button to display the Favourite Programme table menu You can check the programmes stored in the memory by displaying the progr...

Страница 58: ...o display with a mild image U Us se er r 1 1 2 2 Select this option to use the user defined setting Press the E EX XI IT T button to return to TV viewing or press the M ME EN NU U button to return to the previous menu PSM adjusts the set for the best picture appearance Select the preset value in the PSM menu based on the programme category When adjusting User options contrast brightness colour and...

Страница 59: ...of white in the your picture C Co ol lo ou ur r Adjusts intensity of all colours S Sh ha ar rp pn ne es ss s Adjusts the level of crispness in the edges between the light and dark areas of the picture The lower the level the softer the image T Ti in nt t Adjusts the balance between red and green levels Press the G button and then F or G button to make appropriate adjustments Press the E EX XI IT T...

Страница 60: ...To initialize values reset to default settings select the Normal option When adjusting colour temperature options red green or blue manually CSM automatically changes to User Choose one of three automatic colour adjustments Set to warm to enhance hotter colours such as red or set to cool to see less intense colours with more blue 1 2 3 4 PSM CSM G Advanced Reset MENU Prev Cool Normal Warm User STA...

Страница 61: ... Press the G button and then D or E button to select Red Green or Blue Press the G button and then F or G button to make appropriate adjustments The adjustment range of R Re ed d G Gr re ee en n or B Bl lu ue e is 40 40 Press the E EX XI IT T button to return to TV viewing or press the M ME EN NU U button to return to the previous menu Red 40 G Green 0 Blue 0 User MENU Prev STATION PICTURE SOUND T...

Страница 62: ...able to use this function in XD Off mode XD USER OPTION PSM CSM Advanced Reset STATION PICTURE SOUND TIME SPECIAL SCREEN PIP DW Off On Fleshtone Greentone Bluetone XD NR MPEG NR 1 1 1 5 Prev 1 G F PSM CSM Advanced Reset STATION PICTURE SOUND TIME SPECIAL SCREEN PIP DW 1 2 3 4 Press the M ME EN NU U button and then D or E button to select the P PI IC CT TU UR RE E menu Press the G button and then D...

Страница 63: ...he P PI IC CT TU UR RE E menu Press the G button and then D or E button to select X XD D Press the G button and then D or E button to select O On n Press the G button and then D or E button to select X XD D N NR R or M MP PE EG G N NR R Press the F or G button to make appropriate adjustments Press the E EX XI IT T button to return to TV viewing or press the M ME EN NU U button to return to the pre...

Страница 64: ... d Press the G button and then D or E button to select C Ci in ne em ma a Press the F or G button to select O On n or O Of ff f Press the E EX XI IT T button to return to TV viewing or press the M ME EN NU U button to return to the previous menu PSM CSM Advanced Reset STATION PICTURE SOUND TIME SPECIAL SCREEN PIP DW 1 2 3 4 5 1 PSM CSM Advanced Reset STATION PICTURE SOUND TIME SPECIAL SCREEN PIP D...

Страница 65: ...he G button and then D or E button to select B Bl la ac ck k l le ev ve el l Press the F or G button to select L Lo ow w or H Hi ig gh h L Lo ow w The reflection of the screen gets darker H Hi ig gh h The reflection of the screen gets brighter Press the E EX XI IT T button to return to TV viewing or press the M ME EN NU U button to return to the previous menu 1 2 3 4 5 PSM CSM Advanced Reset STATI...

Страница 66: ...t Press the G button to initialize the adjusted value You can initialize PSM CSM XD and Advanced 1 2 3 PSM CSM Advanced Reset G MENU Prev To set STATION PICTURE SOUND TIME SPECIAL SCREEN PIP DW 3 2 PSM CSM Advanced Reset STATION PICTURE SOUND TIME SPECIAL SCREEN PIP DW 1 D A TV INPUT POWER I II GUIDE PIP PR PIP MENU EXIT VCR TV DVD ARC TEXT SWAP BACK PIP PR INFO i OK PIP INPUT SLEEP SUBTITLE 9U100...

Страница 67: ...o return to the previous menu You can select your preferred sound setting Flat Music Movie or Sports and you can also adjust the sound frequency of the equalizer SSM lets you enjoy the best sound without any special adjustment because the set sets the appropriate sound options based on the programme content When adjusting sound equalizer manually SSM automatically switches User Flat Music Movie an...

Страница 68: ...l with the F or G button Press the E EX XI IT T button to return to TV viewing or press the M ME EN NU U button to return to the previous menu 120Hz F G 200Hz 500Hz 1 2KHz 3KHz 7 5KHz 12KHz User MENU Prev STATION PICTURE SOUND TIME SPECIAL SCREEN PIP DW 1 2 3 4 5 6 5 4 SSM AVL Balance 0 TV Speaker STATION PICTURE SOUND TIME SPECIAL SCREEN PIP DW 1 SSM G AVL Balance 0 TV Speaker MENU Prev SRS TSXT ...

Страница 69: ...G button and then D or E button to select A AV VL L Press the G button and then D or E button to select O Of ff f or O On n Press the E EX XI IT T button to return to TV viewing or press the M ME EN NU U button to return to the previous menu 1 2 3 4 1 SSM AVL G Balance 0 TV Speaker MENU Prev Off On STATION PICTURE SOUND TIME SPECIAL SCREEN PIP DW 3 2 D A TV INPUT POWER I II GUIDE PIP PR PIP MENU E...

Страница 70: ... EX XI IT T button to return to TV viewing or press the M ME EN NU U button to return to the previous menu You can adjust the sound balance of speaker to the levels you prefer SSM AVL Balance 0 G TV Speaker L R MENU Prev STATION PICTURE SOUND TIME SPECIAL SCREEN PIP DW 1 2 3 4 3 2 SSM AVL Balance 0 TV Speaker STATION PICTURE SOUND TIME SPECIAL SCREEN PIP DW 1 D A TV INPUT POWER I II GUIDE PIP PR P...

Страница 71: ... the internal speaker status In AV1 AV2 SAV2 AV3 AV4 COMPONENT RGB HDMI1 DVI and HDMI2 TV speaker and or variable audio can be outputted even though there is no video signal If you want to use your external hi fi stereo system turn off the internal speakers of the set SSM AVL Balance 0 TV Speaker G MENU Prev Off On STATION PICTURE SOUND TIME SPECIAL SCREEN PIP DW SSM AVL Balance 0 TV Speaker STATI...

Страница 72: ...n to TV viewing or press the M ME EN NU U button to return to the previous menu SSM AVL Balance 0 TV Speaker Audio Language STATION PICTURE SOUND TIME SPECIAL SCREEN PIP DW 1 2 3 4 This function lets you select your preferred lan guage for audio If the audio data in selected language is not broadcasted English audio will be played SSM AVL Balance 0 TV Speaker Audio Language G MENU Prev English Wel...

Страница 73: ...stantaneous Companding Audio Multiplex digital sound can be received Sound output can be selected according to the type of received broadcast as follows by pressing the I II button repeatedly NICAM RECEPTION In Analogue Mode only SPEAKER SOUND OUTPUT SELECTION When a programme is selected the sound information for the station appears after the programme number and station name disappear A Mono sou...

Страница 74: ...ing or press the M ME EN NU U button to return to the previous menu The clock is set automatically when receiving the digital sig nal You can set the clock if the TV has no DTV signal You must set to the time correctly before using on off time function Clock Off time On time Auto sleep MENU Prev STATION PICTURE SOUND TIME SPECIAL SCREEN PIP DW Time Date Year 12 2006 Apr 20 14 Clock Off time On tim...

Страница 75: ...I IT T button to return to TV viewing or press the M ME EN NU U button to return to the previous menu TV MENU TIME MENU OPTIONS 73 ON OFF TIME The Off time automatically switches the set to standby at the preset time Two hours after the set is switched on by the on time function it will automatically switch back to standby mode unless a but ton has been pressed Once the on time off time is set the...

Страница 76: ...ss the G button and then D or E button to select A Au ut to o s sl le ee ep p Press the G button and then D or E button to select O Of ff f or O On n Press the E EX XI IT T button to return to TV viewing or press the M ME EN NU U button to return to the previous menu Clock Off time On time Auto sleep G MENU Prev STATION PICTURE SOUND TIME SPECIAL SCREEN PIP DW Off On 1 2 3 4 D A TV INPUT POWER I I...

Страница 77: ...0 20 30 60 90 120 180 and 240 When the number of minutes you want is displayed on the screen the timer begins to count down from the number of minutes selected To view the remaining sleep time press the S SL LE EE EP P button once To cancel the sleep time repeatedly press the S SL LE EE EP P button until the display Min appears When you switch the set off the set releases the pre set sleep time a ...

Страница 78: ... MENU MUTE FAV EXIT TEXT OK Press the M ME EN NU U button and then D or E button to select the S SP PE EC CI IA AL L menu Press the G button and then D or E button to select L Lo oc ck k s sy ys st te em m Press the G button and then D or E button to select O On n T To o s se et t t th he e p pa as ss sw wo or rd d Press the G button and then use N NU UM MB BE ER R buttons to input a 4 digit passw...

Страница 79: ... ER R I IN NP PU UT T D D A A T TV V P PR R D E or N NU UM MB BE ER R buttons on the remote control With the Child lock On the display Child lock on appears on the screen if any button on the front panel is pressed while viewing the set Press the E EX XI IT T button to return to TV viewing or press the M ME EN NU U button to return to the previous menu Lock system Child lock G Set ID Factory reset...

Страница 80: ...te control handset Press the M ME EN NU U button and then D or E button to select the S SP PE EC CI IA AL L menu Press the G button and then D or E button to select F Fa ac ct to or ry y r re es se et t Press the G button to reset the menu options to orig inal values After finishing Factory Reset the set will reboot 1 2 3 Lock system Child lock Set ID Factory reset G Software update Subtitle langu...

Страница 81: ... DW Off On When setting Software Update Occasionally a transmis sion of updated digital software information will result in the following menu on the TV screen Select the YES using the F or G button and when you see the following picture After Software Update is completed the System takes about one minute to restart Lock system Child lock Set ID Factory reset Software update Subtitle language Inde...

Страница 82: ... or G Ga ae el li ic c Press the E EX XI IT T button to return to TV viewing or press the M ME EN NU U button to return to the previous menu You can select Subtitle language with the S SU UB BT TI I T TL LE E on the remote control When two or more subtitle languages are broadcasted Lock system Child lock Set ID Factory reset Software update Subtitle language G Index MENU Prev STATION PICTURE SOUND...

Страница 83: ...I In nd de ex x Press the G button and then D or E button to select O On n or O Of ff f If you select O On n the LED Display illuminates brightly Press the E EX XI IT T button to return to TV viewing or press the M ME EN NU U button to return to the previous menu 1 2 3 4 Lock system Child lock Set ID Factory reset Software update Subtitle language Index STATION PICTURE SOUND TIME SPECIAL SCREEN PI...

Страница 84: ... nf fi ig g Press the G button to start Auto config When Auto config has finished O OK K will be shown on screen If the position of the image is still not correct try Auto adjustment again If picture needs to be adjusted more after Auto adjust ment in RGB PC you can adjust the Manual config Press the E EX XI IT T button to return to TV viewing or press the M ME EN NU U button to return to the prev...

Страница 85: ...ows you to remove any hor izontal noise and clear or sharpen the image of characters Press the F or G button to make appropriate adjust ments Press the E EX XI IT T button to return to TV viewing or press the M ME EN NU U button to return to the previous menu Auto config Manual config G XGA Mode ARC XD Demo Reset MENU Prev STATION PICTURE SOUND TIME SPECIAL SCREEN PIP DW Phase Clock H Position V P...

Страница 86: ...ction will lead you to view a picture with an original 4 3 aspect ratio with gray bars appearing at both the left and right sides 16 9 Wide Following selection will lead you to adjust the picture horizontally in a linear proportion to fill the entire screen useful for viewing 4 3 formatted DVDs 14 9 You can enjoy the picture format of 14 9 or general TV programme through the 14 9 mode The screen 1...

Страница 87: ...E button to select the desired XGA resolution Press the E EX XI IT T button to return to TV viewing or press the M ME EN NU U button to return to the previous menu Auto config Manual config XGA Mode G ARC XD Demo Reset MENU Prev STATION PICTURE SOUND TIME SPECIAL SCREEN PIP DW 1024 x 768 1280 x 768 1360 x 768 1366 x 768 Auto config Manual config XGA Mode ARC XD Demo Reset STATION PICTURE SOUND TIM...

Страница 88: ...utton to select X XD D D De em mo o Press the G button to begin X XD D D De em mo o To stop XD Demo press the E EX XI IT T button 1 2 3 4 Auto config Manual config XGA Mode ARC XD Demo G Reset MENU Prev STATION PICTURE SOUND TIME SPECIAL SCREEN PIP DW To start 3 2 Auto config Manual config XGA Mode ARC XD Demo Reset STATION PICTURE SOUND TIME SPECIAL SCREEN PIP DW 1 D A TV INPUT POWER I II GUIDE P...

Страница 89: ...t t Press the G button You can initialize PIP size PIP position PIP Transparency and sub picture size of double window Auto config Manual config XGA Mode ARC XD Demo Reset G MENU Prev STATION PICTURE SOUND TIME SPECIAL SCREEN PIP DW To set Auto config Manual config XGA Mode ARC XD Demo Reset STATION PICTURE SOUND TIME SPECIAL SCREEN PIP DW 1 2 3 1 3 2 D A TV INPUT POWER I II GUIDE PIP PR PIP MENU ...

Страница 90: ...l device to the RS 232C jack on the product back panel Note RS 232C connection cables are not supplied with the product Type of Connector D Sub 9 Pin Male No Pin Name 1 No connection 2 RXD Receive data 3 TXD Transmit data 4 DTR DTE side ready 5 GND 6 DSR DCE side ready 7 RTS Ready to send 8 CTS Clear to send 9 No Connection HDMI IN 2 1 DVI DIGITAL AUDIO OUT OPTICAL RS 232C IN RS 232C IN CONTROL CO...

Страница 91: ...gurations Standard RS 232C cable PC TV RXD 2 3 TXD TXD 3 2 RXD GND 5 5 GND DTR 4 6 DSR DSR 6 4 DTR RTS 7 8 CTS CTS 8 7 RTS D Sub 9D Sub 9 3 Wire Configurations Not standard PC TV RXD 2 3 TXD TXD 3 2 RXD GND 5 5 GND DTR 4 6 DTR DSR 6 4 DSR RTS 7 7 RTS CTS 8 8 CTS D Sub 9D Sub 9 2 3 4 1 Lock system Child lock Set ID G Factory reset Software update Subtitle language Index MENU Prev STATION PICTURE SO...

Страница 92: ...PC com puter E Er rr ro or r A Ac ck kn no ow wl le ed dg ge em me en nt t The TV transmits ACK acknowledgement based on this format when receiving abnormal data from non viable func tions or communication errors Data1 Illegal Code Data2 Not supported function Data3 Wait more time 01 Power k a 0 1 02 Input Select k b G G p 91 03 Aspect Ratio k c G G p 91 04 Screen Mute k d 0 1 05 Volume Mute k e 0...

Страница 93: ...e control Transmission Data Min 0 Max 64 Refer to Real data mapping 1 See page 95 k f Set ID Data Cr Ack f Set ID OK Data x 0 07 7 C Co on nt tr ra as st t C Co om mm ma an nd d 2 2 g g G To adjust screen contrast You can also adjust contrast in the PICTURE menu Transmission Data Min 0 Max 64 Refer to Real data mapping 1 See page 95 k g Set ID Data Cr Ack g Set ID OK Data x 0 08 8 B Br ri ig gh ht...

Страница 94: ...Data 0 PIP DW off 1 PIP 2 DW1 3 DW2 5 POP k n Set ID Data Cr Ack n Set ID OK Data x 0 09 9 C Co ol lo ou ur r C Co om mm ma an nd d 2 2 i i G To adjust the screen colour You can also adjust colour in the PICTURE menu Transmission Data Min 0 Max 64 Refer to Real data mapping 1 See page 95 k i Set ID Data Cr Ack i Set ID OK Data x 1 10 0 T Ti in nt t C Co om mm ma an nd d 2 2 j j o op pt ti io on n ...

Страница 95: ...OK Data x 2 22 2 A Ab bn no or rm ma al l S St ta at te e C Co om mm ma an nd d 2 2 z z G To recognize an abnormal state Transmission Data FF Read Data 0 Normal Power on and signal exist 1 No signal Power on 2 Turn the monitor off by remote control 3 Turn the monitor off by sleep time function 4 Turn the monitor off by RS 232C function 5 5V down 6 AC down 8 Turn the monitor off by Off time functio...

Страница 96: ... Min 00 Max FF 2 26 6 S Se en nd d I IR R C Co od de e C Co om mm ma an nd d 1 1 m m C Co om mm ma an nd d 2 2 c c G To send IR remote key code Transmission Data Key code Refer to page 97 m c Set ID Data Cr Ack c Set ID OK NG Data x 2 27 7 I In np pu ut t s se el le ec ct t C Co om mm ma an nd d 1 1 x x C Co om mm ma an nd d 2 2 b b M Ma ai in n P Pi ic ct tu ur re e I In np pu ut t G To select in...

Страница 97: ...cture MSB LSB 0 x y Set ID Data Cr Ack y Set ID OK NG Data x 0 0 0 0 0 0 0 External Input Input Number Input Number Data 0 0 0 0 Input1 0 1 0 0 Input5 0 1 0 1 Input6 0 0 1 1 Input4 0 0 1 0 Input3 0 0 0 1 Input2 R Re ea al l d da at ta a m ma ap pp pi in ng g 1 1 0 Step 0 A Step 10 Set ID 10 F Step 15 Set ID 15 10 Step 16 Set ID 16 64 Step 100 6E Step 1 10 73 Step 1 15 74 Step 1 16 C7 Step 199 FE S...

Страница 98: ... D2 D3 D4 D5 D6 D7 D0 D1 D2 D3 D4 D5 D6 D7 Lead code Low custom code High custom code Data code Data code Repeat code Tf 4 5 ms 9 ms 2 25 ms 9 ms 0 55 ms 0 56 ms 1 12 ms 0 56 ms 2 24 ms Tf Tf Tf 108ms 455KHz Bit 0 Bit 1 1 How to Connect Connect your wired remote control to the Remote Control port on the TV 2 Remote Control IR Codes Output waveform Single pulse modulated with 37 917KHz signal at 45...

Страница 99: ...rol Button 02 VOL D D Remote control Button 03 VOLE E Remote control Button 40 D D Remote control Button 41 E E Remote control Button 07 F F Remote control Button 06 G G Remote control Button 08 POWER Remote control Button Power On Off 09 MUTE Remote control Button 10 19 Number Key 0 9 Remote control Button 0B INPUT Remote control Button AA INFO i Remote control Button AB GUIDE Remote control Butt...

Страница 100: ...e MENU and MUTE button continuously at the same time for 2 seconds the current selected device button will be illuminated If you don t press any button for 20 seconds the light on the mode button will be turned off In that case you have to repeat from step 2 Enter code numbers using the number button on the remote by referring the code table on the following pages When pressing the button the ligh...

Страница 101: ...LTA 013 020 MITSUBISHI 013 020 045 046 049 051 059 061 151 MTC 034 040 MULTITECH 024 034 NEC 012 023 039 043 048 NORDMENDE 043 OPTONICA 053 054 PANASONIC 066 070 074 083 133 140 145 PENTAX 013 020 031 033 063 PHILCO 031 034 067 PHILIPS 031 033 034 054 067 071 101 PILOT 101 PIONEER 013 021 048 PORTLAND 108 PULSAR 072 QUARTZ 01 1 014 QUASAR 033 066 075 145 RCA 013 020 033 034 040 041 062 063 107 109...

Страница 102: ...EWS WEEK016 PRUCER 059 PTS 01 1 048 071 072 073 074 PULSAR 100 RCA 047 REGAL 049 050 REGENCY 057 REMBRANT 025 SAMSUNG 102 107 030 068 SCIENTIFIC ATLANTA 003 01 1 041 042 043 045 046 SHERITECH 022 SIGNAL 030 SIGNATURE 052 SL MARX 030 SPRUCER 047 078 STARCOM 002 004 008 009 STARGATE 008 030 TADIRAN 030 TAEKWANG 1 10 TAIHAN 105 TANDY 017 TEXSCAN 029 TOCOM 039 040 056 TOSHIBA 100 UNIKA 007 014 024 UNI...

Страница 103: ... on station tuned with Auto off activated Check whether the product is turned on Try another channel The problem may be with the broadcast Is the power cord inserted into wall power outlet Check your antenna direction and or location Test the wall power outlet plug another product s power cord into the outlet where the product s power cord was plugged in This is normal the image is muted during th...

Страница 104: ... output from one of the speakers T Th he er re e i is s a a p pr ro ob bl le em m i in n P PC C m mo od de e O On nl ly y P PC C m mo od de e a ap pp pl li ie ed d Adjust resolution horizontal frequency or vertical frequency Check the input source Work the Auto configure or adjust clock phase or H V position Option Check the signal cable Reinstall the PC video card The signal is out of range Scree...

Страница 105: ...ric softener or dish washing detergent Wring the cloth until it s almost dry and then use it to wipe the screen Make sure the excess water is off the screen and then let it air dry before you turn on your TV Cleaning the Cabinet To remove dirt or dust wipe the cabinet with a soft dry lint free cloth Please be sure not to use a wet cloth Extended Absence G G If you expect to leave your TV dormant f...

Страница 106: ...68 x 300 mm 46 2 x 26 4x 5 7 inches 1 1 75x670x1 43 8mm 91 2 pounds 41 4 kg 72 3 pounds 32 8 kg AC100 240V 50 60Hz PAL SECAM B G D K PAL I II SECAM L L VHF E2 E12 UHF E21 E69 CATV S1 S20 HYPER S21 S47 75 ohm 32 104 F 0 40 C Less than 80 4 140 F 20 60 C Less than 85 Dimensions Width x Height x Depth Weight Power requirement Television System Program Coverage External Antenna Impedance Environment c...

Страница 107: ...9U1004A_03 06 6 27 2 12 PM Page 105 ...

Отзывы: