LG 32PC5 Series Скачать руководство пользователя страница 6

4

PREPARATION

PREP

AR
A

TION

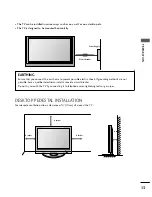
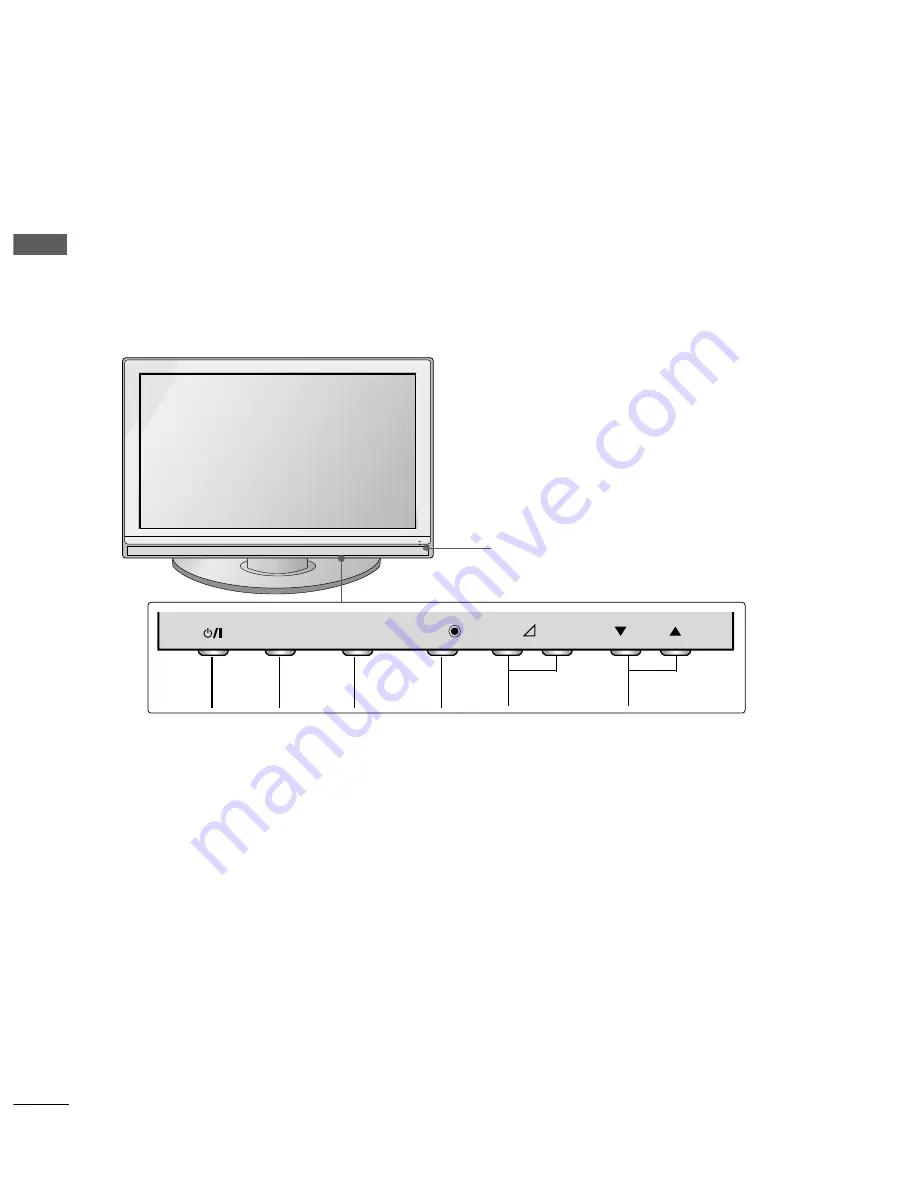
FRONT PANEL CONTROLS

This is a simplified representation of the front panel. Image shown may differ from your TV.

If your product has a protection film attached, remove the film and then wipe the product with a polishing
cloth.

42/50PG1***

MENU 

OK 

INPUT 

POWER

P

-

+

OK

MENU

INPUT

VOLUME 

PROGRAMME 

Remote Control Sensor
Power/Standby Indicator

• illuminates red in standby mode.

• illuminates green when the TV is switched on.

P

-

+

OK

OK

MENU

MENU

INPUT

INPUT

Содержание 32PC5 Series

Страница 1: ...odel number and serial number of the set Refer to the label on the back cover and quote this information To your dealer when requiring service ENGLISH This feature is not available for all models This product qualifies for ENERGY STAR in the factory default Home mode setting and this is the setting in which power savings will be achieved Except for 32PC5 ...

Страница 2: ......

Страница 3: ...h for use on the screen This feature is not available for all models Lightly wipe any stains or fingerprints on the surface of the TV with the polishing cloth Do not use excessive force This may cause scratching or discolouration only 42 50PG1 Cable Holder 42PG1 42PG2 1EA 50PG1 50PG2 2EA Bolts for stand assembly Refer to P 9 42PG1 42PG2 4EA protection cover only 42 50PG2 Cable Management Clip Only...

Страница 4: ...ment 40 Auto Programme Tuning 41 Manual Programme Tuning 42 Fine Tuning 43 Assigning a Station Name 44 Booster 45 Programme Edit 46 PICTURE CONTROL WATCHING TV PROGRAMME CONTROL A AC CC CE ES SS SO OR RI IE ES S 1 2 CONTENTS CONTENTS PREPARATION Front Panel Controls 4 Back Panel Information 6 Stand Installation 9 Please set it up carefully so the product does not fall over 10 Back Cover for Wire A...

Страница 5: ...3 Speaker Sound Output Selection 73 On Screen Menu Language Country Selection 74 3 CONTENTS APPENDIX Troubleshooting 82 Maintenance 84 Product Specifications 85 IR Codes 86 External Control Through RS 232C 88 TIME SETTING Clock Setup 75 Auto On Off Timer Setting 76 Sleep Timer Setting 77 Auto Shut off Setting 78 TELETEXT Switch On Off 79 SIMPLE Text 79 TOP Text 80 FASTEXT 80 Special Teletext Funct...

Страница 6: ...m your TV If your product has a protection film attached remove the film and then wipe the product with a polishing cloth 42 50PG1 MENU OK INPUT POWER P OK MENU VOLUME PROGRAMME Remote Control Sensor Power Standby Indicator illuminates red in standby mode illuminates green when the TV is switched on P OK OK MENU MENU INPUT INPUT ...

Страница 7: ...uminates red in standby mode illuminates green when the TV is switched on P OK OK MENU MENU INPUT INPUT 42 50PG2 32PC5 PR VOL OK MENU INPUT Power Standby Indicator illuminates red in standby mode illuminates green when the TV is switched on Remote Control Sensor PR VOL OK MENU INPUT INPUT MENU OK VOLUME PROGRAMME POWER PR VOL OK MENU INPUT ...

Страница 8: ...empt to operate the TV on DC power HDMI Input Connect a HDMI signal to HDMI IN Or DVI VIDEO signal to HDMI DVI port with DVI to HDMI cable RGB Audio Input Connect the monitor output from a PC to the appropriate input port Euro Scart Socket AV1 AV2 Connect scart socket input or output from an external device to these jacks RS 232C Input CONTROL Port Connect the serial port of the control devices to...

Страница 9: ...power The voltage is indicated on the Specifications page Never attempt to operate the TV on DC power HDMI Input Connect a HDMI signal to HDMI IN Or DVI VIDEO signal to HDMI DVI port with DVI to HDMI cable RGB Audio Input Connect the monitor output from a PC to the appropriate input port Euro Scart Socket AV1 AV2 Connect scart socket input or output from an external device to these jacks RS 232C I...

Страница 10: ...ice to these jacks HDMI Input Connect a HDMI signal to HDMI IN Or DVI VIDEO signal to HDMI DVI port with DVI to HDMI cable RGB Audio Input Connect the monitor output from a PC to the appropriate input port Antenna Input Connect RF antenna UHF to this jack Power Cord Socket This TV operates on an AC power The voltage is indicated on the Specifications page Never attempt to operate the TV on DC powe...

Страница 11: ...ned fully thep roduct can tilt forward after the product installation If you tighten the bolt with excessive force the boltcan deviate from abrasion of the tightening part of the bolt Carefully place the TV screen side down on a cushioned surface to protect the screen from damage Assemble the TV as shown Fix the 4 bolts securely using the holes in the back of the TV 1 2 3 Only 32PC5 ...

Страница 12: ...hildren do not climb or hang from the TV NOTE G When moving the TV undo the cords first G Use a platform or cabinet string and large enough to support the size and weight of the TV G To use the TV safely make sure that the height of the bracket on the wall and on the TV is the same 3 1 2 Use the eye bolts or TV brackets bolts to fix the product to the wall as shown in the picture If your TV has bo...

Страница 13: ...stall the C CA AB BL LE E M MA AN NA AG GE EM ME EN NT T C CL LI IP P as shown 2 Hold the C CA AB BL LE E M MA AN NA AG GE EM ME EN NT T C CL LI IP P with both hands and pull it upward How to remove the cable management clip CABLE MANAGEMENT CLIP For the 42PG1 model press the center of the CABLE MANAGEMENT CLIP and then lift up it Fixthe C Ca ab blle e H Ho olld de er rasshownand bundlethecables C...

Страница 14: ...Only 32PC5 Arrange the cables as shown picture POWER CORD ARRANGEMENT Only 32PC5 After connecting the power cord to the AC input terminal fix the power cord at the rear side Hole of the TV by using the bracket for fixing the power cord BACK COVER FOR WIRE ARRANGEMENT When installing the wall mounted unit use the protection cover for desk type stand installation or Insert the PROTECTION COVER into ...

Страница 15: ...ion allow a clearance of 4 10cm all around the TV 4 inches 4 inches 4 inches 4 inches Power Supply Circuit breaker EARTHING Ensure that you connect the earth wire to prevent possible electric shock If grounding methods are not possible have a qualified electrician install a separate circuit breaker Do not try to earth the TV by connecting it to telephone wires lightening rods or gas pipes ...

Страница 16: ...ALL MOUNT HORIZONTAL INSTALLATION For adequate ventilation allow a clearance of 4 10cm all around the TV We recommend that you use a wall mounting bracket of LG brand when mounting the TV to a wall 4 inches 4 inches 4 inches 4 inches 4 inches ...

Страница 17: ...ll Antenna Socket RF Coaxial Wire 75 ohm Antenna UHF Signal Amplifier VHF In poor signal areas to achieve better picture quality it may be necessary to install a signal amplifier to the antenna as shown above If signal needs to be split for two TVs use an antenna signal splitter for connection VIDEO AUDIO COMPONENT IN HDMI IN HDMI DVI IN 1 2 RGB IN PC ANTENNA IN 1 2 VARIABLE OUT AUDIO IN RGB DVI A...

Страница 18: ...ETUP Connecting with a component cable Connect the video outputs Y PB PR of the digital TV top box to the C CO OM MP PO ON NE EN NT T I IN N V VI ID DE EO O jacks on the TV Connect the audio output of the digital set top box to the C CO OM MP PO ON NE EN NT T I IN N A AU UD DI IO O jacks on the TV Turn on the digital set top box Refer to the owner s manual for the digital set top box Select C Co o...

Страница 19: ...V VI I or H HD DM MI I2 2 Except 42 50PG1 input source using the I IN NP PU UT T button on the remote control Turn on the digital set top box Refer to the owner s manual for the digital set top box 2 3 1 G G TV can receive the video and audio signal simultane ously with using a HDMI cable G G If the digital set top box supports Auto HDMI function the output resolution of the source device will be ...

Страница 20: ...ut of the digital set top box to the H HD DM MI I D DV VI I I IN N 1 1 jack on the TV Connect the audio output of the digital set top box to the A AU UD DI IO O R RG GB B D DV VI I jack on the TV Turn on the digital set top box Refer to the owner s manual for the digital set top box Select H HD DM MI I1 1 D DV VI I input source using the I IN NP PU UT T button on the remote control 2 3 4 1 Connect...

Страница 21: ...EO O jacks on the TV Connect the audio outputs of the DVD to the C CO OM MP PO ON NE EN NT T I IN N A AU UD DI IO O jacks on the TV Turn on the DVD player insert a DVD Select C Co om mp po on ne en nt t input source using the I IN NP PU UT T button on the remote control Refer to the DVD player s manual for operating instructions 2 3 4 5 1 2C IN TROL AUDIO RGB DVI RGB PC COMPONENT IN VIDEO AUDIO AV...

Страница 22: ...DVD player s manual for operating instructions 2 3 4 1 HDMI IN AUDIO RGB DVI B PC ANTENNA IN AV 1 V 1 AV 2 V 2 R AUDIO L AUDIO VIDEO VIDEO AUDIO COMPONENT IN HDMI IN HDMI DVI IN 1 2 RGB IN PC ANTENNA IN AV 2 AV 1 RGB IN PC RS 232C IN CONTROL SERVICE AUDIO IN RGB DVI 1 AV 1 AV 2 VIDEO AUDIO COMPONENT IN HDMI IN HDMI DVI IN 1 2 C RGB IN PC ANTENNA IN ANTENNA IN AV 2 AV 1 C RGB IN PC N RS 232C IN CON...

Страница 23: ... input on the TV Connect the audio outputs of the DVD to the A AU UD DI IO O input jacks on the TV Turn on the DVD player insert a DVD Select A AV V3 3 input source using the I IN NP PU UT T button on the remote control Refer to the DVD player s manual for operating instructions 2 3 4 5 1 AV IN 3 L R S VIDEO VIDEO OUTPUT SWITCH ANT IN ANT OUT 1 2 ...

Страница 24: ...I I1 1 D DV VI I I IN N or H HD DM MI I I IN N2 2 Except 42 50PG1 jack on the TV Select H HD DM MI I1 1 D DV VI I or H HD DM MI I2 2 Except 42 50PG1 input source using the I IN NP PU UT T button on the remote control Refer to the DVD player s manual for operating instructions 1 G G The TV can receive video and audio signals simultaneously when using a HDMI cable G G If the DVD player supports Auto...

Страница 25: ...s used for an extended period the fixed images on the sides of the screen may remain visible Connect the A AN NT T O OU UT T socket of the VCR to the A AN NT TE EN NN NA A I IN N socket on the TV Connect the antenna cable to the A AN NT T I IN N socket of the VCR Press the P PL LA AY Y button on the VCR and match the appropriate programme between the TV and VCR for viewing 1 2 VIDEO AUDIO COMPONEN...

Страница 26: ...socket select A AV V2 2 input source 2 3 1 NOTE G G If you want to use the EURO scart cable you have to use the signal shielded Euro scart cable HDMI IN AUDIO RGB DVI B PC ANTENNA IN AV 1 V 1 AV 2 V 2 R AUDIO L AUDIO VIDEO VIDEO AUDIO COMPONENT IN HDMI IN HDMI DVI IN 1 2 RGB IN PC ANTENNA IN AV 2 AV 1 RGB IN PC RS 232C IN CONTROL SERVICE AUDIO IN RGB DVI 1 AV 1 AV 2 VIDEO AUDIO COMPONENT IN HDMI I...

Страница 27: ...en TV and VCR Match the jack colors Video yellow Audio Left white and Audio Right red Insert a video tape into the VCR and press PLAY on the VCR Refer to the VCR owner s manual Select A AV V3 3 input source using the I IN NP PU UT T button on the remote control 1 2 3 G G If you have a mono VCR connect the audio cable from the VCR to the A AU UD DI IO O L L M MO ON NO O jack of the set NOTE 1 ...

Страница 28: ...eo cable Except 42 50PG1 32PC5 Connect the S VIDEO output of the VCR to the S S V VI ID DE EO O input on the set The picture quality is improved compared to normal composite RCA cable input Connect the audio outputs of the VCR to the A AU UD DI IO O input jacks on the set Insert a video tape into the VCR and press PLAY on the VCR Refer to the VCR owner s manual Select A AV V3 3 input source with u...

Страница 29: ...the A AU UD DI IO O V VI ID DE EO O jacks between TV and external equipment Match the jack colours Video yellow Audio Left white and Audio Right red Select A AV V3 3 input source using the I IN NP PU UT T button on the remote control Operate the corresponding external equipment Refer to external equipment operating guide 1 2 3 ...

Страница 30: ...1 2 RGB IN PC AUDIO IN AUDIO IN RGB DVI RGB DVI RGB OUTPUT AUDIO 1 2 PC SETUP This TV provides Plug and Play capability meaning that the PC adjusts automatically to the TV s settings Connecting with a D sub 15 pin cable Connect the RGB output of the PC to the R RG GB B P PC C jack on the TV Connect the PC audio output to the A AU UD DI IO O jack on the TV Turn on the PC and the TV Select R RG GB B...

Страница 31: ...ast on the menu until the picture is clear If the refresh rate of the PC graphic card can not be changed change the PC graphic card or consult the man ufacturer of the PC graphic card G G The synchronization input waveform for Horizontal and Vertical frequencies are separate G G We recommend using 1024 x 768 60Hz 32PC5 VGA PLASMA TV Models 1024 x 768 60Hz 42PG1 42PG2 XGA PLASMA TV Models 1360 x 76...

Страница 32: ...normal TV viewing Press the R RE ET TU UR RN N button to move to the previous menu screen Automatically adjusts picture position and minimizes image instability After adjustment if the image is still not correct your TV is functioning properly but needs further adjustment A Au ut to o c co on nf fi ig gu ur re e This function is for automatic adjustment of the screen position clock and phase The d...

Страница 33: ... button and then use button to select S Sc cr re ee en n Press the button and then use button to select M Ma an nu ua al l C Co on nf fi ig g Press the button and then use button to select P Ph ha as se e C Cl lo oc ck k H H P Po os si it ti io on n or V V P Po os si it ti io on n Press the button to make appropriate adjustments Press the M ME EN NU U button to return to normal TV viewing Press th...

Страница 34: ...ess the button and then use button to select the desired XGA VGA resolution Press the M ME EN NU U button to return to normal TV viewing Press the R RE ET TU UR RN N button to move to the previous menu screen Selecting XGA VGA mode Only 50PG1 50PG2 32PC5 1 2 3 4 5 1 Picture Mode Colour Temperature XD Advanced Aspect Ratio Picture Reset Screen Picture 2 Picture Picture Mode Colour Temperature XD Ad...

Страница 35: ...ess the button Press the M ME EN NU U button to return to normal TV viewing Press the R RE ET TU UR RN N button to move to the previous menu screen 1 2 3 4 5 Initializing Reset to original factory settings 3 4 1 Picture Mode Colour Temperature XD Advanced Aspect Ratio Picture Reset Screen Picture DE F G OK RETURN 2 Picture Picture Mode Colour Temperature XD Advanced Aspect Ratio Picture Reset Scre...

Страница 36: ...ut mode rotate in regular sequence Switches the TV on from standby Q MENU MENU Select the desired quick menu source Selects a menu Clears all on screen displays and returns to TV viewing from any menu See a list of AV devices connected to TV When you toggle this button the Simplink menu appears at the screen RETURN TELETEXT BUTTONS AV MODE Allows the user to move return one step in an interactive ...

Страница 37: ...d programme Installing Batteries Open the battery compartment cover on the back and install the batteries matching correct polarity with with Install two 1 5V AAA batteries Do not mix old or used batteries with new ones Close cover VCR DVD control buttons Controls some video cassette recorders or DVD players Control connected AV devices by pressing the OK buttons and buttons for G A l l l l FF and...

Страница 38: ...ese buttons are used for teletext on T TE EL LE ET TE EX XT T models only or P Pr ro og gr ra am mm me e e ed di it t 0 9 number button LIST Q VIEW Selects a programme Selects numbered items in a menu Displays the programme table Returns to the previously viewed programme MENU RETURN Q MENU AV MODE THUMBSTICK Up Down Left Right OK Selects a menu Clears all on screen displays and returns to TV view...

Страница 39: ...XT i P A G E TELETEXT BUTTONS These buttons are used for teletext For further details see the Teletext section 1 1 VCR DVD control buttons Controls some video cassette recorders or DVD players Control connected AV devices by pressing the OK buttons and buttons for G A l l l l FF and GG The Ô button does not provide such functions No function VOLUME MUTE FAV Programme PAGE UP DOWN Adjusts the volum...

Страница 40: ...the TV will switch on 1 VOLUME ADJUSTMENT Press the P P or P P or P PR R or N NU UM MB BE ER R buttons to select a programme number 2 3 1 1 Initializing Guide Note a It will automatically disappear after approx 40 seconds unless a button is pressed b In Store mode is only for shop display and not for general customer use c Home mode is the optimal setting for home environments and is the TV s defa...

Страница 41: ...r the images being watched Selects your desired Sound Mode M Mu ullt tii A Au ud diio o Selects the sound output P Pr ro og gr ra am mm me e E Ed diit t Adjusts the stored programmes by delete copy move or skip S Slle ee ep p T Tiim me er r Select the sleep timer Aspect Ratio power Saving Picture Mode Sound Mode Multi Audio programme Edit Sleep Timer F F 4 3 G G Zoom Setting 0 Sport Sport L R To S...

Страница 42: ...us conveniently since it pro vides graphical presentation b In this manual the OSD On Screen Display may be different from your TV s because it is just example to help the TV operation c In the teletext mode menus are not displayed Setup MENU Picture MENU Audio MENU Time MENU Option MENU 1 2 3 Language Country SIMPLINK Key Lock ISM Method Power Saving Set ID Factory Reset Option Clock Off Time On ...

Страница 43: ... the button or NUMBER buttons to select the ini tial programme number If you use NUMBER buttons any number under 10 is entered with a numeric 0 in front of it i e 0 05 5 for 5 Press the button to select S Se ea ar rc ch h Press the button to begin auto tuning All receivable stations are stored To stop auto tuning press the R RE ET TU UR RN N button When auto tuning is complete the Programme edit m...

Страница 44: ...le e Press the button to select C Ch ha an nn ne el l You can select the desired programme number with the button or NUMBER buttons If possible select the programme number directly with the number buttons Any number under 10 is entered with a numeric 0 in front of it i e 0 05 5 for 5 Press the button to select S Se ea ar rc ch h Press the button to commence searching If a station is found the sear...

Страница 45: ...nd Press the O OK K button to store it Press the M ME EN NU U button to return to normal TV viewing Press the R RE ET TU UR RN N button to move to the previous menu screen 1 2 3 4 5 6 Normally fine tuning is only necessary if reception is poor 3 4 5 1 Auto Tuning Manual Tuning Programme Edit Favourite Programme Setup DE F G OK RETURN 2 Setup Auto Tuning Manual Tuning Programme Edit Favourite Progr...

Страница 46: ...blank the number 0 0 to 9 9 and the alphabet A A to Z Z Press the button to select the position and make your choice of the second character and so on Press the O OK K button to store it Press the M ME EN NU U button to return to normal TV viewing Press the R RE ET TU UR RN N button to move to the previous menu screen 1 2 3 4 5 6 7 3 4 5 6 1 Auto Tuning Manual Tuning Programme Edit Favourite Progr...

Страница 47: ...y a set with B Bo oo os st te er r can perform this function If reception is poor select B Bo oo os st te er r to On When the signal is strong select OFF BOOSTER Press the M ME EN NU U button and then button to select the S Se et tu up p menu Press the button and then button to select M Ma an nu ua al l T Tu un ni in ng g Press the button and then use button to select B Bo oo os st te er r Press t...

Страница 48: ...llowing programmes are shifted up one position A A A Au ut to o s so or rt ti in ng g a a p pr ro og gr ra am mm me e 1 Using priority information supported by program arrange searched program automatically 2 You cannot sort programs manually after auto sorting A A M Mo ov vi in ng g a a p pr ro og gr ra am mm me e 1 Select a programme to be moved with the button 2 Press the YELLOW button 3 Move t...

Страница 49: ...ur ri it te e P Pr ro og gr ra am mm me e Press the button Press the button to select Select a desired programme with the button or NUMBER buttons Any number under 10 is entered with a numeric 0 in front of it i e 0 05 5 for 5 To store another programme repeat steps 4 4 to 5 5 You can store up to 8 programmes Press the M ME EN NU U button to return to normal TV viewing Press the R RE ET TU UR RN N...

Страница 50: ...le ec ct ti in ng g a a p pr ro og gr ra am mm me e i in n t th he e p pr ro og gr ra am mm me e l li is st t Select a programme with the button Then press the O OK K button The TV switches to the chosen programme number A A P Pa ag gi in ng g t th hr ro ou ug gh h a a p pr ro og gr ra am mm me e l li is st t There are 10 programme table pages in which contain 100 pro grammes Pressing the button r...

Страница 51: ... when using it with other products with HDMI CEC function This allows you to control and play other AV devices connected to the display through HDMI cable without additional cables and settings If you do not require the SIMPLINK menu select Off Press the M ME EN NU U button and then button to select the O Op pt ti io on n menu Press the button and then button to select S SI IM MP PL LI IN NK K Pre...

Страница 52: ...s and play media without additional settings S Se el le ec ct t A AV V d de ev vi ic ce e Enables you to select one of the AV devices connected to the TV and operate it P Po ow we er r o of ff f a al ll l d de ev vi ic ce es s When you switch off the TV all connected devices are turned off S Sw wi it tc ch h a au ud di io o o ou ut t Offers an easy way to switch audio out Sync Power on The televis...

Страница 53: ... the K Ke ey y L Lo oc ck k O On n the display K Ke ey y L Lo oc ck k O On n appears on the screen if any button on the front panel is pressed while viewing the TV The TV can be set so that the remote control is needed to con trol it This feature can be used to prevent unauthorized viewing This TV is programmed to remember which option it was last set to even if you turn the TV off Press the M ME ...

Страница 54: ...ress the A AV V M MO OD DE E button repeatedly to select the desired source If you select Cinema Mode in AV mode Cinema mode will be selected both for Picture Mode and Sound Mode in Picture menu and Audio menu respectively If you select Off in AV mode the picture and image which you initially set will be selected Press the R RE ET TU UR RN N button to return to normal TV viewing 1 2 ...

Страница 55: ...he following selection will allow you to adjust the picture horizontally in linear proportion to fill the entire screen useful for viewing 4 3 formatted DVDs O Or riig giin na all When your TV receives a wide screen signal it will automatically change to the picture format to be broadcast 4 4 3 3 The following selection will allow you to view a pic ture with an original 4 3 aspect ration grey bars...

Страница 56: ...u wish the picture to be altered both horizontally extended and vertically cropped The picture adopting a compromise between alteration and screen converage J Ju us st t S Sc ca an n Following Selection will lead to you view the picture of best quality without loss of original picture in high resolution image Zooml DE Zoom2 DE NOTE G G You can only select 4 3 16 9 Wide in Component HDMI RGB PC mod...

Страница 57: ...on to select P Pi ic ct tu ur re e M Mo od de e Press the button and then button to select V Vi iv vi id d S St ta an nd da ar rd d C Ci in ne em ma a S Sp po or rt t G Ga am me e U Us se er r1 1 or U Us se er r2 2 Press the M ME EN NU U button to return to normal TV viewing Press the R RE ET TU UR RN N button to move to the previous menu screen Picture Mode Preset 1 2 3 4 1 3 2 Picture Picture Mo...

Страница 58: ...button and then button to select C Co ol lo ou ur r T Te em mp pe er ra at tu ur re e Press the button and then button to select either C Co oo ol l M Me ed di iu um m W Wa ar rm m or U Us se er r Press the M ME EN NU U button to return to normal TV viewing Press the R RE ET TU UR RN N button to move to the previous menu screen 1 2 3 4 Auto Colour Tone Control Cool Medium Warm 1 3 2 Picture Mode C...

Страница 59: ...t Adjusts the difference between light and dark levels in the picture B Br ri ig gh ht tn ne es ss s Increases or decreases the amount of white in the picture C Co ol lo ou ur r Adjusts intensity of all colours S Sh ha ar rp pn ne es ss s Adjusts the level of crispness in the edges between the light and dark areas of the picture The lower the level the softer the image T Ti in nt t Adjusts the bal...

Страница 60: ...t U Us se er r Press the button and then button to select R Re ed d G Gr re ee en n or B Bl lu ue e Press the button to make appropriate adjustments Press the M ME EN NU U button to return to normal TV viewing Press the R RE ET TU UR RN N button to move to the previous menu screen 1 2 3 4 5 6 1 3 2 Picture Picture Mode Colour Temperature XD Advanced Aspect Ratio Picture Reset Screen Colour Tempera...

Страница 61: ...ess the M ME EN NU U button to return to normal TV viewing Press the R RE ET TU UR RN N button to move to the previous menu screen XD is LG electronic s unique picture improving technology to display a real HD source through an advanced digital signal pro cessing algorithm It is not possible to use this function in RGB PC mode A A X XD D C Co on nt tr ra as st t Optimises the contract automaticall...

Страница 62: ...n button to select G Ga am mm ma a Press the button and then button to select L Lo ow w M Me ed di iu um m or H Hi ig gh h Press the M ME EN NU U button to return to normal TV viewing Press the R RE ET TU UR RN N button to move to the previous menu screen 1 2 3 4 5 3 2 Picture Picture Mode Colour Temperature XD Advanced Aspect Ratio Picture Reset Screen Advanced G DE F G OK RETURN To Set 4 Gamma F...

Страница 63: ... then button to select F Fi il lm m M Mo od de e Press the button and then button to select O On n or O Of ff f Press the M ME EN NU U button to return to normal TV viewing Press the R RE ET TU UR RN N button to move to the previous menu screen 1 2 3 4 5 3 2 Picture Picture Mode Colour Temperature XD Advanced Aspect Ratio Picture Reset Screen Advanced G DE F G OK RETURN To Set 1 Picture Mode Colou...

Страница 64: ... to select B Bl la ac ck k L Le ev ve el l Press the button and then button to select L Lo ow w or H Hi ig gh h A A L Lo ow w The reflection of the screen gets darker A A H Hi ig gh h The reflection of the screen gets brighter Press the M ME EN NU U button to return to normal TV viewing Press the R RE ET TU UR RN N button to move to the previous menu screen 1 2 3 4 5 3 2 Picture Picture Mode Colou...

Страница 65: ... ME EN NU U button to return to normal TV viewing Press the R RE ET TU UR RN N button to move to the previous menu screen Returns to the default factory setting for Picture Mode Colour Temperature XD Advanced Aspect Ratio 1 2 3 4 3 2 Picture Picture Mode Colour Temperature XD Advanced Aspect Ratio Picture Reset Screen Picture Reset G DE F G OK RETURN To Set 1 Picture Mode Colour Temperature XD Adv...

Страница 66: ...ning even when you change the image Avoid allowing a fixed image to remain on the screen for prolonged periods W Wh hi it te e W Wa as sh h White wash removes permanent images from the screen Note An excessive permanent image may be impossible to clear entirely with White Wash O Or rb bi it te er r Orbiter may help prevent ghost images However it is best not to allow any fixed image to remain on t...

Страница 67: ...SM Method Power Saving Set ID Factory Reset Power Saving G DE F G OK RETURN Level 0 Level 1 Level 2 Level 3 Level 4 Language Country SIMPLINK Key Lock ISM Method Power Saving Set ID Factory Reset Option DE F G OK RETURN 3 2 Option Language Country SIMPLINK Key Lock ISM Method Power Saving Set ID Factory Reset Power Saving G Off On O On nl ly y 3 32 2P PC C5 5 DE F G OK RETURN NOTE Except for 32PC5...

Страница 68: ...ress the M ME EN NU U button and then button to select the O Op pt ti io on n menu Press the button and then button to select F Fa ac ct to or ry y R Re es se et t Press the button and then button to select Y Ye es s or N No o Press the M ME EN NU U button to return to normal TV viewing Press the R RE ET TU UR RN N button to move to the previous menu screen 1 2 3 4 Factory Reset F G OK RETURN Yes ...

Страница 69: ...button and then button to select O On n or O Of ff f Press the M ME EN NU U button to return to normal TV viewing Press the R RE ET TU UR RN N button to move to the previous menu screen Auto Volume automatically remains on the same level of volume if you change programmes 1 2 3 4 3 2 Audio Sound Mode Auto Volume Balance 0 TV Speaker Auto Volume G DE F G OK RETURN Off On Sound Mode Auto Volume Bala...

Страница 70: ...ound quality at the factory and are not adjustable Press the M ME EN NU U button and then button to select the A Au ud di io o menu Press the button and then button to select S So ou un nd d M Mo od de e Press the button and then button to select S SR RS S T TS SX XT T C Cl le ea ar r V Vo oi ic ce e S St ta an nd da ar rd d M Mu us si ic c C Ci in ne em ma a S Sp po or rt t G Ga am me e or U Us s...

Страница 71: ...uency band by pressing the button Set the desired sound level with the button Press the M ME EN NU U button to return to normal TV viewing Press the R RE ET TU UR RN N button to move to the previous menu screen Adjusting the audio equalizer 1 2 3 4 5 6 5 1 Audio Sound Mode Auto Volume Balance 0 TV Speaker Sound Mode G DE F G OK RETURN SRS TSXT Clear Voice Standard Music Cinema Sport Game User Soun...

Страница 72: ...ss the button and then button to select B Ba al la an nc ce e Press the button and then button to make desired adjustment Press the M ME EN NU U button to return to normal TV viewing Press the R RE ET TU UR RN N button to move to the previous menu screen 1 2 3 4 1 3 2 Audio Sound Mode Auto Volume Balance 0 TV Speaker Balance R15 G DE F G OK RETURN Sound Mode Auto Volume Balance 0 TV Speaker Audio ...

Страница 73: ...al If you wish to use an external hi fi system turn off the TV internal speakers Press the M ME EN NU U button and then button to select the A Au ud di io o menu Press the button and then button to select T TV V S Sp pe ea ak ke er r Press the button and then button to select O On n or O Of ff f Press the M ME EN NU U button to return to normal TV viewing Press the R RE ET TU UR RN N button to mov...

Страница 74: ... II D DU UA AL L I I Sends the primary broadcast language to the loudspeakers D DU UA AL L I II I Sends the secondary broadcast language to the loudspeakers D DU UA AL L I I I II I Sends a separate language to each loudspeaker B Br ro oa ad dc ca as st t Mono Stereo Dual O On n S Sc cr re ee en n D Di is sp pl la ay y M MO ON NO O S ST TE ER RE EO O D DU UA AL L I I D DU UA AL L I II I D DU UA AL ...

Страница 75: ... the TV is equipped with a receiver for NICAM reception high quality NICAM Near Instantaneous Companding Audio Multiplex digital sound can be received Sound output can be selected according to the type of broadcast received Speaker Sound Output Selection In AV Component RGB and HDMI mode you can select output sound for the left and right loudspeakers Select the sound output L L R R Audio signal fr...

Страница 76: ...e to the previous menu screen 1 2 3 4 5 Installation guide menu appears on TV screen when it is turned on for the first time Press the button and then O OK K but ton to select your desired language Press the button and then O OK K button to select your country 1 2 I If f y yo ou u w wa an nt t t to o c ch ha an ng ge e L La an ng gu ua ag ge e C Co ou un nt tr ry y s se el le ec ct ti io on n NOTE...

Страница 77: ...t the minute Press the M ME EN NU U button to return to normal TV viewing Press the R RE ET TU UR RN N button to move to the previous menu screen You must set the time correctly before using on off timer function If current time setting is erased by a power failure or the TV is unplugged reset the clock 1 2 3 4 5 1 3 4 2 Time Clock Off Time On Time Sleep Timer Auto Sleep Clock G DE F G OK RETURN C...

Страница 78: ...eep Off Time G DE F G OK RETURN Off Time Clock Off Time On Time Sleep Timer Auto Sleep On Time G DE F G OK RETURN 07 00 PR 1 Vol 8 On Press the M ME EN NU U button and then button to select the T Ti im me e menu Press the button and then button to select O On n O Of ff f T Ti im me e To cancel O On n O Of ff f T Ti im me e function select O Of ff f Press the button and then button to set the hour ...

Страница 79: ...e M ME EN NU U button and then button to select the T Ti im me e menu Press the button and then button to select S Sl le ee ep p T Ti im me er r Press the button and then button to set the minute Press the M ME EN NU U button to return to normal TV viewing Press the R RE ET TU UR RN N button to move to the previous menu screen 1 2 3 4 Clock Off Time On Time Sleep Timer Auto Sleep Time DE F G OK RE...

Страница 80: ... Press the button and then button to select A Au ut to o S Sl le ee ep p Press the button and then button to select O On n or O Of ff f Press the M ME EN NU U button to return to normal TV viewing Press the R RE ET TU UR RN N button to move to the previous menu screen 1 2 3 4 2 3 1 Clock Off Time On Time Sleep Timer Auto Sleep Time DE F G OK RETURN Time Clock Off Time On Time Sleep Timer Auto Slee...

Страница 81: ...complete the three digit number and then re enter the correct page number The P P o or r P P o or r P PR R button can be used to select the preceding or following page SIMPLE TEXT 1 2 T Th hi is s f fe ea at tu ur re e i is s n no ot t a av va ai il la ab bl le e i in n a al ll l c co ou un nt tr ri ie es s Teletext is a free service broadcast by most TV stations which gives up to the minute infor...

Страница 82: ...revious selection Alternatively the P P o or r P P o or r P PR R button can be used A A Direct page selection As with SIMPLE teletext mode you can select a page by entering it as a three digit number using the NUMBER buttons in TOP mode 4 4 1 2 3 FASTEXT The teletext pages are colour coded along the bottom of the screen and are selected by pressing the correspond ing coloured button A A Page selec...

Страница 83: ...T TE E Displays the TV picture on the screen while waiting for a new teletext page The display will appear at the top left hand corner of the screen When the updated page is available then display will change to the page number Press this button again to view the updated teletext page A A R RE EV VE EA AL L Press this button to display concealed information such as solutions to riddles or puzzles ...

Страница 84: ...ppeared after five minutes Adjust Colour in menu option Allow a sufficient distance between the TV and the VCR Try another channel The problem may be with the broadcast Are the video cables installed properly Activate any function to restore the brightness of the picture Check for local interference such as an electrical appliance or power tool Station or cable channel experiencing problems tune t...

Страница 85: ...n ng gs s It means that the TV is currently set to I In n S St to or re e mode To switch to H Ho om me e mode you should do the followings From the TV Menu choose O Op pt ti io on n F Fa ac ct to or ry y R Re es se et t Y Ye es s wait for a few seconds for the TV to download again Choose L La an ng gu ua ag ge e Choose C Co ou un nt tr ry y Choose H Ho om me e Press O OK K button OSD W WE EL LC CO...

Страница 86: ...ter and a little fabric softener or dish washing detergent Wring the cloth until it s almost dry and then use it to wipe the screen Ensure there is no excess water on the screen Allow any water or dampness to evaporate before switching on Cleaning the Cabinet To remove dirt or dust wipe the cabinet with a soft dry lint free cloth Do not to use a wet cloth Extended Absence G G If you expect to leav...

Страница 87: ... 1040 x 677 x 83 6 mm 40 9x 26 6 x 3 3 inches 26 kg 57 3 lbs 24 kg 52 9 lbs AC100 240V 50 60Hz 310W 42PG1 42PG100R ZA 1040 x 731 3 x 308 mm 40 9x 28 7 x 12 1 inches 1040 x 677 x 86 mm 40 9 x 26 6x 3 4 inches 27 3 kg 60 1 lbs 24 4 kg 53 8 lbs AC100 240V 50 60Hz 310W 42PG2 42PG200R ZA MODELS 1224 7 x 849 x 364 mm 48 2 x 33 4x 14 3inches 1224 7 x 790 x 83 6 mm 48 2x 31 1 x 3 2 inches 41 5 kg 91 5 lbs...

Страница 88: ...4 C5 C6 C7 D0 D1 D2 D3 D4 D5 D6 D7 D0 D1 D2 D3 D4 D5 D6 D7 Lead code Low custom code High custom code Data code Data code Repeat code Tf 4 5 ms 9 ms 2 25 ms 9 ms 0 55 ms 0 56 ms 1 12 ms 0 56 ms 2 24 ms Tf Tf Tf 108ms 455KHz Bit 0 Bit 1 1 How to Connect A Connect your wired remote control to the Remote Control port on the TV 2 Remote Control IR Codes A Output waveform Single pulse modulated with 37...

Страница 89: ...ton 61 BLUE R C Button 02 or VOL R C Button 03 or VOL R C Button 00 P or P or PR R C Button 52 SOUND R C Button 01 P or P or PR R C Button 30 AV MODE R C Button 09 MUTE R C Button 53 LIST R C Button 10 19 Number Key 0 9 R C Button 1E FAV R C Button 1A Q VIEW R C Button 20 TEXT R C Button 7E SIMPLINK R C Button B1 A Stop TIME R C Button B0 G Play SIZE R C Button BA l l l lPause UPDATE R C Button 8F...

Страница 90: ...rnally Connect the serial port of the control device to the RS 232C jack on the TV back panel RS 232C connection cables are not supplied with the TV RS 232C IN CONTROL HDMI IN Type of Connector D Sub 9 Pin Male HDMI IN MI DVI IN No Pin Name 1 No connection 2 RXD Receive data 3 TXD Transmit data 4 DTR DTE side ready 5 GND 6 DSR DCE side ready 7 RTS Ready to send 8 CTS Clear to send 9 No Connection ...

Страница 91: ... U button and then use button to select the O Op pt ti io on n menu Press the button and then use button to select S Se et t I ID D Press the button and then use button to adjust S Se et t I ID D to choose the desired TV ID number The adjustment range of SET ID is 1 99 Press the M ME EN NU U button to return to normal TV viewing Press the R RE ET TU UR RN N button to move to the previous menu scre...

Страница 92: ...can adjust the set ID to choose desired TV ID number in Setup menu Adjustment range is 1 99 When selecting Set ID 0 every connected TV is controlled Set ID is indicated as decimal 1 99 on menu and as Hexa decimal 0x0 0x63 on transmission receiving protocol DATA To transmit command data Transmit FF data to read status of comand Cr Carriage Return ASCII code 0x0D ASCII code space 0x20 O OK K A Ac ck...

Страница 93: ... um me e M Mu ut te e C Co om mm ma an nd d k k e e To control volume mute on off You can also adjust mute using the MUTE button on remote control Data 00 Volume mute on Volume off Data 01 Volume mute off Volume on Transmission k e Set ID Data Cr Acknowledgement e Set ID OK NG Data x 0 05 5 V Vo ollu um me e C Co on nt tr ro oll C Co om mm ma an nd d k k f f To adjust volume You can also adjust vo...

Страница 94: ...ta Min 00 Max 64 Refer to Real data mapping 1 See page 93 Transmission k k Set ID Data Cr Acknowledgement k Set ID OK NG Data x 1 14 4 C Co ollo ou ur r T Te em mp pe er ra at tu ur re e C Co om mm ma an nd d k k u u To adjust colour temperature You can also adjust Colour Temperature in the Picture menu Data 00 Medium 01 Cool 02 Warm 03 User Transmission k u Set ID Data Cr Acknowledgement u Set ID...

Страница 95: ...Acknowledgement q Set ID OK NG Data x 2 21 1 A Au ut to o C Co on nf fiig gu ur re e C Co om mm ma an nd d jj u u To adjust picture position and minimize image shaking automatically It works only in RGB PC mode Data 01 To set Transmission j u Set ID Data Cr Acknowledgement u Set ID OK NG Data x R Re ea al l d da at ta a m ma ap pp pi in ng g 1 1 00 Step 0 A Step 10 F Step 15 10 Step 16 64 Step 100...

Страница 96: ... To select input source for TV Data Structure Transmission x b Set ID Data Cr Input Number Data 0 0 0 0 Input1 0 0 1 1 Input4 0 0 1 0 Input3 0 0 0 1 Input2 2 24 4 C Ch ha an nn ne el l S Sk ki ip p C Co om mm ma an nd d m m b b G To set skip status for the current Programme Data 00 Skip 01 Add Transmission m b Set ID Data Cr Acknowledgement b Set ID OK NG Data x 2 23 3 T Tu un ne e C Co om mm ma a...

Страница 97: ......

Страница 98: ......

Отзывы: