background image

21

Installation

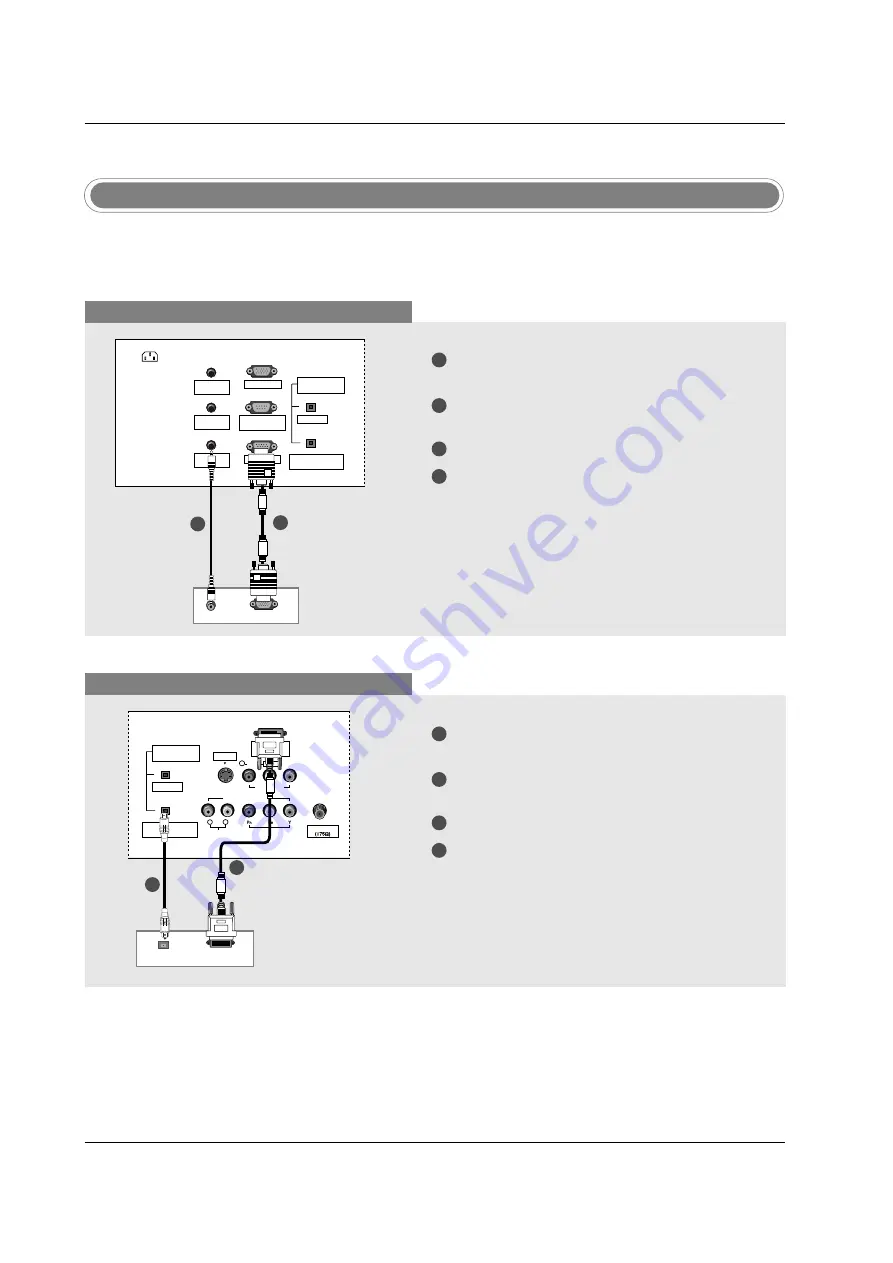
- This TV provides Plug and Play capability, meaning that the PC adjusts automatically to the TV's settings.

The TV sends configuration information (EDID) to the PC using the Video Electronics Standard Association
(VESA) Display Data Channel (DDC) protocol. 

PC Setup

When connecting with a D-sub 15 pin cable

When connecting with a DVI cable

1

2

3

4

Connect the RGB output of the PC to the 

PC

INPUT1

jack on the set.

Connect the PC audio outputs to the 

PC AUDIO

INPUT1

jack on the set.

Turn on the PC and the set. 

Select

RGB1-PC

input source in main input

option of SETUP menu. (Refer to P.29)

1

2

3

4

Connect the DVI output of the PC to the 

DVI

INPUT (PC/DTV INPUT)

jack on the set.

Connect the PC audio outputs to the 

DIGITAL

AUDIO COMPONENT1/DVI INPUT

jack on the set.

Turn on the PC and the set. 

Select

DVI-PC

input source in main input option

of SETUP menu. (Refer to P.29)

DIGITAL AUDIO

OPTICAL

Antenna

DIGITAL AUDIO

(OPTICAL)

DVI INPUT

(PC/DTV INPUT)

L/MONO

AUDIO INPUT

AUDIO

VIDEO

VIDEO INPUT

VIDEO1

COMPONENT1

R

L

R

S-VIDEO

OUTPUT

COMPONENT1/DVI

INPUT

DVI-PC OUTPUT

RGB-PC OUTPUT

AUDIO

PC AUDIO

INPUT2

DIGITAL AUDIO

(OPTICAL)

PC INPUT2

PC INPUT1

PC AUDIO

INPUT1

SPEAKER

OUT

RS-232C INPUT

(CONTROL/SERVICE)

AC IN

OUTPUT

COMPONENT1/DVI

INPUT

1

2

1

2

TV Back

PC

TV Back

PC

Содержание 32LX4DC

Страница 1: ...Test Report No GETEC E3 06 051 FCC Class B Certification EUT Type 32 LCD TV Monitor APPENDIX H USER S MANUAL FCC ID BEJ32LDCB ...

Страница 2: ...e reference Record model number and serial number of the set See the label attached on the back cover and quote this information to your dealer when you require service OWNER S MANUAL MODEL 32LX4DC Internet Home Page http www lgcommercial com P NO 3828TUL309N 0606 REV00 Printed in Korea ...

Страница 3: ...erference in a residential installation This equipment generates uses and can radiate radio frequency energy and if not installed and used in accordance with the instructions may cause harmful interference to radio communications However there is no guarantee that interference will not occur in a particular installation If this equipment does cause harmful interference to radio or television recep...

Страница 4: ...ll near any heat sources such as radiators heat registers stoves or other apparatus including amplifiers that produce heat 9 Do not defeat the safety purpose of the polarized or grounding type plug A polarized plug has two blades with one wider than the other A grounding type plug has two blades and a third grounding prong The wide blade or the third prong is provided for your safety When the prov...

Страница 5: ...g wrong with TV Some minute dot defects may be visible on the screen appearing as tiny red green or blue spots However they have no adverse effect on the monitor s performance Avoid touching the LCD screen or holding your finger s against it for long periods of time Doing so may produce some temporary distortion effects on the screen CAUTION concerning the Power Cord Most appliances recommend they...

Страница 6: ... Temperature Control 31 Video Preset 32 Audio Language 32 EZ SoundRite 33 EZ Sound 33 Manual Sound Control EZ Sound Custom Option 34 Stereo SAP Broadcasts Setup 34 Front Surround 35 TV Speakers On Off Setup 35 BBE 2 Warnings 3 4 Safety Instructions 7 Controls 8 Connection Options 9 12 Remote Control Key Functions 13 Various Installation 13 Swivel Stand 14 Attaching the TV to a wall 15 How to use b...

Страница 7: ...45 Watching PIP Double Window 45 Selecting an Input Signal Source for PIP Double Window 45 TV Program Selection for PIP 46 Moving the PIP sub picture 46 Swapping PIP Double Window 47 52 External Control Device Setup 53 Programming the Remote Control 54 55 Programming Codes 56 57 Troubleshooting Checklist 58 Maintenance 59 Product Specifications Option Menu Features Lock Menu Options PIP Picture in...

Страница 8: ... 0 TV MO DE PO W ER TV AV ZO OM IN FO VC R CA BL E DV D SA T MU TE SW AP PIP CH PIP CH PIP RA TIO RE CO RD ST OP PA US E RE W PL AY FF ME NU EX IT CC FR EE ZE PIP INP UT VO L CH SU RF SA P VID EO SI GN AL AD JU ST MU LT IM ED IA SK IP FLAS HBK Remote Control AA Batteries Twister Holder Arrange the wires with the twister holder CH VOL ENTER TV VIDEO MENU MENU ON OFF ON OFF VOLUME F G Buttons Remote...

Страница 9: ...NO PC INPUT1 AUDIO INPUT AUDIO VIDEO VIDEO INPUT VIDEO1 COMPONENT1 R L R PC AUDIO INPUT1 COMPONENT1 DVI INPUT SPEAKER OUT RS 232C INPUT CONTROL SERVICE AC IN S VIDEO RJP INTERFACE OUTPUT DIGITAL AUDIO OUTPUT COMPONENT1 DVI INPUT PC INPUT2 For service AUDIO VIDEO INPUT1 COMPONENT1 Y PB PR AUDIO INPUT S VIDEO INPUT DVI INPUT PC DTV INPUT ANTENNA INPUT Power Cord Socket PC AUDIO INPUT1 PC AUDIO INPUT...

Страница 10: ...lays the digital signal strength Refer to p 28 EZ SOUND Selects the sound appropriate for the program s character Refer to p 33 POWER Turns your TV or any other programmed equipment on or off depending on mode 1 2 3 4 5 6 7 8 9 0 TV MODE INFO POWER INPUT EZ PIC EZ SOUND VCR CABLE DVD HDSTB MUTE SWAP PIPCH PIPCH PIP RATIO RECORD STOP PAUSE REW PLAY FF MENU EXIT CC FREEZE PIP INPUT VOL CH FAV SAP TI...

Страница 11: ...ly Refer to p 37 CHANNEL UP DOWN Selects available channels found with EZ scan VOLUME UP DOWN Increases decreases the sound level NUMBER buttons DASH Used to enter a program number for multiple program chan nels such as 2 1 2 2 etc FLASHBK Return to the last channel viewed PIP Switches between PIP and Double Window modes Refer to p 45 PIPCH PIPCH Changes to next higher lower PIP channel Refer to p...

Страница 12: ...r to p 41 FREEZE Freezes the currently viewed picture Main picture is frozen in PIP Double Window mode RATIO Changes the aspect ratio Refer to p 39 Installing Batteries Open the battery compartment cover on the back side Insert two 1 5V AA size batteries in correct polarity with with Don t mix old or used batteries with new ones Close the cover Point the remote towards the remote control sensor of...

Страница 13: ...e Day of week Month Year The original aspect ratio of the video is 4 3 The original aspect ratio of the video is 16 9 wide The video resolution is 720x480i The video resolution is 720x480p The video resolution is 1280x720p The video resolution is 1920x1080i Multilingual The program contains two or more audio services Press the SAP button to select wanted Audio Caption The program contains one or m...

Страница 14: ...ach side and 2 from the wall Detailed installation instructions are available from your dealer see the optional Tilt Wall Mounting Bracket Installation and Setup Guide Wall Mount Horizontal installation Desktop Pedestal Installation 4 inches 4 inches 4 inches 4 inches For proper ventilation allow a clearance of 4 on each side and the top and 2 from the wall ...

Страница 15: ...must purchase separately on the wall Use a sturdy rope not provided as parts of the product must purchase separately to tie the product It is safer to tie the rope so it becomes horizontal between the wall and the product 1 2 3 Set it up close to the wall so the product doesn t fall over when it is pushed backwards The instructions shown below is a safer way to set up the product which is to fix i...

Страница 16: ...2 Install wires as necessary To install various wires refer to p 14 21 Align the holes on the TV back panel with the protuberance on the back cover and insert Reinstall the cover Wire Arrangement Pull the cables through the hole on the set Hold the back cover with both hands and pull it backward 1 Arrange the signal input cable and the power cord by holder as shown ...

Страница 17: ...ments Connect to wall antenna socket Single family Dwellings Houses Connect to wall jack for outdoor antenna Outdoor Antenna Wall Antenna Socket VHF Antenna UHF Antenna RF Coaxial Wire 75 ohm Turn clockwise to tighten In a poor signal area to improve picture quality purchase and install a signal amplifier If the antenna needs to be split for two TV s install a 2 Way Signal Splitter in the connecti...

Страница 18: ...cable to the digital audio optical input on the audio equipment Set the TV Speaker option Off in the AUDIO menu Refer to page 35 See the external audio equipment instruction manual for operation DIGITAL AUDIO OPTICAL PC INPUT2 DVI INPUT PC DTV INPUT L MONO PC INPUT1 AUDIO INPUT AUDIO VIDEO VIDEO INPUT VIDEO1 COMPONENT1 R L R RS 232C INPUT CONTROL SERVICE S VIDEO OUTPUT COMPONENT1 DVI INPUT Send th...

Страница 19: ...INPUT PC DTV INPUT VCR TV Back 1 2 3 Connect the AUDIO VIDEO jacks between TV and VCR Match the jack colors Video yellow Audio Left white and Audio Right red Insert a video tape into the VCR and press PLAY on the VCR Refer to the VCR owner s manual Select AV 1 input source with using the INPUT button on the remote control If connected to IN 2 input TV front select AV 2 input source If you have a m...

Страница 20: ... Connect the optical audio output of the DVD to the DIGITAL AUDIO COMPONENT1 DVI INPUT jack on the set Turn on the DVD player insert a DVD Select Component 1 input source with using the INPUT or MULTIMEDIA button on the remote control If connected to COMPONENT2 TV side select Component 2 input source Refer to the DVD player s manual for operating instructions Component Input ports To get better pi...

Страница 21: ...ct the audio outputs of the digital set top box to the COMPONENT1 AUDIO INPUT jacks on the set Turn on the digital set top box Refer to the owner s manual for the digital set top box Select Component 1 input source with using the INPUT or MULTIMEDIA button on the remote control If connected to COMPONENT2 input TV side select Component 2 input source B R R AUDIO L Antenna L MONO AUDIO INPUT AUDIO V...

Страница 22: ... input source in main input option of SETUP menu Refer to P 29 1 2 3 4 Connect the DVI output of the PC to the DVI INPUT PC DTV INPUT jack on the set Connect the PC audio outputs to the DIGITAL AUDIO COMPONENT1 DVI INPUT jack on the set Turn on the PC and the set Select DVI PC input source in main input option of SETUP menu Refer to P 29 DIGITAL AUDIO OPTICAL Antenna DIGITAL AUDIO OPTICAL DVI INPU...

Страница 23: ...PC mode to another resolution change the refresh rate to another rate or adjust the brightness and contrast on the menu until the picture is clear If the refresh rate of the PC graphic card can not be changed change the PC graphic card or consult the manufacturer of the PC graphic card 5 Avoid keeping a fixed image on the TV s screen for a long period of time The fixed image may become permanently...

Страница 24: ...e D E button to select the RESET option 2 Press button and then use F G button to select Yes 3 Press button To initialize the adjusted values Close POSITION G SIZE PHASE RESET Adjust D F G E Close POSITION SIZE PHASE RESET G Adjust Initialize Settings Adjustment for screen Position Size and Phase Initializing Reset to original factory values Position This function is to adjust picture to left righ...

Страница 25: ...channel number If you intend to be away on vacation disconnect the power plug from the wall power outlet The menus can be shown on the screen in the selected language First select your language 1 Press the MENU button and then use D E button to select the OPTION menu 2 Press the G button and then use D E button to select Language 3 Press the G button and then use D E button to select your desired ...

Страница 26: ...IO TIME OPTION LOCK EZ Scan Manual Scan Channel Edit DTV Signal Channel Label Main Input Sub Input Set ID EZ Picture Contrast 85 Brightness 50 Color 50 Sharpness 50 Tint 0 Color Temperature Video Reset R G SETUP VIDEO G AUDIO TIME OPTION LOCK Audio Language EZ SoundRite EZ Sound Balance 0 Treble 50 Bass 50 Front Surround TV Speaker BBE L R SETUP VIDEO AUDIO G TIME OPTION LOCK Auto Clock Manual Clo...

Страница 27: ...utton to return to TV viewing or press MENU button to return to the previous menu 1 2 3 4 5 6 Previous MENU EZ Scan G Manual Scan Channel Edit DTV Signal Channel Label Main Input Sub Input Set ID Selection G or leads you to the EZ scan screen Previous MENU EZ Scan Manual Scan G Channel Edit DTV Signal Channel Label Main Input Sub Input Set ID Select channel type and RF channel number TV 2 Mini Glo...

Страница 28: ...can add or delete the chan nel to from the Favorite List Press the MENU button and then use D E button to select the SETUP menu Press the G button and then use D E button to select Channel Edit Press the G button You will now see a screen filled with channel num bers and a preview picture Use D E F G button to select a channel and then use the but ton to add or delete it Press FAV button to add th...

Страница 29: ...t labels for your channels If a channel label is provided on the signal from the broadcasting station the TV displays a short name for a channel even if you didn t preset a label for the chan nel Press the MENU button and then use D E button to select the SETUP menu Press the G button and then use D E button to select Channel Label Press the G button You will now see a screen filled with Labels an...

Страница 30: ...on to select the source Antenna Cable AV1 AV2 Component1 Component2 RGB1 DTV or RGB1 PC RGB2 DTV or RGB2 PC DVI Press EXIT button to return to TV viewing or press MENU button to return to the previous menu 1 2 3 4 Previous MENU EZ Scan Manual Scan Channel Edit DTV Signal Channel Label Main Input G Sub Input Set ID Antenna Cable AV1 AV2 Component1 Component2 RGB1 DTV RGB2 DTV DVI SETUP G VIDEO AUDI...

Страница 31: ...stom Daylight Normal Night Time Movie Video Game and Sports set tings are preset for optimum picture qual ity at the factory and are not adjustable V Video Menu Options ideo Menu Options Press the MENU button and then use D E button to select the VIDEO menu Press the G button and then use D E button to select the desired pic ture option Contrast Brightness Color Sharpness or Tint Press theG button...

Страница 32: ...um or Warm Press EXIT button to return to TV viewing or press MENU button to return to the previous menu 1 2 3 4 SETUP VIDEO G AUDIO TIME OPTION LOCK SETUP VIDEO AUDIO TIME OPTION LOCK Previous MENU EZ Picture Contrast Brightness Color Sharpness Tint Color Temperature Video Reset G Selection G or resets to the factory settings default Use to quickly reset all the Video menu options to their origin...

Страница 33: ...SETUP VIDEO AUDIO G TIME OPTION LOCK SETUP VIDEO AUDIO TIME OPTION LOCK Scans for changes in sound level during commercials then adjusts the sound to match the specified audio level EZ SoundRite makes sure that the volume level remains consistent whether you are watching a commercial or a regular TV pro gram EZ SoundRite Previous MENU Audio Language EZ SoundRite G EZ Sound Balance Treble Bass Fron...

Страница 34: ...t Surround TV Speaker BBE L R E Balance 0 F G L R SETUP VIDEO AUDIO G TIME OPTION LOCK SETUP VIDEO AUDIO TIME OPTION LOCK EZ Sound 1 Press the EZ SOUND button repeatedly to select the sound setup as shown below Custom your own settings Normal Stadium News Music and Theater You can also use the AUDIO menu to adjust EZ Sound 2 Press the EXIT button to save and return to TV viewing EZ Sound lets you ...

Страница 35: ...3D EchoSound System SRS TruSurround XT Audio Language EZ SoundRite EZ Sound Balance 0 Treble 50 Bass 50 Front Surround TV Speaker BBE L R Mini Glossary SRS TruSurround XT Takes advantage of any multi channel format without needing to add extra speakers or equipment Dialog clarity bass enrichment and the addition of stereo audio enhancement that produces an immersive sound experience from standard ...

Страница 36: ...round TV Speaker G BBE Off On Press the MENU button and then use D E button to select the AUDIO menu Press the G button and then use D E button to select TV Speaker Press the G button and then use D E button to select Off or On Press EXIT button to return to TV viewing or press MENU button to return to the previous menu 1 2 3 4 Previous MENU Audio Language EZ SoundRite EZ Sound Balance Treble Bass...

Страница 37: ...elect Manual Clock Press the G button and then use F G button to select either the year date or time option Once selected use the D E button to set the year date and time options Press EXIT button to return to TV viewing or press MENU button to return to the previous menu 1 2 3 4 Auto Clock Manual Clock Off Timer On Timer Sleep Timer Auto Off Previous MENU Auto Clock Manual Clock G Off Timer On Ti...

Страница 38: ...n to set the minutes For only On Timer function Press the G button and then use D E button to select the channel at turn on Press the G button and then use D E button to set the sound level at turn on Press EXIT button to return to TV viewing or press MENU button to return to the previous menu 1 2 3 4 5 6 7 Auto Clock Manual Clock Off Timer On Timer Sleep Timer Auto Off SETUP VIDEO AUDIO TIME G OP...

Страница 39: ...ect Auto Off Press the G button and then use D E button to select Off or On Press EXIT button to return to TV viewing or press MENU button to return to the previous menu 1 2 3 4 Previous MENU Auto Clock Manual Clock Off Timer On Timer Sleep Timer Auto Off G Off On If set to On and there is no input signal the TV turns off automatically after 10 minutes Auto Clock Manual Clock Off Timer On Timer Sl...

Страница 40: ...y Program Selects the proper picture proportion to match the source s image 4 3 4 3 16 9 16 9 4 3 Choose 4 3 when you want to view a picture with an original 4 3 aspect ratio with gray bars appearing at both the left and right sides 16 9 Choose 16 9 when you want to adjust the picture horizontally in a lin ear proportion to fill the entire screen Horizon Choose Horizon when you want to adjust the ...

Страница 41: ... signal is 30 frames sec This option lets the TV do 3 2 pull down operation for you to watch movies at the best motion appearance This feature operates only in AV S Video Component 480i mode Press the MENU button and then use D E button to select the OPTION menu Press the G button and then use D E button to select Cinema 3 2 Mode Press the G button and then use D E button to select Off or On Press...

Страница 42: ...IT button to return to TV viewing or press MENU button to return to the previous menu 1 2 3 4 Previous MENU Aspect Ratio Cinema 3 2 Mode Caption Caption Text G Caption Option Language Front Display English Spanish French Aspect Ratio Cinema 3 2 Mode Caption Caption Text Caption Option Language Front Display Aspect Ratio Cinema 3 2 Mode Caption Caption Text Caption Option Language Front Display Pre...

Страница 43: ...lor for the edges Press EXIT button to return to TV viewing or press MENU button to return to the previous menu 1 2 3 4 5 Previous MENU Aspect Ratio Cinema 3 2 Mode Caption Caption Text Caption Option G Language Front Display Style Custom Size A Standard Font Font 0 Text Color White Text Opacity Solid Bg Color Black Bg Opacity Solid Edge Type None Edge Color Black Aspect Ratio Cinema 3 2 Mode Capt...

Страница 44: ...n at the theaters or direct to video movies use the Movie Rating System MPAA only Ratings for Movies previously shown in theaters Movie Ratings Blocking Off Permits all programs G General audience PG Parental guidance suggested PG 13 Parents strongly cautioned R Restricted NC 17 No one 17 and under admitted X Adult only If you set PG 13 G and PG movies will be available PG 13 R NC 17 and X will be...

Страница 45: ...ording to the movie rat ings limits specified so children cannot view certain movies You can set the ratings limit by blocking out all the movies with the rat ings above a specified level Keep in mind that the movie ratings limit only applies to movies shown on TV not TV programs such as soap operas TV Rating Children Prevents children from watching certain chil dren s TV programs according to the...

Страница 46: ...IP changes the PIP options as shown below PIP Mode Double Window Mode PIP Off Selecting an Input Signal Source for PIP Double Window Use the PIP INPUT button to select the input source for the sub picture Each press of PIP INPUT button changes the PIP source You can also select sources for the Sub Input in the SETUP menu Available Sub Picture Sources DTV Signal Analog Signal Video 1 Video 2 DTV Si...

Страница 47: ... In PIP mode press the D E F G button to move the sub picture to a differ ent location on the screen Swapping the PIP Double Window Use the SWAP button to switch the main and sub pictures Main Picture PIP Double Window Sub Picture SWAP SWAP ...

Страница 48: ...al control device such as a computer or an A V control system and control the Monitor s functions externally Connect the serial port of the control device to the RS 232C jack on the TV back panel RS 232C connection cables are not supplied with the TV T Type of Connector D Sub 9 Pin Male ype of Connector D Sub 9 Pin Male RS 232C Configurations RS 232C Configurations External Control Device Setup Ex...

Страница 49: ...ent The Monitor transmits ACK acknowledgement based on this format when receiving normal data At this time if the data is data read mode it indicates present status data If the data is data write mode it returns the data of the PC computer Command2 Set ID OK Data x Error Acknowledgement The Monitor transmits ACK acknowledgement based on this format when receiving abnormal data from non viable func...

Страница 50: ...k e Set ID Data Cr Acknowledgement e Set ID OK Data x 03 Aspect Ratio Command2 c Main picture format G To adjust the screen format You can also adjust the screen format using the RATIO button on remote control or in the Option menu Transmission k c Set ID Data Cr Acknowledgement c Set ID OK Data x 04 Screen Mute Command2 d G To select screen mute on off Transmission Data 0 Screen mute off Picture ...

Страница 51: ...arpness in the Video menu Transmission 11 Sharpness Command2 k Data Min 0 Max 64 Refer to Real data mapping See page 49 k k Set ID Data Cr Acknowledgement k Set ID OK Data x 12 OSD Select Command2 l G To select OSD On Screen Display on off Transmission k l Set ID Data Cr Acknowledgement Data 0 OSD off 1 OSD on l Set ID OK Data x 15 PIP Position Command2 q G To select sub picture position for PIP T...

Страница 52: ...xx 01 attribute 0x01 main picture two part it s not mandatory using physical channel NTSC cable xx data don t care major and minor channel number in case analog channel tuning 2 Digital channel ATSC air channel number don t know physical channel major 30 minor 3 sub picture Command ma 00 xx 00 1E 00 03 A2 attribute 0xA2 sub picture two part not using physical channel ATSC air xx data don t care an...

Страница 53: ... AF 70 96 R C Button R C Button Power On Off Discrete IR Code Only Power On Discrete IR Code Only Power Off R C Button R C Button R C Button R C Button R C Button R C Button R C Button R C Button R C Button R C Button R C Button R C Button R C Button R C Button R C Button R C Button R C Button R C Button R C Button R C Button R C Button R C Button R C Button R C Button R C Button R C Button R C Bu...

Страница 54: ...ing on the selected component Test the POWER button to see if the component responds properly If not the remote requires programming to operate the device 2 Turn on the component to be programmed then press the corresponding MODE button on the remote control 3 Press the MENU and MUTE buttons simultaneously for 2 seconds the but ton selected component lights on the remote control If you don t press...

Страница 55: ...03 008 009 010 013 014 017 020 031 042 073 081 101 SHARP 031 054 149 SHINTOM 024 SONY 003 009 031 052 056 057 058 076 077 078 149 SOUNDESIGN 034 STS 013 SYLVANIA 031 033 034 059 067 SYMPHONIC 034 TANDY 010 034 TATUNG 039 043 TEAC 034 039 043 TECHNICS 031 033 070 TEKNIKA 019 031 033 034 101 THOMAS 034 TMK 006 TOSHIBA 008 013 042 047 059 082 112 131 TOTEVISION 040 101 UNITECH 040 VECTOR RESEARCH 012...

Страница 56: ...3 004 016 029 031 059 101 HITACHI 139 140 HOUSTON TRACKER 033 037 039 051 057 104 HUGHES 068 JANIEL 060 147 JERROLD 061 KATHREIN 108 LEGEND 057 LG 001 LUTRON 132 LUXOR 062 144 MACOM 010 059 063 064 065 MEMOREX 057 NEXTWAVE 028 124 125 NORSAT 069 070 PACE SKY SATELLITE 143 PANASONIC 060 142 PANSAT 121 PERSONAL CABLE 117 PHILIPS 071 PICO 105 PRESIDENT 019 102 PRIMESTAR 030 110 111 PROSAT 072 RCA 066...

Страница 57: ...cing problems tune to another station Station signal is weak reorient antenna to receive weaker station Check for sources of possible interference Lines or streaks in pictures Check antenna Change the direction of the antenna Check whether the product is turned on Try another channel The problem may be with the broadcast Is the power cord inserted into wall power outlet Check your antenna directio...

Страница 58: ...on or off and does not indicate a fault with the product No output from one of the speakers Adjust Balance in menu option Screen color is unstable or single color Check the signal cable Reinstall the PC video card The signal is out of range There is a problem in PC mode Only PC mode applied Adjust resolution horizontal frequency or vertical frequency Check it whether the signal cable is connected ...

Страница 59: ...th a soft dry lint free cloth Please be sure not to use a wet cloth If you expect to leave your TV dormant for a long time such as a vacation it s a good idea to unplug the power cord to protect against possible damage from lightning or power surges Early malfunctions can be prevented Careful and regular cleaning can extend the amount of time you will have your new TV Be sure to turn the power off...

Страница 60: ...ications Product Specifications MODEL Width inches mm Height inches mm Depth inches mm Weight pounds kg Power requirement Television System Program Coverage External Antenna Impedance 36 3 922 24 1 613 4 11 3 287 5 55 8 25 3 AC 100 240V 50 60Hz NTSC M ATSC VHF 2 13 UHF 14 69 CATV 1 125 CADTV 1 135 DTV 2 69 75 Ω 32LX4DC ...

Страница 61: ......

Отзывы: