LG 32LH40 Series Скачать руководство пользователя страница 109

PARENT

AL 
CONTR

OL 

R

ATING

109

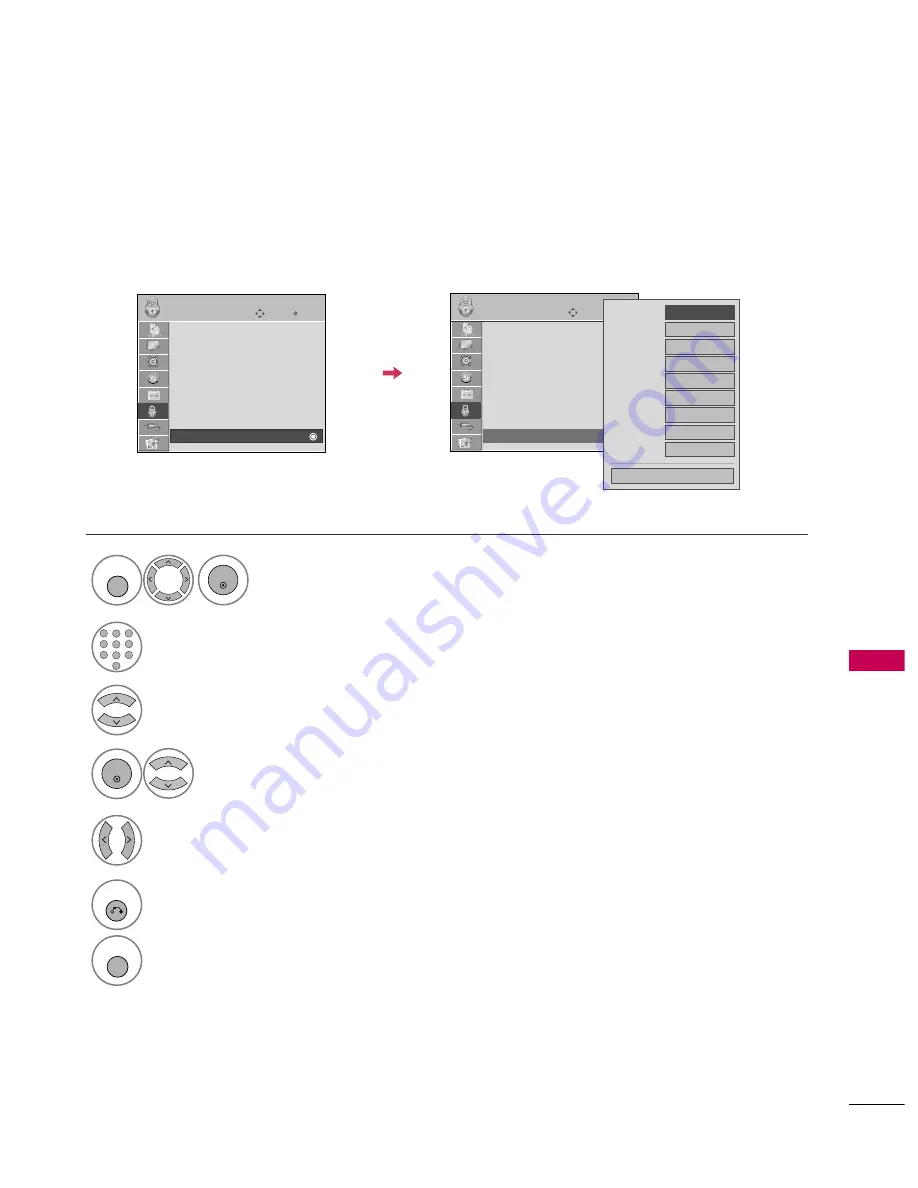
EXTERNAL INPUT BLOCKING

Enables you to block an input.

Select IInnp

puutt   B

Bllo

occkk.

Select input source.

4

3

Select O

O nn or O

O ff ff.

5

ENTER

Enter

Move

LOCK

Lock System            : Off

Set Password

Block Channel

Movie Rating

TV Rating-Children

TV Rating-General

Downloadable Rating

Input Block

Select LLO

OC

CK

K.

1

MENU

ENTER

Input the password.

2

1

4

5

6

7

8

0

9

2

3

6

RETURN

Return to the previous menu.

MENU

Return to TV viewing.

AV1

F


Off       

G

G

AV2

Off

Component1

Off

HDMI1

Off

RGB-PC

Off

Component2

Off

HDMI2

Off

HDMI3

Off

HDMI4

Off

Close

Enter

Move

LOCK

Lock System            : Off

Set Password

Block Channel

Movie Rating

TV Rating-Children

TV Rating-General

Downloadable Rating

Input Block

Содержание 32LH40 Series

Страница 1: ...7CL40 42LU60 47LU60 P NO SAC33601903 0901 REV01 www lgusa com www lg ca This product qualifies for ENERGY STAR in the factory default Home Use setting and this is the setting in which power savings will be achieved Changing the factory default picture setting or enabling other features will increase power consumption that could exceed the limits necessary to quality for Energy Star rating Model Se...

Страница 2: ... modifications not expressly approved by the party responsible for compliance could void the user s authority to operate the equipment CAUTION Do not attempt to modify this product in any way without written authorization from LG Electronics Unauthorized modification could void the user s authority to operate this product The lightning flash with arrowhead symbol within an equilateral triangle is ...

Страница 3: ...o your outlet consult an electrician for replacement of the obsolete outlet Protect the power cord from being walked on or pinched particularly at plugs convenience receptacles and the point where they exit from the apparatus Only use attachments accessories specified by the manufacturer Use only with the cart stand tripod bracket or table specified by the manufacturer or sold with the apparatus W...

Страница 4: ... upon Pay particular attention to plugs wall outlets and the point where the cord exits the appliance Do not make the TV with the power cord plugged in Do not use a damaged or loose power cord Be sure do grasp the plug when unplugging the power cord Do not pull on the power cord to unplug the TV WARNING To reduce the risk of fire or electrical shock do not expose this product to rain moisture or o...

Страница 5: ...e to carry larger TVs Do not press against or put stress on the front panel of the TV V Ve en nt ti il la at ti io on n Install your TV where there is proper ventila tion Do not install in a confined space such as a bookcase Do not cover the product with cloth or other materials e g plastic while plugged in Do not install in excessively dusty places If you smell smoke or other odors coming from th...

Страница 6: ... Connection 41 WATCHING TV CHANNEL CONTROL Remote Control Functions 42 Turning On TV 44 Channel Selection 44 Volume Adjustment 44 Initial Setting 45 On Screen Menus Selection 46 Quick Menu 47 Channel Setup Auto Scan Auto Tuning 48 Add Delete Channel Manual Tuning 49 Channel Editing 50 Channel List 51 Favorite Channel Setup Favorite Channel List 52 Brief Information 53 Input List 54 Input Label 55 ...

Страница 7: ...log Broadcasting System Captions 92 Digital Broadcasting System Captions 93 Caption Option 94 TIME SETTING Clock Setting Auto Clock Setup 95 Manual Clock Setup 96 Auto On Off Time Setting 97 Sleep Timer Setting 98 PARENTAL CONTROL RATINGS Set Password Lock System 99 Channel Blocking 102 Movie TV Rating 103 Downloadable Rating 108 External Input Blocking 109 APPENDIX Troubleshooting 1 10 Maintenanc...

Страница 8: ... Mark Levinson Speakers are embedded in strategic spots behind the front cabinet and use minute vibrations to turn the entire front bezel into the speaker system The result is a clean polished look and enhanced audio by increasing the sweet spot giving a wider and richer sound field HDMITM the HDMI logo and High Definition Multimedia Interface are trademarks or registered trademarks of HDMI Licens...

Страница 9: ...t wipe roughly when removing stain Excessive pressure may cause scratch or discoloration Polishing Cloth Not included with all models D sub 15 pin Cable When using the VGA D sub 15 pin cable PC connection the user must use shielded signal interface cables with ferrite cores to maintain standards compliance F Fo or r 3 32 2 3 37 7 4 42 2 4 47 7 5 55 5L LH H4 40 0 3 37 7 4 42 2 4 47 7 5 55 5L LH H5 ...

Страница 10: ...utton POWER Button Power Standby Indicator Illuminates red in standby mode Illuminates blue when the TV is switched on Can be adjusted P Po ow we er r I In nd di ic ca at to or r in the OPTION menu G G p p 8 80 0 Remote Control Sensor Intelligent Sensor Adjusts picture according to the surrounding conditions 32 37 42 47 55LH40 37 42 47 55LH55 AC power control switch OFF ON SPEAKER ...

Страница 11: ...adjusted using P Po ow we er r I In nd di ic ca at to or r in the OPTION menu G G p p 8 80 0 CH VOL MENU INPUT ENTER Intelligent Sensor Adjusts picture according to the surrounding conditions 32 42 47CL40 42 47LU60 Remote Control Sensor SPEAKER CH VOL MENU INPUT ENTER CHANNEL Buttons VOLUME Buttons ENTER Button MENU Button INPUT Button ...

Страница 12: ...n may differ from your TV VIDEO AUDIO L R RS 232C IN CONTROL SERVICE AUDIO IN RGB DVI OPTICAL DIGITAL AUDIO OUT ANTENNA CABLE IN RGB IN PC AV IN 1 COMPONENT IN 2 3 1 2 1 MONO AUDIO VIDEO DVI IN L R R 1 2 3 6 5 7 9 AV IN 2 L MONO R AUDIO VIDEO USB IN IN 4 1 8 2 4 ...

Страница 13: ...AL DIGITAL AUDIO OUT Digital optical audio output for use with amps and home theater systems Note In standby mode this port doesn t work ANTENNA CABLE IN Connect over the air signals to this jack Connect cable signals to this jack RS 232C IN CONTROL SERVICE PORT Used by third party devices This port is used for Service or Hotel mode COMPONENT IN Analog Connection Supports HD Uses a red green and b...

Страница 14: ... holes in the back of the TV 4 S ST TA AN ND D B BO OD DY Y C CO OV VE ER R B BA AS SE E Carefully place the TV screen side down on a cushioned surface to protect the screen from damage 1 INSTALLATION Only 32 42CL40 42LU60 G G When assembling the desk type stand make sure the bolt is fully tightened If not tightened fully the TV can tilt forward after the product installa tion Do not over tighten ...

Страница 15: ... screen from damage 1 Loose the bolts from TV 2 Detach the stand from TV 3 After removing the stand install the included p pr ro ot te ec ct ti io on n c co ov ve er r over the hole for the stand Press the P PR RO OT TE EC CT TI IO ON N C CO OV VE ER R into the TV until you hear it click PROTECTION COVER ...

Страница 16: ... a cushioned surface to protect the screen from damage Assemble the TV as shown Fix the 4 bolts securely using the holes in the back of the TV 1 2 3 INSTALLATION Except 55LH40 55LH55 G G When assembling the desk type stand make sure the bolt is fully tightened If not tightened fully the TV can tilt forward after the product installa tion Do not over tighten NOTE ...

Страница 17: ... screen from damage 1 Loose the bolts from TV 2 Detach the stand from TV 3 After removing the stand install the included p pr ro ot te ec ct ti io on n c co ov ve er r over the hole for the stand Press the P PR RO OT TE EC CT TI IO ON N C CO OV VE ER R into the TV until you hear it click PROTECTION COVER ...

Страница 18: ...iled installation manual and all parts necessary for assembly are provided G G Do not use screws longer then the standard dimen sion as they may cause damage to the inside to the TV G G For wall mounts that do not comply with the VESA standard screw specifications the length of the screws may differ depending on their specifica tions G G Do not use screws that do not comply with the VESA standard ...

Страница 19: ...onnect additional equipment see the EXTERNAL EQUIPMENT SETUP section Install the CABLE MANAGEMENT CLIP as shown CABLE MANAGEMENT CLIP 1 2 Put the cables inside the CABLE MANAGEMENT CLIP and snap it closed 3 For 32 42 47CL40 42 47LU60 Image shown may differ from your TV ...

Страница 20: ...onnect additional equipment see the EXTERNAL EQUIPMENT SETUP section Install the CABLE MANAGEMENT CLIP as shown CABLE MANAGEMENT CLIP 1 2 Put the cables inside the CABLE MANAGEMENT CLIP and snap it closed 3 For 32 37 42 47 55LH40 37 42 47 55LH55 Image shown may differ from your TV ...

Страница 21: ...ction by 20 degrees to suit your viewing position For proper ventilation allow a clearance of 4 inches on all four sides from the wall Image shown may differ from your TV 4 inches G G Ensure adequate ventilation by following the clearance recommendations G G Do not mount near or above any type of heat source CAUTION 4 inches 4 inches 4 inches ...

Страница 22: ... KENSINGTON SECURITY SYSTEM This feature is not available for all models The TV is equipped with a Kensington Security System connector on the back panel Connect the Kensington Security System cable as shown below For the detailed installation and use of the Kensington Security System refer to the user s guide provided with the Kensington Security System For further information contact h ht tt tp ...

Страница 23: ...oosen the bolts Insert the eye bolts or TV brackets bolts and tighten them securely in the upper holes Secure the wall brackets with the bolts sold separately to the wall Match the height of the bracket that is mounted on the wall to the holes in the product Ensure the eye bolts or brackets are tightened securely Use a sturdy rope sold separately to tie the product It is safer to tie the rope so i...

Страница 24: ...ntenna VHF UHF Cable TV Wall Jack Multi family Dwellings Apartments Connect to wall antenna socket RF Coaxial Wire 75 ohm RF Coaxial Wire 75 ohm Single family Dwellings Houses Connect to wall jack for outdoor antenna Be careful not to bend the copper wire when connecting the antenna Copper Wire To improve the picture quality in a poor signal area please purchase a signal amplifier and install prop...

Страница 25: ...e digital set top box operation Select the C Co om mp po on ne en nt t1 1 input source on the TV using the I IN NP PU UT T button on the remote control If connected to C CO OM MP PO ON NE EN NT T I IN N 2 2 input select the C Co om mp po on ne en nt t2 2 input source on the TV To prevent the equipment damage never plug in any power cords until you have finished connecting all equipment Image shown...

Страница 26: ... TV using the I IN NP PU UT T button on the remote control 2 1 HDMI DTV Horizontal Vertical Frequency KHz Frequency Hz 31 47 59 94 31 50 60 00 44 96 59 94 45 00 60 00 33 72 59 94 33 75 60 00 26 97 23 976 27 00 24 00 33 71 29 97 33 75 30 00 67 432 59 939 67 50 60 00 Resolution 720x480p 1280x720p 1920x1080i 1920x1080p EO AUDIO L R RS 232C IN CONTROL SERVICE AUDIO IN RGB DVI O A C RGB IN PC AV IN 1 O...

Страница 27: ...rate audio connection is necessary NOTE Connect the DVI output of the digital set top box to the H HD DM MI I D DV VI I I IN N 1 1 2 2 or 3 3 jack on the TV Connect the digital set top box audio output to the A AU UD DI IO O I IN N R RG GB B D DV VI I jack on the TV 1 How to connect 2 How to use Turn on the digital set top box Refer to the owner s manual for the digital set top box Select the H HD...

Страница 28: ...Match the jack colors Y green PB blue and PR red Connect the audio outputs of the DVD to the C CO OM MP PO ON NE EN NT T I IN N A AU UD DI IO O 1 1 jacks on the TV 1 How to connect 2 How to use Turn on the DVD player insert a DVD Select the C Co om mp po on ne en nt t1 1 input source on the TV using the I IN NP PU UT T button on the remote control If connected to C CO OM MP PO ON NE EN NT T I IN N...

Страница 29: ...n the TV using the I IN NP PU UT T button on the remote control Refer to the DVD player s manual for operating instructions 1 Connect the HDMI output of the DVD to the H HD DM MI I D DV VI I I IN N 1 1 2 2 3 3 or 4 4 jack on the TV No separate audio connection is necessary HDMI supports both audio and video 1 How to connect 2 How to use Select the H HD DM MI I1 1 H HD DM MI I2 2 H HD DM MI I3 3 or...

Страница 30: ... cable to the RF antenna in socket of the VCR 1 How to connect 2 How to use Set VCR output switch to 3 or 4 and then tune TV to the same channel number Insert a video tape into the VCR and press PLAY on the VCR Refer to the VCR owner s manual 2 1 RS 232C IN CONTROL SERVICE UDIO IN RGB DVI OPTICAL DIGITAL AUDIO OUT RGB IN PC ANTENNA CABLE IN L R S VIDEO VIDEO OUTPUT SWITCH ANT IN ANT OUT AUDIO Wall...

Страница 31: ...DIO OUTPUT SWITCH ANT IN ANT OUT 1 Connect the A AU UD DI IO O V VI ID DE EO O jacks between TV and VCR Match the jack colors Video yellow Audio Left white and Audio Right red 1 How to connect 2 How to use Insert a video tape into the VCR and press PLAY on the VCR Refer to the VCR owner s manual Select the A AV V1 1 input source on the TV using the I IN NP PU UT T button on the remote control If c...

Страница 32: ... ID DE EO O jacks between TV and external equipment Match the jack colors Video yellow Audio Left white and Audio Right red 1 How to connect 2 How to use Select the A AV V2 2 input source on the TV using the I IN NP PU UT T button on the remote control If connected to A AV V I IN N 1 1 input select the A AV V1 1 input source on the TV Operate the corresponding external equipment 1 1 ...

Страница 33: ...OUT ANTENNA CABLE IN 2 3 1 R DVI IN AUDIO IN RGB DVI RGB IN PC RGB OUTPUT AUDIO 2 1 Connect the VGA output of the PC to the R RG GB B I IN N P PC C jack on the TV Connect the PC audio output to the A AU UD DI IO O I IN N R RG GB B D DV VI I jack on the TV 1 How to connect 2 How to use Turn on the PC and the TV Select the R RG GB B P PC C input source on the TV using the I IN NP PU UT T button on t...

Страница 34: ... jack on the TV Connect the PC audio output to the A AU UD DI IO O I IN N R RG GB B D DV VI I jack on the TV 1 How to connect 2 How to use Turn on the PC and the TV Select the H HD DM MI I1 1 H HD DM MI I2 2 or H HD DM MI I3 3 input source on the TV using the I IN NP PU UT T button on the remote control 2 1 G G Check HDMI cable over version 1 3 If the HDMI cables don t support HDMI version 1 3 it ...

Страница 35: ...ontrast or bright ness If noise is present change the PC output to another resolution change the refresh rate to another rate or adjust the brightness and contrast on the PICTURE menu until the picture is clear G G Avoid keeping a fixed image on the screen for a long period of time The fixed image may become permanently imprinted on the screen G G The synchronization input form for Horizontal and ...

Страница 36: ...djusted Select P PI IC CT TU UR RE E Select S Sc cr re ee en n R RG GB B P PC C Select R Re es so ol lu ut ti io on n Select the desired resolution 1024 x 768 1280 x 768 1360 x 768 1366 x 768 Auto Config Resolution Position Size Phase Reset SCREEN Move Prev 1MENU 3 4 2 ENTER ENTER ENTER 5 ENTER Enter Move PICTURE E R G Contrast 50 Brightness 50 Sharpness 50 Color 50 Tint 0 Advanced Control Picture...

Страница 37: ...to Config Resolution Position Size Phase Reset SCREEN Move Prev To Set 3 2 ENTER ENTER Select Y Ye es s 4 ENTER Start Auto Configuration 5 ENTER Select P PI IC CT TU UR RE E 1MENU If the position of the image is still not correct try Auto adjustment again If picture needs to be adjusted again after Auto adjustment in RGB PC you can adjust the P Po os si it ti io on n S Si iz ze e or P Ph ha as se ...

Страница 38: ...E SCREEN Move Prev 3 ENTER 4 ENTER P Po os si it ti io on n This function is to adjust pic ture to left right and up down as you prefer S Si iz ze e This function is to minimize any vertical bars or stripes visible on the screen background And the horizontal screen size will also change P Ph ha as se e This function allows you to remove any horizontal noise and clear or sharpen the image of charac...

Страница 39: ...e operates only in RGB PC mode Auto Config Position Resolution Size Phase Reset SCREEN Move Prev To Set Select R Re es se et t 3 ENTER Select P PI IC CT TU UR RE E Select S Sc cr re ee en n R RG GB B P PC C 1MENU 2 ENTER Select Y Ye es s 4 ENTER 5 ENTER Yes No Enter Move PICTURE E R G Contrast 50 Brightness 50 Sharpness 50 Color 50 Tint 0 Advanced Control Picture Reset Screen RGB PC ...

Страница 40: ...UIPMENT SETUP USB IN IN 4 AV IN 2 L MONO R AUDIO VIDEO Memory Key Connect the USB device to the U US SB B I IN N jack on the side of TV 1 How to connect 1 2 How to use After connecting the U US SB B I IN N jack you use the USB func tion G G p p 6 60 0 1 or ...

Страница 41: ...n may block digital audio output CAUTION Connect one end of the optical cable to the TV port of O OP PT TI IC CA AL L D DI IG GI IT TA AL L A AU UD DI IO O O OU UT T Connect the other end of the optical cable to the digital audio input on the audio equipment Set the TV Speaker option Off in the AUDIO menu G G p p 8 87 7 See the external audio equipment instruction manual for operation 1 How to con...

Страница 42: ...he TV on from standby or off to standby Rotates through inputs Also switches the TV on from standby G G p p 5 54 4 Adjusts the Energy Saving G G p p 7 78 8 Opens the list of Quick Menu options G G p p 4 47 7 Displays the main menu or clears all on screen displays and return to TV viewing See a list of AV devices connected to TV When you toggle this button the SIMPLINK menu appears at the screen G ...

Страница 43: ...les through preset Video and Audio modes G G p p 5 56 6 Adjusts the volume Scroll through the programmed Favorite channels G G p p 5 52 2 Select the input to apply the Picture Wizard settings G G p p 7 71 1 Use to mark or unmark a photo music G G p p 6 62 2 6 66 6 Switches the sound on or off G G p p 4 44 4 Changes the channel Moves from one full set of screen information to the next one Open the ...

Страница 44: ...the TV press the P PO OW WE ER R button on the remote control The TV reverts to standby mode 1 2 3 Press the C CH H or or N NU UM MB BE ER R buttons to select a channel number 1 VOLUME ADJUSTMENT CHANNEL SELECTION Press the V VO OL L or button to adjust the volume If you want to switch the sound off press the M MU UT TE E button You can cancel the Mute function by pressing the M MU UT TE E or V VO...

Страница 45: ...ting for displaying at stores Store Demo mode initializes the TV to set the image quality You can also adjust I In ni it ti ia al l S Se et tt ti in ng g in the O OP PT TI IO ON N menu Check your antenna connection and start A Au ut to o T Tu un ni in ng g 1 ENTER Step3 Time setting Step4 Auto Tuning Language Step1 Selecting Language English Español Français Selecting the environment Choose the se...

Страница 46: ...70 PICTURE E Enter Move Auto Volume On Clear Voice II On Level 3 Balance 0 Sound Mode Standard SRS TruSurround XT Off Treble 50 Bass 50 AUDIO E Enter Move Clock Off Time Off On Time Off Sleep Timer Off TIME Enter Move Photo List Music List USB Enter Move TV AV1 AV2 Component1 Component2 RGB PC HDMI1 HDMI2 INPUT E Enter Move Lock System Off Set Password Block Channel Movie Rating TV Rating Children...

Страница 47: ...the factory preset picture depend on the viewing environment S So ou un nd d M Mo od de e Selects the factory preset sound for type of program M Mu ul lt ti i A Au ud di io o Changes the audio language Digital signal S SA AP P Selects MTS sound Analog signal S Sl le ee ep p T Ti im me er r Select the amount of time before your TV turns off automatically D De el l A Ad dd d F Fa av v Select channel...

Страница 48: ...s Run A Au ut to o t tu un ni in ng g Enter Move CHANNEL Enter Move CHANNEL 1MENU 3 2 ENTER ENTER 4 ENTER Auto Tuning Manual Tuning Channel Edit Auto Tuning Manual Tuning Channel Edit The TV will ask for a password if parental control has been activated LOCK Menu Use the password you set up in the LOCK Menu to allow a channel search 5RETURN Return to the previous menu MENU Return to TV viewing Che...

Страница 49: ... F DTV G G 2 Close Delete Auto Tuning Manual Tuning Channel Edit DTV 2 1 Bad Normal Good Select M Ma an nu ua al l T Tu un ni in ng g Select D DT TV V T TV V C CA AD DT TV V or C CA AT TV V Select channel you want to add or delete 3 ENTER 4 Select A Ad dd d or D De el le et te e 5 ENTER Auto Tuning Manual Tuning Channel Edit The TV will ask for a password if parental control has been activated LOC...

Страница 50: ...ll be unable to select it using C CH H button during TV viewing If you wish to select the deleted channel directly enter the channel number with the NUMBER buttons or select it in the C Ch ha an nn ne el l E Ed di it t menu Channel Editing Enter Move CHANNEL Auto Tuning Manual Tuning Channel Edit Select C CH HA AN NN NE EL L 1MENU 2 ENTER Select C Ch ha an nn ne el l E Ed di it t Return to the pre...

Страница 51: ...e channel list Display the C Ch ha an nn ne el l L Li is st t 1 LIST Displaying Channel List Select a channel 1 Switch to the chosen channel number 2 ENTER Selecting a channel in the channel list Turn the pages 1 CH P A G E Return to TV viewing 2RETURN Paging through a channel list This padlock is displayed when the channel is locked with parental control ...

Страница 52: ...dly Return to TV viewing 4Q MENU Select F Fa av vo or ri it te e 3 Select your desired channel 1 CH P A G E 1 4 5 6 7 8 0 9 2 3 2Q MENU Select D De el l A Ad dd d F Fa av v or A Favorite F F Del Add Fav G G Exit 2 1 3 1 4 1 DTV DTV DTV Favorite List Select a channel 1 Switch to the chosen channel number 2 ENTER Selecting a channel in the favorite channel list Turn the pages 1 CH P A G E Return to ...

Страница 53: ...EN NU U menu to select wanted Audio C Ca ap pt ti io on n The program contains one or more caption services Use the Q Q M ME EN NU U menu to select wanted Closed caption The original aspect ratio of the video is 4 3 The original aspect ratio of the video is 16 9 wide The video resolution is 720x480i The video resolution is 720x480p The video resolution is 1280x720p The video resolution is 1920x108...

Страница 54: ...which are connected to a TV can be activated and selected T TV V Select it to watch over the air cable and digi tal cable broadcasts A AV V Select them to watch a VCR or other external equipment C Co om mp po on ne en nt t Select them to watch DVD or a Digital set top box R RG GB B P PC C Select it to view PC input H HD DM MI I Select them to watch high definition devices VCR Game DVD Set Top Box ...

Страница 55: ...be el l Select the label 1MENU 2 ENTER Select the source 3 ENTER 4 5RETURN Return to the previous menu MENU Return to TV viewing With using OPTION menu Select the source Select the label 1 INPUT 2 3RETURN Return to the previous menu MENU Return to TV viewing With using INPUT button AV1 AV2 Component1 Component2 RGB PC HDMI1 HDMI2 HDMI3 HDMI4 F F G G Close E E Enter Move OPTION Menu Language Englis...

Страница 56: ...peration audio will be muted Select O OP PT TI IO ON N Select S Si im mp pl le e M Ma an nu ua al l 1MENU 2 ENTER Select the part of the manual you want to see 3 ENTER 4RETURN Return to TV viewing If you select C Ci in ne em ma a in AV mode C Ci in ne em ma a will be selected both for PIC TURE menu Picture Mode and AUDIO menu Sound Mode respectively If you select O Of ff f in AV mode the P Pi ic c...

Страница 57: ...n if the TV is turned off press the r r I INPUT CH D DE E or button on the TV or POWER INPUT CH or NUMBER buttons on the remote control With the K Ke ey y L Lo oc ck k O On n the display K Ke ey y L Lo oc ck k appears on the screen if any button on the front panel is pressed while viewing the TV 4RETURN Return to the previous menu MENU Return to TV viewing Enter Move OPTION Menu Language English A...

Страница 58: ...h Audio Language English Input Label SIMPLINK On Key Lock Off Simple Manual Caption Off Set ID 1 Off On NOTE G G Connect the HDMI DVI IN or HDMI IN terminal of the TV to the rear terminal HDMI terminal of the SIMPLINK device with the HDMI cable G G When you switch the Input source with the INPUT button on the remote control the SIMPLINK device will stop G G When you select a device with home theat...

Страница 59: ...Select the desired device Control connected AV devices 1 3 2 ENTER ENTER D Di ir re ec ct t P Pl la ay y After connecting AV devices to the TV you can directly control the devices and play media with out additional settings S Se el le ec ct t A AV V d de ev vi ic ce e Enables you to select one of the AV devices connected to TV D Di is sc c p pl la ay yb ba ac ck k Control connected AV devices by p...

Страница 60: ...er sup ply If not the device may not be recognized G G Please connect a USB storage device with cable is offered by USB maker If connected with cable is not offered by USB maker or an excessively long cable the device may not be recognized G G Some USB storage devices may not be supported or operate properly G G Please backup important files because data on USB device may be damaged Data managemen...

Страница 61: ...ol Supported photo file JPG You can play JPG files only Only baseline scan is supported among JPG Select U US SB B Select P Ph ho ot to o L Li is st t 2 1MENU ENTER ENTER 1 2 3 4 5 Navigation Popup Menu Page Change Mark Exit CH MARK 5 Page 2 3 No Marked Photo List Up Folder 1366x768 125KB KY101 06 10 2008 KY102 04 03 2008 JMJ001 01 01 2000 JMJ002 06 15 2008 JMJ003 04 03 2008 JMJ004 02 18 2008 KY10...

Страница 62: ...l l Deselect all marked photos G G D De el le et te e Delete the selected photo item G G C Cl lo os se e Close the pop up menu Page 2 3 No Marked Photo List Up Folder 1366x768 125KB KY101 06 10 2008 KY102 04 03 2008 JMJ001 01 01 2000 JMJ002 06 15 2008 JMJ003 04 03 2008 JMJ004 02 18 2008 KY103 03 30 2008 KY104 06 19 2008 KY105 01 31 2008 JMJ005 05 13 2008 JMJ006 05 26 2008 JMJ007 02 18 2008 JMJ008 ...

Страница 63: ... 03 30 2008 KY104 06 19 2008 KY105 01 31 2008 JMJ005 05 13 2008 JMJ006 05 26 2008 JMJ007 02 18 2008 JMJ008 02 18 2008 Up Folder Page 2 3 No Marked Photo List Up Folder 1366x768 125KB KY101 06 10 2008 KY102 04 03 2008 JMJ001 01 01 2000 JMJ002 06 15 2008 JMJ003 04 03 2008 JMJ004 02 18 2008 KY103 03 30 2008 KY104 06 19 2008 KY105 01 31 2008 JMJ005 05 13 2008 JMJ006 05 26 2008 JMJ007 02 18 2008 JMJ008...

Страница 64: ...ed all photos in the cur rent folder are displayed during slide show Set the time interval of the slide show in O Op pt ti io on n G G B BG GM M Listen to music while viewing photos in full size Set the BGM device and album in O Op pt ti io on n G G R Ro ot ta at te e Rotate photos Rotates the photo 90 180 270 360 clockwise G G D De el le et te e Delete photos G G O Op pt ti io on n Set values for...

Страница 65: ...G1 32000 44100 48000Hz MPEG2 16000 24000 22050Hz MPEG2 5 8000 12000 1 1025Hz Moves to upper level folder Preview If any album jacket for the file exists this jack et is displayed Current page Total pages Total number of marked musics Corresponding buttons on the remote control 1 3 4 5 2 Select U US SB B Select M Mu us si ic c L Li is st t 1 2 MENU ENTER ENTER Music List Up Folder Title Duration 3 ...

Страница 66: ...usic List Up Folder A A 00 00 04 16 Up Folder Drive1 Title Duration 3945 KB 128 Kbps Play Play with Photo Mark All Delete Close G G P Pl la ay y During stop Play the selected music Once a song finishes playing the next selected one will be played When there are no selected musics to play the next one in the current fold er will be played If you go to a different folder and press the E EN NT TE ER ...

Страница 67: ...ining on the screen for a extended period of time NOTE G G When music is playing is displayed in front of the music play time G G A damaged or corrupted music file that does not play displays 00 00 as the play time G G Music files with copy protection will not play G G Press E EN NT TE ER R A A or R RE ET TU UR RN N button to stop the screen saver ...

Страница 68: ...e desired picture format Select P PI IC CT TU UR RE E Select A As sp pe ec ct t R Ra at ti io o Select the desired picture format 1MENU 3 2 ENTER ENTER 4RETURN Return to the previous menu MENU Return to TV viewing Enter Move PICTURE E Aspect Ratio 16 9 Picture Wizard Energy Saving Off Picture Mode Standard Backlight 70 Contrast 90 Brightness 50 Sharpness 70 Enter Move PICTURE E Aspect Ratio 16 9 P...

Страница 69: ...e source s image 4 3 Choose 4 3 when you want to view a picture with an original 4 3 aspect ratio Zoom Choose Zoom when you want to view the picture without any alteration However the top and bottom portions of the picture will be cropped When adjusting in Q MENU menu a F F or G G button Adjust proportion of Zoom b D D or E E button Move the image on the screen Cinema Zoom Choose Cinema Zoom when ...

Страница 70: ...the Recommended sample below Next Previous Color 50 E E E E Low High Recommended White Level Set the screen above identical to the Recommended sample below Next Previous Low High Recommended Contrast 90 E E E E Tint Set the screen above identical to the Recommended sample below Next Previous Low High Recommended Tint 0 E E E E R G Enter Move PICTURE E Aspect Ratio 16 9 Picture Wizard Energy Saving...

Страница 71: ...ess 50 E E E E Low High Recommended Vertical Sharpness Set the screen above identical to the Recommended sample below Next Previous V Sharpness 50 E E E E Low High Recommended Backlight Set the Backlight to your Brightness preference Next Previous Backlight 50 E E E E Dark Bright Recommended DTV TV AV1 AV2 Component1 Component2 RGB PC HDMI1 HDMI2 HDMI3 HDMI4 Select an input s to apply the settings...

Страница 72: ...t te el ll li ig ge en nt t S Se en ns so or r it is changed contrast brightness sharp ness color and tint automatically V Vi iv vi id d S St ta an nd da ar rd d N Na at tu ur ra al l C Ci in ne em ma a S Sp po or rt t and G Ga am me e Settings are preset for the optimum picture quality at the factory I In nt te el ll li ig ge en nt t S Se en ns so or r The most suitable picture is automatically a...

Страница 73: ...s the brightness of LCD panel to control the brightness of the screen Adjusting the backlight is recommended when setting the brightness of the set When decreas ing the backlight the brightness of the black becomes darker without any loss in video signal and the power consumption is reduced C Co on nt tr ra as st t Increase or decrease the gra dient of the video signal You may use Contrast when th...

Страница 74: ...TURE E R G Contrast 50 Brightness 50 Sharpness 50 Color 50 Tint 0 Advanced Control Picture Reset Screen RGB PC You can calibrate the screen for each Picture Mode or set the video value according to the special video screen You can set the video seeing differently for each input To reset to the factory default after making adjustments to each input source execute the P Pi ic ct tu ur re e R Re es s...

Страница 75: ...ise Reduction Low Gamma Medium Black Level Low Real Cinema Off TruMotion 120Hz Low Color Standard HD Color Gamut Standard Edge Enhancer High Close E Select your desired menu option 5 ENTER Enter Move PICTURE E Aspect Ratio 16 9 Picture Wizard Energy Saving Off Picture Mode Expert1 Backlight 70 Contrast 90 Brightness 50 H Sharpness 50 Intelligent Sensor Vivid Standard Natural Cinema Sport Game Expe...

Страница 76: ...creen from being too bright Dims extremely bright pictures This feature is disabled in P Pi ic ct tu ur re e M Mo od de e V Vi iv vi id d C Ci in ne em ma a Makes video clips recorded in film look more natural by eliminating judder effect DVD and Blu ray movies are filmed at 24 frames per second With LG Real Cinema every frame is consistently processed 5 times in 1 24 of a second producing 120 fps...

Страница 77: ...yan Magenta Red Green Blue Yellow Cyan Magenta Color The adjustment range is 30 30 Red Green Blue Yellow Cyan Magenta Tint The adjustment range is 30 30 This feature is disable in RGB PC and HDMI PC mode This feature is not available for all models As the technology to reduce the power consumption while keeping the same bright ness this has the effect of reducing power consumption improvement in c...

Страница 78: ...g A Au ut to o B Ba ac ck kl li ig gh ht t is automatically adjusted through I In nt te el ll li ig ge en nt t s se en ns so or r according to the surrounding conditions Press the E EN NE ER RG GY Y S SA AV VI IN NG G button repeatedly to select the appropriate Energy Saving setup Select P PI IC CT TU UR RE E Select E En ne er rg gy y S Sa av vi in ng g 1MENU 2 ENTER Select A Au ut to o O Of ff f ...

Страница 79: ...ue 1MENU 4 2 ENTER Select Y Ye es s 3 ENTER ENTER 5MENU Return to TV viewing Enter Move PICTURE E R G Contrast 50 Brightness 50 Sharpness 50 Color 50 Tint 0 Advanced Control Picture Reset Screen RGB PC Resetting video configuration i i Enter Move PICTURE E R G Contrast 50 Brightness 50 Sharpness 50 Color 50 Tint 0 Advanced Control Picture Reset Screen RGB PC No Yes All picture settings will be res...

Страница 80: ... set the indicator light on the front of the TV to O On n or O Of ff f in standby mode P Po ow we er r L Li ig gh ht t Determines whether to set the indicator light on the front of the TV to O On n or O Of ff f when the power turns on Enter Move OPTION SIMPLINK On Key Lock Off Simple Manual Caption Off Set ID 1 Power Indicator Demo Mode Off Initial Setting Home Use Enter Move OPTION SIMPLINK On Ke...

Страница 81: ...y button Except VOL and MUTE button Enter Move OPTION SIMPLINK On Key Lock Off Simple Manual Caption Off Set ID 1 Power Indicator Demo Mode Off Initial Setting Store Demo Enter Move OPTION SIMPLINK On Key Lock Off Simple Manual Caption Off Set ID 1 Power Indicator Demo Mode On Initial Setting Store Demo E E Off On Displays a slide show to explain the various feature of this TV This feature is disa...

Страница 82: ...ure allows users to enjoy stable volume levels by making automatic adjustments for each program Select A AU UD DI IO O Select A Au ut to o V Vo ol lu um me e Select O On n or O Of ff f Enter Move AUDIO E L R Enter Move AUDIO E L R 1MENU 3 2 ENTER ENTER Auto Volume Off Clear Voice II Off Level 3 Balance 0 Sound Mode Standard SRS TruSurround XT Off Treble 50 Bass 50 Auto Volume On Clear Voice II Off...

Страница 83: ...TruSurround XT Off Treble 50 Bass 50 Auto Volume Off Clear Voice II On Level 3 Balance 0 Sound Mode Standard SRS TruSurround XT Off Treble 50 Bass 50 Select A AU UD DI IO O Select C Cl le ea ar r V Vo oi ic ce e I II I Select O On n or O Of ff f 1MENU 3 2 ENTER ENTER 6RETURN Return to the previous menu MENU Return to TV viewing Select L Le ev ve el l 4 ENTER Make appropriate adjustments 5 ENTER Ad...

Страница 84: ...ruSurround XT Off Treble 50 Bass 50 Auto Volume Off Clear Voice II Off Level 3 Balance 0 Sound Mode Standard SRS TruSurround XT Off Treble 50 Bass 50 Standard Music Cinema Sport Game S St ta an nd da ar rd d M Mu us si ic c C Ci in ne em ma a S Sp po or rt t and G Ga am me e are preset for optimum sound quality at the factory You can also adjust S So ou un nd d M Mo od de e in the Q Q M ME EN NU U...

Страница 85: ...Auto Volume Off Clear Voice II Off Level 3 Balance 0 Sound Mode Standard SRS TruSurround XT Off Treble 50 Bass 50 Select A AU UD DI IO O Select S SR RS S T Tr ru uS Su ur rr ro ou un nd d X XT T Select O On n or O Of ff f 1MENU 3 2 ENTER ENTER If you select C Cl le ea ar r V Vo oi ic ce e I II I O On n S SR RS S T Tr ru uS Su ur rr ro ou un nd d X XT T feature will not work S SR RS S T Tr ru uS Su...

Страница 86: ...o suit your taste and room situations Enter Move AUDIO Enter Move AUDIO L R E Auto Volume Off Clear Voice II Off Level 3 Balance 0 Sound Mode Standard SRS TruSurround XT Off Treble 50 Bass 50 L R E Auto Volume Off Clear Voice II Off Level 3 Balance 0 Sound Mode Standard SRS TruSurround XT Off Treble 50 Bass 50 Close E E E E Balance 0 L R 4RETURN Return to the previous menu MENU Return to TV viewin...

Страница 87: ...ternal Hi Fi system or a SRS System turn off the TV s internal speakers Enter Move AUDIO E Level 3 Balance 0 Sound Mode Standard SRS TruSurround XT Off Treble 50 Bass 50 Reset TV Speaker On Select A AU UD DI IO O Select T TV V S Sp pe ea ak ke er r Select O On n or O Of ff f 1MENU 3 2 ENTER ENTER 4RETURN Return to the previous menu MENU Return to TV viewing L R Enter Move AUDIO E Level 3 Balance 0...

Страница 88: ...Re es se et t 1MENU 2 ENTER Initialize the adjusted value 3 ENTER 4MENU Return to TV viewing Enter Move AUDIO E Level 3 Balance 0 Sound Mode Standard SRS TruSurround XT Off Treble 50 Bass 50 Reset TV Speaker On L R Enter Move AUDIO E Level 3 Balance 0 Sound Mode Standard SRS TruSurround XT Off Treble 50 Bass 50 Reset TV Speaker On L R Resetting audio configuration i i ...

Страница 89: ...m if the station transmits an additional sound signal Mono sound is automatically used if the broadcast is only in Mono Select S SA AP P Select M Mo on no o S St te er re eo o or S SA AP P Return to TV viewing 1Q MENU 3 2 Q MENU Select M Mu ul lt ti i A Au ud di io o Select other languages Return to TV viewing 1Q MENU 3 2 Q MENU Analog TV Digital TV A English F F Multi Audio G G ...

Страница 90: ...i io o L La an ng gu ua ag ge e Select your desired language 1MENU 3 2 ENTER ENTER 4RETURN Return to the previous menu MENU Return to TV viewing Enter Move OPTION Enter Move OPTION Menu Language English Audio Language English Input Label SIMPLINK On Key Lock Off Simple Manual Caption Off Set ID 1 Menu Language English Audio Language English Input Label SIMPLINK On Key Lock Off Simple Manual Captio...

Страница 91: ...he on screen menus will be shown in the selected language 1MENU 3 2 ENTER ENTER 4RETURN Return to the previous menu MENU Return to TV viewing Enter Move OPTION Enter Move OPTION Menu Language English Audio Language English Input Label SIMPLINK On Key Lock Off Simple Manual Caption Off Set ID 1 Menu Language English Audio Language English Input Label SIMPLINK On Key Lock Off Simple Manual Caption O...

Страница 92: ...1MENU 3 2 ENTER ENTER Select C CC C1 1 4 4 or T Te ex xt t1 1 4 4 4 Analog Broadcasting System Captions When selecting O Of ff f Sub menus for Analog DTV and Digital Option become disabled C CA AP PT TI IO ON N The term for the words that scroll across the bottom of the TV screen usually the audio portion of the pro gram provided for the hearing impaired T TE EX XT T The term for the words that ap...

Страница 93: ...C Ca ap pt ti io on n Select O On n 1MENU 3 2 ENTER ENTER Select C CC C1 1 4 4 T Te ex xt t1 1 4 4 or S Se er rv vi ic ce e1 1 6 6 4 5RETURN Return to the previous menu MENU Return to TV viewing Enter Move OPTION Enter Move OPTION Menu Language English Audio Language English Input Label SIMPLINK On Key Lock Off Simple Manual Caption Off Set ID 1 Menu Language English Audio Language English Input L...

Страница 94: ... Si iz ze e Set the word size F Fo on nt t Select a typeface for the text T Te ex xt t C Co ol lo or r Choose a color for the text T Te ex xt t O Op pa ac ci it ty y Specify the opacity for the text color B Bg g B Ba ac ck kg gr ro ou un nd d C Co ol lo or r Select a background color B Bg g B Ba ac ck kg gr ro ou un nd d O Op pa ac ci it ty y Select the opacity for the background color E Ed dg ge ...

Страница 95: ... 10 AM 02 Minute 10 Time Zone Eastern Daylight Saving Auto Close F F Auto G G Select T TI IM ME E Select C Cl lo oc ck k Select A Au ut to o 1MENU 3 2 ENTER ENTER Select your viewing area time zone U S A E Ea as st te er rn n C Ce en nt tr ra al l M Mo ou un nt ta ai in n P Pa ac ci if fi ic c A Al la as sk ka a or H Ha aw wa ai ii i Canada E Ea as st te er rn n C Ce en nt tr ra al l M Mo ou un nt...

Страница 96: ...IME Clock Off Time Off On Time Off Sleep Timer Off Clock Off Time Off On Time Off Sleep Timer Off Select T TI IM ME E Select C Cl lo oc ck k Select M Ma an nu ua al l 1MENU 3 2 ENTER ENTER Select the Year Month Date Hour or Minutes option 4 Set the Year Month Date Hour or Minutes option 5 6RETURN Return to the previous menu MENU Return to TV viewing Month Date 21 Year 2009 Hour 10 AM 02 Minute 10 ...

Страница 97: ...ct I In np pu ut t Select the desired input source Enter Move TIME Enter Move TIME Clock Off Time Off On Time Off Sleep Timer Off Clock Off Time Off On Time 6 30 AM Once Sleep Timer Off Select T TI IM ME E Select O Of ff f T Ti im me e or O On n T Ti im me e Select R Re ep pe ea at t 1MENU 3 2 ENTER ENTER Select O Of ff f O On nc ce e D Da ai il ly y M Mo on n F Fr ri i M Mo on n S Sa at t S Sa at...

Страница 98: ... Press the S SL LE EE EP P button repeatedly to select the number of minutes Enter Move TIME Enter Move TIME Clock Off Time Off On Time Off Sleep Timer Off Clock Off Time Off On Time Off Sleep Timer Off Select T TI IM ME E Select S Sl le ee ep p T Ti im me er r Make appropriate adjustments 1MENU 3 2 ENTER ENTER 4RETURN Return to the previous menu MENU Return to TV viewing Off 10 min 20 min 30 min ...

Страница 99: ...ies Movies that have been shown at the theaters or direct to video movies use the Movie Rating System MPAA only Ratings for Television programs including made for TV movies TV G General audience TV PG Parental guidance suggested TV 14 Parents strongly cautioned TV MA Mature audience only TV Y All children TV Y7 Children 7 years older Set up blocking schemes to block specific channels ratings and e...

Страница 100: ...Downloadable Rating Input Block Select L Lo oc ck k S Sy ys st te em m Select O On n or O Of ff f 4 3 ENTER Enter Move LOCK Lock System On Set Password Block Channel Movie Rating TV Rating Children TV Rating General Downloadable Rating Input Block Off On When you select O On n the Lock System is enable Select L LO OC CK K 1MENU ENTER Input the password 21 4 5 6 7 8 0 9 2 3 5RETURN Return to the pr...

Страница 101: ... wo or rd d Choose any 4 digits for your new password As soon as the 4 digits are entered re enter the same 4 digits on the C Co on nf fi ir rm m 4 3 ENTER 1 4 5 6 7 8 0 9 2 3 Enter Move LOCK Lock System Off Set Password Block Channel Movie Rating TV Rating Children TV Rating General Downloadable Rating Input Block Close New Confirm Select L LO OC CK K 1MENU ENTER Input the password 21 4 5 6 7 8 0...

Страница 102: ... Select B Bl lo oc ck k C Ch ha an nn ne el l Select a channel to block or unblock 4 3 ENTER Block or unblock a channel 5 Blocks any channels that you do not want to watch or that you do not want your children to watch Select L LO OC CK K 1MENU ENTER Input the password 21 4 5 6 7 8 0 9 2 3 6RETURN Return to the previous menu MENU Return to TV viewing Ch Change Page Change CH Navigation Previous Bl...

Страница 103: ...v vi ie e R Ra at ti in ng g Select G G P PG G P PG G 1 13 3 R R N NC C 1 17 7 X X or B Bl lo oc ck ki in ng g O Of ff f 4 3 ENTER Enter Move LOCK Lock System Off Set Password Block Channel Movie Rating TV Rating Children TV Rating General Downloadable Rating Input Block Blocking off Permits all programs G PG PG 13 R NC 17 X Blocking Off G General audience PG Parental guidance suggested PG 13 Pare...

Страница 104: ...l Movie Rating TV Rating Children TV Rating General Downloadable Rating Input Block Age applies to TV Y TV Y7 Fantasy Violence applies to TV Y7 TV Rating Children For USA Prevents children from watching certain children s TV programs according to the ratings limit set The children rating does not apply to other TV programs Unless you block certain TV programs intended for mature audi ences in the ...

Страница 105: ... ex x or V Vi io ol le en nc ce e 4 3 ENTER Select block options 5 ENTER Enter Move LOCK Lock System Off Set Password Block Channel Movie Rating TV Rating Children TV Rating General Downloadable Rating Input Block Age applies to TV G TV PG TV 14 TV MA Dialogue sexual dialogue applies to TV PG TV 14 Language adult language applies to TV PG TV 14 TV MA Sex sexual situations applies to TV PG TV 14 TV...

Страница 106: ...ck ki in ng g O Of ff f 4 3 ENTER Enter Move LOCK Lock System Off Set Password Block Channel TV Rating English TV Rating French Downloadable Rating Input Block Blocking off Permits all programs E C C8 G PG 14 18 Blocking Off E Exempt C Children C8 Children eight years and older G General programming suitable for all audiences PG Parental Guidance 14 Viewers 14 years and older 18 Adult programming ...

Страница 107: ...NTER Enter Move LOCK Lock System Off Set Password Block Channel TV Rating English TV Rating French Downloadable Rating Input Block Blocking off Permits all programs E G 8ans 13ans 16ans 18ans Blocking Off E Exempt G General 8ans General Not convenient for lit tle children 13ans Not convenient for children of 13 years and younger 16ans Not convenient for children of 16 years and younger 18ans This ...

Страница 108: ...ck Channel Movie Rating TV Rating Children TV Rating General Downloadable Rating Input Block Humor Sport Cruelty Language Sadness Genre Age Close E E Select D Do ow wn nl lo oa ad da ab bl le e R Ra at ti in ng g Select desired D Do ow wn nl lo oa ad da ab bl le e R Ra at ti in ng g option 4 3 ENTER Select desired option and block it 5 ENTER Select L LO OC CK K 1MENU ENTER Input the password 21 4 ...

Страница 109: ...TV Rating Children TV Rating General Downloadable Rating Input Block Select L LO OC CK K 1MENU ENTER Input the password 21 4 5 6 7 8 0 9 2 3 6RETURN Return to the previous menu MENU Return to TV viewing AV1 F F Off G G AV2 Off Component1 Off HDMI1 Off RGB PC Off Component2 Off HDMI2 Off HDMI3 Off HDMI4 Off Close Enter Move LOCK Lock System Off Set Password Block Channel Movie Rating TV Rating Chil...

Страница 110: ...r channel The problem may be with the broadcast Is the power cord inserted into wall power outlet Check your antenna direction and or location Test the wall power outlet plug another product s power cord into the outlet where the product s power cord was plugged in This is normal the image is muted during the product startup process Please contact your service center if the picture has not appeare...

Страница 111: ...t position Picture OK No sound Unusual sound from inside the product No sound when connecting HDMI USB No output from one of the speakers T Th he e a au ud di io o d do oe es s n no ot t w wo or rk k Press the VOL or VOLUME button Sound muted Press MUTE button Try another channel The problem may be with the broadcast Are the audio cables installed properly Adjust Balance in menu option A change in...

Страница 112: ... water and a little fabric softener or dish washing detergent Wring the cloth until it s almost dry and then use it to wipe the screen Make sure the excess water is off the screen and then let it air dry before you turn on your TV Cleaning the Cabinet To remove dirt or dust wipe the cabinet with a soft dry lint free cloth Please be sure not to use a wet cloth Extended Absence G G If you expect to ...

Страница 113: ...3 x 1 1 6 inches 1036 0 x 721 3 x 296 2 mm 40 7 x 25 8 x 3 5 inches 1036 0 x 655 4 x 89 8 mm 41 6 lbs 18 9 kg 37 6 lbs 17 1 kg Dimensions Width x Height x Depth Weight With stand Without stand With stand Without stand 45 4 x 31 1 x 13 2 inches 1 153 2 x 791 5 x 337 4 mm 45 4 x 28 3 x 3 9 inches 1 153 2 x 719 0 x 99 8 mm 48 9 lbs 22 2 kg 43 2 lbs 19 6 kg MODELS 47LH40 47LH40 UA 52 7 x 35 4 x 16 6 i...

Страница 114: ... 6 inches 1052 2 x 719 1 x 296 2mm 41 5 x 25 8 x 3 5 inches 1052 2 x 657 3 x 90 8mm 41 8 lbs 19 0 kg 37 9 lbs 17 2 kg Dimensions Width x Height x Depth Weight With stand Without stand With stand Without stand 46 1 x 31 0 x 13 2 inches 1 173 4 x 789 7 x 337 4 mm 46 1 x 28 4 x 3 9 inches 1 173 4 x 723 4 x 100 8 mm 51 5 lbs 23 4 kg 45 8 lbs 20 8 kg MODELS 47LH55 47LH55 UA 53 4 x 35 4 x 16 6 inches 13...

Страница 115: ... control Button AA INFO Remote control Button 30 AV MODE Remote control Button 72 RED Remote control Button 71 GREEN A Remote control Button 63 YELLOW G Remote control Button 61 BLUE l l l l Remote control Button 8F FF Remote control Button 8E GG Remote control Button D6 TV Discrete IR Code TV Input Selection C4 POWER ON Discrete IR Code Only Power On C5 POWER OFF Discrete IR Code Only Power Off 5...

Страница 116: ...GB DVI OPTICAL DIGITAL AUDIO OUT ANTENNA CABLE IN RGB IN PC AV IN 1 COMPONENT IN 2 3 1 MONO AUDIO VIDEO L R DVI IN RS 232C IN CONTROL SERVICE Type of Connector D Sub 9 Pin Male No Pin Name 1 No connection 2 RXD Receive data 3 TXD Transmit data 4 DTR DTE side ready 5 GND 6 DSR DCE side ready 7 RTS Ready to send 8 CTS Clear to send 9 No Connection 1 6 5 9 PC i e Communication Parameters Baud rate 96...

Страница 117: ...ons Not standard Select O OP PT TI IO ON N Select S Se et t I ID D Choose the desired TV ID number The adjustment range of Set ID is 1 99 1MENU 3 2 ENTER ENTER 4RETURN Return to the previous menu MENU Return to TV viewing Enter Move OPTION Enter Move OPTION Menu Language English Audio Language English Input Label SIMPLINK On Key Lock Off Simple Manual Caption Off Set ID 1 Menu Language English Aud...

Страница 118: ...the status during the standby mode O OK K A Ac ck kn no ow wl le ed dg ge em me en nt t The TV transmits ACK acknowledgement based on this for mat when receiving normal data At this time if the data is data read mode it indicates present status data If the data is data write mode it returns the data of the PC computer In this model TV will not send the status during the standby mode Data Format Co...

Страница 119: ...display On Screen Display OSD 0 05 5 V Vo ollu um me e M Mu ut te e C Co om mm ma an nd d k k e e To control volume mute on off You can also adjust mute using the MUTE button on remote control Transmission k e Set ID Data Cr Data 00 Volume mute on Volume off Data 01 Volume mute off Volume on Acknowledgement e Set ID OK NG Data x 0 06 6 V Vo ollu um me e C Co on nt tr ro oll C Co om mm ma an nd d k...

Страница 120: ...mission k t Set ID Data Cr Data Min 00 Max 64 transmit by Hexadecimal code Refer to Real data mapping Acknowledgement t Set ID OK NG Data x 1 17 7 C Co ollo or r T Te em mp pe er ra at tu ur re e C Co om mm ma an nd d k k u u To adjust color temperature You can also adjust color temperature in the PICTURE menu Transmission k u Set ID Data Cr Data 00 Medium 01 Cool 02 Warm Acknowledgement u Set ID ...

Страница 121: ... 22 Total ma 00 00 00 1E 00 03 22 Acknowledgement a Set ID OK Data00 Data01 Data02 Data03 Data04 x a Set ID NG Data00 x 2 21 1 C Ch ha an nn ne ell A Ad dd d D De ell C Co om mm ma an nd d m m b b To add and delete the channels Transmission m b Set ID Data Cr Data 00 Channel Delete Data 01 Channel Add Acknowledgement b Set ID OK NG Data x 2 22 2 K Ke ey y C Co om mm ma an nd d m m c c To send IR r...

Страница 122: ...ct on the original authors reputations Finally any free program is threatened constantly by software patents We wish to avoid the danger that redistributors of a free program will individually obtain patent licenses in effect making the program proprietary To prevent this we have made it clear that any patent must be licensed for everyone s free use or not licensed at all The precise terms and con...

Страница 123: ...ne readable copy of the corresponding source code to be distributed under the terms of sections 1 and 2 above on a medium customarily used for software interchange or c Accompany it with the information you received as to the offer to distribute corresponding source code This alter native is allowed only for noncommercial distribution and only if you received the program in object code or exe cuta...

Страница 124: ...the body of this license 9 The Free Software Foundation may publish revised and or new versions of the General Public License from time to time Such new versions will be similar in spirit to the present ver sion but may differ in detail to address new problems or con cerns Each version is given a distinguishing version number If the program specifies a version number of this license which applies ...

Страница 125: ...re Foundation Inc 51 Franklin Street Fifth Floor Boston MA 021 10 1301 USA Also add information on how to contact you by electronic and paper mail If the program is interactive make it output a short notice like this when it starts in an interactive mode Gnomovision version 69 Copyright C year name of author Gnomovision comes with ABSOLUTELY NO WARRANTY for details type show w This is free softwar...

Страница 126: ...y for the free library Also if the library is mod ified by someone else and passed on the recipients should know that what they have is not the original version so that the origi nal author s reputation will not be affected by problems that might be introduced by others Finally software patents pose a constant threat to the existence of any free program We wish to make sure that a company can not ...

Страница 127: ...copy an appropriate copyright notice and disclaimer of warranty keep intact all the notices that refer to this license and to the absence of any warranty and distribute a copy of this license along with the Library You may charge a fee for the physical act of transferring a copy and you may at your option offer warranty protection in exchange for a fee 2 You may modify your copy or copies of the L...

Страница 128: ... ten lines or less in length then the use of the object file is unrestricted regardless of whether it is legal ly a derivative work Executable containing this object code plus portions of the library will still fall under Section 6 Otherwise if the work is a derivative of the library you may distribute the object code for the work under the terms of Section 6 Any executable containing that work al...

Страница 129: ...ny further restrictions on the recipients exercise of the rights granted herein You are not responsible for enforcing compliance by third parties with this license 1 1 If as a consequence of a court judgment or allegation of patent infringement or for any other reason not limited to patent issues conditions are imposed on you whether by court order agreement or otherwise that contradict the con di...

Страница 130: ...F SUCH HOLDER OR OTHER PARTY HAS BEEN ADVISED OF THE POSSIBILITY OF SUCH DAMAGES END OF TERMS AND CONDITIONS How to apply these terms to your new libraries If you develop a new library and you want it to be of the great est possible use to the public we recommend making it free soft ware that everyone can redistribute and change You can do so by permitting redistribution under these terms or alter...

Страница 131: ... is not already covered code governed by this license 1 10 1 Patent claims means any patent claim s now owned or hereafter acquired including without limitation method process and apparatus claims in any patent licensable by grantor 1 1 1 Source code means the preferred form of the covered code for making modifications to it including all modules it contains plus any associated interface definitio...

Страница 132: ...e you distribute You may not offer or impose any terms on any source code version that alters or restricts the applicable version of this license or the recipients rights hereunder However you may include an additional document offering the additional rights described in section 3 5 3 2 Availability of source code Any modification which you create or to which you con tribute must be made available...

Страница 133: ...hat any terms which differ from this license are offered by you alone not by the Initial developer or any contributor You hereby agree to indemnify the initial developer and every contributor for any liability incurred by the initial developer or such contributor as a result of any such terms You offer 3 7 Larger works You may create a larger work by combining covered code with other code not gove...

Страница 134: ...of the 60 day notice period specified above b any software hardware or device other than such par ticipant s contributor Version directly or indirectly infringes any patent then any rights granted to You by such participant under sections 2 1 b and 2 2 b are revoked effective as of the date you first made used sold distributed or had made modifications made by that participant 8 3 If you assert a ...

Страница 135: ...nsed Multiple Licensed means that the initial developer permits you to utilize portions of the covered code under your choice of the NPL or the alternative licenses if any specified by the initial developer in the file described in exhibit A EXHIBIT A Mozilla Public License The contents of this file are subject to the Mozilla Public License Version 1 1 the license you may not use this file except ...

Страница 136: ......

Отзывы: