15
PREP
AR
A
TION
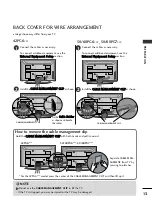
32/37/42/47LG6***
Connect the cables as necessary.
To connect additional equipment, see the E
Exxtteerrn
naall
E
Eq
qu
uiip
pm
meen
ntt S
Seettu
up
p section.
1
2
Align the hole with the tab on the C
CA
AB
BLLE
E
M
MA
AN
NA
AG
GE
EM
ME
EN
NT
T C
CLLIIP
P.
Turn the C
CA
AB
BLLE
E M
MA
AN
NA
AG
GE
EM
ME
EN
NT
T C
CLLIIP
P as
shown.
Note: This cable management can be broken
by excessive pressure.
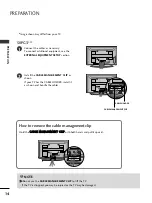
Connect the cables as necessary.
To connect additional equipment, see the
External Equipment Setup
section of the manual.
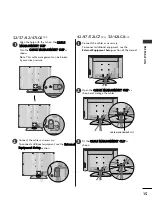
1
Open the C
CA
AB
BLLE
E M
MA
AN
NA
AG
GE
EM
ME
EN
NT
T C
CLLIIP
P as
shown and manage the cables.
2
CABLE MANAGEMENT CLIP
Fit the C
CA
AB
BLLE
E M
MA
AN
NA
AG
GE
EM
ME
EN
NT
T C
CLLIIP
P as
shown.
3
42/47/52LG7***, 32/42LG8***


