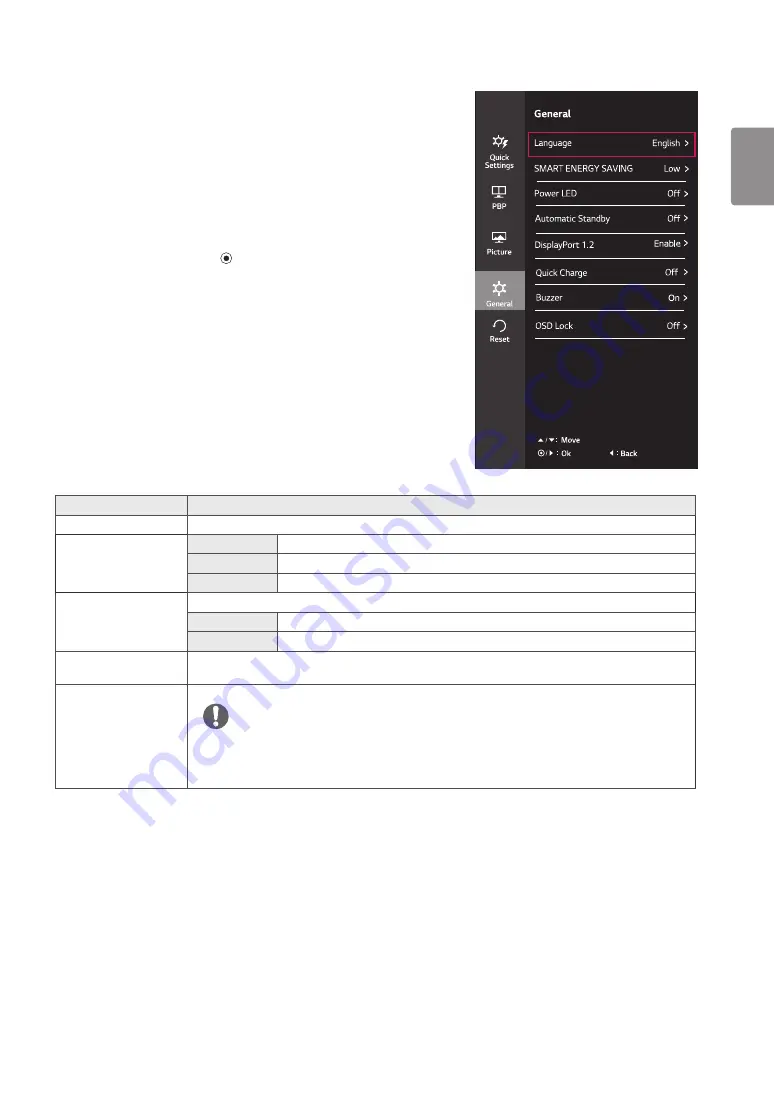
background image

25

ENGLISH

Menu > General

Description

Language

Sets the menu screen to the desired language.

SMART ENERGY 

SAVING

High

Saves energy using the high-efficiency SMART ENERGY SAVING feature.

Low

Saves energy using the low-efficiency SMART ENERGY SAVING feature.

Off

Disables the SMART ENERGY SAVING feature.

Power LED

Turns the power LED on the front of the monitor on or off.

On

The power LED turns on automatically.

Off

The power LED turns off.

Automatic Standby

Feature that automatically turns off the monitor when there is no movement on the screen for a period of time. 

You can set a timer for the auto-off function. (Off, 4 H, 6 H, and 8 H)

DisplayPort 1.2

Enables or disables DisplayPort 1.2.


y

Be sure to configure this option according to the DisplayPort version supported by your graphics card. 

Set this option to Disable if your graphics card does not support DisplayPort 1.2.

NOTE

-General

1  

To view the 

OSD menu

, press the 

joystick button

 at the bot-

tom of the monitor and then enter the 

Menu

.

2  

Go to 

General

 by moving the joystick.

3  

Configure the options following the instructions that appear in 
the bottom right corner.

4  

To return to the upper menu or set other menu items, move the 
joystick to 

 or pressing (  / OK) it.

5  

If you want to exit the OSD menu, move the joystick to 

 until 

you exit.

Each option is described below.

Содержание 27UD88

Страница 1: ...Please read the safety information carefully before using the product IPS LED Monitor LED Monitor Model List Owner s Manual IPS LED MONITOR LED MONITOR LG LED Monitors are LCD Monitors with LED Backlighting 27UD88 ...

Страница 2: ...k 14 Detaching the Stand Body 14 Installing the wall mount plate 15 Installing to a wall 16 USING THE MONITOR 16 Connecting to a PC 16 HDMI connection 16 DisplayPort connection 16 USB C connection 17 Connecting to AV Devices 17 HDMI connection 17 Connecting Peripherals 17 USB Cable connection PC 18 Connecting Headphones 18 Service only port 19 USER SETTINGS 19 Activating the Main Menu 20 Customizi...

Страница 3: ...ogo for dual mode source are all registered trademarks of the Video Electronics Standards Association The SuperSpeed USB Trident logo is a registered trademark of USB Implementers Forum Inc The following content is only applied to the monitor which is sold in Europe market and which needs to meet the ErP Directive This monitor is set to be turned off automatically in 4 hours after you turned on di...

Страница 4: ...omponents y y It is recommend that use the supplied components y y If you use generic cables not certified by LG the screen may not display or there may be image noises y y Note that the components may look different from those shown here y y Without prior notice all information and specifications in this manual are subject to change to improve the performance of the product y y To purchase option...

Страница 5: ...You can download and install the latest version from the LGE website www lg com Drivers and Software Installation Priority 27UD88 Monitor Driver Recommended O OnScreen Control Recommended O Dual Controller Optional O TRUE COLOR PRO Optional O ...

Страница 6: ...ng the joystick button or moving it left right with your finger Basic Functions Power on Press the joystick button once with your finger to turn on the monitor Power off Press and hold the joystick button once with your finger to turn off the monitor Volume Control You can control the volume by moving the joystick button left right y y The joystick button is located at the bottom of the monitor NO...

Страница 7: ...7 ENGLISH Input Connector ...

Страница 8: ...fore moving or lifting the monitor disconnect the power cord and all cables y y Hold the top and bottom of the monitor frame firmly Do not hold the panel itself y y When holding the monitor the screen should face away from you to prevent it being scratched y y When moving the monitor avoid any strong shock or vibrations to the product y y When moving the monitor keep it upright never turn the moni...

Страница 9: ...ling the Monitor Assembling the stand base y y To protect the screen from scratches cover the surface with a soft cloth CAUTION 1 3 4 2 Stand Body Stand Base y y Press the stand until the button reaches the top NOTE or ...

Страница 10: ...ty y y Do not carry the monitor upside down by just holding the base This may cause the monitor to fall off the stand and could result in personal injury y y When lifting or moving the monitor do not touch the monitor screen The force applied to the monitor screen may cause damage to it CAUTION Using the cable holder Cable Holder Arrange the cables using the cable holder as shown in the illustrati...

Страница 11: ... the power cord into the wall outlet 100 mm 100 mm 100 mm 100 mm y y Unplug the power cord prior to moving or installing the monitor There is risk of electric shock y y Make sure to use the power cord that is provided in the product package and connect it to a grounded power outlet y y If you need another power cord please contact your local dealer or the nearest retail store CAUTION 3 Press the j...

Страница 12: ...the screen can be adjusted forwards or backwards for a comfortable viewing experience Front Side Rear Side y y To avoid injury to the fingers when adjusting the screen do not hold the lower part of the monitor s frame as illustrated below WARNING y y Be careful not to touch or press the screen area when adjusting the angle of the monitor 110 0 mm y y Do not put your fingers or hand between the scr...

Страница 13: ...e make sure that when rotating the monitor using the pivot feature the stand does not make contact with the monitor y y Auto Pivot feature of the display is not supported y y The screen can be rotated easily using the screen pivot shortcut key provided with your Windows op erating system Note that some Windows versions and some graphics card drivers may use different settings for the screen pivot ...

Страница 14: ...y y For more information on installation refer to the wall mount plate s installation guide y y Be careful not to use excessive force when mounting the wall mount plate as this can damage the monitor s screen NOTE y y Use of the Kensington lock is optional The accessories can be purchased at your local electronics store NOTE Using the Kensington lock The Kensington security system connector is loc...

Страница 15: ...ad to injury Please use the genuine LG wall mounting bracket For more information contact your local retail store or a qualified installer y y Applying excessive force when fastening screws may cause damage to the monitor Damage caused in this way will not be covered by the product warranty y y Use the wall mounting bracket and screws that conform to the VESA standard Damage caused by the use or m...

Страница 16: ...you use generic cables not certified by LG the screen may not display or there may be image noises NOTE HDMI connection Transmits the digital video and audio signals from your PC and A V devices to the monitor Connect your PC and AV de vice to the monitor with the HDMI cable as illustrated below Press the menu button and then select the input option from the input menu USB C A cable Data Only USB ...

Страница 17: ...NOTE y y Make sure to install the most recent Windows OS service pack before using the product y y Peripheral devices are sold separately y y A keyboard mouse or USB device can be connected to the USB port y y When Quick Charge is set to On data transmission through the USB1 2 port is not available e g connecting your keyboard mouse or other USB storage devices to the monitor Go to General Quick C...

Страница 18: ...ly for Service y y Peripheral devices are sold separately y y If you use angled earphones it may cause a problem with connecting another external device to the monitor Therefore it is recommended to use straight earphones y y Depending on the audio settings of the PC and external device headphones and speaker functions may be limited NOTE Angled Straight SERVICE ONLY ...

Страница 19: ...put feature Main menu disabled Enables the main menu Main menu enabled Enters the game mode feature Main menu disabled Enables the main menu Main menu enabled Turns off the monitor Main Menu Features Main Menu Description Menu Configures the screen settings Game Mode You can change Picture Mode to a gaming mode Input Sets input mode Monitor off Turns off the monitor Exit Exits the main menu USER S...

Страница 20: ...e joystick to until you exit Menu Quick Settings Description Brightness Adjusts the color contrast and brightness of the screen Contrast Volume Adjusts the volume NOTE y y You can adjust Mute Unmute by moving the joystick button to in the Volume menu Input Selects the current input mode Ratio Adjusts the screen ratio Wide Displays the video in wide screen regardless of the video signal input Origi...

Страница 21: ... O O Sound Out Changes the audio output in PBP mode Swap Toggles between the main screen and sub screen in PBP mode Sub Full Converts the sub screen of PBP mode to the wide screen Ratio Adjusts the aspect ratio of the main screen or sub screen Main Wide Displays the video to fit the PBP screen regardless of the video signal input Original Displays the video in the aspect ratio of the video signal ...

Страница 22: ...or broadcasting DICOM Optimizes the screen for viewing X ray images You can brighten the screen in the OSD menu NOTE y y This product has been approved as an IT device and not as a medical device It is intended for office use only It may be used for education and reference purposes but not for medical diagnosis Calibration 1 Adjusts to the last calibrated screen Calibration 2 Adjusts to the previo...

Страница 23: ...offset level for HDMI only y y Offset as a reference for a video signal this is the darkest color the moni tor can display High Keeps the current contrast ratio of the screen Low Lowers the black levels and raises the white levels from the cur rent contrast ratio of the screen HDMI ULTRA HD Deep Color Provides sharper images when connected to a device supporting ULTRA HD Deep Color 4K 60 Hz Suppor...

Страница 24: ...ucing the Black Stabilizer value darkens the low gray level area and increases the dynamic contrast on the screen Color Adjust Gamma The higher the gamma value the darker the image becomes Likewise the lower the gamma value the lighter the image becomes If you do not need to adjust the gamma settings select Off Color Temp Manual Adjusts the color temperature in 500K increments Note that 9300K is s...

Страница 25: ... of time You can set a timer for the auto off function Off 4 H 6 H and 8 H DisplayPort 1 2 Enables or disables DisplayPort 1 2 y y Be sure to configure this option according to the DisplayPort version supported by your graphics card Set this option to Disable if your graphics card does not support DisplayPort 1 2 NOTE General 1 To view the OSD menu press the joystick button at the bot tom of the m...

Страница 26: ...le e g con necting your keyboard mouse or other USB storage devices to the monitor NOTE Buzzer This feature lets you set the sound generated from Buzzer when your monitor powers on On Enables your monitor s Buzzer Off Disables your monitor s Buzzer OSD Lock This feature disables the configuration and adjustment of menus On Enables OSD Lock Off Disables OSD Lock y y All features are disabled except...

Страница 27: ...ing the instructions that appear in the bottom right corner 4 To return to the upper menu or set other menu items move the joystick to or pressing OK it 5 If you want to exit the OSD menu move the joystick to until you exit Each option is described below Menu Reset Description Do you want to reset your settings Reset Returns to the default settings Cancel Cancel the select Quick Charge ...

Страница 28: ... screen retains an image Does image sticking occur even when the monitor is turned off y y Displaying a still image for a prolonged time may cause damage to the screen resulting in the retention of the image y y To extend the lifetime of the monitor use a screensaver Screen display is unstable and shaky Images displayed on the monitor leave shadow trails Did you select the appropriate resolution y...

Страница 29: ... resolution or frequency is within the range allowed by the monitor and set it to the recommended optimal resolution in Control Panel Display settings y y Not setting the graphics card to the recommended optimal resolution may result in blurred text a dimmed screen a truncated display area or misalignment of the display y y The setting methods may be different depending on the computer or operatin...

Страница 30: ...nmental Con ditions Operating Conditions Temperature 0 C to 40 C Humidity Less than 80 Storing Condition Temperature 20 C to 60 C Humidity Less than 85 Stand Angle Adjust ment Forwards Backwards 3 to 20 Head Dimension Monitor Size Width x Height x Depth With Stand 615 0 mm x 425 2 mm x 222 6 mm Without Stand 615 0 mm x 365 1 mm x 42 7 mm Weight Without Packaging With Stand 6 2 kg Without Stand 4 7...

Страница 31: ...60 1920 x 2160 133 29 60 Recommended resolution for PBP 3840 x 2160 67 5 30 3840 x 2160 135 60 When HDMI ULTRA HD Deep Color is set to ON DisplayPort USB C Display Modes Resolution Horizontal Frequency kHz Vertical Frequency Hz Polarity H V Remarks 640 x 480 31 469 59 94 800 x 600 37 879 60 317 1024 x 768 48 363 60 1152 x 864 54 347 60 05 1280 x 720 45 60 1280 x 1024 63 981 60 02 1600 x 900 60 60 ...

Страница 32: ... mode Preset Mode Horizontal Frequency kHz Vertical Frequency Hz Remarks 480p 31 5 60 720p 45 0 60 1080p 67 5 60 2160p 135 60 When HDMI ULTRA HD Deep Color is set to ON Power LED Mode LED Color On Mode White Sleep Mode Flashing White Off Mode Off ...

Страница 33: ...ource licenses that is contained in this product please visit http opensource lge com In addition to the source code all referred license terms warranty disclaimers and copyright notices are available for download LG Electronics will also provide open source code to you on CD ROM for a charge covering the cost of performing such distribution such as the cost of media shipping and handling upon ema...

Отзывы: