background image

7

ENG

ENGLISH

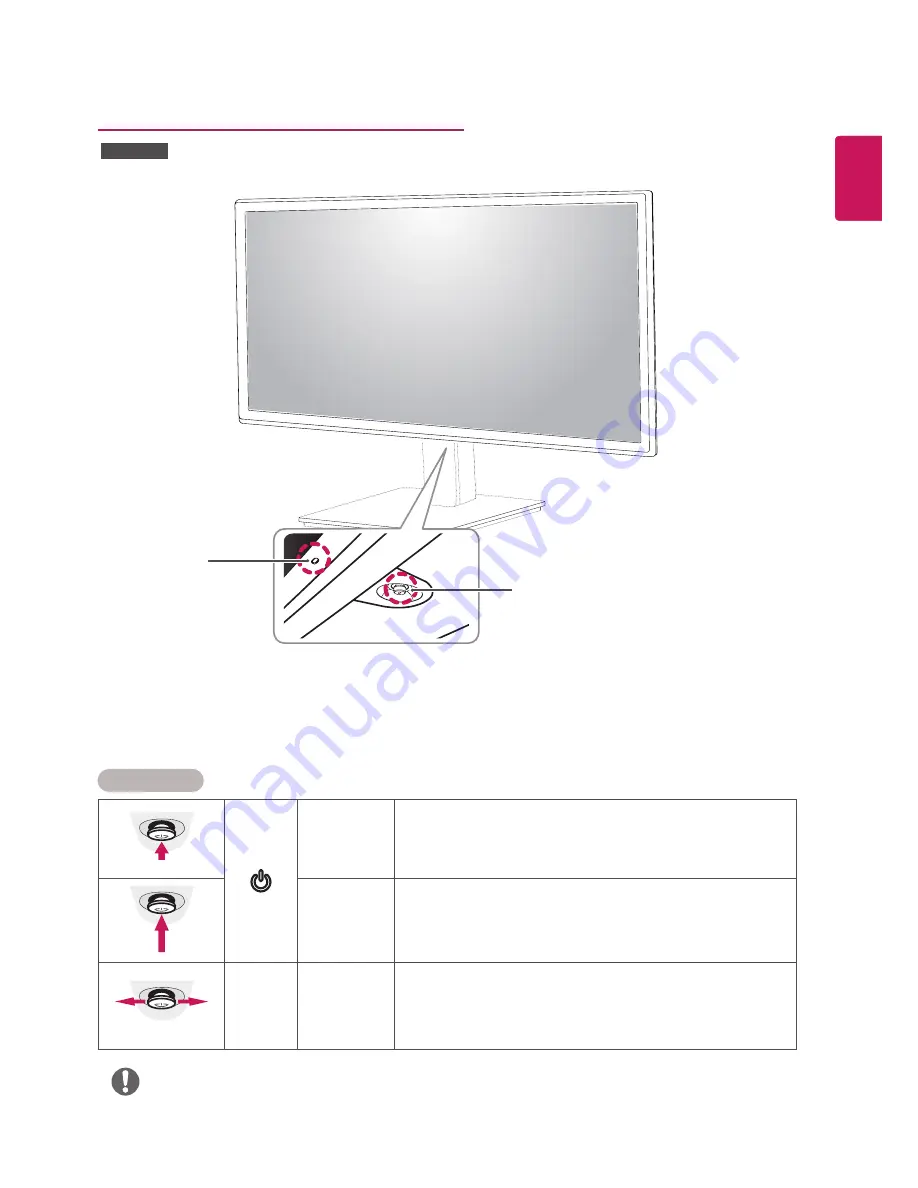
Component and Button Description

Power LED


y

 On: power is on


y

 Off: power is off

Joystick Button

How to Use the Joystick Button

You can easily control the functions of the monitor by pressing the joystick button or moving it left/right with your 
finger.

Basic Functions

Power on

Press the joystick button once with your finger to turn on the  

monitor.

Power off

Press and hold the joystick button once with your finger to turn off the 

monitor.

/

Volume

 Control

You can control the volume by moving the joystick button left/right.


y

The joystick button is located at the bottom of the monitor.

NOTE

27UD59P

Содержание 27UD59

Страница 1: ...ase read the safety information carefully before using the product IPS LED Monitor LED Monitor Model List Owner s Manual IPSLEDMONITOR LEDMONITOR LG LED Monitors are LCD Monitors with LED Backlighting 27UD59 27UD59P ...

Страница 2: ...Use the Joystick Button 8 Input Connector 10 Moving and Lifting the Monitor 11 Setting up the Monitor set 11 Assembling the stand base 13 Installing onto a table 14 Using the cable holder 14 Adjusting the Stand Height 15 Adjusting the angle 15 Swivel stand 16 Pivot Feature 18 Using the Kensington lock 18 Installing the wall mount plate 19 Installing to a wall 20 USING THE MONITOR 20 Connecting to ...

Страница 3: ... trademarks of HDMI Licensing LLC in the United States and other countries The following content is only applied to the monitor which is sold in Europe market and which needs to meet the ErP Directive This monitor is set to be turned off automatically in 4 hours after you turned on display if there is no adjustment to display To make this setting be disabled change the option to Off in OSD menu of...

Страница 4: ...e supplied components y y If you use generic cables not certified by LG the screen may not display or there may be image noises y y Note that the components may look different from those shown here y y Without prior notice all information and specifications in this manual are subject to change to improve the performance of the product y y To purchase optional accessories visit an electronics store...

Страница 5: ...y y Required and Recommended You can download and install the latest version from the enclosed CD or from the LGE website www lg com y y Optional You can download and install the latest version from the LGE website www lg com Drivers and Software Installation Priority 27UD59 27UD59P Monitor Driver Recommended O OnScreen Control Recommended O Dual Controller Optional O ...

Страница 6: ...g the joystick button or moving it left right with your finger Basic Functions Power on Press the joystick button once with your finger to turn on the monitor Power off Press and hold the joystick button once with your finger to turn off the monitor Volume Control You can control the volume by moving the joystick button left right y y The joystick button is located at the bottom of the monitor NOT...

Страница 7: ... the joystick button or moving it left right with your finger Basic Functions Power on Press the joystick button once with your finger to turn on the monitor Power off Press and hold the joystick button once with your finger to turn off the monitor Volume Control You can control the volume by moving the joystick button left right y y The joystick button is located at the bottom of the monitor NOTE...

Страница 8: ...8 ENG ENGLISH Input Connector 27UD59 ...

Страница 9: ...9 ENG ENGLISH Input Connector 27UD59P ...

Страница 10: ... Before moving or lifting the monitor disconnect the power cord and all cables y y Hold the top and bottom of the monitor frame firmly Do not hold the screen itself y y When holding the monitor the screen should face away from you to prevent it being scratched y y When moving the monitor avoid any strong shock or vibrations to the product y y When moving the monitor keep it upright never turn the ...

Страница 11: ...edures so they may look different from the actual product y y Do not carry the monitor upside down by just holding the stand base This may cause the moni tor to fall off the stand and could result in per sonal injury y y When lifting or moving the monitor do not touch the monitor screen The force applied to the moni tor screen may cause damage to it y y Do not apply foreign substances oils lubrica...

Страница 12: ...al procedures so they may look different from the actual product y y Do not carry the monitor upside down by just holding the stand base This may cause the moni tor to fall off the stand and could result in per sonal injury y y When lifting or moving the monitor do not touch the monitor screen The force applied to the moni tor screen may cause damage to it y y Do not apply foreign substances oils ...

Страница 13: ...to the wall outlet 100 mm 100 mm 100 mm 100 mm 100 mm 100 mm 100 mm 100 mm y y Unplug the power cord prior to moving or install ing the monitor There is risk of electric shock y y Make sure to use the power cord that is pro vided in the product package and connect it to a grounded power outlet y y If you need another power cord please contact your local dealer or the nearest retail store CAUTION 3...

Страница 14: ...ble holder Arrange the cables using the cable holder as shown in the illustration Cable holder 130 0 mm y y Do not put your fingers or hand between the screen and the base chassis when adjusting the screen s height WARNING 27UD59 27UD59P 27UD59P Rotate Set Pivot and put connectors It is easy to put connectors and manage cables using cable holder ...

Страница 15: ...st the angle of the screen The angle of the screen can be adjusted forwards or backwards for a comfortable viewing experience Front Side Front Side Rear Side Rear Side y y To avoid injury to the fingers when adjusting the screen do not hold the lower part of the moni tor s frame as illustrated below WARNING y y Be careful not to touch or press the screen area when adjusting the angle of the monito...

Страница 16: ...make sure that when rotating the monitor using the pivot feature the stand does not make contact with the monitor y y Auto Pivot feature of the display is not supported y y The screen can be rotated easily using the screen pivot shortcut key provided with your Windows op erating system Note that some Windows versions and some graphics card drivers may use different settings for the screen pivot ke...

Страница 17: ...he cable is connected y y To avoid injury when rotating the display do not place your fingers between the display and the stand base WARNING y y The left or right side of the monitor head can be slightly rotated up or down up to 3 Adjust the horizontal level of the monitor head ...

Страница 18: ...em connector is located at the back of the Monitor set For more information on installation and usage refer to the Kensington lock user manual or visit the website at http www kensington com Connect the Kensington security system cable between the Monitor set and a table y y The wall mount plate is sold separately y y For more information on installation refer to the wall mount plate s installatio...

Страница 19: ...ead to injury Please use the genu ine LG wall mounting bracket For more informa tion contact your local retail store or a qualified installer y y Applying excessive force when fastening screws may cause damage to the monitor Damage caused in this way will not be covered by the product warranty y y Use the wall mounting bracket and screws that conform to the VESA standard Damage caused by the use o...

Страница 20: ...ct your PC to the monitor us ing the Displayport cable as illustrated below Press the menu button and then select the input option from the input menu NOTE HDMI connection Transmits the digital video and audio signals from your PC and A V devices to the monitor Connect your PC and AV device to the monitor with the HDMI cable as illustrated below Press the menu button and then select the input opti...

Страница 21: ...MI cable the screen may not display or a connection error may occur y y Recommended HDMI cable types High Speed HDMI TM Cable High Speed HDMI TM Cable with Ethernet Connecting to External Devices sold separately Connecting Headphones Connect peripherals to the monitor via the headphones port Connect as illustrated y y Peripheral devices are sold separately y y If you use angled earphones it may ca...

Страница 22: ...input feature Main menu disabled Enables the main menu Main menu enabled Enters the game mode feature Main menu disabled Enables the main menu Main menu enabled Turns off the monitor Main Menu Features Main Menu Description Menu Configures the screen settings Game Mode You can change Picture Mode to a gaming mode Input Sets input mode Monitor off Turns off the monitor Exit Exits the main menu USER...

Страница 23: ... same for Wide Original options at the recommended resolution y y The ratio is disabled in the interlaced signal Menu Settings 1 To view the OSD menu press the joystick button at the bottom of the monitor and then enter the Menu 2 Configure the options by moving the joystick up down left right 3 To return to the upper menu or set other menu items move the joystick to or pressing Ok it 4 If you wan...

Страница 24: ...ystal clear images It is effective for high quality video or game Middle The optimized picture quality is displayed when a user wants images between low and high modes for comfortable viewing It is effective for UCC or SD video Low The optimized picture quality is displayed when a user wants smooth and natural images It is effective for slow moving pictures or still images Off Select this option f...

Страница 25: ...n dark scenes Increasing the Black Stabilizer value brightens the low gray level area on the screen You can easily distinguish objects on dark game screens Reducing the Black Stabilizer value darkens the low gray level area and increas es the dynamic contrast on the screen Color Adjust Gamma The higher the gamma value the darker the image becomes Likewise the lower the gamma value the lighter the ...

Страница 26: ...wer LED turns off Automatic Standby Feature that automatically turns off the monitor when there is no movement on the screen for a period of time You can set a timer for the auto off function Off 4 H 6 H and 8 H DisplayPort 1 2 Enables or disables DisplayPort 1 2 y y Be sure to configure this option according to the DisplayPort version supported by your graphics card Set this option to Disable if ...

Страница 27: ...g displayed Are some functions not avail able when you press the Menu button y y The OSD is locked Go to Menu General and set OSD Lock to Off The screen retains an image Does image sticking occur even when the monitor is turned off y y Displaying a still image for a prolonged time may cause damage to the screen resulting in the retention of the image y y To extend the lifetime of the monitor use a...

Страница 28: ... Plug Play function y y Check if the graphics card s resolution or frequency is within the range allowed by the monitor and set it to the recommended optimal resolution in Control Panel Display settings y y Not setting the graphics card to the recommended optimal resolution may result in blurred text a dimmed screen a truncated display area or misalignment of the display y y The setting methods ma...

Страница 29: ...tandard 37 W Typ Outgoing condition Sleep Mode 0 5 W Off Mode 0 3 W Environmental Conditions Operating Condition Temperature 0 C to 40 C Humidity 80 Storing Condition Temperature 20 C to 60 C Humidity 85 Dimension Monitor Size Width x Height x Depth With Stand 632 5 mm x 474 9 mm x 217 3 mm Without Stand 632 5 mm x 375 9 mm x 61 3 mm Weight Without Packaging 5 6 kg The specifications are subject t...

Страница 30: ...tandard 37 W Typ Outgoing condition Sleep Mode 0 5 W Off Mode 0 3 W Environmental Conditions Operating Condition Temperature 0 C to 40 C Humidity 80 Storing Condition Temperature 20 C to 60 C Humidity 85 Dimension Monitor Size Width x Height x Depth With Stand 632 5 mm x 406 9 mm x 249 7 mm Without Stand 632 5 mm x 375 9 mm x 42 8 mm Weight Without Packaging 7 2 kg The specifications are subject t...

Страница 31: ...1600 x 900 60 60 1920 x 1080 67 5 60 2560 x 1440 88 79 59 95 3840 x 2160 67 5 30 3840 x 2160 135 60 When HDMI ULTRA HD Deep Color is set to ON DisplayPort Display Modes Resolution Horizontal Frequency kHz Vertical Frequency Hz Polarity H V Remarks 640 x 480 31 469 59 94 800 x 600 37 879 60 317 1024 x 768 48 363 60 1152 x 864 54 347 60 05 1280 x 720 45 60 1280 x 1024 63 981 60 02 1600 x 900 60 60 1...

Страница 32: ...support mode Preset Mode Horizontal Frequency kHz Vertical Frequency Hz Remarks 480p 31 5 60 720p 45 0 60 1080p 67 5 60 2160p 135 60 When HDMI ULTRA HD Deep Color is set to ON Power LED Mode LED Color On Mode White Sleep Mode Off Off Mode Off ...

Страница 33: ...ntal Protection Agency EPA Refer to ENERGY STAR gov for more information on the ENERGY STAR program To obtain the source code under GPL LGPL MPL and other open source licenses that is contained in this product please visit http opensource lge com In addition to the source code all referred license terms warranty disclaimers and copyright notices are available for download LG Electronics will also ...

Отзывы: