background image

24

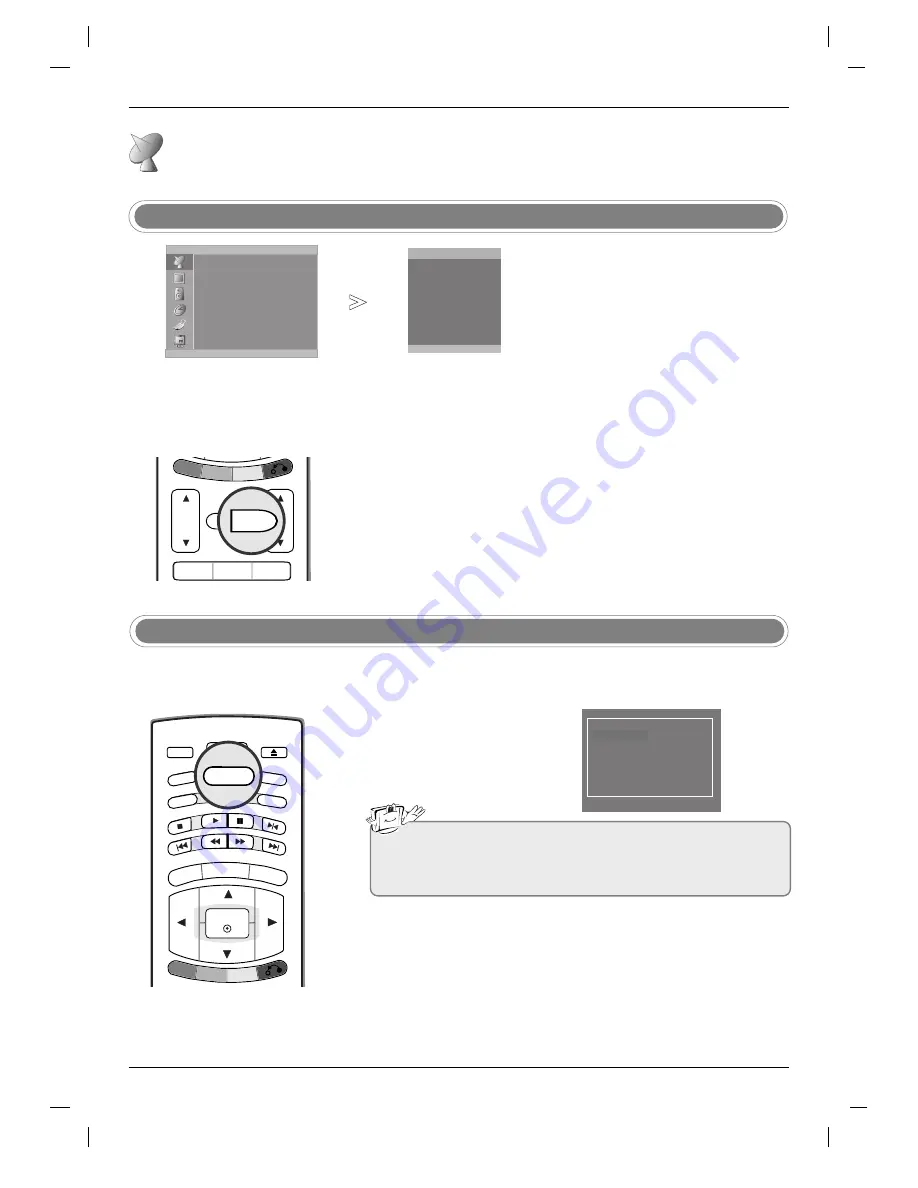
- This function lets you select your

favourite programmes directly.

- Repeatedly press the 

Q.VIEW

but-

ton to select stored favourite pro-
grammes.

Favourite programme

Auto programme

Manual programme

Programme edit

Favourite programme

Channel

DE F G

OK   MENU

On

-- -----

-- -----

-- -----

-- -----

-- -----

-- -----

-- -----

-- -----

DE F G

OK   MENU

Favourite programme

- You can check the programmes

stored in the memory by displaying
the programme table.

A

Displaying programme table

Press the 

LIST

button to display the 

Programme table 

menu.

The programme table appears on the screen. One programme table con-
tains ten programmes as below.

A

Selecting a programme in the programme table 

Select a programme with the 

D

E

F

G

button. Then press the 

OK

but-

ton. The set switches to the chosen programme number.

A

Paging through a programme table

There are 10 programme table pages in which contain 100 programmes. 
Pressing the 

D

E

F

G

G

button repeatedly turns the pages.

Press the 

EXIT 

button to return to normal TV viewing.

Calling the programme table

Note

a.

You may find some blue programmes. They have been set up to
be skipped by auto programming or in the programme edit mode.

b.

Some programmes with the channel number shown in the pro-
gramme table indicate there is no station name assigned.

0

C

03

5

S 69

1 BLN 03

6

S 17

2

C

12

7

S 22

3

S

66

8

C 09

4

S

67

9

C 11

Press the 

MENU 

button and then 

D

E

button to select the 

Channel

menu.

Press the 

G

G

button and then 

D

E

button to select 

Favourite programme

.

Press the 

G

G

button and then 

F

G

G

button to select 

On 

or 

Off

.

Press the 

D

E

button to select 

-- -----

.

Select a desired programme with the 

F

G

button.

To store another programme, repeat steps 

4

to 

5

.

You can store up to 8 programmes.

Press the 

EXIT 

button to return to normal TV viewing.

1
2
3

4

5
6

7

VOL

PR

1

2

3     

MUTE

Q.VIEW

DISC MENU

TITLE

DISPLAY RETURN

Q.VIEW

TV/AV

OPEN/CLOSE

POWER

PSM

STOP

SKIP

PLAY

SCAN SCAN

SSM

I/II

MENU

ARC

EXIT

TEXT

REPEA

T

SKIP

AUDIO

MULTIMEDIA

LIST

PAUSE/STEP

OK

DISC MENU

TITLE

DISPLAY RETURN

LIST

Setting up TV stations

Setting up TV stations

Содержание 26LZ5RV

Страница 1: ...operating your set Retain it for future reference Record model number and serial number of the set See the label attached on the back cover and quote this information to your dealer when you require service P NO 3828TUL266F 0603 REV02 Printed in Korea OWNER S MANUAL MODEL 26LZ5RV 27LZ5RV ...

Страница 2: ...ME DIA LI ST PAU SE ST EP OK UP DA TE TI ME A B MA RK ER RA ND OM SE AR CH AN GL E SU B_ T PR OG RA M RE VE AL MO DE M MI X i DIS C ME NU TI TL E DIS PL AY RET URN Remote Control Batteries Ensure that the following accessories are included with your TV If any accessory is missing please contact the dealer from where you purchased the product Accessories DVI D cable PC DVI to D Sub cable PC Audio c...

Страница 3: ...e OSD sreen 20 Auto programme tuning 21 Manual programme tuning 22 Assigning a station name 23 Programme edit 24 Favourite programme 24 Calling the programme table 25 PSM Picture Status Memory 25 Manual Picture adjustment 26 Picture format ARC 27 SSM Sound Status Memory 27 EQualizer Adjustments 28 AVL Auto Volume Leveler 28 Sound Balance 29 I II 30 Time 30 On Off Time 31 Auto off 31 Sleep timer 32...

Страница 4: ...d 49 Slow Motion 49 Moving to another CHAPTER TRACK 49 Repeat Playback 50 Disc Menu Title Menu 51 On Screen Display 52 A B Repeat Playback Random Playback Camera Angle 53 Subtitles Marker Search Zoom 54 Playing an Audio CD or MP3 WMA Disc 54 Pause Playback Still mode 54 Fast Forward Backward 54 Moving to another Track 55 Repeat Playback A B Repeat Playback Random Playback 3D Surround 56 Programmed...

Страница 5: ...o to previous chapter track or to the beginning Press and hold for two seconds for fast reverse search Forward SKIP G GG GI SCAN G GG G Button Go to the next chapter track Press and hold for two seconds for fast forward search STOP Button Stops playback PLAY Button Starts playback OPEN CLOSE Button Opens or closes the disc tray Disc Tray Insert a disc here Power Standby Indicator r r illuminates r...

Страница 6: ...l Sound Output RS 232C 2 480i 576i Remote Control Port RS 232C port Euro Scart Socket AV1 Euro Scart Socket AV2 AC Input DVI PC Input Antenna Input PC Sound Input S Video Input Component Input Y PB PR Audio Input Connection Options Connection Options Introduction Introduction ...

Страница 7: ...witches the set On from standby LIST Displays the programme table TELETEXT buttons These buttons are used for teletext For further details see the Teletext section Refer to p 36 PSM Picture Status Memory Recalls your preferred picture setting Refer to p 25 SSM Sound Status Memory Recalls your preferred sound setting Refer to p 27 I II AUDIO Selects the sound output Changes the AUDIO status during ...

Страница 8: ...e edit TV AV OPEN CLOSE VOL SLEEP CLEAR PR POWER 1 2 3 4 5 6 7 8 0 9 INDEX SIZE HOLD ZOOM PSM STOP SKIP PLAY SCAN SCAN SSM I II MENU ARC MUTE Q VIEW EXIT TEXT REPEAT SKIP AUDIO MULTIMEDIA LIST PAUSE STEP OK UPDATE TIME A B MARKER RANDOM SEARCH ANGLE SUB_T PROGRAM REVEAL MODE M MIX i DISC MENU TITLE DISPLAY RETURN VOL Volume D E Adjusts the volume MUTE Switches the sound On or Off Q VIEW Returns to...

Страница 9: ...EP CLEAR 1 2 3 4 5 6 7 8 0 9 INDEX SIZE HOLD ZOOM UPDATE TIME A B MARKER RANDOM SEARCH ANGLE SUB_T PROGRAM REVEAL MODE M MIX i Installing Batteries Open the battery compartment cover on the back side Insert two 1 5V AA size batteries in correct polarity with with Don t mix old or used batteries with new ones Close the cover Use a remote control 7 meter dis tance and 30 degree left right with in th...

Страница 10: ...Connection Basic Connection Installation Installation Pull the back cover backside while pushing the two tabs and then lift it up Connect the cables as necessary To connect an additional equipment see the External equipment Connections section 1 2 3 Align the holes on the TV back panel with the protuberances on the rear back cover and insert Cable Arranagement Pull the cables through the hole on t...

Страница 11: ... install a sig nal amplifier to the antenna as shown to the right If signal needs to be split for two TVs use an antenna sig nal splitter for connection Signal Amplifier UHF VHF Multi family Dwellings Apartments Connect to wall antenna socket Single family Dwellings Houses Connect to wall jack for outdoor antenna Outdoor Antenna Wall Antenna Socket VHF Antenna UHF Antenna RF Coaxial Wire 75 ohm Tu...

Страница 12: ...e PR D D E E or number buttons You can also record programmes received by the TV on video tape The signal type RGB the signals red green and blue can only be selected for the AV1 scart socket and the AV1 input source can be received These signals are transmitted for example by a pay TV decoder game machine or photo CD unit etc and that digital signal can be recorded via AV1 scart socket If the AV1...

Страница 13: ...al equipment operating guide External AV Source Setup When connecting with an S Video cable S VIDEO OUT IN R AUDIO L VIDEO ANT OUT ANT IN 480i 576i VCR TV side panel 1 1 2 2 3 4 Connect the S VIDEO output of the VCR to the S VIDEO input on the set The picture quality is improved compared to connecting a regular VCR to the Video input Connect the AUDIO jacks between TV and VCR Insert a video tape i...

Страница 14: ...Component Input ports To get better picture quality connect a DVD player to the component input ports as shown below Y PB PR Component ports on the TV Y Y Y Y Pb B Y Cb PB Pr R Y Cr PR Video output ports on DVD player When connecting with a scart cable R AUDIO L AUDIO VIDEO 2 DVD TV back panel 1 1 2 3 Connect the scart socket of the DVD to the AV1 scart socket on the set Please use shielded scart ...

Страница 15: ...DIGITAL SOUND OUT VIDEO DIGITAL AUDIO OPTICAL TV Back Panel Stand Second TV or Monitor input terminals OR 1 2 Connect the second TV or monitor to the TV s DVD OUT VIDEO and DVD OUT AUDIO jacks See the Operating Manual of the second TV or monitor for further details regarding that device s input settings 1 2 Connect the second TV or monitor to the TV s DVD OUT VIDEO and OPTICAL DIGITAL SOUND OUT ja...

Страница 16: ...the TV to the PC with the PC cable Connect the PC audio output to the TV s PC SOUND input Turn on the PC Use the TV AV button on the remote control to select PC NOTE Connect the signal cable DVI D cable Not DVI to D Sub cable from the DVI output sock et of the PC to the DVI input socket of the set when using a PC with DVI output In some video cards DVI Analog output may not be supported External E...

Страница 17: ...uality To change the computer video output format please refer to the operating manual for the computer you are using b If the message Out of range appears on the screen adjust the PC output to a format list ed in the Monitor Display Specifications table c The synchronization input form for Horizontal and Vertical frequencies is separate AC INPUT Connect the power cord correctly as shown Power Cor...

Страница 18: ...OOM SSM I II MUTE MULTIMEDIA OK UPDATE TIME A B MARKER RANDOM SEARCH ANGLE SUB_T PROGRAM REVEAL MODE M MIX i MENU EXIT 1 2 Turning On Off the TV Press the VOL D D E E button to adjust the volume If you want to switch the sound off press the MUTE button You can cancel this function by pressing the MUTE VOL D D E E I II or SSM but ton 1 2 Volume Adjustment Press the PR D D E E or NUMBER buttons to s...

Страница 19: ... the PC menu option is not displayed b In the teletext mode menus are not displayed Auto programme Manual programme Programme edit Favourite programme Channel Channel menu PSM Contrast Brightness Colour Sharpness Picture Picture menu SSM AVL Balance Sound Sound menu Language Input Child lock Set ID Setup Setup menu DE F G OK MENU DE F G OK MENU Time Off time On time Auto off Time Time menu DE F G ...

Страница 20: ...beginning programme number with the F F G G button or NUMBER buttons on the Storage from pull down menu Any number under 10 is entered with a numeric 0 in front of it i e 05 for 5 Press the OK button Press the D D E E button to select Search Press the G G button to begin auto programming All receivable stations are stored The station name is stored for stations which broadcast VPS Video Programme ...

Страница 21: ...rea Philippines Press the OK button Press the D D E E button to select Channel Press the G G button and then D D E E button to select VHF UHF or Cable on the Channel menu If possible press the channel number with the number buttons to com mence searching directly Any number under 10 is entered with a numer ic 0 in front of it i e 05 for 5 Press the OK button Press the D D E E button to select Sear...

Страница 22: ... and then use the D D E E button You can use a blank the number 0 to 9 and the alphabet A to Z With the F F button you can select in the opposite direction Select the position by pressing the F F G G button and then make your choice of the second character and so on Press the OK button to store it Press the EXIT button to return to normal TV viewing Assigning a station name 1 2 3 4 5 6 7 Manual pr...

Страница 23: ...e moved with the D D E E F F G G button 2 Press the YELLOW button 3 Move the programme to the desired programme number with the D D E E F F G G button 4 Press the YELLOW button again to release this function A A Skipping a programme number 1 Select a programme number to be skipped with the D D E E F F G G button 2 Press the BLUE button The skipped programme turns to blue 3 Press the BLUE button ag...

Страница 24: ... the EXIT button to return to normal TV viewing Calling the programme table Note a You may find some blue programmes They have been set up to be skipped by auto programming or in the programme edit mode b Some programmes with the channel number shown in the pro gramme table indicate there is no station name assigned 0 C 03 5 S 69 1 BLN 03 6 S 17 2 C 12 7 S 22 3 S 66 8 C 09 4 S 67 9 C 11 Press the ...

Страница 25: ...ld Game User PSM Contrast Brightness Colour Sharpness DE F G OK MENU You can adjust picture contrast brightness colour intensity sharpness to the levels you prefer Manual Picture adjustment Press the MENU button and then D D E E button to select the Picture menu Press the G G button and then D D E E button to select the desired picture item Press the F F G G button to make appropriate adjustments ...

Страница 26: ...d left right sides so that the screen 16 9 is full The bottom and top of the picture may be lost Spectacle When your TV receives the wide screen signal it will lead you to adjust the picture horizontally in a nonlinear proportion to fill the entire screen Original When your TV receives the wide screen signal it will be automatically changed to the picture format to be sent 4 3 This picture format ...

Страница 27: ...MENU SSM AVL Balance Sound DE F G OK MENU Equalizer Adjustments Press the MENU button and then D D E E button to select the Sound menu Press the G G button and then D D E E button to select SSM Press the G G button and then use the D D E E button to select User Press the G G button and then use the F F G G button to select the band you want to adjust Then use the D D E E button to adjust the band ...

Страница 28: ...rn to normal TV viewing 1 2 3 4 5 SSM AVL Balance Sound DE F G OK MENU Sound SSM AVL Balance On Off DE F G OK MENU Sound Balance Press the MENU button and then D D E E button to select the Sound menu Press the G G button and then D D E E button to select Balance Press the G G button and then use the F F G G button to adjust the sound balance Balance is adjustable from Left 50 to Right 50 Press the...

Страница 29: ... output can be selected according to the type of received broadcast as follows by pressing the I II button repeatedly 1 When NICAM mono is received you can select NICAM MONO or FM MONO 2 When NICAM stereo is received you can select NICAM STEREO or FM MONO If the stereo signal is weak switch to FM mono 3 When NICAM dual is received you can select NICAM DUAL I NICAM DUAL II or NICAM DUAL I II or MON...

Страница 30: ... D E E button to select On To cancel On Off time function press the D D E E button to select Off Press the G G button and then D D E E button to adjust the hour Press the G G button and then D D E E button to adjust the minute Only On time function Press the G G button and then D D E E button to adjust volume level and programe number Press the OK button to save Press the EXIT button to return to ...

Страница 31: ...e Off time On time Auto off DE F G OK MENU Sleep timer Press the SLEEP button repeatedly to select the number of minutes First the off option appears on the screen followed by the following sleep timer options 10 20 30 60 90 120 180 and 240 minutes The timer begins to count down from the number of minutes selected To check the remaining minutes before the TV turns off press the SLEEP button once T...

Страница 32: ...ton to select Input Press the G G button and then use the D D E E button to select TV AV1 AV2 S video DVD Component or PC Press the EXIT button to return to normal TV viewing 1 2 3 4 Setup TV DVD AV1 Component AV2 PC S video Language Input Child lock Set ID DE F G OK MENU Auto AV switching If your VCR outputs an AV switching voltage when connected to the Euro scart socket the set will switch to AV...

Страница 33: ...d then D D E E button to select the Setup menu Press the G G button and then D D E E button to select Child lock Press the G G button and then D D E E button to select On or Off on the Child lock menu Press the EXIT button to return to normal TV viewing 1 2 3 4 Setup On Off Language Input Child lock Set ID DE F G OK MENU Note a The display Child lock will not appear on the screen if any button on ...

Страница 34: ...on TV screen PC H Position V Position Clock Phase Auto Configure Reset To Set DE F G OK MENU H position V Position This function is to adjust picture to left right and up down as you prefer H Position V Position Press the MENU button and then use the D D E E button to select the PC menu Press the G G button and then use the D D E E button to select H Position or V Position Use the F F G G button t...

Страница 35: ...ress the EXIT button to return to normal TV viewing 1 2 3 4 5 PC H Position V Position Clock Phase Auto Configure Reset 85 DE F G OK MENU Returns to the default settings pro grammed at the factory default set tings cannot be changed Reset Press the MENU button and then use the D D E E button to select the PC menu Press the G G button and then use the D D E E button to select Reset Press the G G bu...

Страница 36: ...r following page A A Programming a colour button in LIST mode If the TV is in SIMPLE text TOP text or FASTEXT mode press the button to switch to LIST mode Four teletext page numbers of your choice can be colour coded and easily selected by pressing the corresponding coloured button on the remote control handset 1 Press a coloured button 2 Using the NUMBER buttons select the page you wish to progra...

Страница 37: ...the new teletext page The display will appear at the top left hand corner of the screen When the updated page is available then display will change to the page number Press this button to view the updated teletext page HOLD Stops the automatic page change which will occur if a teletext page consists of 2 or more sub pages The number of sub pages and the sub page displayed is usually shown on the s...

Страница 38: ...discs outside of their case may cause warping Structure of disc contents Normally DVD video discs are divided into titles and the titles are sub divided into chapters Video CDs and Audio CDs are divided into tracks DVD video disc Video CD Audio CD Each title chapter or track is assigned a number which is called title number chapter number or track number respectively There may be discs that do not...

Страница 39: ...sc Player employs a Laser System To ensure proper use of this product please read this owner s manual carefully and retain for future reference should the unit require maintenance contact an authorized service location see service procedure Use of controls adjustments or the performance of proce dures other than those specified herein may result in haz ardous radiation exposure To prevent direct e...

Страница 40: ...uage press number buttons then OK button to enter the corresponding 4 digit num ber according to the language code list in the REFERENCE chapter Refer to P 62 If you enter the wrong language code press CLEAR button Disc Audio Disc Subtitle Disc Menu Press the MENU button twice and then use the D D E E button to select Language Press the G G button and then use D D E E button to select Disc Audio D...

Страница 41: ...then use the D D E E button to select DISPLA Y Press the G G button to select Progressive Scan Press the G G button and then use D D E E button to select On or Off Press the OK button Press the EXIT button to exit the menu Progressive Scan On Off 1 2 3 4 5 DISPLAY Move G Select F F Prev D E Progressive Scan G G DVD Menu options DISPLA DVD Menu options DISPLAY Y ...

Страница 42: ...tstream PCM 1 2 3 4 5 AUDIO Move G Select F F Prev D E Dolby Digital G G DVD V DivX If your receiver or amplifier is NOT capable of handling 96 kHz signals select 48 kHz When this choice is made this unit automatically converts any 96 kHz signals to 48 kHz so your system can decode them If your receiver or amplifier is capable of handling 96 kHz signals select 96 kHz When this choice is made this ...

Страница 43: ...n use D D E E button to select On or Off Press the OK button Press the EXIT button to exit the menu Dolby Digital DTS MPEG Sample Freq DRC Vocal On Off 1 2 3 4 5 AUDIO Move G Select F F Prev D E DRC G G DVD V DivX Set to On only when a multi channel karaoke DVD is playing The karaoke channels on the disc mix into normal stereo sound Vocal setting works when the Dolby Digital mode is set to PCM in ...

Страница 44: ... and press OK button to verify If you make a mistake before pressing OK button press CLEAR button Select a rating from 1 to 8 using the D D E E button Rating 1 8 Rating 1 has the most restrictions and rating 8 is the least restrictive Unlock If you select unlock parental control is not active and the disc plays in full Press the OK button Press the EXIT button to exit the menu Rating Password Area...

Страница 45: ...3 4 LOCK Move G Select F F Prev D E Password G G Rating Password Area Code New LOCK Password Enter the code of the country area whose standards were used to rate the DVD video disc based on the list in the REFERENCE chapter Refer to P 62 Area Code Press the MENU button twice and then use the D D E E button to select LOCK Press the G G button and then use D D E E button to select Area Code Press th...

Страница 46: ...e is set to On this DVD player will search for title that has the longest playback time and then play back the title automatically AUTO PLAY Press the MENU button twice and then use the D D E E button to select OTHERS Press the G G button and then use D D E E button to select Auto Play Press the G G button and then use D D E E button to select On or Off Press the OK button Press the EXIT button to...

Страница 47: ...button to exit the menu PBC Auto Play DivX R VOD Select 1 2 3 4 OTHERS Move G Select F F Prev D E DivX R VOD G G Div X DivX R Video on demand Your registration code is XXXXXXXX To lern more visit www divx com vod Done Note a If you rent the DivX VOD file it has several options of viewing limits as show below Display the number which you can watch the file The rental has been expired Display the au...

Страница 48: ... 6 7 8 0 9 VOL PR MUTE Q VIEW DISC MENU TITLE DISPLAY RETURN MENU ARC EXIT TV AV PSM SSM I II TEXT AUDIO MULTIMEDIA LIST OPEN CLOSE POWER INDEX SIZE HOLD ZOOM OK UPDATE TIME A B MARKER RANDOM SEARCH ANGLE SUB_T PROGRAM REVEAL MODE M MIX i STOP SKIP PLAY SCAN SCAN REPEAT SKIP PAUSE STEP Pause Playback Still mode 1 2 Press II PAUSE STEP button during playback Press the G G PLAY button again to retur...

Страница 49: ...the beginning of the current chapter track Press IF FF F SKIP button twice briefly to step back to the previous chapter track To go directly to any chapter during DVD playback press DISPLAY button and press D D E E to select the chapter track icon Then input the chapter track num ber or use F F G G VCD DVD V DivX Repeat Playback 1 You can play a specific title chapter or track repeatedly Press the...

Страница 50: ...se the D D E E F F G G button or OK button to select the desired item DVD V Note a The unit may not be able to select the disc or title menu depend ing on a sort of DVD disc STOP SKIP PLAY SCAN SCAN REPEAT SKIP PAUSE STEP RETURN SLEEP CLEAR 1 2 3 4 5 6 7 8 0 9 VOL PR MUTE Q VIEW MENU ARC EXIT PSM SSM I II TEXT AUDIO MULTIMEDIA LIST TV AV OPEN CLOSE POWER INDEX SIZE HOLD ZOOM OK UPDATE TIME A B MAR...

Страница 51: ... CLOSE POWER INDEX SIZE HOLD ZOOM OK UPDATE TIME A B MARKER RANDOM SEARCH ANGLE SUB_T PROGRAM REVEAL MODE M MIX i DISC MENU TITLE DISPLAY On Screen Display 1 2 3 Press DISPLAY button during playback Use D D E E button to select an item Press F F G G button to change the setting You can also use the number buttons if appropriate e g inputting the title number For some functions press OK to execute ...

Страница 52: ...on DVD video discs that do not contain scenes recorded at different angles c The number of angles varies from disc to disc A B Repeat Playback 1 2 3 A B repeat playback allows you to repeat material between two selected points Press the A B button to select the start point during playback A is dis played on the TV screen and the starting point of your selected segment is set up Press the A B butto...

Страница 53: ... Scene 1 During disc playback press SEARCH button The MARKER SEARCH menu appears on the screen 2 Within 10 seconds press F F G G button to select a marker number that you want to recall or clear 3 Press OK button and playback starts from the marked scene Or Press CLEAR button and the marker number is erased from the list 4 You can play any marker by inputting its number on the MARKER SEARCH menu N...

Страница 54: ...e Playback Still mode 1 2 Press II PAUSE STEP button during playback To return to playback press G G PLAY OK or press II PAUSE STEP button again MP3 CD WMA Moving to another Track 1 2 3 Press IF FF F SKIP or G GG GI SKIP button briefly during playback to go to the next track or to return to the beginning of the current track Press IF FF F SKIP button twice briefly to go back to the previous track ...

Страница 55: ...Playback 1 2 A B Repeat Playback 1 2 3 A B repeat playback allows you to repeat material between two selected points Press the A B button to select the start point during playback A is displayed on the TV screen and the starting point of your selected segment is set up Press the A B button again to select the end point A B is displayed on the TV screen and the ending point is set up Playback start...

Страница 56: ...rogrammed playback select a track on the List and then press PLAY button A A Repeat Programmed Tracks 1 Press the G GIF F REPEAT button during playback 2 Each time you press the G GIF F REPEAT button the repeat mode changes as follows Track All Off A A Erasing a Track from Program list 1 Use D D E E G G button to select the track that you wish to erase from the Program list 2 Press CLEAR button Re...

Страница 57: ...to highlight the Slide Show then press OK button A A Slide Speed There are three slide speed options Fast Normal Slow 1 Use D D E E F F G G button to highlight the Speed Then use F F G G button to select the option you want to use then press OK button A A Still Picture 1 Press II PAUSE STEP button during slide show The player will now go into PAUSE mode 2 To return to the slide show press G G PLAY...

Страница 58: ...s please rename them as jpg file File names without jpg extension will not be able to be read by this DVD player Even though the files are shown as JPEG image files in Windows Explorer Insert a disc and close the tray The DVD VR menu appears on the TV screen Press D D E E button to select a track then press G G PLAY or OK button and playback starts What is CPRM CPRM is a copy protection system wit...

Страница 59: ...f the DivX subtitle is available by 56 characters If there is impossible code to express in the DivX file it may be displayed as _ mark on the display If the number of the screen frame is over 30 per 1 second this unit may not operate normally If the video and audio structure of recorded file is not interleaved either video or audio is outputted If the file is recorded with GMC the unit supports o...

Страница 60: ...eriencing problems tune to another station Station signal is weak reorient antenna to receive weaker station Check for sources of possible interference Lines or streaks in pictures Check antenna Change the direction of the antenna Check whether the product is turned on Try another channel The problem may be with the broadcast Is the power cord inserted into wall power outlet Check your antenna dir...

Страница 61: ... off and does not indicate a fault with the product No output from one of the speakers Adjust Balance in menu option Screen color is unstable or single color Check the signal cable Reinstall the PC video card The signal is out of range There is a problem in PC mode Only PC mode applied Adjust resolution horizontal frequency or vertical frequency Check it whether the signal cable is connected or lo...

Страница 62: ...alese Slovak Slovenian Somali Spanish Sudanese Swahili Swedish Tagalog Tajik Tamil Tatar Telugu Thai Tibetan Tigrinya Tonga Turkish Turkmen Twi Ukrainian Urdu Uzbek Vietnamese Volapük Welsh Wolof Xhosa Yiddish Yoruba Zulu 8373 8375 8376 8379 6983 8385 8387 8386 8476 8471 8465 8484 8469 8472 6679 8473 8479 8482 8475 8487 8575 8582 8590 8673 8679 6789 8779 8872 7473 8979 9085 Language Code Language ...

Страница 63: ...igh custom code Data code Data code TC Tf T1 C0 Carrier frequency FCAR 1 TC fOSC 12 Duty ratio T1 TC 1 3 Repeat frame C1 C2 C3 C4 C5 C6 C7 C0 C1 C2 C3 C4 C5 C6 C7 D0 D1 D2 D3 D4 D5 D6 D7 D0 D1 D2 D3 D4 D5 D6 D7 Repeat code 9 ms 4 5 ms 0 55 ms 9 ms 2 25 ms G Bit description G Frame interval Tf The waveform is transmitted as long as a key is depressed Bit 0 Tf Tf Tf 108ms 455KHz 0 56 ms 0 56 ms 1 12...

Страница 64: ...H E Remote Control Button 44H OK Remote Control Button 72H RED Remote Control Button 71H GREEN Remote Control Button 63H YELLOW Remote Control Button 61H BLUE Remote Control Button 02H VOL D Remote Control Button 03H VOL E Remote Control Button 00H PR D Remote Control Button 01H PR E Remote Control Button 09H MUTE Remote Control Button 1AH Q VIEW Remote Control Button 10H 19H Number Key 0 9 Remote...

Страница 65: ...up PC No Pin name 1 No connection 2 RXD Receive data 3 TXD Transmit data 4 DTR DTE side ready 5 GND 6 DSR DCE side ready 7 RTS Ready to send 8 CTS Clear to send 9 No Connection 1 5 6 9 2 3 5 4 6 7 8 RXD TXD GND DTR DSR RTS CTS TXD RXD GND DSR DTR CTS RTS PC 7 Wire Configurations Standard RS 232C cable D Sub 9 3 2 5 6 4 8 7 TV D Sub 9 2 3 5 4 6 7 8 RXD TXD GND DTR DSR RTS CTS TXD RXD GND DTR DSR RT...

Страница 66: ...t indicates present status data If the data is data write mode it returns the data of the PC computer Command2 Set ID OK Data x Error Acknowledgement The Monitor transmits ACK acknowledgement based on this format when receiving abnormal data from non viable functions or communication errors Command2 Set ID NG Data x 01 Power k a 0 1 02 Input Select k b 03 Aspect Ratio k c 0 6 04 Screen Mute k d 0 ...

Страница 67: ...mat using the ARC Aspect Ratio Control button on remote control or in the Screen menu Transmission Data 0 Normal screen 4 3 1 Wide screen 16 9 2 14 9 3 Zoom 4 Spectacle 6 Original k c Set ID Data Cr Acknowledgement c Set ID OK Data x 04 Screen Mute Command d G To select screen mute on off Transmission Data 0 Screen mute off Picture on 1 Screen mute on Picture off k d Set ID Data Cr 06 Volume Contr...

Страница 68: ...D OK Data0 x a Set ID NG Data0 x G To adjust the screen sharpness You can also adjust sharpness in the Picture menu Transmission 11 Sharpness Command k Data Min 0 Max 64 Refer to Real data mapping 1 See page 67 k k Set ID Data Cr Acknowledgement k Set ID OK Data x 12 OSD Select Command l G To select OSD On Screen Display mute on off Transmission k l Set ID Data Cr Acknowledgement Data 0 OSD mute o...

Страница 69: ...r hang from the product Please set it up carefully so the product doesn t fall over Notes When moving the product to another place undo the ropes first Use a product holder or a cabinet that is big and strong enough for the size and weight of the product To use the product safely make sure that the height of the bracket that is mounted on the wall is same as that of the product 2 The Product Back ...

Страница 70: ...240V 50 60Hz 1 5A 130W 26LZ5RV 27LZ5RV 776 0 mm x 235 0 mm x 549 6 mm 30 6 inches x 9 3 inches x 21 6 inches 26LZ5RV 17 0 kg 37 5 lbs 27LZ5RV 17 3 kg 38 1 lbs PAL SECAM B G D K PAL I II SECAM L L VHF E2 E12 UHF E21 E69 CATV S1 S20 HYPER S21 S47 75 Ω Power Requirement Power Consumption Dimensions Width x Depth x Height Weight Net Television System Programme Coverage External Antenna Impedance ...

Страница 71: ...71 ...

Страница 72: ......

Отзывы: