background image

31

ENG

ENGLISH

USER SETTINGS

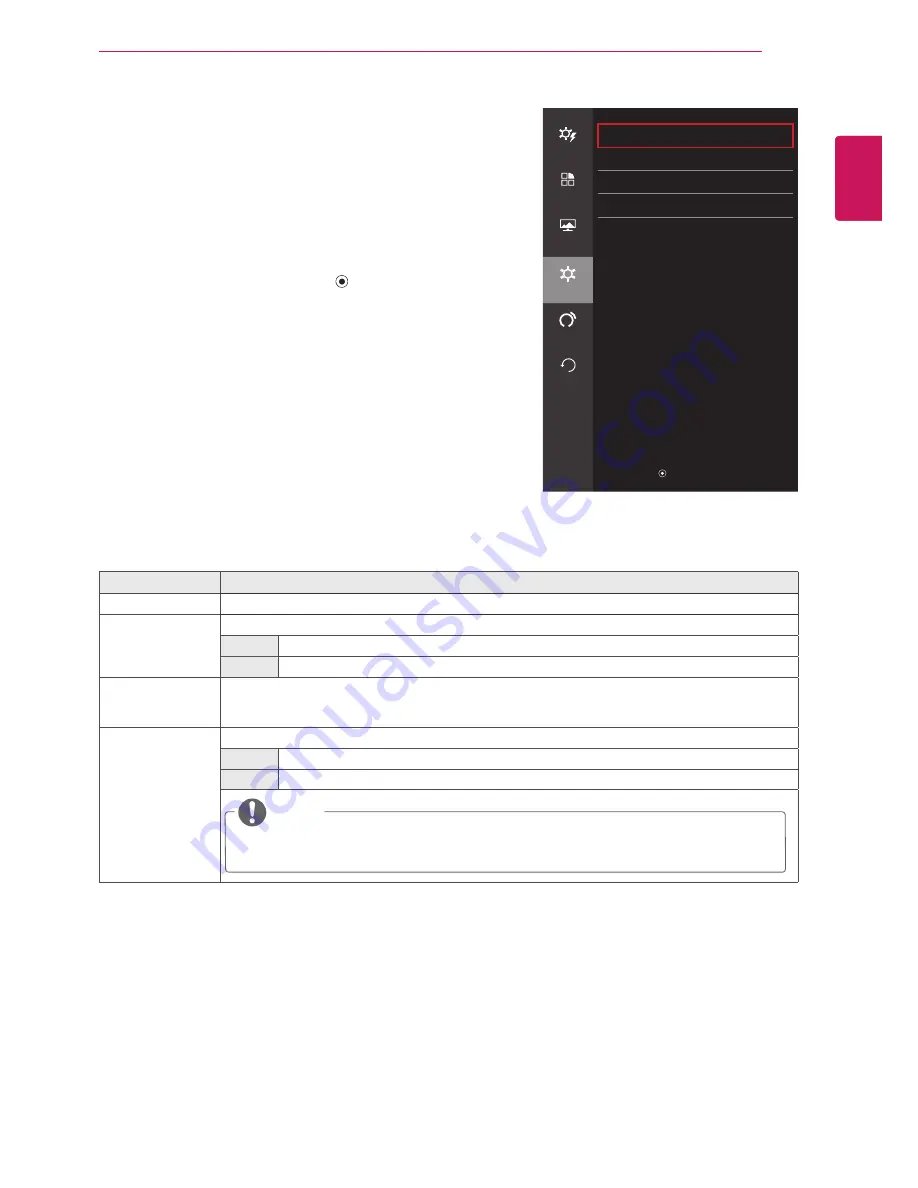
Settings

1  

To view the 

oSD menu

, press the 

Joystick button

 on the 

bottom of the monitor and then enter the 

Menu

.

2  

Go to 

Settings

 by moving the joystick.

3  

Configure the options following the instructions that appear in 
the bottom right corner.

4  

If you want to configure an upper menu, or another option, 

move the joystick ◄ or press it (

 / OK).

5  

If you want to exit the OSD menu, move the joystick ◄ until 

you exit.

Each option is described below.

Menu > Settings

Description

Language

Sets the menu screen to the desired language.

Power LED

Turns the Power LED on the front of the monitor on or off.

on

The power LED turns on automatically.

off

The power LED turns off.

automatic  

Standby

Turns the monitor off automatically when there is no movement on the screen for a set period of 

time.

You can set timer for the auto-off function. (Off, 4H, 6H, and 8H)

oSD Lock

Prevents incorrect key input.

on

Disables the key input feature.

off

Enables the key input feature.


NoTE


y

All of the features are disabled, except for Brightness, Contrast, Volume, Input, OSD 

Lock in Settings, and the Exit button.

Settings

Easy control

Language

English

>

Power LED

off

>

function

automatic Standby

off

>

oSD Lock

off

>

Screen

Settings

auto 

configuration

Reset

▲ / ▼ : Move

 / ► : OK

◄ : Back

Содержание 24GM77

Страница 1: ...www lg com OWNER S MANUAL LED MONITOR 24GM77 Please read the safety information carefully before using the product LED Monitor Model List ...

Страница 2: ...ount Plate 14 Installing on the Wall 16 USING THE MONITOR 16 Connecting to a PC 16 HDMI Connection 17 DisplayPort Connection 17 D SUB Connection 18 DVI Connection 18 Connecting AV Devices 18 HDMI Connection 19 Connecting Peripherals 19 USB Cable Connection PC 20 Headphone Port Connection 21 USER SETTINGS 21 Activating the Main Menu 21 Main Menu Features 22 User Settings 22 Menu Settings 23 Ratio 2...

Страница 3: ...lay Port Compliance Logo and Display Port Compliance Logo for dual mode source are all registered trademarks of the Video Electronics Standards Association The terms HDMI and HDMI High Definition Multimedia Interface and the HDMI logo are trademarks or registered trademarks of HDMI Licensing LLC in the United States and other countries ...

Страница 4: ...he power cord provided may differ depending upon the region NOTE Product Composition Please check whether all the components are included in the box before using the product If there are missing components contact the retail store where you purchased the product Note that the product and components may look different from those shown here y y Always use genuine components to ensure safety and prod...

Страница 5: ...can make necessary adjustments to the brightness level to compensate y y The joystick button is located at the bottom of the monitor NOTE AC IN USB 2 USB 1 BLACK ST GAME MODE DAS MODE DP IN D SUB IN DVI D IN HDMI IN 1 USB UP HDMI IN 2 5 V 0 9 A Joystick Button Input Connector Front Side Buttons Power LED y y On Power on y y Off Power off Brightness Sensor ...

Страница 6: ...ng the joystick button or moving it left right with your finger Basic Functions Power on Press the joystick button once with your finger to turn on the monitor Power off Press and hold the joystick button once with your finger to turn off the monitor Volume Control You can control the volume by moving the joystick button left right ...

Страница 7: ...nel itself y y When holding the monitor the screen should face away from you to prevent it from being scratched y y When transporting the monitor do not ex pose the monitor to jolts or excessive vibra tion y y When moving the monitor keep it upright and never turn the monitor on its side or tilt it side ways CAUTION y y Avoid touching the monitor screen as much as possible Do not apply pressure Th...

Страница 8: ...avoid scratching the head make sure that when rotating the Stand Body the stand body does not make contact with the head y y Applying excessive force when tightening screws may cause damage to the monitor Damage caused in this way will not be cov ered by the product warranty CAUTION CAUTION 3 Align the hole on the Stand Base with the Stand Body and push it all the way up Turn the screws on the Sta...

Страница 9: ...the monitor only hold the stand or the plastic cover This avoids putting unnecessary pressure on the screen CAUTION 2 BodyTurn the screws on the Stand Base to the left to detach the Stand Base from the Stand Body 2 Connect the Power Cord to a wall outlet 3 Press the Power button on the bottom of the monitor to turn it on y y To avoid the risk of electric shock disconnect the Power Cord before movi...

Страница 10: ...be adjusted up to 100 0 mm y y Once the pin is removed it is not necessary to re insert it to adjust the height y y Problems with the height or angle adjustment of the product caused by the attachment of protective glass in Internet cafes specializing in gaming will not be covered by the warranty CAUTION Head Locking pin 100 0 mm y y To avoid injury do not put your fingers or hand between the head...

Страница 11: ...the stand body as illustrated 2 Gather and bind the cables with the supplied cable holder 5 20 Front Side Rear Side y y To avoid injury do not put your fingers or hand between the head and the base when adjusting the screen s angle or height y y Be careful not to touch or press the screen area when adjusting the angle of the moni tor WARNING 5 20 5 20 y y Problems with the height or angle adjustme...

Страница 12: ...he direction of the arrow as shown in the figure 4 Complete the installation by rotating the monitor 90 as shown below y y Auto Pivot feature of the display is not supported y y The screen can be rotated easily using the screen pivot shortcut key provided with your Windows operating system Note that some Windows versions may use different settings for the screen pivot key or may not support the pi...

Страница 13: ... Monitor and a table y y The Kensington security system is optional You can obtain additional accessories from most electronics stores NOTE y y Take care when rotating the monitor if the cable is connected y y To avoid injury when rotating the display do not place your fingers between the display and the stand base WARNING Detaching the Stand Body 1 Place the monitor s screen face down To protect ...

Страница 14: ...ail store Alternatively please refer to the manual for how to install and set up a tilting wall mounting bracket Wall mount plate y y The wall mount plate is sold separately y y For more information on installation refer to the wall mount plate s installation guide y y Be careful not to apply too much force while mounting the wall mount plate as it may cause damage to the screen NOTE 10 cm 10 cm 1...

Страница 15: ...r on the ceiling or on a slanted wall may result in the monitor falling off which could lead to injury Use an autho rized LG wall mount and contact the local dealer or qualified personnel y y Applying excessive force when tightening screws may cause damage to the monitor Damage caused in this way will not be cov ered by the product warranty y y Use the wall mounting bracket and screws that conform...

Страница 16: ...he screen for a prolonged period of time This may cause image retention Use a screensaver if pos sible CAUTION y y Connecting your PC to the monitor using the HDMI cable may cause device compatibility issues y y Using a DVI to HDMI DP DisplayPort to HDMI cable may cause compatibility issues CAUTION y y When connecting the power cord to the out let use a grounded 3 hole multi socket or a grounded p...

Страница 17: ... y y When using a Mini DP to DP Mini DisplayPort to DisplayPort cable a cable with DisplayPort 1 1a specifications or above is recommended NOTE D SUB Connection Transmits the analog video signal from your PC to the monitor Connect the monitor to the PC using the provided 15 pin D Sub signal cable as illustrated below D SUB OUT PC AUDIO OUT DP OUT DP IN D SUB IN DVI D IN HDMI IN 1 HD DP IN D SUB IN...

Страница 18: ...s NOTE DVI Connection Transmits digital video signals to the monitor Connect the monitor using the DVI cable as illustrated below y y Connect the input signal cable and turn in the direction of the arrow To prevent disconnection secure the cable firmly do not over tighten CAUTION y y Using a DVI to HDMI cable may cause compatibility issues y y If you connect a DVI signal cable use the DVI D dual c...

Страница 19: ...B devices may not be supported or may not work properly y y It is recommended to use a USB hub or hard disk drive with an external power supply If the power supply is not adequate the USB device may not be recognized properly CAUTION To use USB 3 0 connect the A B type USB 3 0 cable of the product to the PC Peripheral devices connected to the USB 1 2 port can be controlled from the PC D SUB OUT PC...

Страница 20: ...ipheral devices are sold separately y y It is difficult to connect an angle plug earphone or a peripheral device so please use a straight type plug Angle Type Straight Type y y Depending on the audio settings of the PC and external device headphone and speaker functions may be limited Sold Separately USB UP I IN 2 USB UP I IN 2 USB UP I IN 2 USB 2 USB 1 5 V 0 9 A ...

Страница 21: ...od at any time including when the OSD On Screen Display is on Main menu disabled Adjusts the monitor volume level Main menu enabled Enters the menu features Main menu disabled Adjusts the monitor volume level Main menu enabled Enters the input feature Main menu disabled Enables the main menu Main menu enabled Enters the picture mode feature Main menu disabled Enables the main menu Main menu enable...

Страница 22: ...htness adjustment on off by moving the joystick but ton in the Brightness menu Contrast Adjusts the screen contrast Volume Adjusts the volume level NOTE y y You can turn mute on off by moving the joystick button in the Volume menu Input Selects the input mode Ratio Adjusts the aspect ratio of the screen Function Adjusts Picture Mode Game Mode DAS Mode Motion 240 and SUPER ENERGY SAVING Screen Pict...

Страница 23: ...Easy control Ratio Description Wide Displays the video in wide screen regardless of the video signal input Original Displays the video according to the aspect ratio of the video signal input 1 1 The aspect ratio is not adjusted from the original NOTE y y This function is not available when the DAS mode is turned on To use the 1 1 mode you should turn the DAS mode off Easy control Easy control Brig...

Страница 24: ...an brighten the screen in the OSD menu Photo Optimizes the screen for photos Cinema Optimizes the screen for video Custom You can customize Screen functions Game Mode Gamer 1 2 3 Brightness Contrast Sharpness Gamma Color Temp Black Stabilizer Response Time DAS Mode and Motion 240 functions can be customized as Gamer 1 2 or 3 FPS 1 Game Mode functions are optimized for FPS games FPS 2 The Black Sta...

Страница 25: ...0 1080 120 Hz for DisplayPort DP or DVI inputs before enabling Motion 240 This function is available for 100 Hz and 120 Hz only Off Turns Motion 240 Mode off NOTE y y To reduce motion blur brightness is reduced with backlight control y y Motion 240 and DAS Mode cannot be used simultaneously When Motion 240 is enabled DAS Mode is disabled automatically SUPER ENERGY SAVING High Saves energy using th...

Страница 26: ...ess Contrast Sharpness Gamma Color Temp Black Stabilizer Re sponse Time DAS Mode and Motion 240 functions can be customized as Gamer 1 2 or 3 FPS 1 Game Mode functions are optimized for FPS games FPS 2 The Black Stabilizer value is greater than that of FPS 1 It is suitable for very dark FPS games RTS Game Mode functions are optimized for RTS games DAS MODE You can enter the OSD menu by pressing th...

Страница 27: ...harpness of low resolution pictures it is not recommended to use the function for normal text or for desktop icons Doing so may result in unnecessarily high sharpness Sharpness Adjusts the sharpness of the screen Black Level Sets the offset level for HDMI only y y Offset as a reference for the video signal this is the darkest color the monitor can display High The screen picture gets brighter Low ...

Страница 28: ...y switch between the BLACK ST options Menu Description BLACK ST You can enter the OSD menu by pressing the BLACK ST button on the front of the monitor You can change the Black Stabilizer settings by using the left and right buttons Press the BLACK ST button again to save your settings and exit the OSD menu Increasing the Black Stabilizer value brightens the low gray level area on the screen You ca...

Страница 29: ...lor Temp Warm Sets the screen color to a reddish tone Medium Sets the screen color between the reddish and bluish tone Cool Sets the screen color to a bluish tone Custom Selects the factory default picture color Red You can customize the picture color using Red Green and Blue colors Green Blue Six Color Meets the user s requirements for color by adjusting the hue and saturation of the six colors r...

Страница 30: ...ed to adjust the vertical position of the screen Clock To obtain the correct width of the input signal by adjusting the frequency Used to minimize the vertical bars that appear because of an incorrect width Phase Used to optimize screen performance by adjusting the phase Screen Easy control Picture Color Function Display Screen Settings Auto Configuration Reset Move OK Back NOTE y y This function ...

Страница 31: ... the desired language Power LED Turns the Power LED on the front of the monitor on or off On The power LED turns on automatically Off The power LED turns off Automatic Standby Turns the monitor off automatically when there is no movement on the screen for a set period of time You can set timer for the auto off function Off 4H 6H and 8H OSD Lock Prevents incorrect key input On Disables the key inpu...

Страница 32: ...pper menu or another option move the joystick or press it OK 5 If you want to exit the OSD menu move the joystick until you exit Each option is described below Menu Auto Configuration Description Do you want to Auto Configuration Yes Adjusts the Position Width and Phase of the screen automatically Activated only when using a D Sub Analog input Cancel Cancels the Auto Configuration Auto Configurati...

Страница 33: ...right corner 4 If you want to configure an upper menu or another option move the joystick or press it OK 5 If you want to exit the OSD menu move the joystick until you exit Each option is described below Menu Reset Description Do you want to reset your settings Reset Restores the default settings Cancel Cancels the Reset Reset Easy control Do you want to reset your settings Reset Function Cancel S...

Страница 34: ...nnect The OSD Lock message is being displayed Are some functions not available when you press the Menu button y y The OSD is locked Go to Menu Settings and set OSD Lock to Off The screen retains an image Does image sticking occur even when the monitor is turned off y y Displaying a still image for a prolonged time may cause damage to the screen resulting in the retention of the image y y To extend...

Страница 35: ...ut without sound y y Make sure that the headphone port connections are made properly y y Try increasing the volume with the joystick y y Set the audio output of the PC to the monitor you are using On Microsoft Windows go to Control Panel Hardware and Sound Sound set the monitor as default device y y Check if the video card s resolution or frequency is within the range allowed by the monitor and se...

Страница 36: ...D DisplayPort 56 Hz to 144 Hz Synchronization Separate Sync Input Connector USB 1 2 USB UP DP DisplayPort IN D SUB IN DVI D IN HDMI IN 1 2 HP OUT Power Voltage AC 100 240 V 50 60 Hz 0 8 A Power consumption Typ On Mode 23 W Power Saving Mode 1 2 W Off Mode 0 3 W Stand Angle Forward Backward 5 to 20 Head Environmental Conditions Operating Condition Temperature 10 C to 35 C Humidity 10 to 80 Storing ...

Страница 37: ...024 x 768 48 363 60 1024 x 768 60 123 75 029 1024 x 768 97 551 119 989 1280 x 1024 63 981 60 02 1280 x 1024 79 976 75 025 1280 x 1024 130 035 119 958 1920 x 1080 67 5 60 1920 x 1080 137 26 119 98 1920 x 1080 158 11 144 1280 x 1024 120 Hz HDMI not supported 1920 x 1080 120 Hz 144 Hz HDMI D Sub not supported HDMI Timing Video Preset Mode PC Horizontal Frequency kHz Vertical Frequency Hz Remarks 480P...

Страница 38: ...educe any fatigue caused by long time usage y y The stand of the touch monitor allows the product to be used in the optimum position Adjust the stand angle from 5 to 20 to obtain the best view of the screen You should be looking slightly down at the screen Place your hands gently on the keyboard keeping your arms bent at the elbows and extended horizontally in front of you Adjust the angle 5 to 20...

Страница 39: ......

Страница 40: ...ote that the label attached to the product provides information for technical support Model Serial No As an ENERGY STAR Partner LGE U S A Inc has determined that this product meets the ENERGY STAR guidelines for energy efficiency ENERGY STAR is a set of power saving guidelines issued by the U S Environmental Protection Agency EPA Refer to ENERGY STAR gov for more infor mation on the ENERGY STAR pr...

Отзывы: