background image

17

REMOTE CONTROL

ENG

ENGLISH

REMoTE coNTRoL


 caUTIoN


y

Do not mix old and new batteries, as this may damage the remote control.


y

In Analogue TV and some countries, some remote control buttons may not work.

Make sure to point the remote control toward the remote control sensor on the TV.

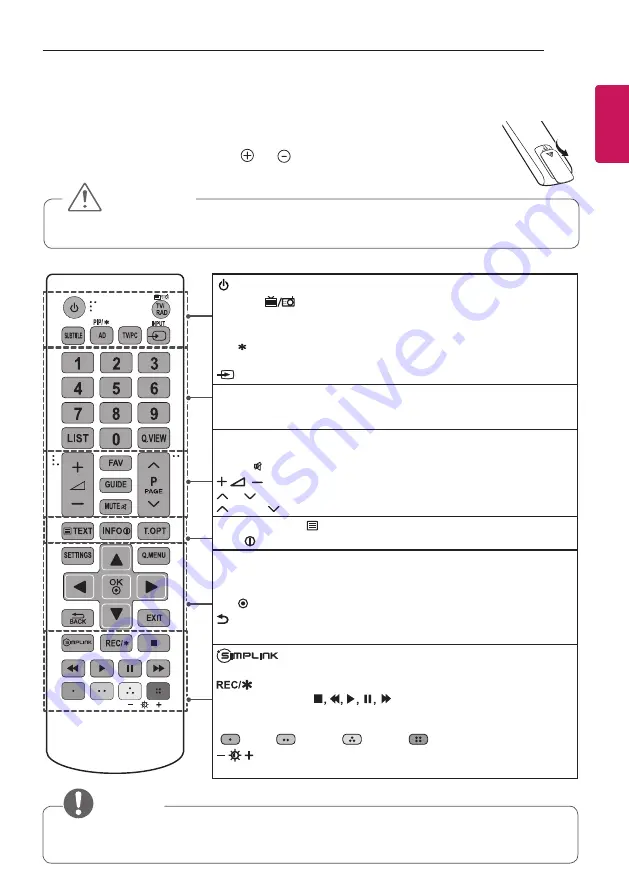
 (PoWER)

 Turns the TV on or off.

TV/RaD 


Selects Radio, TV and DTV programme.

SUbTITLE

 Recalls your preferred subtitle in digital mode.

aD 

By pressing the AD button, audio descriptions function will be enabled.

PIP/

 Turns the PIP mode on or off. (Depending on model)

TV/Pc

 Selects TV or PC mode.

 INPUT 

Changes the input source.

Number buttons 

Enters numbers. 

LIST

 Accesses the saved  programme list.

Q.VIEW

 Returns to the previously viewed programme.

faV

 Accesses your favourite programme list.

GUIDE 

Shows programme guide.

MUTE   

Mutes all sounds.

      Adjusts the volume level.

 P     

Scrolls through the saved programmes

 PaGE   

Moves to the  previous or next screen.

Teletext buttons(   TEXT / T.oPT) 

These buttons are used for teletext.

INFO


Views the information of the current programme and screen.

SETTINGS

 Accesses the main menus.

Q. MENU

 Accesses the quick menus.

Navigation buttons 

(up/down/left/right) Scrolls through menus or options.

oK 

 Selects menus or options and confirms your input.

 bacK

 Returns to the previous level.

EXIT

 Clears all on-screen displays and returns to TV viewing.


Accesses the AV devices connected with the HDMI 

cable through HDMI-CEC. Opens the SIMPLINK menu.


Starts to record and displays record menu. (Depending on model)

control buttons 

(

) Controls the MY MEDIA menus, 

or the SIMPLINK compatible devices (USB,SIMPLINK).

colour buttons 

These access special functions in some menus. 

(

: Red, 

: Green, 

: Yellow, 

: Blue)

 (backlight) 

Adjusts the brightness of the screen by controlling 

the screen backlight.


 NoTE


y

On MHEG programme, you cannot adjust the backlight with the yellow or blue key.


y

AD(Audio Description Service) may not be available on all models and is also dependant on 

broadcast service in your country.

The descriptions in this manual are based on the buttons on the remote control. Please read 

this manual carefully and use the TV correctly. To replace batteries, open the battery cover, re-

place batteries (1.5 V AAA) matching the    and   ends to the label inside the compartment, 

and close the battery cover. To remove the batteries, perform the installation actions in reverse.


Содержание 22MT55D-PT

Страница 1: ...ww lg com www lg com Please read this manual carefully before operating your set and retain it for future reference MT55 OWNER S MANUAL LED TV Disclaimer LG LED TV applies LCD screen with LED backlights ...

Страница 2: ...NTROL 18 SETTINGS 23 TO SEE WEB MANUAL 24 MAINTENANCE 24 Cleaning your TV 24 Screen frame cabinet and stand 24 Power cord 24 Preventing Image burn or Burn in on your TV screen 25 TROUBLESHOOTING 26 SPECIFICATIONS WARNING y y If you ignore the warning message you may be seriously injured or there is a possibility of accident or death CAUTION y y If you ignore the caution message you may be slightly...

Страница 3: ...d VOD movies To obtain your registration code locate the DivX VOD section in your device setup menu Go to vod divx com for more information on how to complete your registration DivX Certified to play DivX video up to HD 1080p including premium content DivX DivX Certified and associated logos are trademarks of Rovi Corpo ration or its subsidiaries and are used under license Covered by one or more o...

Страница 4: ...x for the following items If there are any missing accessories contact the local dealer where you purchased your product The illustrations in this manual may differ from the actual product and item CAUTION y y Do not use any unapproved items to ensure the safety and product life span y y Any damage or injuries caused by using unapproved items are not covered by the manufacturer s warranty y y Some...

Страница 5: ...5 ASSEMBLING AND PREPARING ENG ENGLISH Remote control batteries AAA See p 17 CD Owner s Manual Cards Stand Base See p 7 Power Cord See p 9 AC DC Adaptor See p 9 RGB Cable See p 15 Stand Body See p 7 ...

Страница 6: ... the buttons are touch sensitive and can be operated through simple touch with your finger y y You can set the power indicator light to on or off by selecting OPTION in the main menus Touch button Description Scrolls through the saved programmes Adjusts the volume level OK Selects the highlighted menu option or confirms an input SETTINGS Accesses the main menus or saves your input and exits the me...

Страница 7: ...isconnect the power cord and all cables y y When holding the TV the screen should face away from you to avoid damage y y Hold the top and bottom of the TV frame firmly Make sure not to hold the transparent part speaker or speaker grill area y y When transporting the TV do not expose the TV to jolts or excessive vibration y y When transporting the TV keep the TV upright never turn the TV on its sid...

Страница 8: ...om scratches NOTE y y Remove the stand before installing the TV on a wall mount by performing the stand attachment in reverse CAUTION y y Do not carry the TV upside down by holding the stand body or stand base as this may cause it to fall off resulting in damage or injury y y The illustration shows a general example of installation and may look different from the actual product ...

Страница 9: ...r ventilation 10 cm 10 cm 10 cm 10 cm 2 Connect the AC DC Adapter and Power Cord to a wall outlet DC IN AC DC Adapter Power Cord CAUTION y y Do not place the TV near or on sources of heat as this may result in fire or other damage y y Please be sure to connect the TV to the AC DC power adapter before connecting the TV s power plug to a wall power outlet NG NG OK NG NG OK OK NG ...

Страница 10: ... http www kensington com Connect the Kensington security system cable between the TV and a table NOTE y y The Kensington security system is optional You can obtain additional accessories from most electronics stores Adjusting the angle of the TV to suit view y y Image shown may differ from your TV Tilt from 20 to 5 degrees up or down to adjust the angle of the TV to suit your view Front Rear 20 5 ...

Страница 11: ...ll mount interface in accordance with VESA Standards 2 If you use screw longer than standard the TV might be damaged internally 3 If you use improper screw the product might be damaged and drop from mounted position In this case LG Electronics is not responsible for it 4 VESA compatible only with respect to screw mounting interface dimensions and mounting screw specifications 5 Please use VESA sta...

Страница 12: ...s or injuries by misuse or using an improper accessory are not covered by the manufacturer s warranty y y Screw length from outer surface of back cover should be under 8mm Wall mount Pad Back Cover Standard screw M4 x L10 Wall mount Pad Back Cover Max 8mm NOTE y y Use the screws that are listed on the VESA standard screw specifications y y The wall mount kit includes an installation manual and nec...

Страница 13: ...y y Refer to the external equipment s manual for operating instructions y y If you connect a gaming device to the TV use the cable supplied with the gaming device y y In PC mode there may be noise associated with the resolution vertical pattern contrast or brightness If noise is present change the PC output to another resolution change the refresh rate to another rate or adjust the brightness and ...

Страница 14: ... with the HDMI cable as shown Some separate cable is not provided DVD Blu Ray HD Cable Box HD STB PC HDMI OUT AV IN COMPONENT IN AV IN COMPONENT IN MONO L R AV IN COMPONENT IN R VIDEO AUDIO VIDEO AUDIO VIDEO AUDIO VIDEO AUDIO GREEN GREEN BLUE BLUE RED RED RED RED WHITE WHITE YELLOW YELLOW WHITE WHITE RED RED DVD Blu Ray HD Cable Box DVD Blu Ray HD Cable Box VCR ...

Страница 15: ...C AUDIO IN PC USB IN 5 V 0 5 A RGB IN PC DVI OUT AUDIO OUT H P AUDIO OUT USB HDD1 Headphone PC DVD Blu Ray HD Cable Box PC 1 USB port supports 0 5A electric current If you need more electric current in case of HDD use the separate power adaptor ...

Страница 16: ... mode y y The OSD On Screen Display is displayed on the screen as shown below When turning the product on in HDMI input When switching to HDMI input Is the input connected to your PC Do not show message again Yes No y y If you select Yes the size and image quality are optimised for your PC y y If you select No the size and image quality are optimised for the AV device DVD player set top box y y If...

Страница 17: ...ses the main menus Q MENU Accesses the quick menus Navigation buttons up down left right Scrolls through menus or options OK Selects menus or options and confirms your input BACK Returns to the previous level EXIT Clears all on screen displays and returns to TV viewing Accesses the AV devices connected with the HDMI cable through HDMI CEC Opens the SIMPLINK menu Starts to record and displays recor...

Страница 18: ... This is the adjustment menu provided for ISF certified picture tuning professionals ISF logo can only be used on ISF certified TVs ISFccc Imaging Science Foundation Certified Calibration Control y y Depending on input signal available range of picture modes may differ y y Expert mode is for picture tuning professionals to control and fine tune using a specific image For normal images the effects ...

Страница 19: ... y y Depending on input signal or other picture settings the range of detailed items for adjustment may differ To use TruMotion SETTINGS PICTURE TruMotion Depending on model Corrects images to display smoother motion sequences y y Smooth De judder De blur working on higher range in auto mode y y Clear De judder De blur working on middle range in auto mode y y User De judder De blur can be set manu...

Страница 20: ...evices conveniently via the SIMPLINK menu 1 Connect the TV s HDMI IN terminal and the SIMPLINK device s HDMI output terminal using an HDMI cable y y Depending on model For home theatre units with a SIMPLINK function connect HDMI terminals as above and use an optical cable to connect Optical Digital Audio Out from the TV to Optical Digital Audio In of the SIMPLINK device 2 Select INPUT OPTION SIMPL...

Страница 21: ...parate the device from the TV y y Once a USB device has been selected for removal it can no longer be read Remove the USB storage device and then re connect it Using a USB storage device warning y y If the USB storage device has a built in auto recognition program or uses its own driver it may not work y y Some USB storage devices may not work or may work incorrectly y y Use only USB storage devic...

Страница 22: ...HE AAC Dolby Digital MPEG 1 Layer III MP3 DTS LPCM y y motion JPEG Video MJPEG Audio LPCM ADPCM y y mpg mpeg mpe Video MPEG 1 MPEG 2 Audio MPEG 1 Layer I MPEG 1 Layer II Dolby Digital LPCM y y dat Video MPEG 1 MPEG 2 Audio MP2 y y flv Video Sorenson H 263 H 264 AVC Audio MP3 AAC HE AAC y y rm rmvb Video RV30 RV40 Audio Dolby Digital AAC HE AAC RA6 Cook y y 3gp 3gp2 Video H 264 AVC MPEG 4 Part2 Aud...

Страница 23: ...l Type 15360 W x 8640 H Progressive Type 1920 W x 1440 H y y Category BMP Photo size Minimum 64 x 64 Maximum 9600 x 6400 y y Category PNG Available file type Interlace Non Interlace Photo size Minimum 64 x 64 Maximum Interlace 1200 x 800 Non Interlace 9600 x 6400 y y BMP and PNG format files may be slower to display than JPEG TO SEE WEB MANUAL To obtain detailed User Guide information please visit...

Страница 24: ... result in damage to the screen y y Do not push rub or hit the screen surface with your fingernail or a sharp object as this may result in scratches and image distortions y y Do not use any chemicals as this may damage the product y y Do not spray liquid onto the surface If water enters the TV it may result in fire electric shock or malfunction Power cord Remove the accumulated dust or dirt on the...

Страница 25: ... if the power cord is connected to a wall outlet y y Check if there is a problem in the wall outlet by connecting other products The TV turns off suddenly y y Check the power control settings The power supply may be interrupted y y Check if the Sleep Timer or Off Time feature is activated in the TIME settings y y If there is no signal while the TV is on the TV will turn off automatically after 15 ...

Страница 26: ... Power requirement 19 V 1 6 A 19 V 1 6 A 19 V 2 0 A AC DC Adapter Manufacturer Lien Chang Model LCAP21C Manufacturer Honor Model ADS 45SN 19 3 19040G In AC 100 240 V 50 60 Hz Out DC 19 V 2 1 A Environment condition Operating Temperature 10 C to 35 C Operating Humidity 20 to 80 Storage Temperature 10 C to 60 C Storage Humidity 5 to 90 Digital TV Depend on Country Analogue TV Depend on Country Telev...

Страница 27: ... 37 500 59 940 75 000 800 x 600 37 879 46 875 60 317 75 000 1024 x 768 48 363 60 023 60 004 75 029 1024 x 768 Only HDMI PC 56 476 70 069 1152 x 864 67 500 75 000 1280 x 720 45 000 60 000 1280 x 800 49 702 59 810 1280 x 1024 63 981 79 976 60 020 75 025 1400 x 1050 65 317 59 978 1440 x 900 55 935 59 887 1600 x 900 60 000 60 000 1680 x 1050 64 674 65 290 59 883 59 954 1920 x 1080 67 500 60 000 NOTE y...

Страница 28: ...ns before using the product Keep the Owner s Manual CD in an accessible place for future reference The model and serial number of the TV is located on the back and one side of the TV Record it below should you ever need service MODEL SERIAL ...

Отзывы: