background image

24

206-4281

Express Script

Step 7. Channel Tuning/Channel Banner Display

Logical

PTC: V#.##.### CPU: V##.##.##.## ASIC: D279

Back

Next

OK

Exit

CC


1


► 

2


► 

3


► 

4


► 

5


6


► 

7


► 

8

Which channel tuning/channel banner display 

format would you like to use?

(Continued from previous page) 

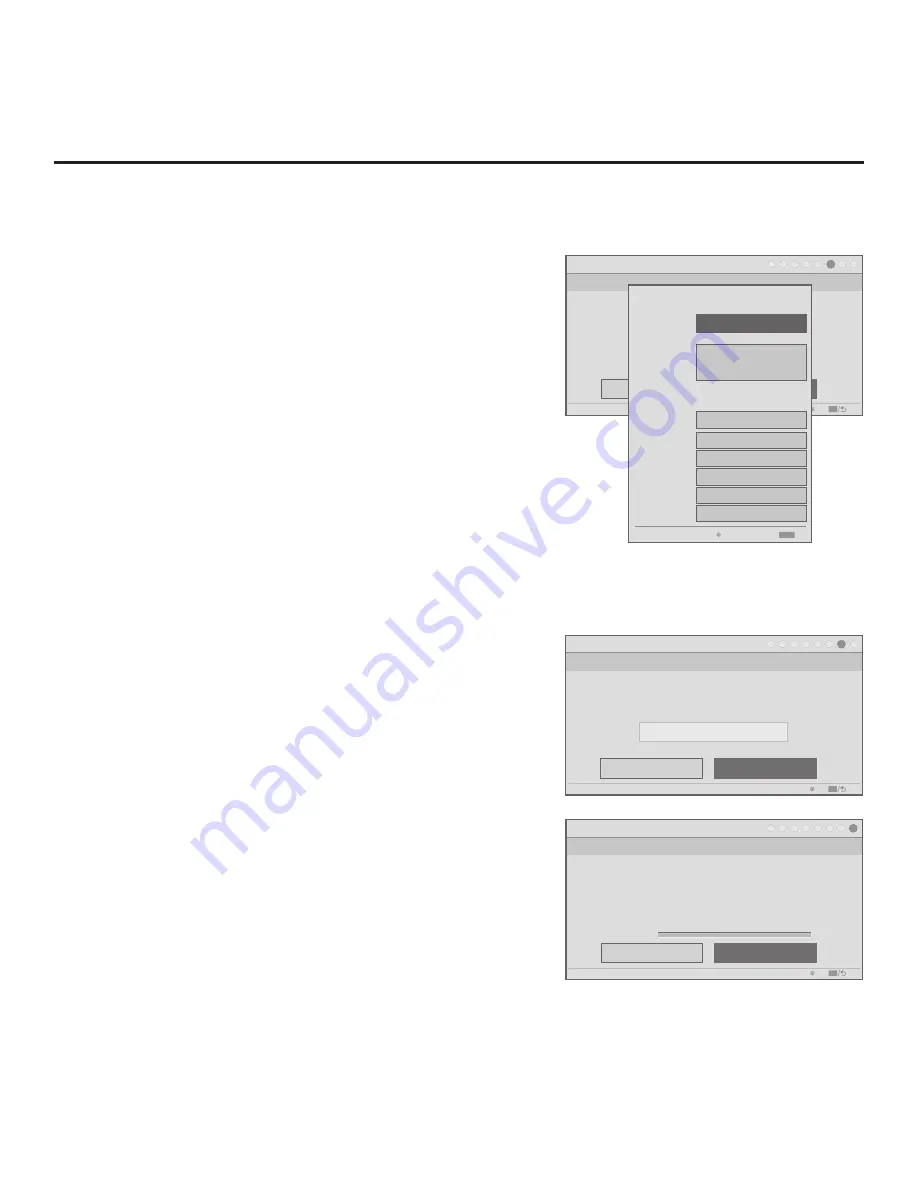
•  Input & CH: Edit the channel lineup, as necessary. Use the  

Left/Right arrow keys on the Installer Remote to select channels 

(including Aux inputs), and press 

OK

 to delete (or re-add)  

channels per the installation site requirements.

Note:

 When a channel is active in the channel lineup (i.e.,  

added), all additional fields in this screen are selectable/


available. If a channel is deleted, all other fields in this screen 

become inaccessible (grayed out).

• 

Icon: This field enables you

 to select the appropriate trademark/

icon for each channel’s Channel-Time on-screen display. If 

known, you can direct enter the icon number using the number 

keys on the Installer Remote. Otherwise, use the Left/Right arrow 

keys on the Installer Remote to select the desired logo. Icons 

are available for familiar channels, such as ABC, CBS, NBC, 

etc. Identifiable icons should enable the end user to readily know 

what common networks are available. 

•  Label: Press 

OK 

to display the pop-up virtual alphanumeric 

keypad, and add a custom text label for each channel/Aux input 

(up to 17 characters), as desired. Added custom labels will be 

displayed above the Label/Keypad field for each channel, as 

applicable. 

• 

Bank: Use the arrow keys to define channel banks, as desired. 

See “Channel Banks Overview” on the following page for further 

information.

When you are finished, press 

MENU

 to close the pop-up window. 

Use the arrow keys to select 

Next

, and then press 

OK

7.  Select the channel tuning/channel banner display format.

If logical channel tuning (default) is appropriate for the installation 

site, you can simply select 

Next

 and press 

OK

. Otherwise, use 

the Up/Down arrow keys on the Installer Remote to select the 

channel tuning/channer banner field, and then 

use the Left/Right 

arrow keys on the Installer Remote to select “Physical” for the 

channel tuning/channel banner display format. When you have 

made your selection, use the arrow keys to select 

Next

, and then 

press 

OK

8. Completion.

As the final step of the Express Script, the TV saves your settings 

and uses the channel/Aux input lineup to create an FTG Channel 

Map before configuring the TV for FTG Mode via CPU (see also 

notes on following page). When you are ready to proceed, select 

Finish

, and then press 

OK

.

Configuration progress will be shown at the bottom of the screen. 

When this step is complete, the Express Script exits, and the TV 

tunes to the first channel in the FTG Channel Map. 

Express Script (Cont.) 

Express Script

Step 8. Complete the Express Script

PTC: V#.##.### CPU: V##.##.##.## ASIC: D279

Back

Finish

OK

Exit

CC


1


2


► 

3


► 

4


► 

5


► 

6


7


► 

8

This step uses the auto-tuned/edited channel lineup to create an FTG Channel Map and 

configure the TV’s CPU for FTG operation.
If you did not run Auto Tuning, no digital or analog channels will be included in the FTG 

Channel Map upon completion of this step. In this case, only the Aux inputs from the 

channel lineup will be included in the FTG Channel Map. 
Select ‘Finish’ to complete the Express Script.

Saving data… 0%

Express Script

Step 6. Edit the Channel Lineup

Edit Channel Lineup

PTC: V#.##.### CPU: V##.##.##.## ASIC: D279

Back

Next

OK

Exit

CC


1


► 


2


► 

3


► 

4


► 

5


► 

6


7


8

Would you like to edit the channel lineup?


• Input & CH

• Icon

• Label
• Bank

DIGITAL 2-1

Keypad

You can also use numeric keys to direct enter Icon 

number (0–212)

Searched CH: 135 / Enabled Aux: 3 / Added CH: 128 / Added Aux: 3

* You can add up to 600 channels (Aux added as analog).

No Logo

Add/Delete

Move

Exit

MENU

NORMAL

1


ADDED

2


ADDED

3


ADDED

4


ADDED

Note:

 The total number of channels found 

(“Searched”) during Auto Tuning is indicated 

at the top of the pop-up window.

Содержание 22LX570M

Страница 1: ...es pages 43 46 EXPERIENCED INSTALLER Commercial Mode Setup Guide Note Selected features shown in this guide may not be available on all models Hospital Grade Interactive Pro Centric TVs Copyright 2016 LG Electronics U S A Inc P N 206 4281 Rev B 22LX570M 28LX570M 32LX570M 43LX570M ...

Страница 2: ...shall be connected to the grounding system of the building as close to the point of the cable entry as practical REGULATORY INFORMATION This equipment has been tested and found to comply with the limits for a Class B digital device pursuant to Part 15 of the FCC Rules These limits are designed to provide reasonable protection against harmful interference when the equipment is operated in a residen...

Страница 3: ...age or deterioration unplug it discontinue use of the appliance and have the cord replaced with an exact replacement part by an authorized servicer Protect the power cord from physical or mechanical abuse such as twisting kinking or pinching or being closed in a door or walked upon Pay particular attention to plugs wall outlets and the point where the cord exits the appliance Do not use a damaged ...

Страница 4: ...uctions 28 Do not install this product on a wall if it could be exposed to oil or oil mist This may damage the product and cause it to fall 29 Do not allow an impact shock or any objects to fall into the product and do not drop objects onto the screen 30 Do not touch the ventilation openings as they may become hot while the TV is operating This does not affect the perfor mance of the product or ca...

Страница 5: ... 47 FTG File Manager Main Screen 49 FTG Channel Map Configuration Utility 50 FTG Channel Map Editor 51 FTG Installer Menu Configuration Utility 52 References Updating TV PTC Software using a USB Memory Device 53 Downloading a Splash Screen Image using a USB Memory Device 54 Power Consumption Settings 55 TV Aux Input Configuration 56 b LAN Setup Overview 57 FTG Mode via EBL Local Configuration 58 A...

Страница 6: ...s as described in this document for Commercial Mode operation Pass through Mode This mode allows you to configure individual TVs for Pro Centric and or FTG Mode via CPU operation or create a Master TV Setup for cloning purposes This mode also allows external control via the GAME CONTROL MPI port on the TV rear jack panel There are three methods for configuring individual TVs that are currently in ...

Страница 7: ...External MPI Control To control the TV using an external MPI control device you must use the TV s GAME CONTROL MPI port for communication purposes In these TVs Installer Menu item 118 POWER SAVINGS controls the power circuitry for both the embedded b LAN module and the GAME CONTROL MPI port therefore to ensure that the GAME CONTROL MPI port circuitry is powered thus enabling MPI communication Inst...

Страница 8: ...TG Channel Map and must be configured with an FTG Channel Map and FTG Installer Menu settings using one of the following processes Local Configure an individual LX570M TV via its USB port using a USB memory device tlx file The file may be either a Clone file see Cloning Procedures on pages 43 to 46 or an FTG Configuration file see FTG File Manager Utilities Overview on pages 47 to 52 Remote Config...

Страница 9: ... Free To Guest FTG File Manager User Guide for further information on the FTG File Manager Refer to the Free To Guest FTG Device Configuration Application User Guide for information on the FTG Device Configuration Application Remote Management in FTG Mode When the TV is configured for FTG Mode via CPU remote management of the FTG Channel Map and FTG Installer Menu settings is provided by a Pro Cen...

Страница 10: ...he hospital to deliver a video file to patient and visitor TVs for promotion and information purposes The Pro Centric server Admin Client web editor content wizard is provided for customer configuration of portal messages and billboards maps Note Customized content is typically defined by the service integrator and or hospital administrators LG does not provide hospital specific content Pro Centri...

Страница 11: ...uration option that enables you to configure a TV for FTG Mode via CPU using a Clone Configuration tlx file stored on a USB memory device The tlx file incorporates FTG Installer Menu settings including Installer Menu items 098 PRO CENTRIC and 119 DATA CHANNEL which are used to set up the TV s Pro Centric feature TV in Pass through Mode If the TV is in Pass through Mode set Installer Menu items 098...

Страница 12: ...ug the TV power cord or remove the antenna cable during the configuration process as doing so will interrupt the current step and may corrupt the configuration data Note If you do not intend to complete the Express Script but you wish to enable pillow speaker functionality you must set Installer Menu item 027 HOSPITAL MODE appropriately See the Installer Menu section of this document for further i...

Страница 13: ...ipt and then press OK Then continue to the Express Script section on pages 20 to 25 To exit the Setup Wizard use the arrow keys on the Installer Remote to select highlight Exit and then press OK In the confirmation pop up window select OK and then press OK once more on the Installer Remote Note Both the EZ Manager Wizard and the Express Script enable you to configure Pro Centric settings on this T...

Страница 14: ...rd you can do so by selecting the Exit option from the subsequent screen s From the EZ Manager Welcome screen you have the following options To proceed with the EZ Manager Wizard use the arrow keys on the Installer Remote to select Next and then press OK Then continue to the TV Configuration Options section below To exit the EZ Manager Wizard but retain the use of the Pro Centric remote management...

Страница 15: ...ll have the option to save any settings made by selecting Save and Exit in the exit confirmation pop up window Or you can exit the wizard without saving any settings by simply selecting OK in the confirmation pop up window Zone and Room Number Assignments You may complete one or more of the fields in the Zone Label and Room Number screen or leave them at their default settings Zone or blank Label ...

Страница 16: ... key on the Installer Remote to delete characters in this field 2 When you are ready to continue select the appropriate option as follows To proceed to the next EZ Manager screen use the arrow keys to select Next and then press OK on the Installer Remote Continue to Configure Pro Centric Settings below To use a USB memory device to complete the configuration continue to USB Configuration on pages ...

Страница 17: ...on display you can also manually turn off or reboot the TV If desired select Turn Off or Reboot respectively and then press OK on the Installer Remote Manual Pro Centric Configuration 1 With the Searching for Pro Centric Server screen on display use the Left Right arrow keys on the Installer Remote to select Manual Pro Centric at the bottom right of the screen and then press OK In the Pro Centric ...

Страница 18: ...entric application and or E Z Installation data downloads see Processing the Pro Centric Configuration screen example on previous page When the Pro Centric configuration is complete an EZ Manager Configuration Complete screen see example on previous page is displayed and after 10 seconds the wizard exits and the TV turns OFF Note With the EZ Manager Configuration Complete screen on display you als...

Страница 19: ...he TV using the USB memory device 1 Insert the USB memory device that contains the appropriate file s into the TV s USB port 2 Use the arrow keys on the Installer Remote to select USB Configuration and then press OK You will be redirected to the TV Manager USB Download Menu see example below TV Manager USB Diagnostics Previous OK Ez Download Logo Image Download Update TV Software Update PTC Softwa...

Страница 20: ...Express Script Welcome screen you have the following options To proceed with the Express Script use the Left Right arrow keys on the Installer Remote to select Next Then press OK on the Installer Remote Note Select this option even if you only intend to configure Pro Centric settings on this TV After you configure the Pro Centric settings you will have the option to exit without completing the rem...

Страница 21: ... Channel value can be set from 1 to 135 2 In the Pro Centric Mode field use the Left Right arrow keys on the Installer Remote to select the appropriate Pro Centric Application Mode GEM FLASH or Configuration Only Note For remote management only select Configuration Only The TV will search for TV E Z Installation data downloads however Pro Centric application data will not be downloaded i e Install...

Страница 22: ...up in step 6 if you want to leave it enabled in the Installer Menu Note After the TV setup is complete see step 8 the only way to add or remove Aux inputs to from the FTG Channel Map is to edit the FTG Channel Map using the FTG Channel Map Editor in the FTG File Manager Refer to the Free To Guest FTG File Manager User Guide for further information Note Disabled Aux inputs are not included in the c...

Страница 23: ...p window Then continue with step 6 Note If you do not want to run Auto Tuning use the arrow keys on the Installer Remote to select Next and press OK 6 Edit the channel lineup This option enables you to customize the channel lineup add channel labels and icons etc before the channel lineup is used to create an FTG Channel Map in step 8 You can also set up channel banks in this step Note If for any ...

Страница 24: ...tion site you can simply select Next and press OK Otherwise use the Up Down arrow keys on the Installer Remote to select the channel tuning channer banner field and then use the Left Right arrow keys on the Installer Remote to select Physical for the channel tuning channel banner display format When you have made your selection use the arrow keys to select Next and then press OK 8 Completion As th...

Страница 25: ...l Bank Allocation below for further information Channel Attributes and Channel Bank Allocation Three attributes are available for each channel Encrypted OSD and Blank Video When the TV creates an FTG Channel Map upon completion of the Express Script the OSD attribute displays the channel number label and icon is automatically assigned to all channels and the Encrypted attribute is assigned to each...

Страница 26: ...r to Custom Master TV Setup on pages 40 to 42 for information on creating a Clone tlx file and or refer to Creating an FTG Configuration File on pages 47 to 48 for information on creating an FTG Configuration tlx file for FTG Mode via CPU configuration See Reference section Downloading a Splash Screen Image using a USB Memory Device for splash screen image guidelines See Reference section Updating...

Страница 27: ...ed the TV Manager via the EZ Manager Wizard you will be returned to the last screen on display before you selected the USB Configuration option If you accessed the TV Manager via the TV menus you will be returned to program viewing 7 To select or de select a file respectively use the Up Down arrow keys on the Installer Remote to highlight the filename and press OK to add or remove the checkmark at...

Страница 28: ...file will be displayed at the right of the screen 9 When you are ready to continue use the arrow keys on the Installer Remote to select Apply and then press OK Update progress will be shown in a new window Do NOT remove the USB device while updates are in progress When the Ez Download process is complete an overview of the results will briefly be displayed and then the TV will reboot 10 Remove the...

Страница 29: ...ENU repeatedly until the on screen display of the TV setup menus if the TV is in Pass through Mode or the Function Menu if the TV is not in Pass through Mode no longer toggles and then press the Installer Menu entry sequence e g 9 8 7 6 OK to access the Installer Menu Note The default Installer Menu entry sequence is 9876 however if Installer Menu item 000 INSTALLER SEQUENCE has been modified the ...

Страница 30: ... within the Installer Menu Use the Up Down arrow keys on the Installer Remote to sequence through the available menu items or access an item directly by keying in the item number and then pressing MENU For example to access the SLEEP TIMER option which is item 015 press 0 1 5 MENU Changing Installer Menu Settings To change an Installer Menu item value use the Left Right arrow keys on the Installer...

Страница 31: ...TIMER 0 1 1 Set to 1 to enable Sleep Timer 016 EN TIMER 0 1 1 Set to 1 to enable On Off Timers 017 ALARM 0 1 1 Set to 1 to enable Alarm 020 FEATURE LEVEL 0 1 16 24 64 65 1 Determines an additional IR code scheme to which the TV will respond 021 V CHIP 0 1 1 Set to 1 to enable V Chip Parental Control functions 022 MAX BLK HRS 0 99 12 Sets number of V Chip blocking hours 023 CAPTION LOCK 0 1 0 Set t...

Страница 32: ...0 50 0 Use to extend the normal video mute time during channel change 088 EN NOISE MUTE 0 1 1 Analog channels only If set to 1 audio is muted if no signal is present 090 KEY LOCK 0 1 0 If set to 1 all display panel joystick button functions are locked IR is still functional 091 HDMI2 ENABLE 0 2 1 Set to 0 to disable HDMI 2 Set to 1 DTV Mode or 2 PC Mode as applicable to enable HDMI 2 094 SAP MENU ...

Страница 33: ...t and initiate an update event once every 24 hours During the update event the TV as applicable performs a Data Channel Auto Search item 119 set to 255 and or checks for and downloads any available updates from the Pro Centric server item 119 set from 1 to 135 or 253 The time at which this event occurs depends on the setting of item 121 UPDATE TIME HR See item 119 and 121 descriptions for further ...

Страница 34: ...E Enables or disables sound mute function If set to 1 sound cannot be muted If set to 0 sound can be muted 011 KEY DEFEAT If set to 1 Key Defeat is enabled which means that end users cannot access or navigate within the on screen menu s from the display panel i e joystick button menu navigation functions will not be available Set to 0 to disable Key Defeat Note that all IR features remain function...

Страница 35: ...sabled both the IR code that will control the TV and the speaker selection depend on the Installer Menu item 020 FEATURE LEVEL setting Value Speaker Pillow Speaker Code Voltage Hospital IR Code 000 Determined by item 020 setting Zenith 12v Determined by item 020 setting 001 Pillow Only Zenith 12v Zenith Bed 1 002 Pillow Only Zenith 12v Zenith Bed 2 017 Pillow Only Philips 5v Zenith Bed 1 018 Pillo...

Страница 36: ... item 035 HDMI1 ENABLE must also be set to 1 or 2 Also see note above regarding TV operation when both this item and item 041 SIMPLINK EN are enabled 046 STRT AUX SRCE Start Aux Source Sets the starting Aux source When turned ON the TV will tune to starting Aux source if item 004 STRT CHANNEL is set to 0 1 AV 5 HDMI 2 255 Last Aux 3 HDMI 1 Note Above is applicable only if all Aux sources are enabl...

Страница 37: ... 0 for user specified hours control of blocking schemes Note This item is not available in the Installer Menu when item 021 V CHIP is set to 0 086 V MUTE TIME Video Mute Time Use to extend the normal video mute time during channel change For example you may wish to extend the normal video mute time to prevent the display of encrypted video i e from a Pro Idiom encrypted channel that has not yet be...

Страница 38: ...t power up 0 NTSC If not 0 number selected is the digital channel s Minor Start Channel number Note This item is not available in the Installer Menu when item 004 STRT CHANNEL is set to 0 or 255 106 ASP RATIO LOCK Aspect Ratio Lock Set to 1 to retain previous aspect ratio with power off Set to 0 to retain default aspect ratio with power off See item 096 DEF ASP RATIO above 107 BANNER SELECT Applic...

Страница 39: ...es not mean the TV will not initiate update events see additional information below Under standard TV OFF ON operating conditions i e item 002 AC ON is set to 0 a Wake For Update event occurs when the TV is OFF and causes the TV s CPU to temporarily turn ON perform the update cycle and then turn back OFF all while the TV appears to be OFF If item 002 AC ON is set to 2 or 3 for Instant ON then the ...

Страница 40: ...nfiguration file Before You Begin It is recommended that you disconnect all Aux inputs if you intend to run Auto Tuning Channel Search Under certain conditions Auto Tuning is disabled if there is an Aux input active A Clone tlx file comprises Installer Menu settings and all TV sources analog digital AV HDMI etc clonable setup menu settings See also Clonable TV Setup Menu Features list below If the...

Страница 41: ...ssing the Installer Menu on page 29 for further information b Set Installer Menu item 003 BAND AFC as appropriate Broadcast Set to 0 HRC Set to 2 CATV Set to 1 default IRC Set to 3 c Set Installer Menu item 027 HOSPITAL MODE as appropriate to select the speaker configuration d Set any other Installer Menu items that affect your TV program ming network to the required configuration For example enab...

Страница 42: ...et TV this will put the Target TV in FTG Mode via CPU Note When you import a Clone Configuration tlx file that contains an FTG Channel Map on a Target TV for FTG Mode via CPU configuration you will have the option to select either logical or physical channel tuning For either selection the channel sequence will be based on the order in which the channels appear in the FTG Channel Map You can view ...

Страница 43: ...1 Ensure the Master TV is set up completely and turned ON 2 Insert the USB memory device into the USB port on the Master TV 3 Press MENU on the Installer Remote to display the TV setup menus TV is in Pass through Mode or the Function Menu TV is already in FTG Mode 4 Use the arrow navigation keys to select highlight either the Option menu icon from the TV setup menus or the Lock menu icon from the ...

Страница 44: ...tion describes how to transfer import a Clone or FTG Configuration tlx file from a USB memory device to a TV using the TV Manager USB Download Menu Import Clone File option The tlx file may be created either from a Master TV Setup that was saved exported from a Master TV or in the FTG File Manager Before You Begin Ensure the USB device has been formatted with FAT format Avoid using special charact...

Страница 45: ...ion or an FMA head end device to reconfigure the EBL If the preceding condition applies but you wish to switch the TV to FTG Mode via CPU see Refer ence section Restoring Factory Defaults on the TV s for further information before proceeding If the Clone Configuration tlx file was edited created in the FTG File Manager it may contain multiple zoned FTG Installer Menu profiles for different TV mode...

Страница 46: ...A00001 tlx Import Clone File xxLX570M UA00001 TLX Channel Tuning Channel Banner Display Logical Physical TV Manager USB Diagnostics Ez Download Logo Image Download Update TV Software Update PTC Software Import Clone File Note TV Manager Diagnostics is for service use only 10 Press OK on the Installer Remote when you are ready to continue Import progress will be shown in a new window Do NOT remove ...

Страница 47: ...ssary and launch the FTG File Manager v1 3 2 or later on the PC that will be used to create the FTG Configuration tlx file 2 You have a number of options To view and or base a new FTG Configuration file on an existing FTG Configuration tlx file click the Open button in the TLX File command section of the FTG File Manager main screen and select double click on the desired tlx file A list of the fil...

Страница 48: ...ction Using the TV Zoning Feature for further information on the TV Zoning feature and setting the TV Zone in the TV s 6 To add FTG Installer Menu settings to the FTG Configuration List click under FTG Installer Menu Settings This will copy the selected model s settings to the FTG Configuration List Note If you make any change s in the FTG Installer Menu Configuration Utility to the current data t...

Страница 49: ...applicable Copy FTG Channel Map to and from FTG Configuration List Filename of opened FTG Configuration rml file created using FTG Device Configuration Application FTG CONFIGURATION LIST Data to be saved in FTG Configuration tlx file FTG File Manager Main Screen The FTG File Manager main screen enables you to compile modify and save FTG Configuration tlx files It also allows you to change the Zone...

Страница 50: ...ew edit and print a Logical Channel Map PRINT MAP Click to display a printable FTG Channel Map Report The report can also be exported as an HTML or Text file EDIT ADD MAP Click to open the FTG Channel Map Editor to create or edit an FTG Channel Map see next page Filename of opened FTG Configuration rml file created using FTG Device Configuration Application ...

Страница 51: ...Channel s data click to commit the changes in the FTG Channel Map ZONE RESTRICTION Select Zone TV not in Hospital Mode or channel bank TV in Hospital Mode restriction s for channel See note below Note The application of FTG Channel Map Zone restrictions in the TV see Zone Restriction section in this screen depends on the setting of Installer Menu item 027 HOSPITAL MODE see item 027 description on ...

Страница 52: ...Installer Menu Configuration Utility Notes The Pro Centric tab enables you to set up Pro Centric specific parameters Refer to the Free To Guest FTG File Manager User Guide for further information LAN parameters are not applicable for these TV models Filename of opened FTG Configuration rml file created using FTG Device Configuration Application ...

Страница 53: ...ct highlight either the Option menu icon from the TV setup menus or the Lock menu icon from the Function Menu Then press the number 7 key a total of seven times to display the TV Manager USB Download Menu 4 With the TV Manager USB Download Menu on display use the Up Down arrow keys to select Update TV Software or Update PTC Software as applicable and then press OK 5 In the next window TV Software ...

Страница 54: ...insert the USB memory device into the TV s USB port 2 Press MENU on the Installer Remote to display the TV setup menus TV is in Pass through Mode or the Function Menu TV is not in Pass through Mode 3 Use the arrow navigation keys to select highlight either the Option menu icon from the TV setup menus or the Lock menu icon from the Function Menu Then press the number 7 key a total of seven times to...

Страница 55: ...5 45 5 81 83 40 16 4 29 50 20 2 36 33 32 2 57 91 43 6 78 42 30 15 1 27 16 18 2 32 73 29 3 52 70 36 9 66 37 20 14 2 25 54 16 8 30 22 25 9 46 58 31 5 56 65 10 13 0 23 38 14 9 26 73 22 5 40 47 24 9 44 78 1 12 0 21 58 13 4 24 10 19 5 35 07 19 7 35 43 Item 099 Back Lighting Dynamic 22LX570M 28LX570M 32LX570M 43LX570M Power Consumption Watts Percent Savings Power Consumption Watts Percent Savings Power ...

Страница 56: ...RCE R Installer Menu Item 029 OLD OCV 0 Installer Menu Item 029 OLD OCV 1 Aux Input Input Mode Item Function Value Enable Bit Label Value Value Description 131 0 91 0 AV Rear CV 39 REAR AUX EN 1 1 Rear Video Aux 1 0 VIDEO 1 132 0 92 0 HDMI2 DTV 91 HDMI2 ENABLE 1 2 S Video Rear 2 0 VIDEO 5 PC 2 2 COMPUTER 133 0 93 0 HDMI1 DTV 35 HDMI1 ENABLE 1 3 Front Computer 3 0 VIDEO 3 PC 2 2 COMPUTER Use Instal...

Страница 57: ...r Menu item 118 POWER SAVINGS to 1 so that the GAME CONTROL MPI port circuitry is always powered Caution POWER SAVINGS should NEVER be set to 7 This setting is intended for factory use only The b LAN module is internal to the TV It allows hotel institution head end equipment with b LAN technology to communicate via the institution s RF distribution system with the TV for configuration and control ...

Страница 58: ...ing a USB to TTL serial cable TTL 232R 5V AJ If necessary install the device driver on the PC 4 Turn ON the TV Note If Installer Menu item 118 POWER SAVINGS is set to 3 default the TV must be ON in order for steps 5 and 6 below to be successful 5 Write the FTG Channel Map to the EBL switches the EBL from Pass through Mode to FTG Mode Note After a Write of new data the TV will briefly display a gre...

Страница 59: ... Input Installer Menu Item Function 0 AV 039 REAR AUX EN 6 HDMI 1 035 HDMI1 ENABLE 7 HDMI 2 091 HDMI2 ENABLE To disable auto sensing for all available Aux inputs set item 042 to 0 To enable auto sensing for all available Aux inputs set item 042 to 255 All other available settings i e settings for individual inputs are listed in the table below Item 042 Value Inputs Installer Menu Display AV HDMI 1...

Страница 60: ...20 Bed 1 Bed 2 020 X X X Multi code IR 020 X X X X X X Speaker 020 X X X Function Preview 025 X X Hospital Mode 027 Bed 1 Bed 2 027 X X X Pillow Speaker Voltage 027 b X b X b X Speaker 027 X X X Quick Shutoff 077 c c c c c c Channel Banks Number of Banks Enabled 1 4 1 4 Channel Preview Banks Setup Menu X X Blanked Channel X X X X Inactive TV X X SAP Key special use in Channel Preview Banks Setup M...

Страница 61: ...HOSPITAL MODE Value Item 020 FEATURE LEVEL Value Audio Menu TV Speaker Speaker 0 0 24 OFF None 0 0 24 ON TV Only 0 64 65 N A Pillow Only 1 34 N A N A Pillow Only 65 98 N A OFF None 65 98 N A ON TV Only 129 162 N A OFF Pillow Only 129 162 N A ON Pillow TV Note If the TV is in FTG Mode the Audio Menu is no longer accessible Reference LX570M Hospital Operations Cont ...

Страница 62: ...ime However both options require that you create a Zero Mapped Channels FTG Configuration tlx file i e an FTG Configuration file with no data Refer to the Free To Guest FTG File Manager User Guide for further information Using a USB memory device import a Zero Mapped Channels FTG Configuration tlx file to the TV Refer to Importing a Clone File on pages 44 to 46 for further information on the impor...

Страница 63: ...sections briefly describe how to assign Zone designations in the FTG File Manager Refer to the Free To Guest FTG File Manager User Guide for further information FTG Installer Menu Profile Zone Assignments The FTG File Manager main screen enables you to change the Zone assignment default Zone 0 for each Installer Menu profile to be included in an FTG Configuration tlx file For example you may wish ...

Страница 64: ... then be used to configure Target TVs For example if the TV Zone in the Master TV is set to 3 before the Clone file export is initiated the Master TV s Installer Menu and TV Setup Menu profiles will be saved with the TV Zone 3 assignment In order to configure the Target TVs with the Zone 3 Installer Menu and TV Setup Menu profiles exported from the Master TV you must set the TV Zone accordingly in...

Страница 65: ...necessary select OK and then press OK on the Installer Remote to close the window and return to the Option Menu 6 Press MENU to return to program viewing OPTION OK Move Language Caption Off Standby Light Off DivX R VOD Set ID 1 Demo Mode Zone Room Number Eject Z Change a room number OK Room Number Label Zone Label and Room Number CH VOL 1 2 3 4 5 6 7 8 0 9 P A G E Q MENU CHAR NUM FLASHBK EXIT OK E...

Страница 66: ...ions for further information HDMI IN 1 Connection for HDMI output from external device ANTENNA CABLE IN Connect to Antenna CATV SERVICE ONLY Restricted to service updates TV LINK CFG 3 5 mm jack Use to connect PC to TV EBL for local FTG Mode via EBL configuration OPTICAL AUDIO OUT Use for amps and home theater systems Note When the TV is OFF this port is not enabled Side Jack Panel HDMI IN 2 Conne...

Страница 67: ...ernal audio fixed speaker variable speaker or fixed line level amplifier equipment See Reference section External Stereo Speaker Specifications for further information HDMI IN 1 Connection for HDMI output from external device ANTENNA CABLE IN Connect to Antenna CATV SERVICE ONLY Restricted to service updates TV LINK CFG 3 5 mm jack Use to connect PC to TV EBL for local FTG Mode via EBL configurati...

Страница 68: ...e SPEAKER OUT LINE OUT 3 5 mm stereo jack on the LX570M rear panel provides stereo speaker signal outputs fixed speaker variable speaker or fixed line level amplifier for external audio equipment Set Installer Menu item 097 AUDIO OUTPUT as required in accordance with external audio equipment connected to the TV Also refer to the following diagram for pinout details Caution Do NOT plug in a mono co...

Страница 69: ...Installer Remote is required to set up and operate the TV The LG Installer Remote illustrated below shows typical remote control functions and is provided for reference only PORTAL Displays and removes the Pro Centric interactive menu INFO Displays channel information GUIDE Displays and removes the Pro Centric channel guide EPG RETURN Returns one level to the previous menu display Color buttons ac...

Страница 70: ...emote IR code scheme i e you can always use an Installer Remote with the TV regardless of its multi code IR setting The following procedure describes how to set the bed number in the TV s Installer Menu and in the patient remote 1 Installer Menu item 020 FEATURE LEVEL determines the additional IR code scheme to which the TV will respond Access the Installer Menu and set item 020 to the desired val...

Страница 71: ...pillow speaker to select highlight the desired option s in the Smart Share screen and then press Enter OK 3 Within each USB media directory Photos Videos or Music Use the arrow keys on the patient remote pillow speaker to navigate from one folder or file to another and press Enter OK to open or play a selected folder or file Use the arrow keys on the patient remote pillow speaker as necessary to s...

Страница 72: ...y and is being implemented by certain brands of smart pillow speakers Pillow Speaker Interface This connector provides an interface for patient pendant remote control or entertainment audio and nurse call systems The following table describes the pillow speaker interface pinout see also diagram below Refer to the appropriate subsection on the following page depending on model for additional inform...

Страница 73: ...pply optocouplers isolate the control lines and a transformer isolates the audio For positive voltage configurations e g for Zenith Philips pillow speakers 12 volts 5 volts is provided on pin 3 Channel Up Data In in reference to pin 4 Common For negative voltage configurations e g for RCA pillow speakers 5 volts is provided on pin 4 in reference to pin 3 Controlling the TV with Mechanical Switches...

Страница 74: ...t location chosen should be appropriate for drilling holes and have available the required power source as well as antenna cable and any other equipment leads as necessary Pedestal Mounts and Stands A sturdy surface on a desk or other similar flat table like furniture would be the appropriate location for mounting a pedestal style TV stand Most stands are designed so that the wiring is threaded th...

Страница 75: ... If applicable connect MPI cable to MPI device Encrypted program Try another channel Wrong tuning band Adjust Installer Menu settings Normal picture poor or no sound Broadcast problem Try a different channel Audio muted Press MUTE or use Volume Up key to increase sound level Pillow TV speaker not configured properly Check that Installer Menu items 020 FEATURE LEVEL and 027 HOSPITAL MODE are set as...

Страница 76: ...ected to AC Power Bad TV No Yes FTG Operation Troubleshooting The following table provides troubleshooting information for when the EBL is configured for FTG Mode operation Symptom Possible Cause s Solution s Communication Error Communications Timeout Cable s not connected Check and connect communication cables TV not powered Check connect the TV power cord TV not turned ON TV needs to be turned O...

Страница 77: ...ctive TV message if all channels are deleted from Channel Bank 4 Select another channel bank 1 2 or 3 to return TV to normal operation Channel found during Auto Tuning does not tune in with Channel Up Down Channel was deleted in currently selected channel bank Premium channels may only be available on another channel bank Modify the channel bank allocation s for the channel if desired using the FT...

Страница 78: ... a particular commercial mode of operation within an LG TV See also FTG Mode Logical Channel Number A number assigned to either a physical or virtual channel number in a Logical Channel Map Major Channel Number Typically the RF channel number assigned to a digital video stream Master TV A TV whose Channel Map and Installer Menu and TV setup menu settings have been configured as a Master TV Setup f...

Страница 79: ...GPL LGPL MPL and other open source licenses that is contained in this product please visit http opensource lge com In addition to the source code all referenced license terms warranty disclaimers and copyright notices are available for download LG Electronics will also provide open source code to you on CD ROM for a charge covering the cost of performing such distribution such as the cost of media...

Страница 80: ... 865 3026 www lg com us commercial Pro Idiom is a registered trademark of Zenith Electronics LLC Pro Centric and the LG logo are registered trademarks of LG Electronics Inc b LAN is a trademark of SONIFI Solutions Inc All other trademarks or registered trademarks are the property of their respective owners ...

Отзывы: