background image

W

A

TCHING 

TV 

CHANNEL 

CONTR

OL

28

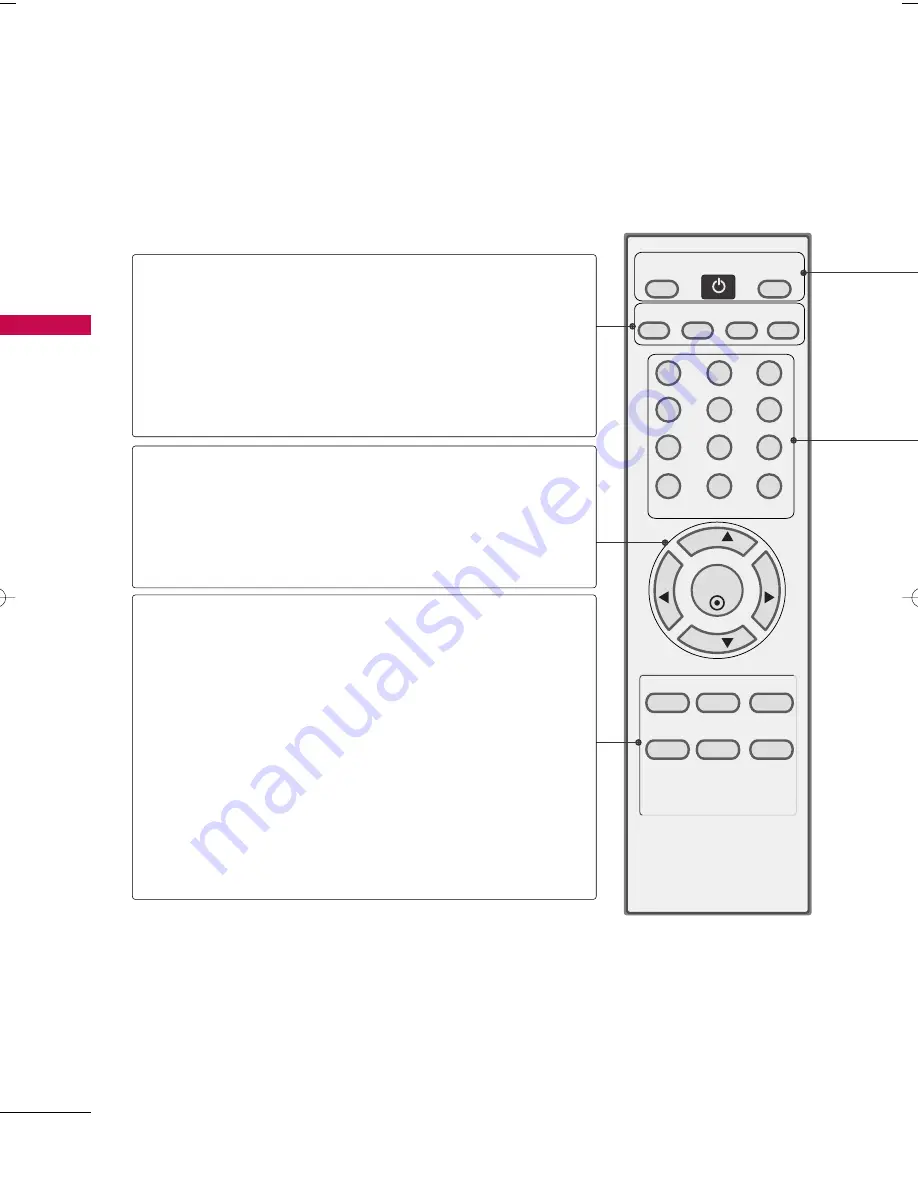
REMOTE CONTROL FUNCTIONS

WATCHING TV / CHANNEL CONTROL

When using the remote control, aim it at the remote control sensor on the TV.

1

2

3

4

5

6

7

8

0

9

VOL

VOL

CH

CH

ENTER

POWER

MENU

Q.VIEW

SLEEP

PICTURE SOUND

RATIO

MTS

FAV

MUTE

A.PROG MEMORY/ERASE CAPTION

TV

INPUT

MTS

A.PROG

(AUTO PROGRAM)

MEMORY/ERASE

CAPTION

CHANNEL

UP/DOWN

VOLUME UP

/DOWN

THUMBSTICK

(Up/Down/Left

Right/ENTER)

MENU

Q.VIEW

SLEEP

PICTURE

SOUND

RATIO

Selects the MTS sound: Mono, Stereo, or SAP. 

G

G

p

p..5

55

5

Searches for available channels. 

G

G

p

p..3

32

2

Memorizes or erases selected channel. 

G

G

p

p..3

33

3

Selects CAPTION mode. 

G

G

p

p..5

54

4

Select available channels.

Increase/decrease the sound level.

Navigate the on-screen menus and adjust the system set-
tings to your preference.

Displays the main menu. 

Tune to the last channel viewed.

Select the amount of time before your TV turns off auto-
matically. 

G

G

p

p..5

58

8

Selects the factory preset picture depend on the viewing
environment. 

G

G

p

p..3

39

9

Selects the factory preset sound for type of program. 

G

G

p

p..5

50

0

Change the aspect ratio.

G

G

p

p..3

38

8

MFL41469212-Edit1-en  1/7/04 8:22 PM  Page 28

Содержание 22LG30R

Страница 1: ...ting your set and retain it for future reference Write the model number and serial number from the label on the back cabinet on the front or back of this manual LCD TV OWNER S MANUAL 22LG30R P NO MFL41469212 0808 REV03 Printed in Korea www lge com ...

Страница 2: ......

Страница 3: ...c shock to persons The exclamation point within an equilateral triangle is intended to alert the user to the presence of important operating and maintenance servicing instructions in the litera ture accompanying the appliance TO REDUCE THE RISK OF ELECTRIC SHOCK DO NOT REMOVE COVER OR BACK NO USER SERVICEABLE PARTS INSIDE REFER TO QUALIFIED SERVICE PERSONNEL WARNING CAUTION TO REDUCE THE RISK OF F...

Страница 4: ...to your outlet consult an electrician for replacement of the obsolete outlet Protect the power cord from being walked on or pinched particularly at plugs convenience receptacles and the point where they exit from the apparatus Only use attachments accessories specified by the manufacturer Use only with the cart stand tripod bracket or table specified by the manufacturer or sold with the apparatus ...

Страница 5: ...sted kinked pinched closed in a door or walked upon Pay particular attention to plugs wall outlets and the point where the cord exits the appliance Do not make the TV with the power cord plugged in Do not use a damaged or loose power cord Be sure do grasp the plug when unplugging the power cord Do not pull on the power cord to unplug the TV WARNING To reduce the risk of fire or electrical shock do...

Страница 6: ...rger TVs Do not press against or put stress on the front panel of the TV Ventilation Install your TV where there is proper ventilation Do not install in a confined space such as a bookcase Do not cover the product with cloth or other mate rials e g plastic while plugged in Do not install in excessively dusty places If you smell smoke or other odors coming from the TV or hear strange sounds unplug ...

Страница 7: ...eting Channels 33 Fine Tuning Adjustment 34 Booster 35 Favorite Channels Setup 36 Key Lock 37 PICTURE CONTROL Picture Size Aspect Ratio Control 38 Preset Picture Settings Picture Mode Preset 39 Auto Color Tone Control 40 Manual Picture Adjustment Picture Mode User Mode 41 Color Tone User Mode 42 XD Picture Improvement Technology 43 Advanced Gamma 44 Advanced Film Mode 45 Advanced Black Darkness Le...

Страница 8: ...se effect on the monitor s performance Avoid touching the LCD screen or holding your finger s against it for long periods of time Doing so may produce some temporary distortion effects on the screen On Disposal a The fluorescent lamp used in this product contains a small amount of mercury b Do not dispose of this product with general household waste c Disposal of this product must be carried out i...

Страница 9: ...CH CH ENTER M ENU Q V IE W SLE EP TU RE SOUND RAT IO FA V MUT E OG ME MO RY ER ASE CA PT ION IN PUT 1 2 3 4 5 6 7 8 0 9 VO L VO L CH CH ENTER PO W ER M ENU Q V IE W SLE EP RAT IO M TS FA V MUT E A PR OG CA PT IO N TV IN PUT ME MO RY ER ASE SOUND PIC TU RE Wipe spots on the exterior only with the polishing cloth Do not wipe roughly when removing stain Please be cautions of that excessive pressure m...

Страница 10: ...he tape And then wipe the TV with a cloth If a polishing cloth is included with your product use it INPUT MENU VOL CH ENTER CHANNEL E E D D Buttons VOLUME F F G G Buttons MENU Button ENTER Button INPUT Button POWER Button Remote Control Sensor Power Standby Indicator Illuminates red in standby mode Illuminates blue when the TV is switched on ...

Страница 11: ...e for video red and white for audio RGB PC IN Analog PC Connection Uses a D sub 15 pin cable VGA cable AUDIO RGB DVI IN 1 8 headphone jack for analog PC audio input RS 232C IN CONTROL SERVICE PORT Used by third party devices ANTENNA IN Connect over the air signals to this jack AV Audio Video IN Analog composite connection Supports standard definition video only 480i S VIDEO Better quality than sta...

Страница 12: ... DY Y with C CO OV VE ER R B BA AS SE E of the TV Insert the S ST TA AN ND D B BO OD DY Y into a C CO OV VE ER R B BA AS SE E until clicking sound 2 Assemble the TV as shown 3 S ST TA AN ND D B BO OD DY Y C CO OV VE ER R B BA AS SE E Carefully place the TV screen side down on a cushioned surface to protect the screen from damage 1 ...

Страница 13: ...the CABLE MANAGEMENT CLIP as shown 1 2 3 G G Do not hold the CABLE MANAGEMENT CLIP when moving the TV If the TV is dropped you may be injured or the product may be broken NOTE How to remove the CABLE MANAGEMENT CLIP G G Hold the CABLE MANAGE MENT CLIP with both hands and pull it backward CABLE MANAGEMENT Fit the CABLE MANAGEMENT CLIP as shown CABLE MANAGEMENT CLIP ...

Страница 14: ...TION 4 inches 4 inches 4 inches 4 inches For proper ventilation allow a clearance of 4 inches on all four sides from the wall Image shown may differ from your TV WALL MOUNT HORIZONTAL INSTALLATION For adequate ventilation allow a clearance of 4 10cm all around the TV We recommend that you use an LG brand wall mount when mounting the TV to a wall 4 inches 4 inches 4 inches 4 inches 4 inches ...

Страница 15: ... B BO OD DY Y Loose the bolts from TV 1 Insert the P PR RO OT TE EC CT TI IO ON N C CO OV VE ER R into the TV 3 P PR RO OT TE EC CT TI IO ON N C CO OV VE ER R Bend the H HI IN NG GE E B BO OD DY Y and pull it backward 2 Fix the 4 bolts securely using the holes in the back of the TV 4 ...

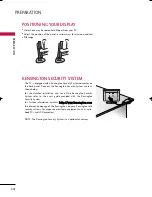
Страница 16: ...the Kensington Security System cable as shown below For the detailed installation and use of the Kensington Security System refer to the user s guide provided with the Kensington Security System For further information contact h ht tt tp p w ww ww w k ke en ns si in ng gt to on n c co om m the internet homepage of the Kensington company Kensington sells security systems for expensive electronic eq...

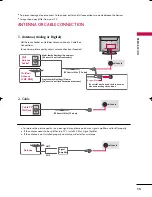
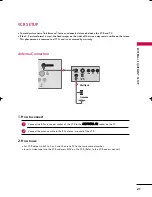
Страница 17: ... TV Wall Jack Multi family Dwellings Apartments Connect to wall antenna socket RF Coaxial Wire 75 ohm RF Coaxial Wire 75 ohm Single family Dwellings Houses Connect to wall jack for outdoor antenna Be careful not to bend the bronze wire when connecting the antenna Copper Wire To improve the picture quality in a poor signal area please purchase a signal amplifier and install properly If the antenna ...

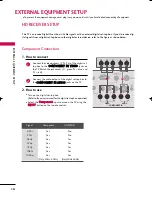
Страница 18: ... NE EN NT T I IN N V VI ID DE EO O jacks on the TV Match the jack colors Y green PB blue and PR red Connect the audio output of the digital set top box to the C CO OM MP PO ON NE EN NT T I IN N A AU UD DI IO O jacks on the TV 2 1 2 How to use Turn on the digital set top box Refer to the owner s manual for the digital set top box operation Select the C Co om mp po on ne en nt t input source on the ...

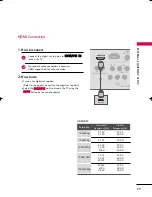
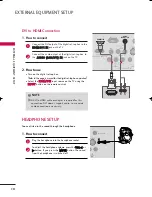
Страница 19: ...nd video 1 How to connect 2 How to use Turn on the digital set top box Refer to the owner s manual for the digital set top box Select the H HD DM MI I D DV VI I input source on the TV using the I IN NP PU UT T button on the remote control 2 1 1 HDMI DTV Resolution 720x480p 720x576p 1280x720p 1920x1080i 1920x1080p Horizontal Vertical Frequency kHz Frequency Hz 31 47 59 94 31 50 60 00 31 25 50 00 44...

Страница 20: ...to use Turn on the digital set top box Refer to the owner s manual for the digital set top box operation Select the H HD DM MI I D DV VI I input source on the TV using the I IN NP PU UT T button on the remote control RGB PC IN RS 232C IN CONTROL SERVICE S VIDE AUD COMPONENT IN VIDEO VIDEO AUDIO MONO AV IN HDMI DVI IN L R DVI OUTPUT AUDIO RGB DVI IN 1 2 HEADPHONE SETUP You can listen to the sound t...

Страница 21: ... NE EN NT T I IN N V VI ID DE EO O jacks on the TV Match the jack colors Y green PB blue and PR red Connect the audio outputs of the DVD to the C CO OM M P PO ON NE EN NT T I IN N A AU UD DI IO O jacks on the TV 2 1 2 How to use Turn on the DVD player insert a DVD Select the C Co om mp po on ne en nt t input source on the TV using the I IN NP PU UT T button on the remote control Refer to the DVD p...

Страница 22: ...nual for operating instructions 1 How to connect Connect the HDMI output of the DVD to the H HD DM MI I D DV VI I I IN N jack on the TV No separated audio connection is necessary HDMI supports both audio and video 2 1 2 How to use Select the H HD DM MI I D DV VI I input source on the TV using the I IN NP PU UT T button on the remote control Refer to the DVD player s manual for operating instructio...

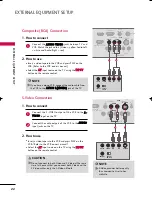
Страница 23: ...nty Antenna Connection L R S VIDEO VIDEO OUTPUT SWITCH ANT IN ANT OUT ANTENNA IN ANTENNA IN N S VIDEO AUDIO IN H P Wall Jack Antenna 1 2 Connect the RF antenna out socket of the VCR to the A AN NT TE EN NN NA A I IN N socket on the TV Connect the antenna cable to the RF antenna in socket of the VCR 1 How to connect Set VCR output switch to 3 or 4 and then tune TV to the same channel number Insert ...

Страница 24: ...MI DVI IN AUDIO S VIDEO VIDEO OUTPUT SWITCH L R S VIDEO VIDEO ANT IN ANT OUT 1 2 OUTPUT SWITCH L R S VIDEO VIDEO ANT IN ANT OUT S 232C IN OL SERVICE S VIDEO COMPONENT IN VIDEO VIDEO AUDIO MONO AV IN H P AUDIO ANTENNA IN 1 2 S Video Connection 1 How to connect Connect the S VIDEO output of the VCR to the S S V VI ID DE EO O input on the TV Connect the audio outputs of the VCR to the A AU UD DI IO O...

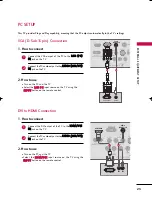
Страница 25: ...ow to connect Connect the VGA output of the PC to the R RG GB B P PC C I IN N jack on the TV Connect the PC audio output to the A AU UD DI IO O R RG GB B D DV VI I I IN N jack on the TV 2 1 2 How to use Turn on the PC and the TV Select the R RG GB B P PC C input source on the TV using the I IN NP PU UT T button on the remote control 1 How to connect Connect the DVI output of the PC to the H HD DM ...

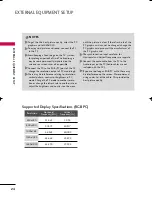
Страница 26: ... refresh rate to another rate or adjust the brightness and contrast on the menu until the picture is clear If the refresh rate of the PC graphic card can not be changed change the PC graphic card or consult the manufacturer of the PC graphic card G G The synchronization input waveform for Horizontal and Vertical frequencies are separate G G Connect the audio cable from the PC to the Audio input on...

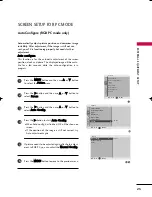
Страница 27: ...in RGB PC you can adjust the M Ma an nu ua al l C Co on nf fi ig g Press the M ME EN NU U button to move to the previous menu 2 1 4 5 3 6 Automatically adjusts picture position and minimizes image instability After adjustment if the image is still not cor rect your TV is functioning properly but needs further adjustment A Au ut to o c co on nf fi ig gu ur re e This function is for the automatic ad...

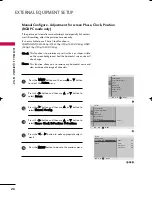
Страница 28: ...us menu 2 1 4 5 3 6 If the picture isn t clear after auto adjustment and especially if characters are still trembling adjust the picture phase manually It s not available to use Phase Clock function in COMPONENT 480i 480p 576i 576p 720p 1080i 1080p HDMI 480p 576p 720p 1080i 1080p C Cl lo oc ck k This function is to minimize any vertical bars or stripes visible on the screen background And the hori...

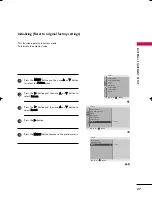
Страница 29: ...se D D or E E button to select R Re es se et t Press the G G button Press the M ME EN NU U button to move to the previous menu 2 1 4 5 3 This function operates in current mode To initialize the adjusted value DE F G MENU 1 Picture Mode Color Temperature Advanced Aspect Ratio Picture Reset Screen Picture DE F G MENU 2 Picture Picture Mode Color Temperature Advanced Aspect Ratio Picture Reset Screen...

Страница 30: ...s the MTS sound Mono Stereo or SAP G G p p 5 55 5 Searches for available channels G G p p 3 32 2 Memorizes or erases selected channel G G p p 3 33 3 Selects CAPTION mode G G p p 5 54 4 Select available channels Increase decrease the sound level Navigate the on screen menus and adjust the system set tings to your preference Displays the main menu Tune to the last channel viewed Select the amount of...

Страница 31: ... ones Close cover Installing Batteries NUMBER button Turns your TV or any other programmed equipment on or off depending on the mode In AV Component RGB PC and HDMI DVI input sources screen returns to the last TV channel Select the desired input source TV AV Component RGB PC and HDMI DVI Switch the sound on or off G G p p 3 30 0 Scroll through the programmed Favorite channels G G p p 3 36 6 POWER ...

Страница 32: ... You can cancel the Mute function by pressing the M MU UT TE E or V VO OL L F F or G G button Adjust the volume to suit your personal preference 1 2 3 I In ni it ti ia al li iz zi in ng g s se et tu up p Note a It will automatically disappear after approx 40 seconds unless a button is pressed b In store mode is only for shop display and not for general customer use c Home mode is the optimal setti...

Страница 33: ... Mode Auto Volume Balance 0 Audio DE F G MENU DE F G MENU DE F G MENU DE F G MENU Picture Mode Color Temperature XD Advanced Aspect Ratio Picture Reset Screen Picture DE F G MENU In this manual the OSD On Screen Display may be different from your TV s because it is just example to help the TV operation Press the M ME EN NU U button and then use D D or E E button to select the each menu Press the G...

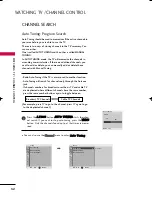
Страница 34: ...lete those channels with Manual Tuning Redo Auto Tuning if the TV is ever moved to another location Auto Tuning will search for channels only through the Antenna jack If channels numbers for broadcast over the air TV and cable TV are duplicated where different channels have the same number press the same number buttons again to toggle between For example press 17 to go to the channel press 17 agai...

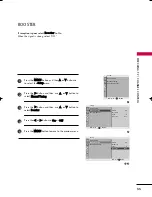
Страница 35: ...n manually Manual Tuning Adding Deleting Channels Use the C CH H D D E E or NUMBER buttons to select the channel number you want to add or delete Press the M ME EM MO OR RY Y E ER RA AS SE E button Press the M ME EM MO OR RY Y E ER RA AS SE E button to select M Me em mo or ry y or E Er ra as se e Press the E EN NT TE ER R button to return to TV viewing 1 2 3 4 You can also use the C Ch ha an nn ne...

Страница 36: ... al l T Tu un ni in ng g Press the G G button and then D D or E E button to select F Fi in ne e Press the F F or G G button to adjust the picture to your preference Press the E EN NT TE ER R button to save 2 1 4 5 3 1 2 Setup Auto Tuning Manual Tuning Favorite Channel CATV 39 Memory Fine 0 Booster Off Manual Tuning G DE F G MENU Auto Tuning Manual Tuning Favorite Channel Setup DE F G MENU Setup Au...

Страница 37: ... ni in ng g Press the G G button and then use D D or E E button to select B Bo oo os st te er r Press the F F or G G button to O On n or O Of ff f Press the M ME EN NU U button to move to the previous menu 2 1 4 5 3 1 2 Setup Auto Tuning Manual Tuning Favorite Channel CATV 39 Memory Fine 0 Booster Off Manual Tuning G DE F G MENU Auto Tuning Manual Tuning Favorite Channel Setup DE F G MENU 4 Setup ...

Страница 38: ...utton to select F Fa av vo or ri it te e C Ch ha an nn ne el l Press the G G button and then D D or E E button to select the first favorite channel position Use the F F or G G button to set the desired channel number for first favorite channel Repeat steps 3 to 5 to memorize other favorite chan nels You can store up to 8 channels Press the M ME EN NU U button to move to the previous menu 2 3 4 5 6...

Страница 39: ... use D D or E E button to select O On n or O Of ff f Press the M ME EN NU U button to move to the previous menu 2 3 4 1 1 3 2 Option Language Key Lock Caption Text Set ID Factory Reset Key Lock G DE F G MENU Off On Language Key Lock Caption Text Set ID Factory Reset Option DE F G MENU NOTE G G In K Ke ey y L Lo oc ck k O On n if the TV is turned off press the I IN NP PU UT T C CH H D D or E E butt...

Страница 40: ... the top and bottom por tions of the picture will be cropped You can adjust the enlarge proportion of Cinema Zoom using D D or E E button Zoom 2 Choose Zoom2 when you want the picture to be altered both horizontally extended and vertical ly cropped The picture taking a halfway trade off between alteration and screen coverage You can adjust the enlarge proportion of Cinema Zoom using D D or E E but...

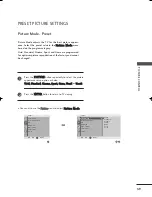
Страница 41: ... preset value in the P Pi ic ct tu ur re e M Mo od de e menu based on the program category Vivid Standard Cinema Sport and Game are programmed for optimum picture reproduction at the factory and cannot be changed Press the P PI IC CT TU UR RE E button repeatedly to select the picture appearance setup option as below V Vi iv vi id d S St ta an nd da ar rd d C Ci in ne em ma a S Sp po or rt t G Ga a...

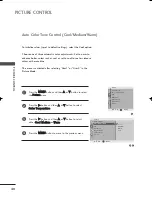
Страница 42: ...the P Pi ic ct tu ur re e menu Press the G G button and then D D or E E button to select C Co ol lo or r T Te em mp pe er ra at tu ur re e Press the G G button and then D D or E E button to select either C Co oo ol l M Me ed di iu um m or W Wa ar rm m Press the M ME EN NU U button to move to the previous menu 1 2 3 4 Auto Color Tone Control Cool Medium Warm 1 3 2 Picture Mode Color Temperature XD ...

Страница 43: ...ss of the screen adjust the bright ness of LCD panel C Co on nt tr ra as st t Adjusts the difference between light and dark B Br ri ig gh ht tn ne es ss s Increases or decreases the amount of white in the picture C Co ol lo or r Adjusts intensity of all colors S Sh ha ar rp pn ne es ss s Adjusts the level of crispness in the edges between the light and dark areas of the picture The lower the level...

Страница 44: ...the G G button and then D D or E E button to select U Us se er r Press the G G button and then D D or E E button to select R Re ed d G Gr re ee en n or B Bl lu ue e Press the F F or G G button to make appropriate adjustments Press the M ME EN NU U button to move to the previous menu 1 2 3 4 5 6 1 3 2 4 Picture Mode Color Temperature XD Advanced Aspect Ratio Picture Reset Screen Picture DE F G MENU...

Страница 45: ...re Mode Color Temperature XD Advanced Aspect Ratio Picture Reset Screen XD G DE F G MENU Auto Manual Manual Selection When selecting Picture Mode User1 or User2 you can operate this function Press the G G button and then D D or E E button to select X XD D C Co on nt tr ra as st t X XD D C Co ol lo or r or X XD D N NR R X XD D C Co on nt tr ra as st t Optimizing the contrast automatically according...

Страница 46: ...dv va an nc ce ed d Press the G G button and then D D or E E button to select G Ga am mm ma a Press the G G button and then D D or E E button to select L Lo ow w M Me ed di iu um m or H Hi ig gh h Press the M ME EN NU U button to move to the previous menu 1 2 3 4 5 1 3 2 4 Picture Mode Color Temperature XD Advanced Aspect Ratio Picture Reset Screen Picture DE F G MENU Picture Picture Mode Color Te...

Страница 47: ...v va an nc ce ed d Press the G G button and then D D or E E button to select F Fi il lm m M Mo od de e Press the G G button and then D D or E E button to select O On n or O Of ff f Press the M ME EN NU U button to move to the previous menu 1 2 3 4 5 1 3 2 4 Picture Mode Color Temperature XD Advanced Aspect Ratio Picture Reset Screen Picture DE F G MENU Picture Picture Mode Color Temperature XD Adv...

Страница 48: ...on and then D D or E E button to select B Bl la ac ck k L Le ev ve el l Press the G G button and then D D or E E button to select L Lo ow w or H Hi ig gh h A A L Lo ow w The reflection of the screen gets darker A A H Hi ig gh h The reflection of the screen gets brighter Press the M ME EN NU U button to move to the previous menu 1 2 3 4 5 1 3 2 4 Picture Mode Color Temperature XD Advanced Aspect Ra...

Страница 49: ...he G G button to initialize the adjusted value Press the M ME EN NU U button to move to the previous menu Returns to the default factory setting for Picture Mode Color Temperature XD Advanced Aspect Ratio 1 2 3 4 1 3 2 Picture Mode Color Temperature XD Advanced Aspect Ratio Picture Reset Screen Picture DE F G MENU Picture Picture Mode Color Temperature XD Advanced Aspect Ratio Picture Reset Screen...

Страница 50: ...o on n menu Press the G G button and then D D or E E button to select F Fa ac ct to or ry y R Re es se et t Press the G G button and then F F or G G button to select Y YE ES S or N NO O Press the M ME EN NU U button to move to the previous menu 1 2 3 4 1 3 2 Option Language Key Lock Caption Text Set ID Factory Reset Factory Reset G DE F G MENU Language Key Lock Caption Text Set ID Factory Reset Op...

Страница 51: ...Au ut to o V Vo ol lu um me e Press the G G button and then D D or E E button to select O On n or O Of ff f Press the M ME EN NU U button to move to the previous menu Auto Volume automatically remains on the same level of volume if you change programs 1 2 3 4 1 Sound Mode Auto Volume Balance 0 Audio 3 2 Audio Sound Mode Auto Volume Balance 0 Auto Volume G DE F G MENU Off On DE F G MENU SOUND LANGU...

Страница 52: ...sound qual ity at the factory and are not adjustable 1 3 2 Sound Mode Auto Volume Balance 0 Audio Audio Sound Mode Auto Volume Balance 0 Sound Mode G DE F G MENU Standard Music Cinema Sport Game User DE F G MENU Press the S SO OU UN ND D button repeatedly to select the appropri ate sound setup as below S St ta an nd da ar rd d M Mu us si ic c C Ci in ne em ma a S Sp po or rt t G Ga am me e or U Us...

Страница 53: ... or E E button to select U Us se er r Press the G G button Select a frequency band by pressing the F F or G G button Set the desired sound level with the D D or E E button Press the M ME EN NU U button to move to the previous menu Adjusting the audio equalizer 1 2 3 4 5 6 1 3 4 2 Sound Mode Auto Volume Balance 0 Audio Audio Sound Mode Auto Volume Balance 0 Sound Mode G DE F G MENU Standard Music C...

Страница 54: ... button to select the A Au ud di io o menu Press the G G button and then D D or E E button to select B Ba al la an nc ce e Press the G G button and then F F or G G button to make desired adjustment Press the M ME EN NU U button to move to the previous menu 1 2 3 4 1 3 2 Sound Mode Auto Volume Balance 0 Audio DE F G MENU Audio Sound Mode Auto Volume Balance Balance 15 DE F G MENU ...

Страница 55: ...anguage Press the M ME EN NU U button and then use D D or E E button to select the O Op pt ti io on n menu Press the G G button and then use D D or E E button to select L La an ng gu ua ag ge e Press the G G button and then use F F or G G button to select your desired language Press the M ME EN NU U button to move to the previous menu 1 2 3 4 ...

Страница 56: ...ap pt ti io on n T Ti ip ps s Not all TV broadcasts include closed caption signals Sometimes TV stations broadcast four different caption signals on the same channel By selecting Mode1 to Mode2 you can choose which signal you view Mode1 is usually the signal with the captions while another mode might show demonstration or programming information Your TV might not receive caption signals normally i...

Страница 57: ...ge is heard from left and right speakers Signal mode is stereo SAP The secondary language is heard from left and right speakers in mono sound Use the M MT TS S button to select your desired MTS mode in analog signal Each time you press the M MT TS S button M Mo on no o S St te er re eo o or S SA AP P appear in turn Press the E EN NT TE ER R button to return to TV viewing NOTE G G Select mono sound...

Страница 58: ...to set the hour Press the G G button and then D D or E E button to set the minute Press the M ME EN NU U button to move to the previous menu You must set the time correctly before using on off timer function If current time setting is erased by a power failure or the TV is unplugged reset the clock 1 2 3 4 5 1 3 4 2 Time Clock Off Time On Time Sleep Timer Auto Sleep Clock G DE F G MENU AM Clock Of...

Страница 59: ... U button to move to the previous menu The Off time function automatically switches the TV to standby at a preset time Two hours after the TV is switched on by the on time function it will auto matically switch back to standby mode unless a button has been pressed Once the on time off time is set these functions operate daily at the preset time The Off time function overrides the On time function ...

Страница 60: ...n the number of minutes you want is displayed on the screen press the E EN NT TE ER R button The timer begins to count down from the number of minutes selected To check the remaining minutes before the TV turns off press the S SL LE EE EP P button once To cancel the Sleep Timer press the S SL LE EE EP P button repeat edly to select The Sleep Timer turns the TV off at the preset time Note that this...

Страница 61: ...lect the T Ti im me e menu Press the G G button and then D D or E E button to select A Au ut to o S Sl le ee ep p Press the G G button and then D D or E E button to select O On n or O Of ff f Press the M ME EN NU U button to move to the previous menu 1 2 3 4 1 3 2 Time Clock Off Time On Time Sleep Timer Auto Sleep Auto Sleep G DE F G MENU Clock Off Time On Time Sleep Timer Auto Sleep Time DE F G M...

Страница 62: ... channel The problem may be with the broadcast Is the power cord inserted into wall power outlet Check your antenna direction and or location Test the wall power outlet plug another product s power cord into the outlet where the product s power cord was plugged in This is normal the image is muted during the product startup process Please contact your service center if the picture has not appeared...

Страница 63: ...ture OK No sound Unusual sound from inside the product No sound when connecting HDMI or USB No output from one of the speakers T Th he e a au ud di io o f fu un nc ct ti io on n d do oe es s n no ot t w wo or rk k Press the VOL or VOLUME button Sound muted Press MUTE button Try another channel The problem may be with the broadcast Are the audio cables installed properly Adjust Balance in menu opti...

Страница 64: ...r and a little fabric softener or dish washing detergent Wring the cloth until it s almost dry and then use it to wipe the screen Make sure the excess water is off the screen and then let it air dry before you turn on your TV Cleaning the Cabinet To remove dirt or dust wipe the cabinet with a soft dry lint free cloth Please be sure not to use a wet cloth Extended Absence G G If you expect to leave...

Страница 65: ...es 5 60 kg 12 3 lbs 5 34 kg 1 1 7 lbs AC100 240V 50 60Hz NTSC PAL M N VHF 2 13 UHF 14 69 CATV 1 125 75 ohm 32 104 F 0 40 C Less than 80 4 140 F 20 60 C Less than 85 Dimensions Width x Height x Depth Weight Power requirement Television System Program Coverage External Antenna Impedance Environment condition Including stand Excluding stand including stand excluding stand Operating Temperature Operat...

Страница 66: ...the control device to the RS 232C jack on the TV back panel RS 232C con nection cables are not supplied with the TV ANTENNA IN RGB PC IN AUDIO RGB DVI IN S VIDEO VIDEO AUDIO MONO AV IN H P HDMI DVI IN RS 232C IN CONTROL SERVICE Type of Connector D Sub 9 Pin Male No Pin Name 1 No connection 2 RXD Receive data 3 TXD Transmit data 4 DTR DTE side ready 5 GND 6 DSR DCE side ready 7 RTS Ready to send 8 ...

Страница 67: ... a crossed reverse cable Press the M ME EN NU U button and then use D D or E E button to select the O Op pt ti io on n menu Press the G G button and then D D or E E button to select S Se et t I ID D Press the G G button and then D D or E E button to adjust S Se et t I ID D to choose the desired TV ID number The adjustment range of SET ID is 1 99 Press the M ME EN NU U button to move to the previou...

Страница 68: ...up menu Adjustment range is 1 99 When selecting Set ID 0 every connected TV is controlled Set ID is indicated as decimal 1 99 on menu and as Hexa decimal 0x0 0x63 on transmission receiving protocol DATA To transmit command data Transmit FF data to read status of comand Cr Carriage Return ASCII code 0x0D ASCII code space 0x20 O OK K A Ac ck kn no ow wl le ed dg ge em me en nt t The TV transmits ACK...

Страница 69: ...on off You can also adjust mute using the MUTE button on remote control Data 00 Volume mute on Volume off Data 01 Volume mute off Volume on Transmission k e Set ID Data Cr Acknowledgement e Set ID OK NG Data x 0 05 5 V Vo ollu um me e C Co on nt tr ro oll C Co om mm ma an nd d k k f f To adjust volume You can also adjust volume with the volume buttons on remote control Data Min 00 Max 64 Refer to ...

Страница 70: ... You can also adjust Color Temperature in the Picture menu Data 00 Medium 01 Cool 02 Warm 03 User Transmission k u Set ID Data Cr Acknowledgement u Set ID OK NG Data x 1 15 5 R Re ed d A Ad djju us st tm me en nt t C Co om mm ma an nd d k k v v To adjust red in color temperature Data Min 00 Max 50 Refer to Real data mapping 2 See page 69 Transmission k v Set ID Data Cr Acknowledgement v Set ID OK ...

Страница 71: ... 16 C7 Step 199 FE Step 254 FF Step 255 R Re ea al l d da at ta a m ma ap pp pi in ng g 2 2 00 30 01 29 02 28 1E 0 28 10 3A 28 3B 29 3C 30 4E N A 4F N A 50 N A 2 20 0 E Eq qu ua al li iz ze e C Co om mm ma an nd d j j v v G To adjust equalize MSB LSB 0 Transmission j v Set ID Data Cr 0 0 0 0 0 0 0 Frequency Data Acknowledgement v Set ID OK NG Data x Frequency 1 st Band 2 st Band 3 st Band 4 st Ban...

Страница 72: ... NTSC cable 1 0 0 2 0 0 3 0 0 4 x x Reserved 5 0 1 Use No Use Using Physical Channel 6 0 1 Two One Two One Part Channel 7 0 1 Main Sub Main Sub Picture 0 0 1 T Tw wo o O On ne e p pa ar rt t C Ch ha an nn ne el l 6 6t th h b bi it t This bit is used in a cable ready system U Us si in ng g p ph hy ys si ic ca al l c ch ha an nn ne el l 5 5t th h b bi it t If the channel band is NTSC air or NTSC cab...

Страница 73: ... TV 0B INPUT 08 POWER 79 RATIO 10 19 Number Key 0 9 09 MUTE 02 VOL G G 03 VOL F F 00 CH D D 01 CH E E 43 MENU 44 ENTER 1A Q VIEW 52 SOUND 4D PICTURE 39 CAPTION 0E SLEEP 54 A PROG 55 MEMORY ERASE 1E FAV 0A MTS 2 23 3 C Co on nt tr ro oll B Ba ac ck klliig gh ht t C Co om mm ma an nd d m m g g To control the back light Data Min 00 Max 64 Transmission m g Set ID Data Cr Acknowledgement g Set ID OK Da...

Страница 74: ......

Отзывы: