background image

GB-

PIC
TURE C

ONTR

OL

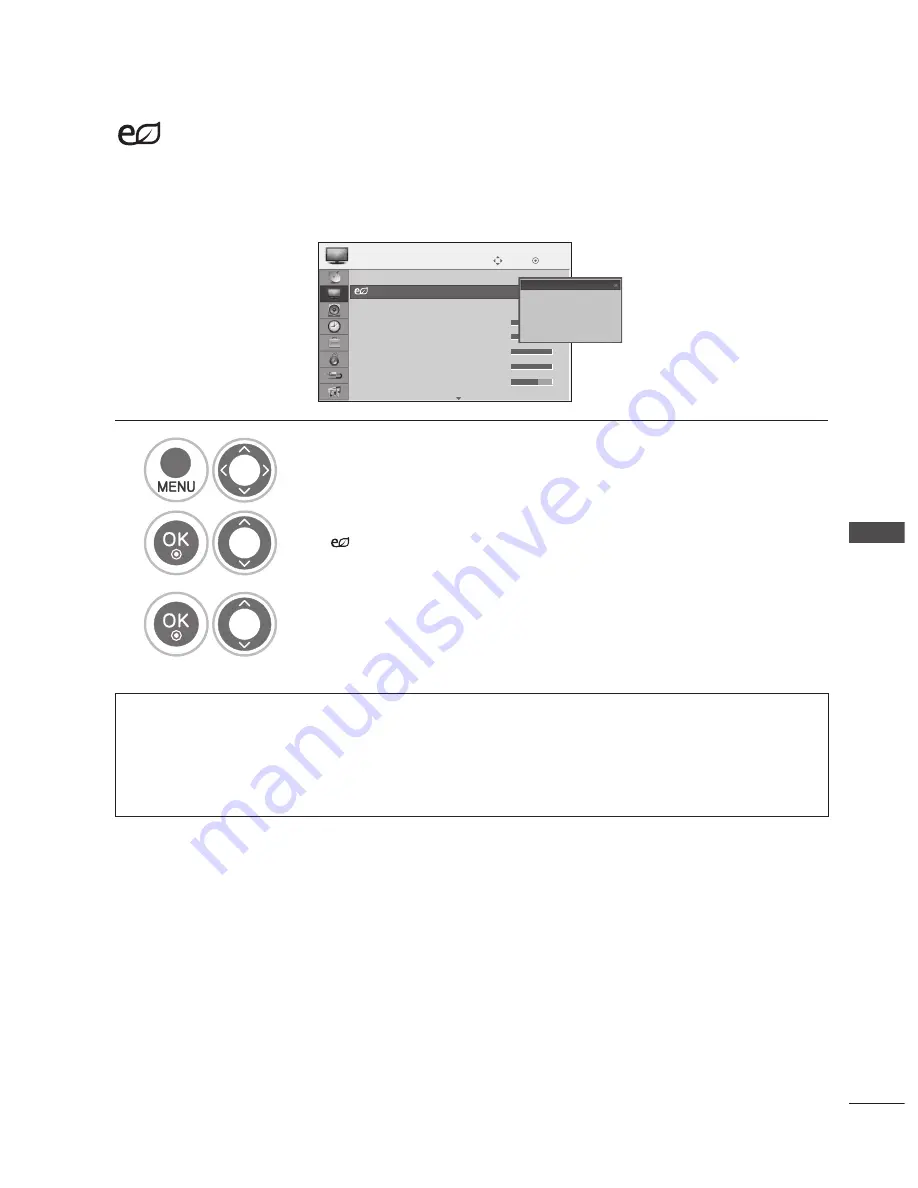
 ENERGY SAVING

It reduces the TV’s power consumption. 
You can increase the brightness of your screen by adjusting the 

Energy Saving level 

or by setting the 

Picture Mode

.

When adjusting Energy Saving in MHEG mode, the Energy Saving setting is applied after the MHEG is finished.

1

Select 

PICTURE

.

2

Select 


Energy Saving

.

3

Select 

Off

,

 Minimum

,

 Medium

,


Maximum 

or

 Screen Off

.

When selecting Screen off, TV turned off after 3 seconds.
If you adjust

 “Energy Saving

 -

Minimum

Medium

Maximum”

, Backlight feature will not work.

You can also adjust this feature by selecting 

Energy Saving

 button on the remote control.


•  Press the 

MENU

 button to return to normal TV viewing.

•  Press the 

RETURN

 button to return to the previous screen.

RED

GREEN

YELLOW

BLUE

RED

GREEN

YELLOW

BLUE

RED

GREEN

YELLOW

BLUE

RED

GREEN

YELLOW

BLUE

RED

GREEN

YELLOW

BLUE

RED

GREEN

YELLOW

BLUE

PICTURE

Move

OK

80
90
50
60
60

• 

Backlight

• 

Contrast

• 

Brightness

• 

Sharpness

 Colour

:  16:9

:  Off

:  Standard

Aspect Ratio


Energy Saving

Picture Mode

Off

Minimum
Medium
Maximum
Screen Off

Содержание 19LU70 Series

Страница 1: ...d serial number of the TV Refer to the label on the back cover and quote this information to your dealer when requiring service LCD TV OWNER S MANUAL LCD TV MODELS 19LU70 22LU70 Trade Mark of the DVB Digital Video Broadcasting Project 1991 to 1996 I ID Number s 6207 19LU7000 6224 22LU7000 ENGLISH Model Serial No ...

Страница 2: ...tem is not included for all models Lightly wipe any stains or fingerprints on the surface of the TV with the polishing cloth Polishing Cloth Polishing cloth for use on the screen Do not use excessive force This may cause scratching or discolouration Remote Control HDMI the HDMI logo and High Definition Multimedia Interface are trademarks or registered trademarks of HDMI Licensing LLC ACCESSORIES W...

Страница 3: ...etup 18 WATCHING TV PROGRAMME CONTROL Remote Control Key Functions 24 Turning On The TV 26 Programme Selection 26 Volume Adjustment 26 Quick Menu 27 On Screen Menus Selection and Adjustment 28 Auto Programme Tuning 29 Manual Programme Tuning In Digital Mode 30 Manual Programme Tuning In Analogue Mode 31 Programme Edit 33 Software Update 35 Diagnostics 38 CI Information In Digital Mode Only 39 Sele...

Страница 4: ... Off Time Setting 92 Auto Shut Off Setting 93 Sleep Timer Setting 93 PARENTAL CONTROL RATINGS Set Password Lock System 94 Block Programme 95 Parental Control In Digital Mode Only 96 Key Lock 97 TELETEXT Switch On Off 98 Simple Text 98 Fastext 98 Special Teletext Functions 99 DIGITAL TELETEXT Teletext Within Digital Service 100 Teletext In Digital Service 100 APPENDIX Troubleshooting 101 Maintenanc...

Страница 5: ...open or close the tray DVD Indicator illuminates blue when loading the disc or turning on the TV Remote Control Sensor Power Standby Indicator illuminates red in standby mode illuminates blue when the TV is switched on INPUT MENU OK VOLUME PROGRAMME POWER Standby Operation EJECT STOP PLAY PAUSE Back NOTE If you cannot open the disc tray with the EJECT button please contact your local product distr...

Страница 6: ...udio to various types of equipment Connect to a Digital Audio Component Use an Optical audio cable Audio Video Input Connect audio video output from an external device to these jacks Component Input Connect a component video audio device to these jacks Euro Scart Socket AV AV Connect scart socket input or output from an external device to these jacks Antenna Input Connect antenna or cable to this ...

Страница 7: ...ushioned surface to protect the screen from damage Assemble the TV as shown Slide the stand upwards towards the back of the TV until the locking pins are locked fully with an audible click Desktop Pedestal Installation For adequate ventilation allow a clearance of 4 10cm all around the TV 1 2 4 inches 4 inches 4 inches 4 inches ...

Страница 8: ... TV Use the eye bolts or TV brackets bolts to fix the product to the wall as shown in the picture If your TV has bolts in the eyebolts loosen these bolts Insert the eye bolts or TV brackets bolts and tighten them securely in the upper holes Secure the wall brackets with the bolts on the wall Match the height of the bracket that is mounted on the wall Use a sturdy rope to tie the product for alignm...

Страница 9: ...ll wall mount on a solid wall perpendicular to the floor Should use a special wall mount if you want to install it to ceiling or slanted wall The surface that wall mount is to be mounted on should be of sufficient strength to support the weight of TV set e g concrete natural rock brick and hollow block Installing screw type and length depends on the wall mount used Further information refer to the...

Страница 10: ...l areas to achieve better picture quality it may be necessary to install a signal amplifier to the antenna as shown above If signal needs to be split for two TVs use an antenna signal splitter for connection Wall Antenna Socket Outdoor Antenna VHF UHF Terrestrial Antenna Single family Dwellings Houses Connect to wall jack for outdoor antenna RF Coaxial Wire 75 ohm Multi family Dwellings Apartments...

Страница 11: ...efer to the diagram as shown below Connecting with a Component Cable Connect the video outputs Y PB PR of the digital set top box to the COMPONENT IN VIDEO jacks on the TV Connect the audio outputs of the digital set top box to the COMPONENT IN AUDIO jacks on the TV Turn on the digital set top box Refer to the owner s manual for the digital set top box Select Component input source using the INPUT...

Страница 12: ...ion or higher If the HDMI cables don t support HDMI version flickering or no screen display can result Please use the latest cables that support at least HDMI version Connecting with an HDMI to DVI Cable Connect the digital set top box to HDMI DVI IN jack on the TV Connect the audio output of the digital set top box to the AUDIO IN RGB DVI jack on the TV Turn on the digital set top box Refer to th...

Страница 13: ...s shown below Component ports on the TV Y PB PR Video output ports on DVD player Y Y Y Y PB B Y Cb Pb PR R Y Cr Pr Connecting with an HDMI Cable Connect the HDMI output of the DVD to the HDMI DVI IN or HDMI IN jack on the TV Select HDMI or HDMI input source using the INPUT button on the remote control Refer to the DVD player s manual for operating instructions NOTE The TV can receive video and aud...

Страница 14: ...art cable used must be signal shielded Copy protected programmes will not be output on the EURO scart sockets for legal reasons Even if it was output the video signals fed through the EURO scart sockets will be not recorded by copyright protection systems Scart Output Main Input AV SCART Output AV SCART Output Digital TV Mute Digital TV Analogue TV Mute Analogue TV if the TV mode you last watched ...

Страница 15: ...wing Connecting with a RCA Cable Connect the AUDIO VIDEO jacks between TV and VCR Match the jack colours Video yellow Audio Left white and Audio Right red Insert a video tape into the VCR and press PLAY on the VCR Refer to the VCR owner s manual Select AV input source using the INPUT button on the remote control NOTE If you have a mono VCR connect the audio cable from the VCR to the AUDIO L MONO j...

Страница 16: ...not be output on the EURO scart sockets for legal reasons Even if it was output the video signals fed through the EURO scart sockets will be not recorded by copyright protection systems Scart Output Main Input AV SCART Output AV SCART Output Digital TV Mute Digital TV Analogue TV Mute Analogue TV if the TV mode you last watched is Analogue mode Analogue TV AV1 SCART1 CVBS AV1 CVBS RGB AV2 SCART2 C...

Страница 17: ...ITAL AUDIO OUT terminal on the back of TV to a Home Theater or amp Connect one end of an optical cable to the TV Digital Audio Optical Output port Connect the other end of the optical cable to the digital audio Optical input on the audio equipment Set the TV Speaker option Off in the AUDIO menu up 84 Refer to the external audio equipment instruction manual for operation CAUTION Do not look into th...

Страница 18: ...io Left white and Audio Right red Select AV input source using the INPUT button on the remote control Operate the corresponding external equipment Refer to external equipment operating guide USB SETUP Connect the USB device to the USB IN jack on the side of the TV After connecting the USB IN jack you use the USB function up 44 1 Camcorder Video Game Set ...

Страница 19: ... audio output to the AUDIO IN RGB DVI jack on the TV Turn on the PC and the TV Select RGB input source using the INPUT button on the remote control Connecting with an HDMI to DVI Cable Connect the DVI output of the PC to the HDMI DVI IN jack on the TV Connect the PC audio output to the AUDIO IN RGB DVI jack on the TV Turn on the PC and the TV Select HDMI input source using the INPUT button on the ...

Страница 20: ...solution or change the refresh rate to another rate or adjust the brightness and contrast on the menu until the picture is clear If the refresh rate of the PC graphic card can not be changed change the PC graphic card or consult the manufacturer of the PC graphic card The synchronization input waveform for Horizontal and Vertical frequencies are separate We recommend using 60x 68 60Hz for the PC m...

Страница 21: ...d resolution Press the MENU button to return to normal TV viewing Press the RETURN button to return to the previous screen RED GREEN YELLOW BLUE RED GREEN YELLOW BLUE RED GREEN YELLOW BLUE RED GREEN YELLOW BLUE RED GREEN YELLOW BLUE RED GREEN YELLOW BLUE RED GREEN YELLOW BLUE RED GREEN YELLOW BLUE PICTURE Contrast Brightness Sharpness Colour Tint AdvancedControl PictureReset Move OK 90 50 60 60 0 ...

Страница 22: ...o Config Press the MENU button to return to normal TV viewing Press the RETURN button to return to the previous screen RED GREEN YELLOW BLUE RED GREEN YELLOW BLUE RED GREEN YELLOW BLUE RED GREEN YELLOW BLUE RED GREEN YELLOW BLUE RED GREEN YELLOW BLUE RED GREEN YELLOW BLUE RED GREEN YELLOW BLUE RED GREEN YELLOW BLUE RED GREEN YELLOW BLUE SCREEN Move Prev Resolution AutoConfig Position Size Phase Re...

Страница 23: ...appropriate adjustments Press the MENU button to return to normal TV viewing Press the RETURN button to return to the previous screen RED GREEN YELLOW BLUE RED GREEN YELLOW BLUE RED GREEN YELLOW BLUE RED GREEN YELLOW BLUE RED GREEN YELLOW BLUE RED GREEN YELLOW BLUE RED GREEN YELLOW BLUE RED GREEN YELLOW BLUE RED GREEN YELLOW BLUE PICTURE Contrast Brightness Sharpness Colour Tint AdvancedControl Pi...

Страница 24: ... RETURN button to return to the previous screen RED GREEN YELLOW BLUE RED GREEN YELLOW BLUE RED GREEN YELLOW BLUE RED GREEN YELLOW BLUE RED GREEN YELLOW BLUE RED GREEN YELLOW BLUE RED GREEN YELLOW BLUE RED GREEN YELLOW BLUE RED GREEN YELLOW BLUE PICTURE Contrast Brightness Sharpness Colour Tint AdvancedControl PictureReset Move OK 90 50 60 60 0 Screen SCREEN Move Prev Resolution AutoConfig Positio...

Страница 25: ...umbered items in a menu LIST Displays the programme table u p 40 Q VIEW Returns to the previously viewed programme Up Down Left Right Allows you to navigate the on screen menus and adjust the system settings to your preference OK Accepts your selection or displays the current mode MENU Selects a menu Clears all on screen displays and returns to TV viewing from any menu u p 28 RETURN EXIT Allows th...

Страница 26: ...e the Teletext section u p 98 GUIDE Shows programme schedule up 52 Q MENU Select the desired quick menu source Aspect Ratio Energy Saving Picture Mode Sound Mode Audio Sleep Timer Fav On Off USB Eject up 27 INFO Shows the present screen information SUBTITLE Recalls your preferred subtitle in digital mode MARK Check and un check programmes FAV Displays the selected favourite programme Installing Ba...

Страница 27: ...cedure you may not have all of the channels available In this case you can use the SETUP Auto Tuning to search for more channels Press the RETURN button to change the current OSD to the previous OSD For those countries without confirmed DTV broadcasting standards some DTV features might not work depending on the DTV broadcasting environment Home Use mode is the optimal setting for home environment...

Страница 28: ...g Selects your desired Energy Saving mode Sleep Timer Sets the sleep timer Picture Mode Selects your desired Picture Mode Fav On Off Add the programme to the favourite list Sound Mode It is a feature to automatically set the sound combination which it deems the best for the images being watched Selects your desired Sound Mode USB Eject Select Eject in order to remove USB device 1 Display each menu...

Страница 29: ...W BLUE SETUP PICTURE AUDIO TIME OPTION LOCK INPUT USB SETUP Move OK AutoTuning ManualTuning ProgrammeEdit SoftwareUpdate Diagnostics CIInformation PICTURE 16 9 Off Standard Move OK 80 90 50 60 60 AspectRatio EnergySaving PictureMode Backlight Contrast Brightness Sharpness Colour AUDIO Off 0 Standard Move OK AutoVolume Balance SoundMode SRSTruSurroundXT Off 80Hz 220Hz 470Hz 1KHz 0 0 0 0 OPTION Move...

Страница 30: ...N service First tunes the digital TV and radio programmes then analogue programmes 2 Select Auto Tuning 3 Select Yes 4 Select Start 5 Run Auto Tuning The search results will appear The found programmes are automatically saved in order Press the MENU button to return to normal TV viewing Press the RETURN button to return to the previous screen RED GREEN YELLOW BLUE RED GREEN YELLOW BLUE RED GREEN Y...

Страница 31: ...ect Update Press the MENU button to return to normal TV viewing Press the RETURN button to return to the previous screen RED GREEN YELLOW BLUE RED GREEN YELLOW BLUE RED GREEN YELLOW BLUE RED GREEN YELLOW BLUE RED GREEN YELLOW BLUE RED GREEN YELLOW BLUE RED GREEN YELLOW BLUE RED GREEN YELLOW BLUE RED GREEN YELLOW BLUE RED GREEN YELLOW BLUE SETUP Move OK AutoTuning ManualTuning ProgrammeEdit Softwar...

Страница 32: ... 2 Select Manual Tuning 3 Select TV 4 Select the desired programme number on 5 Select a TV system 6 Select V UHF or Cable 7 Select the desired channel number or or RED GREEN YELLOW BLUE RED GREEN YELLOW BLUE RED GREEN YELLOW BLUE RED GREEN YELLOW BLUE RED GREEN YELLOW BLUE RED GREEN YELLOW BLUE RED GREEN YELLOW BLUE RED GREEN YELLOW BLUE RED GREEN YELLOW BLUE RED GREEN YELLOW BLUE RED GREEN YELLOW...

Страница 33: ...lect Store Fine Tuning Normally fine tuning is only necessary if reception is poor 1 Select Fine 2 Fine tune for the best picture and sound 3 Select Store Press the MENU button to return to normal TV viewing Press the RETURN button to return to the previous screen RED GREEN YELLOW BLUE BLUE RED GREEN YELLOW BLUE RED GREEN YELLOW BLUE RED GREEN YELLOW BLUE RED GREEN YELLOW BLUE RED GREEN YELLOW BLU...

Страница 34: ...ot work 2 Select Programme Edit 3 Enter the Programme Edit Changing a programme 1 Select a programme you want to watch 2 Switch to the selected programme Changing groups 1 Switch between TV and Radio groups Press the MENU button to return to normal TV viewing Press the RETURN button to return to the previous screen RED GREEN YELLOW BLUE RED GREEN YELLOW BLUE RED GREEN YELLOW BLUE RED GREEN YELLOW ...

Страница 35: ...hift the cursor to the position you want 3 Move the selected programmes to the new location After you finish the edit press the RETURN or EXIT button to save all the changes Press the MENU button to return to normal TV viewing Press the RETURN button to return to the previous screen RED GREEN YELLOW BLUE RED GREEN YELLOW BLUE RED GREEN YELLOW BLUE RED GREEN YELLOW BLUE RED GREEN YELLOW BLUE RED GR...

Страница 36: ...must not be disconnected After Software Update you can confirm the updated software version in Diagnostics menu 2 Search for the new software The new software information will be shown Refer to When detecting new software using Auto Update or Manual Update menu up 37 Press the MENU button to return to normal TV viewing Press the RETURN button to return to the previous screen RED GREEN YELLOW BLUE ...

Страница 37: ... time 4 Select Close If the new software is detected the software update message is displayed when you turn on the TV Select Yes and press the OK button to start the software update Press the MENU button to return to normal TV viewing Press the RETURN button to return to the previous screen RED GREEN YELLOW BLUE RED GREEN YELLOW BLUE RED GREEN YELLOW BLUE RED GREEN YELLOW BLUE RED GREEN YELLOW BLU...

Страница 38: ...are by the Regular Auto Update in Standby mode When you turn on the TV after new software is detected the software update message will be displayed Select Yes and press the OK button to start the software update The progress status is displayed Please wait until it is complete After the software update is complete the confirm message will be displayed and the system restarts automatically SystemIn...

Страница 39: ...he system status information will be displayed Press the MENU button to return to normal TV viewing Press the RETURN button to return to the previous screen RED GREEN YELLOW BLUE RED GREEN YELLOW BLUE RED GREEN YELLOW BLUE RED GREEN YELLOW BLUE RED GREEN YELLOW BLUE SETUP Move OK AutoTuning ManualTuning ProgrammeEdit SoftwareUpdate Diagnostics CIInformation Manufacturer Model Type UpdateDate Softw...

Страница 40: ...SD is only for illustration and the menu options and screen format will vary according to the Digital pay services provider It is possible for you to change CI Common Interface menu screen and service by consulting your dealer 1 Select SETUP 2 Select CI Information 3 Display the CI Information 4 Select the desired item Module information smart card information language or software download etc Pre...

Страница 41: ...ogramme List Displaying the Favourite List 1 Display or exit the programme list 1 Display or exit the favourite programme list Selecting a Programme 1 Select a programme Change the page 2 Switch to the selected programme Displayed when the Locked Programme RED GREEN YELLOW BLUE GREEN YELLOW BLUE RED GREEN YELLOW BLUE RED GREEN YELLOW BLUE RED GREEN YELLOW BLUE Programme List Favourite List Exit Ex...

Страница 42: ...lect INPUT Antenna Select it when watching the TV DTV AV1 AV2 AV3 Select it when watching the VCR or external equipment Component Select it when using the DVD or the Digital set top box depends on connector DVD Select it when watching the built in DVD RGB Select it when using PC depends on connector HDMI1 HDMI2 Select it when using DVD PC or Digital set top box depend on connector 2 Select the inp...

Страница 43: ...inema mode will be selected both for Picture Mode and Sound Mode in PICTURE menu and AUDIO menu respectively If you select Off in AV mode the picture and image which you initially set will be selected RED GREEN YELLOW BLUE RED GREEN YELLOW BLUE RED GREEN YELLOW BLUE RED GREEN YELLOW BLUE RED GREEN YELLOW BLUE RED GREEN YELLOW BLUE RED GREEN YELLOW BLUE OPTION Move OK MenuLanguage AudioLanguage Sub...

Страница 44: ...gotten your password press 7777 to reset your password 2 Select Factory Reset 3 Select Yes 4 Start Factory Reset Press the MENU button to return to normal TV viewing Press the RETURN button to return to the previous screen RED GREEN YELLOW BLUE RED GREEN YELLOW BLUE RED GREEN YELLOW BLUE RED GREEN YELLOW BLUE RED GREEN YELLOW BLUE RED GREEN YELLOW BLUE RED GREEN YELLOW BLUE OPTION Move OK AudioLan...

Страница 45: ...r image files Please use only a USB storage device which was formatted as a FAT file system provided with the Windows operating system In case of a storage device formatted as a different utility programme which is not supported by Windows it may not be recognized Please connect power to a USB storage device over 0 5A which requires an external power supply If not the device may not be recognized ...

Страница 46: ... among JPEG SOF0 SOF1 only Non supported files are displayed in the form of bitmap Screen Components 1 Select USB 2 Select Photo List Moves to upper level file Current page Total pages Total number of marked photos Usable USB memory Corresponding buttons on the remote control RED GREEN YELLOW BLUE RED GREEN YELLOW BLUE RED GREEN YELLOW BLUE RED GREEN YELLOW BLUE RED GREE YELLO BLUE PhotoList UpFol...

Страница 47: ...4 Select the desired PopUp menu Press the RETURN button to return to the previous screen RED GREEN YELLOW BLUE RED GREEN YELLOW BLUE RED GREEN YELLOW BLUE RED GREEN YELLOW BLUE RED GREEN YELLOW BLUE RED GREEN YELLOW BLUE Photo List UpFolder Navigation Option PageChange Select Exit UpFolder Page 1 1 1file s Marked USBDevice FreeSpace 2GB Photo List UpFolder Navigation Option PageChange Select Exit ...

Страница 48: ...he photo displayed on the screen in full size Press the RETURN button to return to the previous screen RED GREEN YELLOW BLUE RED GREEN YELLOW BLUE RED GREEN YELLOW BLUE RED GREEN YELLOW BLUE RED GREEN YELLOW BLUE RED GREEN YELLOW BLUE RED GREEN YELLOW BLUE PhotoList UpFolder Navigation Option PageChange Select Exit UpFolder Page 1 1 1file s Marked USBDevice FreeSpace 2GB PhotoList UpFolder Navigat...

Страница 49: ...size Set the Music Folder for BGM in Options before using this function u Rotate Rotate photos Rotates the photo 90 180 270 360 clockwise It can not be rotate when the width of a picture is bigger than supported height u Delete Delete photos u Option Set values for Slide Speed and Music Folder for BGM Use button and OK button to set values Then go to and press OK to save the settings You cannot ch...

Страница 50: ...ample to assist with the TV operation MUSIC MP3 supporting file Bit rate 32 320 Sampling rate MPEG1 layer 3 32 kHz 44 1 kHz 48 kHz Screen Components 1 Select USB 2 Select Music List Moves to upper level file Current page Total pages Total number of marked musics Usable USB memory Corresponding buttons on the remote control RED GREEN YELLOW BLUE RED GREEN YELLOW BLUE RED GREEN YELLOW BLUE RED GREEN...

Страница 51: ...arget folder or drive Use the P button to navigate in the music page Use the MARK button to mark or unmark a music When one or more music files are marked the marked musics will be played in sequence For example if you want to listen to only one music repeatedly just mark the music only and play it If no music is marked all the music in the folder will be played in sequence 2 Select the desired mu...

Страница 52: ... When music is playing is displayed in back of the music title A damaged or corrupted music does not play but displays 00 00 in playtime A music downloaded from a paid service with copyright protection does not start but displays inappropriate information in playtime If you press n button screen saver is stopped The PLAY Pause II n tt buttons on the remote control are also available in this mode Y...

Страница 53: ...he broadcaster Three modes are available for quick search and reminder Table Schedule and Find 1 Display or exit the TV Guide 2 Move to Schedule mode 3 Move to Find mode 4 Move to Table mode TVGUIDE EPG ELECTRONICPROGRAMMEGUIDE In Digital Mode BLUE RED GREEN YELLOW BLUE RED GREEN YELLOW BLUE RED GREEN YELLOW BLUE ...

Страница 54: ... Display the programme information Reserving the watching 1 Select a programme in the future 2 Reserve the watching of the selected programme To cancel press it again The reserved programmes are added automatically in Schedule RED GREEN YELLOW BLUE RED GREEN YELLOW BLUE RED GREEN YELLOW BLUE RED GREEN YELLOW BLUE RED GREEN YELLOW BLUE RED GREEN YELLOW BLUE RED GREEN YELLOW BLUE RED GREEN YELLOW BL...

Страница 55: ...up Change the page 2 Select each option and enter the values Display the programme information 3 Select OK to save RED GREEN YELLOW BLUE RED GREEN YELLOW BLUE RED GREEN YELLOW BLUE RED GREEN YELLOW BLUE RED GREEN YELLOW BLUE RED GREEN YELLOW BLUE RED GREEN YELLOW BLUE RED GREEN YELLOW BLUE RED GREEN YELLOW BLUE RED GREEN YELLOW BLUE RED GREEN YELLOW BLUE RED GRE YELLO BLU TVGuide Table Schedule Fi...

Страница 56: ...e watching 1 Select a programme on air 1 Select a programme in the future 2 Switch to the selected programme 2 Reserve the watching of the selected programme To cancel press it again The reserved programmes are added automatically in Schedule RED GREEN YELLOW BLUE RED GREEN YELLOW BLUE RED GREEN YELLOW BLUE RED GREEN YELLOW BLUE RED GREEN YELLOW BLUE RED GREEN YELLOW BLUE RED GREEN YELLOW BLUE RED...

Страница 57: ...store discs in a place subject to direct sunlight or near heat sources Do not store discs in places subject to moisture and dust such as a bathroom or near a humidifier Store discs vertically in a case Stacking or placing objects on discs outside of their case may cause warping Structure of disc contents Normally DVD video discs are divided into titles and the titles are sub divided into chapters ...

Страница 58: ... on the labels of some DVD discs indicates which type of player can play those discs This unit can play only DVD discs labeled 2 or ALL If you try to play any other discs the message Wrong Region will appear on the TV screen Some DVD discs may not have a region code label even though their playback is prohibited by area limits CAUTION This Digital Video Disc Player employs a Laser System To ensure...

Страница 59: ...ack will start automatically Stop Resume 1 Press to stop playback temporarily II n appears on the screen The unit memorizes the location where you stopped even if standby or other input modes 2 Resume playback from the location where you stopped unless you turned off the main power or removed the disc after you had stopped Full Stop Eject 1 Press twice to stop playback fully n appears on the scree...

Страница 60: ...fast backward or forward playback Select the required speed by pressing repeatedly x2 x4 x16 x32 or x128 2 Return to normal playback Slow Backward Forward 1 Press to pause playback 2 Press to slow backward or forward playback Select the required speed by pressing repeatedly x1 16 x1 8 x1 4 or x1 2 3 Return to normal playback The slow backward is available for DVD or or ...

Страница 61: ...u want by pressing repeatedly Still Picture and Frame by Frame Playback 1 Press to pause playback 2 Press it repeatedly to advance the picture frame by frame 3 Return to normal playback Repeat Playback You can play a specific title chapter track or segment repeatedly 1 Press to set the repeat mode Press it repeatedly to change the repeat mode DVD CHAPTER TITLE OFF VCD TRACK ALL OFF On a Video CD w...

Страница 62: ... on TV screen and the ending point is set up Playback starts at the point that you selected Playback stops at the end point returns to Point A automatically and then starts again 3 Resume normal playback Disc Menu DVD only 1 Press to display the disc menu 2 Select the desired item 3 Return to normal playback Title Menu DVD only 1 Press to display the title menu 2 Select the desired item The TV may...

Страница 63: ...e the camera angle of the scene you are currently watching 1 Press this button during playback 2 Press it repeatedly to select the desired angle You can only change the angle for DVDs that provide multiple angles of scenes The angle function will not work on DVD video discs that do not contain scenes recorded at different angles The number of angles varies from disc to disc Subtitles DVD only 1 Pr...

Страница 64: ...e is available for Video CDs with the PBC function over version 2 0 Mp3 Operation Basic Playback 1 Insert a disc The MUSIC menu screen appears 2 Select the desired folder 3 Select the desired file 4 Play the MP3 files from the selected file You can easily move the cursor to the next page using the DISC MENU button When using the disc with both MP3 and JPEG files press the TITLE button to switch be...

Страница 65: ...stop playback temporarily II n appears on the screen 2 Resume playback from the location where you stopped Full Stop Eject 1 Press twice to stop playback fully n appears on the screen 2 Remove the disc Pause Playback 1 Press to pause playback 2 Return to normal playback Fast Backward Forward 1 Press to fast backward or forward playback Select the required speed by pressing repeatedly x2 x4 or x8 2...

Страница 66: ...atedly to change the repeat mode TRACK ALL OFF Edit Programme List 1 Press to edit the programme list appears on the screen 2 Select the desired file in the list and add to the programme list on the right 3 Select Clear All to delete all files in the programme list MP3 WMA music file requirement MP3 WMA compatibility with this unit is limited as follows File extensions mp3 wma Sampling frequency w...

Страница 67: ...top Resume 1 Press once to stop playback temporarily II n appears on the screen 2 Resume playback from the location where you stopped Full Stop Eject 1 Press twice to stop playback fully n appears on the screen 2 Remove the disc Pause Playback 1 Press to pause playback 2 Return to normal playback TRACK 01 TRACK 02 TRACK 03 TRACK 04 TRACK 05 TRACK 06 TRACK 07 TRACK 08 Edit 00 01 37 1 19 List Progra...

Страница 68: ...e to Another Track 1 Press to go to the next track Playback starts from the beginning of the next track 2 Press to return to the beginning the current track You can select the previous or next track you want by pressing repeatedly Repeat Playback You can play a specific track repeatedly 1 Press to set the repeat mode Press it repeatedly to change the repeat mode TRACK ALL OFF or ...

Страница 69: ...ct the end point A B is displayed on TV screen and the ending point is set up Playback starts at the point that you selected Playback stops at the end point returns to Point A automatically and then starts again 3 Resume normal playback Edit Programme List 1 Press to edit the programme list appears on the screen 2 Select the desired track in the list and add to the programme list on the right 3 Se...

Страница 70: ...ected JPEG image in full screen 5 Return to the menu screen You can easily move the cursor to the next page using the DISC MENU button When using the disc with both MP3 and JPEG files press the TITLE button to switch between the MUSIC and PHOTO menu screens or 1 30 533 x 800 IMG 001 IMG_002 IMG_003 IMG_004 IMG_005 IMG_006 IMG_007 Music List Preview Photo IMG_001 jpg ...

Страница 71: ... selected file 5 Press to pause the slide show 6 Press to stop the slide show Press the DISPLAY button to hide the play control menu during showing Rotation 1 Rotate a JPEG file clockwise or counter clockwise during showing Photo file requirement JPEG file compatibility with this unit is limited as follows File extensions jpg Photo size Less than 2MB recommended Maximum Files Disc Less than 600 to...

Страница 72: ...icture format 16 9 The following selection will allow you to adjust the picture horizontally in linear proportion to fill the entire screen useful for viewing 4 3 formatted DVDs Original When your TV receives a wide screen signal it will automatically change to the picture format broadcast Just Scan Following Selection will lead to you view the picture of best quality without loss of original pict...

Страница 73: ...r a general TV programme in the 14 9 mode The 14 9 screen is viewed in the same way as in 4 3 but is magnified to the left and right Cinema Zoom 1 Choose Cinema Zoom 1 when you want to enlarge the picture in correct proportion NOTE When enlarging or reducing the picture the image may become distorted t or u button Adjust enlarge proportion of Cinema Zoom The adjustment range is 1 16 p or q button ...

Страница 74: ...TV turned off after 3 seconds If you adjust Energy Saving Minimum Medium Maximum Backlight feature will not work You can also adjust this feature by selecting Energy Saving button on the remote control Press the MENU button to return to normal TV viewing Press the RETURN button to return to the previous screen RED GREEN YELLOW BLUE RED GREEN YELLOW BLUE RED GREEN YELLOW BLUE RED GREEN YELLOW BLUE ...

Страница 75: ...t picture appearance Select the preset value in the Picture Mode menu based on the programme category You can also adjust Picture Mode in the Q Menu 2 Select Picture Mode 3 Select Vivid Standard Natural Cinema Sport or Game Press the MENU button to return to normal TV viewing Press the RETURN button to return to the previous screen RED GREEN YELLOW BLUE RED GREEN YELLOW BLUE RED GREEN YELLOW BLUE ...

Страница 76: ...tricity consumption is reduced by up to 60 The black brightness is reduced As the black has greater depth you can enjoy a better quality definition You can adjust brightness with maintaining original signal resolution 2 Select Picture Mode 3 Select Vivid Standard Natural Cinema Sport or Game 4 Select Backlight Contrast Brightness Colour Sharpness or Tint 5 Make appropriate adjustments NOTE You can...

Страница 77: ...our desired Source Colour Temperature Noise Reduction Black Level Eye Care Real Cinema or Film Mode u p 77 4 Make appropriate adjustments Press the MENU button to return to normal TV viewing Press the RETURN button to return to the previous screen RED GREEN YELLOW BLUE RED GREEN YELLOW BLUE RED GREEN YELLOW BLUE RED GREEN YELLOW BLUE RED GREEN YELLOW BLUE RED GREEN YELLOW BLUE RED GREEN YELLOW BLU...

Страница 78: ...of the screen gets brighter Set black level of the screen to proper level This function enables to select Low or High in the following mode AV NTSC M HDMI or Component Eye Care On Off Adjust the brightness of the screen to prevent the screen from being too bright Dims extremely bright pictures This feature is disable in Picture Mode Vivid Cinema Real Cinema Film Mode On Off Makes video clips recor...

Страница 79: ...n to normal TV viewing Press the RETURN button to return to the previous screen RED GREEN YELLOW BLUE RED GREEN YELLOW BLUE RED GREEN YELLOW BLUE RED GREEN YELLOW BLUE RED GREEN YELLOW BLUE PICTURE Move OK 90 50 60 60 0 Screen Contrast Brightness Sharpness Colour Tint AdvancedControl PictureReset PICTURE Move OK 90 50 60 60 0 Screen Contrast Brightness Sharpness Colour Tint AdvancedControl Picture...

Страница 80: ...GREEN YELLOW BLUE RED GREEN YELLOW BLUE RED GREEN YELLOW BLUE RED GREEN YELLOW BLUE RED GREEN YELLOW BLUE RED GREEN YELLOW BLUE RED GREEN YELLOW BLUE OPTION Move OK AudioLanguage SubtitleLanguage HardofHearing Country InputLabel KeyLock ModeSetting FactoryReset English English Off UK Off HomeUse OPTION Move OK AudioLanguage SubtitleLanguage HardofHearing Country InputLabel KeyLock ModeSetting Fact...

Страница 81: ...h program 1 Select AUDIO 2 Select Auto Volume 3 Select On or Off Press the MENU button to return to normal TV viewing Press the RETURN button to return to the previous screen SOUND LANGUAGE CONTROL RED GREEN YELLOW BLUE RED GREEN YELLOW BLUE RED GREEN YELLOW BLUE RED GREEN YELLOW BLUE RED GREEN YELLOW BLUE RED GREEN YELLOW BLUE AUDIO Move OK SRSTruSurroundXT Off 80Hz 220Hz 470Hz 1KHz 0 0 0 0 Off 0...

Страница 82: ...sic Optimizes sound for watching movies Optimizes sound for watching sports events Optimizes sound for playing games 1 Select AUDIO You can also adjust Sound Mode in the Q Menu 2 Select Sound Mode 3 Select Standard Music Cinema Sport or Game Press the MENU button to return to normal TV viewing Press the RETURN button to return to the previous screen RED GREEN YELLOW BLUE RED GREEN YELLOW BLUE RED ...

Страница 83: ...from SRS Labs Inc 2 Select SRS TruSurround XT 3 Select On or Off Press the MENU button to return to normal TV viewing Press the RETURN button to return to the previous screen RED GREEN YELLOW BLUE RED GREEN YELLOW BLUE RED GREEN YELLOW BLUE RED GREEN YELLOW BLUE RED GREEN YELLOW BLUE RED GREEN YELLOW BLUE RED GREEN YELLOW BLUE RED GREEN YELLOW BLUE RED GREEN YELLOW BLUE RED GREEN YELLOW BLUE RED G...

Страница 84: ...ess the RETURN button to return to the previous screen RED GREEN YELLOW BLUE RED GREEN YELLOW BLUE RED GREEN YELLOW BLUE RED GREEN YELLOW BLUE RED GREEN YELLOW BLUE RED GREEN YELLOW BLUE AUDIO Move OK SRSTruSurroundXT Off 80Hz 220Hz 470Hz 1KHz 0 0 0 0 Off 0 Standard AutoVolume Balance SoundMode Close Balance 0 AUDIO Move OK SRSTruSurroundXT Off 80Hz 220Hz 470Hz 1KHz 0 0 0 0 Off 0 Standard AutoVolu...

Страница 85: ... menus in AUDIO are disabled when TV Speaker is set to Off 2 Select TV Speaker 3 Select On or Off Press the MENU button to return to normal TV viewing Press the RETURN button to return to the previous screen RED GREEN YELLOW BLUE RED GREEN YELLOW BLUE RED GREEN YELLOW BLUE RED GREEN YELLOW BLUE RED GREEN YELLOW BLUE RED GREEN YELLOW BLUE AUDIO Move OK 470Hz 1KHz 2 2KHz 4 7KHz 12KHZ Reset 0 0 0 0 0...

Страница 86: ...ense from Dolby Laboratories Dolby and the double D symbol are trademarks of Dolby Laboratories There is a possibility that when HDMI mode some DVD players do not make SPDIF sound At that time set the output of the digital audio of the DVD player to PCM 2 Select Digital Audio Out 3 Select Dolby Digital or PCM Item Audio Input Digital Audio output Dolby Digital MPEG DD DD PCM DD Not available PCM M...

Страница 87: ...turn to normal TV viewing Press the RETURN button to return to the previous screen RED GREEN YELLOW BLUE RED GREEN YELLOW BLUE RED GREEN YELLOW BLUE RED GREEN YELLOW BLUE RED GREEN YELLOW BLUE AUDIO Move OK DolbyDigital On DigitalAudioOut TVSpeaker 470Hz 1KHz 2 2KHz 4 7KHz 12KHZ Reset 0 0 0 0 0 AUDIO Move OK DolbyDigital On DigitalAudioOut TVSpeaker 470Hz 1KHz 2 2KHz 4 7KHz 12KHZ Reset 0 0 0 0 0 R...

Страница 88: ... is improved Language selection for dual language broadcast If a programme can be received in two languages dual language you can switch to DUAL I DUAL II or DUAL I II DUAL I Sends the primary broadcast language to the loudspeakers DUAL II Sends the secondary broadcast language to the loudspeakers DUAL I II Sends a separate language to each loudspeaker Broadcast On Screen Display Mono MONO Stereo ...

Страница 89: ...n select NICAM STEREO or FM MONO If the stereo signal is weak switch to FM MONO When NICAM dual is received you can select NICAM DUAL I NICAM DUAL II or NICAM DUAL I II or FM MONO Speaker Sound Output Selection In AV Component RGB and HDMI mode you can select output sound for the left and right loudspeakers Select the sound output L R Audio signal from audio L input is sent to the left loudspeaker...

Страница 90: ... not appear correctly on the screen and some problems may occur during teletext operation The CI Common Interface function may not be applied based on country broadcasting circumstances DTV mode control buttons may not function based on country broadcasting circumstances In country that Digital broadcasting regulation isn t fixed some DTV function may not work depending on digital broadcasting cir...

Страница 91: ...io for Hearing Impaired Subtitle Language OSD Information Display Status N A Not Available Teletext Subtitle Subtitle for Hard of Hearing 2 Select an audio language 3 Select L R L L or R R Subtitle Language Selection Use the Subtitle function when two or more subtitle languages are broadcast When two or more subtitle languages are broadcast you can select the subtitle language with the SUBTITLE bu...

Страница 92: ...ct either the year date or time option 4 Set the year date and time options 5 Select Close 6 Select Time Zone 7 Select a Time Zone city 8 Save Press the MENU button to return to normal TV viewing Press the RETURN button to return to the previous screen RED GREEN YELLOW BLUE RED GREEN YELLOW BLUE RED GREEN YELLOW BLUE RED GREEN YELLOW BLUE RED GREEN YELLOW BLUE RED GREEN YELLOW BLUE RED GREEN YELLO...

Страница 93: ...un or Sun 3 Set the programme 5 Set the hour 4 Adjust volume level at switch on 6 Set the minutes Press the MENU button to return to normal TV viewing Press the RETURN button to return to the previous screen RED GREEN YELLOW BLUE RED GREEN YELLOW BLUE RED GREEN YELLOW BLUE RED GREEN YELLOW BLUE RED GREEN YELLOW BLUE RED GREEN YELLOW BLUE RED GREEN YELLOW BLUE RED GREEN YELLOW BLUE RED GREEN YELLOW...

Страница 94: ...s the TV to standby after the preset time has elapsed 1 Select Sleep Timer 2 Select Off 10 20 30 60 90 120 180 or 240 Min When you switch the TV off the preset sleep timer is cancelled You can also adjust Sleep Timer in the TIME menu RED GREEN YELLOW BLUE RED GREEN YELLOW BLUE RED GREEN YELLOW BLUE RED GREEN YELLOW BLUE RED GREEN YELLOW BLUE RED GREEN YELLOW BLUE RED GREEN YELLOW BLUE RED GREEN YE...

Страница 95: ...5 Input a 4 digit password Be sure to remember this number Re enter new password for confirm Press the MENU button to return to normal TV viewing Press the RETURN button to return to the previous screen PARENTAL CONTROL RATINGS RED GREEN YELLOW BLUE RED GREEN YELLOW BLUE RED GREEN YELLOW BLUE RED GREEN YELLOW BLUE RED GREEN YELLOW BLUE RED GREEN YELLOW BLUE RED GREEN YELLOW BLUE RED GREEN YELLOW B...

Страница 96: ...ed when the channel is locked In Analogue Antenna mode it will be saved automatically without the confirm message 2 Select Block Programme 3 Enter the Block Programme 4 Select a programme to be locked unlocked 5 Lock or Unlock Press the MENU button to return to normal TV viewing Press the RETURN button to return to the previous screen RED GREEN YELLOW BLUE RED GREEN YELLOW BLUE RED GREEN YELLOW BL...

Страница 97: ...If you have selected On in LOCK Lock System menu you will be prompted to enter your password to access Use NUMBER buttons to input a 4 digit password If you have forgotten your password press 7777 to reset your password If Parental Guidance is set a programme without parental rating will be blocked 2 Select Parental Guidance 3 Make appropriate adjustments Press the MENU button to return to normal ...

Страница 98: ...essed while viewing the TV 2 Select Key Lock 3 Select On or Off 4 Save Press the MENU button to return to normal TV viewing Press the RETURN button to return to the previous screen RED GREEN YELLOW BLUE RED GREEN YELLOW BLUE RED GREEN YELLOW BLUE RED GREEN YELLOW BLUE RED GREEN YELLOW BLUE RED GREEN YELLOW BLUE RED GREEN YELLOW BLUE OPTION Move OK MenuLanguage AudioLanguage SubtitleLanguage Hardof...

Страница 99: ...while the second shows the current page displayed Press the TEXT button to switch off teletext The previous mode reappears Simple Text Page selection Enter the desired page number as a three digit number with the NUMBER buttons If during selection you press a wrong number you must complete the three digit number and then re enter the correct page number The P button can be used to select the prece...

Страница 100: ...ub pages The number of sub pages and the sub page displayed is usually shown on the screen below the time When this menu is selected the stop symbol is displayed at the top left hand corner of the screen and the automatic page change is inactive Reveal Select this menu to display concealed information such as solutions to riddles or puzzles Update Displays the TV picture on the screen while waitin...

Страница 101: ... Follow the indications on digital teletext and move onto the next step by pressing TEXT OK RED GREEN YELLOW BLUE or NUMBER buttons and etc To change digital teletext service select a different service by the numeric or P button Teletext In Digital Service Press the numeric or P button to select a certain service which broadcasts digital teletext Press the TEXT or coloured button to switch on tele...

Страница 102: ... the VCR Try another channel The problem may be with the broadcast Are the video cables installed properly Activate any function to restore the brightness of the picture Horizontal vertical bars or picture shaking Check for local interference such as an electrical appliance or power tool Poor reception on some channels Station or cable channel experiencing problems tune to another station Station ...

Страница 103: ...ould do the followings From the TV Menu choose OPTION Choose Mode Setting Choose Home use Now you have completed switching to the Home use mode The DVD function dose not work Playback doesn t start No disc is loaded The disc may be dirty Clean up the disc The unit cannot play CD ROMs etc Picture is distorted during fast reverse forward playback The picture will be distorted occasionally Stopping p...

Страница 104: ...ater and a little fabric softener or dish washing detergent Wring the cloth until it is almost dry and then use it to wipe the screen Ensure there is no excess water on the screen Allow any water or dampness to evaporate before switching on Cleaning the Cabinet To remove dirt or dust wipe the cabinet with a soft dry lint free cloth Do not to use a wet cloth Extended Absence CAUTION If you expect t...

Страница 105: ...lbs 6 2kg 13 7lbs 6 1kg 13 4lbs Power requirement Power Consumption AC 220 240V 50 60Hz 38W AC 220 240V 50 60Hz 48W CI Module Size Width x Height x Depth 100 0 x 55 0 x 5 0mm 3 94 x 2 17 x 0 20inches Television System Programme Coverage External Antenna Impedance PAL SECAM B G D K PAL I SECAM L L VHF E2 E12 UHF E21 E69 CATV S1 S20 HYPER S21 S47 75 ohm Environment condition Operating Temperature Op...

Страница 106: ...This offer is valid for a period of three 3 years from the date of the distribution of this product by LG Electronics You can obtain a copy of the GPL and LGPL licenses at next pages http www gnu org licenses old licenses gpl 2 0 html Also you can obtain the translation of GPL LGPL licenses from http www gnu org licenses old licenses gpl 2 0 translations html http www gnu org licenses old licenses...

Страница 107: ... rights with two steps 1 copyright the software and 2 offer you this license which gives you legal permission to copy distribute and or modify the software Also for each author s protection and ours we want to make certain that everyone understands that there is no warranty for this free software If the software is modified by someone else and passed on we want its recipients to know that what the...

Страница 108: ...ch is a work based on the Program the distribution of the whole must be on the terms of this License whose permissions for other licensees extend to the entire whole and thus to each and every part regardless of who wrote it Thus it is not the intent of this section to claim rights or contest your rights to work written entirely by you rather the intent is to exercise the right to control the dist...

Страница 109: ...tirely from distribution of the Program If any portion of this section is held invalid or unenforceable under any particular circumstance the balance of the section is intended to apply and the section as a whole is intended to apply in other circumstances It is not the purpose of this section to induce you to infringe any patents or other property right claims or to contest validity of any such c...

Страница 110: ...ar name of author This program is free software you can redistribute it and or modify it under the terms of the GNU General Public License as published by the Free Software Foundation either version 2 of the License or at your option any later version This program is distributed in the hope that it will be useful but WITHOUT ANY WARRANTY without even the implied warranty of MERCHANTABILITY or FITN...

Страница 111: ...tributor we want to make it very clear that there is no warranty for the free library Also if the library is modified by someone else and passed on the recipients should know that what they have is not the original version so that the original author s reputation will not be affected by problems that might be introduced by others Finally software patents pose a constant threat to the existence of ...

Страница 112: ... does and what the program that uses the Library does 1 You may copy and distribute verbatim copies of the Library s complete source code as you receive it in any medium provided that you conspicuously and appropriately publish on each copy an appropriate copyright notice and disclaimer of warranty keep intact all the notices that refer to this License and to the absence of any warranty and distri...

Страница 113: ...erial from a header file that is part of the Library the object code for the work may be a derivative work of the Library even though the source code is not Whether this is true is especially significant if the work can be linked without the Library or if the work is itself a library The threshold for this to be true is not precisely defined by law If such an object file uses only numerical parame...

Страница 114: ...do not accept this License Therefore by modifying or distributing the Library or any work based on the Library you indicate your acceptance of this License to do so and all its terms and conditions for copying distributing or modifying the Library or works based on it 10 Each time you redistribute the Library or any work based on the Library the recipient automatically receives a license from the ...

Страница 115: ...INCIDENTAL OR CONSEQUENTIAL DAMAGES ARISING OUT OF THE USE OR INABILITY TO USE THE LIBRARY INCLUDING BUT NOT LIMITED TO LOSS OF DATA OR DATA BEING RENDERED INACCURATE OR LOSSES SUSTAINED BY YOU OR THIRD PARTIES OR A FAILURE OF THE LIBRARY TO OPERATE WITH ANY OTHER SOFTWARE EVEN IF SUCH HOLDER OR OTHER PARTY HAS BEEN ADVISED OF THE POSSIBILITY OF SUCH DAMAGES END OF TERMS AND CONDITIONS How to Appl...

Страница 116: ......

Отзывы: