background image

TIME 

SETTING

54

TIME SETTING

MENU

REVIEW

SLEEP

APC

DASP

ARC/

*

FCR

MUTE

0

ENTER

VOL

VOL

CH

CH

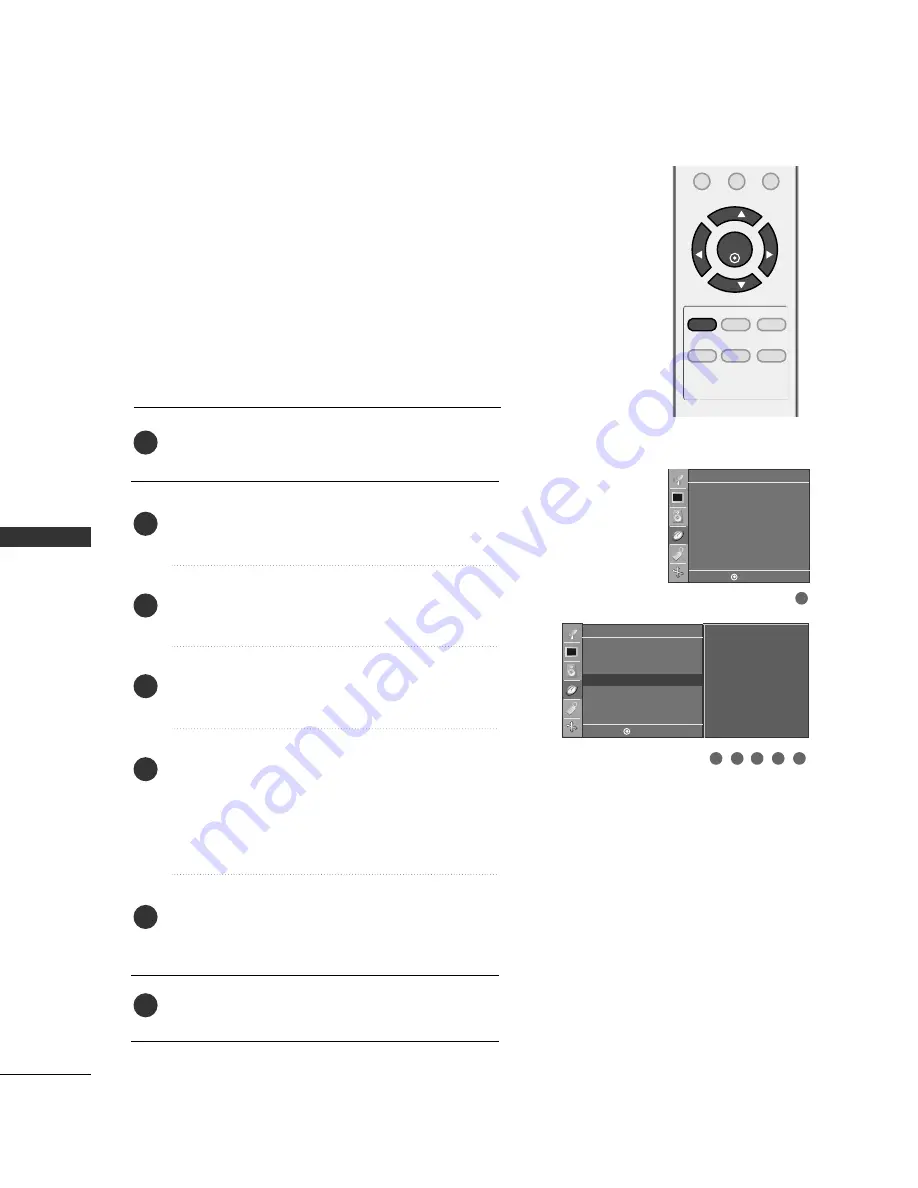
AUTO ON/OFF TIMER SETTING

Press the M

MEEN

NU

U button and then 

D

D

or 

E

E

button to

select the T

Tiim

meerr menu.

Press the 

G

button and then use

D

or 

E

button to

select O

Offff  ttiim

meerr or O

Onn  ttiim

meerr. 

Press the 

G

button and then use

D

or 

E

button to

set the hour.

Press the 

G

button and then use

D

or 

E

button to

set the minutes.

O

Onnllyy  O

Onn  ttiim

meerr 

Press the 

G

button and then use

D

or 

E

to select

the channel at turn-on.
Press the 

G

button and then use

D

or 

E

to set the

sound level at turn-on.

Press the 

G

button and then use

D

or 

E

button to

select O

O nn.

To cancel the O

Onn//O

Offff ttiim

meerr function, select O

O ff ff.

Press the EEN

NT

TEER

R button to save.

2

3

4

5

6

7

1

The  timer  function  operates  only  if  the  current  time  has
been set.
The  Off-Timer  function  overrides  the  On-Timer  function  if
they are both set to the same time.
The TV must be in standby mode for the On-Timer to work.
If  you  do  not  press  any  button  within  2  hours  after  the  TV
turns on with the On Timer function, the TV will automatically
revert to standby mode.

1

Timer

Clock

Off timer

On timer

Auto off

Timer

- - : - -   

AM

Ch.

TV  2

Vol. 30

Off

Clock

Off timer

On timer

G

Auto off

3

2

5

4

6

DE  F G

MENU

DE  F G

MENU

Содержание 19LS4R Series

Страница 1: ...ture reference Record model number and serial number of the set See the label attached on the back cover and quote this information to your dealer when you require service LCD TV OWNER S MANUAL LCD TV MODELS 19LS4R 22LS4R P NO MFL34797012 0710 REV01 Printed in Korea www lge com ...

Страница 2: ......

Страница 3: ...on Marking Apparatus shall not be exposed to dripping or splashing and no objects filled with liquids such as vases shall be placed on the apparatus Do not insert any object into the exhaust vent This may cause a fire or could give an electric shock Do not place heavy objects on the product This may cause serious injury to a child or adult Important safety instructions shall be provided with each ...

Страница 4: ...hand This may cause an electric shock Disconnect from the mains and remove all connections before moving Do not place the product in a built in installation such as a bookcase or rack Ventilation required When installing the product on a table be careful not to place the edge of its stand This may cause the product to fall causing serious injury to a child or adult and serious damage to the produc...

Страница 5: ...strain Unplug the product from the wall outlet when it is left unattended and unused for long periods of time Accumulated dust may cause a fire or an electric shock from deterioration or electric leakage Only use the specified batteries This make cause damaged the product or could give an electric shock Do not allow a impact shock or any objects to fall into the product and do not drop onto the sc...

Страница 6: ...2 Auto Program Program Search 32 Manual Program Adding Deleting Channels 33 Fine Tuning Adjustment 34 Favorite Channels Setup 35 Key Lock 36 PICTURE CONTROL Picture Size ARC Aspect Ratio Control 37 Preset Picture Settings 38 Auto Picture Control APC Preset 38 Color Tone Preset 39 Manual Picture Adjustment 40 Auto Picture Control APC User Mode 40 Color Tone User Mode 41 XD Picture Improvement Techn...

Страница 7: ...rol 1 2 3 4 5 6 7 8 0 9 VOL VOL CH CH ENTER POWER MENU REVIEW SLEEP APC DASP ARC MTS FCR MUTE A PROG CAPTION TV INPUT MEMORY ERASE Batteries Power Cord Slightly wipe stained spot on the exterior only with the polishing cloth for the product exterior if there is stain or fingerprint on surface of the exterior Do not wipe roughly when removing stain Please be cautions of that excessive pressure may ...

Страница 8: ...hen the TV is turned on the indicator blinks green and then illuminates green before the picture is displayed INPUT MENU VOL CH I ENTER CHANNEL E E D D Buttons VOLUME F F G G Buttons MENU Button ENTER Button INPUT Button POWER Button G G If your product has a protection tape attached remove the tape And then wipe the product with a cloth If a polishing cloth is included with your product use it NO...

Страница 9: ... cable RGB PC DTV IN Connect the output from a PC or DTV AUDIO RGB DVI IN Connect the audio from a PC or DTV ANTENNA IN Connect over the air signals to this jack HEADPHONE INPUT Plug the headphone into the headphone socket AV Audio Video IN Connect audio video output from an external device to these jacks S VIDEO Connect S Video out from an S VIDEO device COMPONENT IN Connect a component video aud...

Страница 10: ... cushioned surface that will protect product and screen from damage Assemble the parts of the S ST TA AN ND D B BO OD DY Y with C CO OV VE ER R B BA AS SE E of the prod uct S ST TA AN ND D B BO OD DY Y Here shown may be somewhat different from your TV 3 1 4 Hold the H HI IN NG GE E B BO OD DY Y and bend it upward 2 H HI IN NG GE E B BO OD DY Y C CO OV VE ER R B BA AS SE E ...

Страница 11: ...damage Pull cover base backward while pressing button on stand body Shake the base while pulling it will separate from stand body Hold the H HI IN NG GE E B BO OD DY Y and bend it upward Pull stand body to separate from set while press ing the 2 latches Here shown may be somewhat different from your TV 1 2 3 5 4 H HI IN NG GE E B BO OD DY Y ...

Страница 12: ...N NT T S SE ET TU UP P section Install the C CA AB BL LE E M MA AN NA AG GE EM ME EN NT T as shown First press the cable management Hold the C CA AB BL LE E M MA AN NA AG GE EM ME EN NT T with both hands and pull it upward NOTE G G Do not hold the C CA AB BL LE E M MA AN NA AG GE EM ME EN NT T when moving the product If the product is dropped you may be injured or the product may be broken How to ...

Страница 13: ...anel in various ways for maximum comfort T Ti il lt t r ra an ng ge e 10 12 3 0 For proper ventilation allow a clearance of 10 1cm 4inches on all four sides from the wall G G Ensure adequate ventilation by following the clearance recommendations CAUTION DESKTOP PEDESTAL INSTALLATION 10 1cm 10 1cm 4 inches 10 1cm 10 1cm ...

Страница 14: ...and use of the Kensington Security System refer to the user s guide provided with the Kensington Security System For further information contact h ht tt tp p w ww ww w k ke en ns si in ng gt to on n c co om m the internet homepage of the Kensington company Kensington sells security systems for expensive electronic equipment such as note book PCs and LCD projectors NOTE The Kensington Security Syst...

Страница 15: ...l jack for outdoor antenna Be careful not to bend the bronze wire when connecting the antenna Copper Wire ANTENNA IN N ANTENNA IN G G The TV will let you know when the analog cable and digital channel scans are complete NOTE To improve the picture quality in a poor signal area please purchase a signal amplifier and install properly If the antenna needs to be split for two TV s install a 2 Way Sign...

Страница 16: ... NE EN NT T I IN N V VI ID DE EO O jacks on the set Match the jack colors Y green PB blue and PR red Connect the audio output of the digital set top box to the C CO OM MP PO ON NE EN NT T I IN N A AU UD DI IO O jacks on the set 2 1 2 How to use Turn on the digital set top box Refer to the owner s manual for the digital set top box operation Select C Co om mp po on ne en nt t input source by using ...

Страница 17: ...connecting HDMI cable Connect the digital set top box to H HD DM MI I D DV VI I I IN N jack on the set No separated audio connection is necessary HDMI supports both audio and video 1 How to connect 2 How to use Turn on the digital set top box Refer to the owner s manual for the digital set top box Select H HD DM MI I D DV VI I input source by using the I IN NP PU UT T button on the remote control ...

Страница 18: ...ox to the H HD DM MI I D DV VI I I IN N jack on the set Connect the audio output of the digital set top box to the A AU UD DI IO O R RG GB B D DV VI I I IN N jack on the set 1 How to connect Turn on the digital set top box Refer to the owner s manual for the digital set top box Select H HD DM MI I D DV VI I input source by using the I IN NP PU UT T button on the remote control 2 How to use 2 1 1 2...

Страница 19: ...DVD player Y Y Y Y PB B Y Cb Pb PR R Y Cr Pr Connect the video outputs Y PB PR of the DVD to the C CO OM MP PO ON NE EN NT T I IN N V VI ID DE EO O jacks on the set Match the jack colors Y green PB blue and PR red Connect the audio outputs of the DVD to the C CO OM MP PO ON NE EN NT T I IN N A AU UD DI IO O jacks on the set 1 How to connect 2 How to use Turn on the DVD player insert a DVD Select C...

Страница 20: ...EO VIDEO AUDIO AV IN VIDEO AUDIO COMPONENT IN HDMI DVD OUTPUT 1 When connecting HDMI cable Connect the HDMI output of the DVD to the H HD DM MI I D DV VI I I IN N jack on the set No separated audio connection is necessary HDMI supports both audio and video 1 How to connect 2 How to use Select H HD DM MI I D DV VI I input source by using the I IN NP PU UT T button on the remote control Refer to the...

Страница 21: ...product bearing this phenomenon ANTENNA IN RGB PC DTV IN HDMI DVI IN AUDIO RGB DVI IN MONO S VIDEO VIDEO AUDIO AV IN H P VIDEO AUDIO COMPONENT IN L R S VIDEO VIDEO OUTPUT SWITCH ANT IN ANT OUT Wall Jack Antenna 1 2 Connect the RF antenna out socket of the VCR to the A AN NT TE EN NN NA A I IN N socket on the set Connect the antenna cable to the RF antenna in socket of the VCR 1 How to connect Set ...

Страница 22: ...olors Video yellow Audio Left white and Audio Right red 1 How to connect 2 How to use Insert a video tape into the VCR and press PLAY on the VCR Refer to the VCR owner s manual Select A AV V input source by using the I IN NP PU UT T button on the remote control When connecting with an S Video cable Connect the S VIDEO output of the VCR to the S S V VI ID DE EO O input on the set Connect the audio ...

Страница 23: ...hrough the headphone Plug the headphone into the headphone socket To adjust the headphone volume press the V VO OL L F F or G G button If you press the M MU UT TE E button the sound from the headphone is switched off 1 How to connect 2 1 ANTENNA IN O I IN VIDEO H P AUDIO IN ...

Страница 24: ...UDIO RGB DVI IN MONO S VIDEO VIDEO AUDIO AV IN H VIDEO AUDIO COMPONENT IN RGB OUTPUT AUDIO Connect the RGB output of the PC to the R RG GB B P PC C D DT TV V I IN N jack on the set Connect the PC audio output to the A AU UD DI IO O R RG GB B D DV VI I I IN N jack on the set 1 How to connect 2 How to use Turn on the PC and the TV Select R RG GB B P PC C input source by using the I IN NP PU UT T but...

Страница 25: ... audio output to the A AU UD DI IO O R RG GB B D DV VI I I IN N jack on the set 1 How to connect 2 How to use Turn on the PC and the TV Select H HD DM MI I D DV VI I input source by using the I IN NP PU UT T button on the remote control 2 1 RGB PC DTV IN HDMI DVI IN AUDIO RGB DVI IN MONO S VIDEO VIDEO AUDIO AV IN VIDEO AUDIO COMPONENT IN DVI PC OUTPUT AUDIO 1 2 ...

Страница 26: ...nge the PC graphic card or consult the manufacturer of the PC graphic card G G Avoid keeping a fixed image on the screen for a long period of time The fixed image may become permanently imprinted on the screen G G The synchronization input form for Horizontal and Vertical frequencies is separate NOTES RGB PC HDMI DVI PC mode Horizontal Vertical Frequency KHz Frequency Hz 31 469 70 08 31 469 59 94 ...

Страница 27: ...t your set is functioning properly but needs further adjustment This function works in the following mode RGB PC mode Press the A A P PR RO OG G button to start A Au ut to o c co on nf fi ig g When A Au ut to o c co on nf fi ig g has finished O Ok k will be shown on screen If the position of the image is still not correct try Auto adjust ment again If the picture needs to be adjusted more after Au...

Страница 28: ...ct H H P Po os si it ti io on n V V P Po os si it ti io on n P Ph ha as se e or C Cl lo oc ck k P Ph ha as se e This function allows you to remove any horizontal noise and clear or sharpen the image of characters C Cl lo oc ck k This function is to minimize any vertical bars or stripes visible on the screen background And the horizontal screen size will also change H H P Po os si it ti io on n V V...

Страница 29: ...o select the S Sc cr re ee en n menu Press the G G button and then use D D or E E button to select R Re es se et t Press the G G button You can initialize H Position V Position Phase Clock 1 2 3 Screen Auto config Manual config ARC Reset Screen Auto config Manual config ARC Reset G To set 1 2 3 DE F G MENU DE F G MENU MENU REVIEW SLEEP APC DASP ARC ENTER VOL VOL CH CH Initializing Reset to origina...

Страница 30: ...just the screen automatically G G p p 2 25 5 Memorizes or erases selected channel G G p p 3 33 3 Selects CAPTION mode G G p p 5 52 2 Select available channels Increase decrease the sound level Navigate the on screen menus and adjust the system set tings to your preference Displays the main menu Tune to the last channel viewed Select the amount of time before your TV turns off auto matically G G p ...

Страница 31: ... batteries in a recycle bin to preserve environment 1 2 3 4 5 6 7 8 0 9 POWER MTS FCR MUTE A PROG CAPTION TV INPUT MEMORY ERASE Installing Batteries Remote control effective range NUMBER button Turns your TV or any other programmed equipment on or off depending on the mode In AV Component RGB and HDMI DVI input sources screen returns to the last TV channel Select the desired input source TV AV Com...

Страница 32: ...programmed to remember which power state it was last set to even if the power cord is out When finished using the TV press the P PO OW WE ER R button on the remote control The TV reverts to standby mode POWER MTS FCR MUTE A PROG MEMORY ERASE CAPTION TV INPUT ENTER VOL VOL CH CH 1 2 3 4 5 6 7 8 0 9 1 2 3 FCR MUTE ENTER VOL VOL CH CH 1 2 3 4 5 6 7 8 0 9 Press the C CH H D D E E or N NU UM MB BE ER R...

Страница 33: ...V s OSD On Screen Display may differ slightly from what is shown in this manual Channel Picture Special Screen Timer Sound 2 1 Channel Auto program Manual program Favorite channel Timer Clock Off timer On timer Auto off Sound DASP AVL Balance 0 Picture APC ACC XD Cinema Reset Special Language Key lock Caption Text XD Demo Screen Auto config Manual config ARC Reset DE F G MENU DE F G MENU DE F G ME...

Страница 34: ...e TV is ever moved to another location Auto Program will search for channels only through the Antenna jack If channels numbers for broadcast over the air TV and cable TV are duplicated where different channels have the same number press the same number buttons again to toggle between For example press 17 to go to the channel press 17 again to go to the duplicated channel Broadcast TV Channels Cabl...

Страница 35: ...hannel number you want to add or delete Press the M ME EM MO OR RY Y E ER RA AS SE E button Press the M ME EM MO OR RY Y E ER RA AS SE E button to select M Me em mo or ry y or E Er ra as se e Press the E EN NT TE ER R button 1 2 3 4 You can also use the C Ch ha an nn ne el l menu to adjust M Ma an nu ua al l p pr ro og gr ra am m Channel Auto program Manual program Favorite channel Channel TV 30 M...

Страница 36: ...n nn ne el l menu Press the G G button and then D D or E E button to select M Ma an nu ua al l p pr ro og gr ra am m Press the G G button and then D D or E E button to select F Fi in ne e Press the F F or G G button to adjust the picture to your preference Press the E EN NT TE ER R button to store it MENU REVIEW SLEEP APC DASP ARC FCR MUTE 0 ENTER VOL VOL CH CH 2 1 4 5 3 Channel Auto program Manua...

Страница 37: ...button to select the C Ch ha an nn ne el l menu Press the G G button and then D D or E E button to select F Fa av vo or ri it te e c ch ha an nn ne el l Press the G G button and then D D or E E button to select the first favorite channel position Use the F F or G G button to set the desired channel number for first favorite channel Press the E EN NT TE ER R button to save Repeat steps 3 to 5 to me...

Страница 38: ... set off Press the M ME EN NU U button and then use D D or E E button to select the S Sp pe ec ci ia al l menu Press the G G button and then use D D or E E button to select K Ke ey y l lo oc ck k Press the G G button and then use D D or E E button to select O On n or O Of ff f Press the E EN NT TE ER R button to save 2 1 4 3 2 3 1 Special DE F G MENU Language Key lock Caption Text XD Demo Special ...

Страница 39: ...oth sides to create a spectacular view Zoom 1 Choose Zoom 1 when you want to view the picture without any alteration However the top and bottom portions of the picture will be cropped Zoom 2 Choose Zoom 2 when you want the picture to be altered both vertically extended and cropped The picture taking a halfway trade off between alteration and screen coverage NOTE G G If a fixed image is displayed o...

Страница 40: ... to save APC adjusts the TV for the best picture appearance Select the preset value in the APC menu based on the program category C Cl le ea ar r O Op pt ti im mu um m S So of ft t Settings are preset for optimum picture quality at the factory and are not adjustable In the U Us se er r mode only you can directly adjust the contrast brightness color sharpness tint You can also use the P Pi ic ct tu...

Страница 41: ...ess the M ME EN NU U button and then D D or E E button to select the P Pi ic ct tu ur re e menu Press the G G button and then D D or E E button to select A AC CC C Press the G G button and then D D or E E button to select either C Co oo ol l N No or rm ma al l W Wa ar rm m or U Us se er r Press the E EN NT TE ER R button to save 2 3 4 1 1 2 3 Picture APC ACC XD Cinema Reset Picture Cool Normal War...

Страница 42: ...G G button and then D D or E E button to select U Us se er r Press the G G button and then D D or E E button to select the desired picture option C Co on nt tr ra as st t B Br ri ig gh ht tn ne es ss s C Co ol lo or r S Sh ha ar rp pn ne es ss s and T Ti in nt t Press the G G button and then F F or G G button to make appropriate adjustments Press the E EN NT TE ER R button to save 2 3 4 5 6 1 2 3 ...

Страница 43: ...CC C Press the G G button and then D D or E E button to select U Us se er r Press the G G button and then D D or E E button to select R Re ed d G Gr re ee en n or B Bl lu ue e Press the G G button and then F F or G G button to make appropriate adjustments The adjustment range of R Re ed d G Gr re ee en n or B Bl lu ue e is 30 30 Press the E EN NT TE ER R button to save 2 3 4 5 6 1 2 3 4 5 1 Pictur...

Страница 44: ...ose the Auto Manual When selecting the Manual you can adjust the XD Contrast XD color and XD NR 2 3 4 1 S Se el le ec ct ti in ng g t th he e M Ma an nu ua al l 1 Press the G G button and then use D D or E E but ton to select X XD D C Co on nt tr ra as st t X XD D C Co ol lo or r or X XD D N No oi is se e X XD D C Co on nt tr ra as st t Optimizing the contrast automatically according to the bright...

Страница 45: ... button and then use D D or E E button to select the S Sp pe ec ci ia al l menu Press the G G button and then use D D or E E button to select X XD D D De em mo o Press the G G button to begin X XD D D De em mo o To stop X XD D D De em mo o press the M ME EN NU U button 2 1 4 3 2 3 1 Special Language Key lock Caption Text XD Demo Special To start Language Key lock Caption Text XD Demo G DE F G MENU...

Страница 46: ...o select C Ci in ne em ma a Press the G G button and then use D D or E E button to select O On n or O Of ff f Press the E EN NT TE ER R button to save Set up the TV for the best picture appearance for viewing movies When you operate Cinema 3 2 Mode 3 2 Pull Down Mode or Cinema Correction Mode the TV will adjust 24 fps video from movies to 30 fps video for display 2 3 4 1 2 3 1 Picture APC ACC XD C...

Страница 47: ...ct the P Pi ic ct tu ur re e menu Press the G G button and then D D or E E button to select R Re es se et t Press the G G button to initialize the adjusted value Use to quickly reset all the Picture menu options to their original factory preset values 2 3 1 2 3 1 Picture APC ACC XD Cinema Reset Picture APC ACC XD Cinema Reset G To set DE F G MENU DE F G MENU ...

Страница 48: ...c Movie and Sports are preset for good sound quality at the factory and are not adjustable Press the D DA AS SP P button repeatedly to select the appropriate sound setup as below F Fl la at t M Mu us si ic c M Mo ov vi ie e S Sp po or rt ts s and U Us se er r your own set tings Press the E EN NT TE ER R button to save You can also adjust D DA AS SP P in the S So ou un nd d menu 2 1 Sound DASP AVL ...

Страница 49: ...to select D DA AS SP P Press the G G button and then use D D or E E button to select U Us se er r Press the G G button Press the F F or G G button to select the band you want to adjust Press the D D or E E button to adjust the band level Press the E EN NT TE ER R button to save Adjust the sound equalizer 2 3 4 5 6 1 1 2 3 4 5 Sound DASP AVL Balance 0 Sound DASP AVL Balance 0 Flat Music Movie Sport...

Страница 50: ... select the S So ou un nd d menu Press the G G button and then use D D or E E button to select A AV VL L Press the G G button and then use D D or E E button to select O On n or O Of ff f Press the E EN NT TE ER R button to save 2 3 4 1 AVL automatically keeps on an equal volume level even if you change program 2 3 1 Sound DASP AVL Balance 0 Sound On Off DASP AVL G Balance 0 DE F G MENU DE F G MENU...

Страница 51: ... M ME EN NU U button and then use D D or E E button to select the S So ou un nd d menu Press the G G button and then use D D or E E button to select B Ba al la an nc ce e Press the G G button and then use F F or G G button to make appropriate adjustments Press the E EN NT TE ER R button to save 2 3 4 1 2 3 1 Sound DASP AVL Balance 0 Sound DASP AVL Balance 0 G DE F G MENU DE F G MENU ...

Страница 52: ... and right speak ers Signal mode is mono Stereo The primary language is heard from left and right speak ers Signal mode is stereo SAP The secondary language is heard from left and right speak ers in mono sound Use the M MT TS S button to select your desired MTS mode in analog signal Each time you press the M MT TS S button M Mo on no o S St te er re eo o or S SA AP P appear in turn Press the E EN ...

Страница 53: ...nguage Press the M ME EN NU U button and then use D D or E E button to select the S Sp pe ec ci ia al l menu Press the G G button and then use D D or E E button to select L La an ng gu ua ag ge e Press the G G button and then use D D or E E button to select your desired language From this point on the on screen menus will be shown in the selected language Press the E EN NT TE ER R button to save 1...

Страница 54: ...all TV broadcasts include closed caption signals Sometimes TV stations broadcast four different cap tion signals on the same channel By selecting Mode1 to Mode2 you can choose which signal you view Mode1 is usually the signal with the captions while another mode might show demonstration or program ming information Your TV might not receive caption signals normally in the following situations I IG ...

Страница 55: ...utton to select the T Ti im me er r menu Press the G G button and then D D or E E button to select C Cl lo oc ck k Press the G G button and then use D D or E E button to set the Hour Press the G G button and then use D D or E E button to set the minutes Press the E EN NT TE ER R button to save 2 3 4 5 1 2 3 1 Timer Clock Off timer On timer Auto off Timer AM Clock G Off timer On timer Auto off DE F...

Страница 56: ...n Press the G G button and then use D D or E E to set the sound level at turn on Press the G G button and then use D D or E E button to select O On n To cancel the O On n O Of ff f t ti im me er r function select O Of ff f Press the E EN NT TE ER R button to save 2 3 4 5 6 7 1 The timer function operates only if the current time has been set The Off Timer function overrides the On Timer function i...

Страница 57: ...nd 240 minutes When the number of minutes you want is displayed on the screen press the E EN NT TE ER R button The timer begins to count down from the number of minutes selected To check the remaining minutes before the TV turns off press the S SL LE EE EP P button once To cancel the Sleep Timer press the S SL LE EE EP P button repeat edly to select The Sleep Timer turns the TV off at the preset t...

Страница 58: ...E EN NU U button and then use D D or E E button to select the T Ti im me er r menu Press the G G button and then use D D or E E button to select A Au ut to o o of ff f Press the G G button and then use D D or E E button to select O On n or O Of ff f Press the E EN NT TE ER R button to save 2 3 4 1 2 3 1 Timer Clock Off timer On timer Auto off Timer On Off Clock Off timer On timer Auto off G DE F G...

Страница 59: ...o broadcast on station tuned with Auto off activated Check whether the product is turned on Try another channel The problem may be with the broadcast Is the power cord inserted into wall power outlet Check your antenna direction and or location Test the wall power outlet plug another product s power cord into the outlet where the product s power cord was plugged in This is normal the image is mute...

Страница 60: ...single color Vertical bar or stripe on background Horizontal Noise Incorrect position Press the VOL or VOLUME button Sound muted Press MUTE button Try another channel The problem may be with the broadcast Are the audio cables installed properly Adjust Balance in menu option A change in ambient humidity or temperature may result in an unusual noise when the product is turned on or off and does not ...

Страница 61: ...r and a little fabric softener or dish washing detergent Wring the cloth until it s almost dry and then use it to wipe the screen Make sure the excess water is off the screen and then let it air dry before you turn on your TV Cleaning the Cabinet To remove dirt or dust wipe the cabinet with a soft dry lint free cloth Please be sure not to use a wet cloth Extended Absence G G If you expect to leave...

Страница 62: ...25 4 x 441 6 x 187 4 mm 20 7 x 16 3 x 2 7 inches 525 4 x 413 0 x 68 6 mm 12 8 pounds 5 8 kg 1 1 5 pounds 5 2 kg 60 W AC100 240V 50 60Hz NTSC PAL M N VHF 2 13 UHF 14 69 CATV 1 125 75 ohm 32 104 F 0 40 C Less than 80 4 140 F 20 60 C Less than 85 Dimensions Width x Height x Depth Weight Power Consumption Power requirement Television System Program Coverage External Antenna Impedance Environment condi...

Страница 63: ......

Страница 64: ......

Отзывы: