


Instruction / Safety Information
17
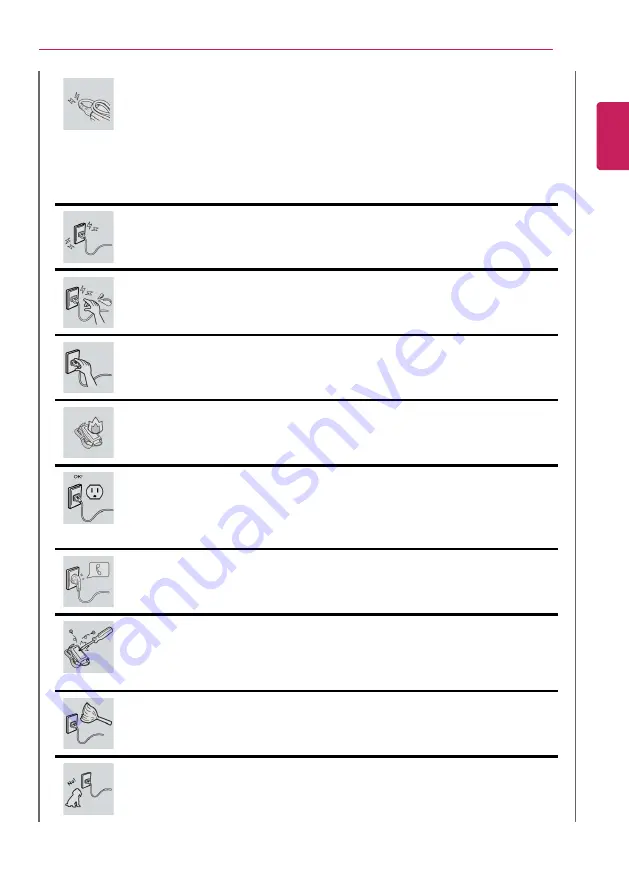
Do not bend the power cable for AC adapter too much or get stamped by a
sharp object.
•
The wires inside the cable may break and cause electric shock or fire.
Do not use loose plugs or damaged power cords.
•
An electric shock or fire may occur.
Do not touch the power cord with your hands wet.
•
Otherwise, an electric shock may occur.
Pull the plug, not the cord, to disconnect the AC adapter and power jack.
•
Otherwise, a fire or product damage may occur.
Operate the product at the proper voltage.
•
Excessive voltage may result in damage on the product, electric shock or fire.
Use power outlets with an earth pin installed and proper supply of rated
electricity.
•
An electric leakage may cause an electric shock or fire.
•
The shape of the power cord and outlet may differ by country and region.
In the case of strange noise from the cord or plug, disconnect the power
cord from the outlet immediately and contact the service center.
•
A fire or electric shock may occur.
Use the power supply/adapter provided with the product and never
disassemble the product.
•
Using a different product or disassembling it may cause an electric shock or
fire.
Always keep the AC adapter and power outlet clean.
•
A fire may occur.
Keep children and pets from damaging the power cord.
•
It may cause a fire or an electric shock.
ENGLISH
Содержание 17Z990 Series
Страница 1: ...LG EASY GUIDE NOTEBOOK 17Z990 Series www lg com Copyright 2020 LG Electronics Inc All rights reserved ...
Страница 22: ...22 Instruction Safety Information Regulatory Notices ENGLISH ...
Страница 23: ...Instruction Safety Information 23 ENGLISH ...
Страница 24: ...24 Instruction Safety Information ENGLISH ...
Страница 25: ...Instruction Safety Information 25 ENGLISH ...
Страница 26: ...26 Instruction Safety Information ENGLISH ...
Страница 27: ...Instruction Safety Information 27 ENGLISH ...
Страница 28: ...28 Instruction Safety Information ENGLISH ...
Страница 29: ...Instruction Safety Information 29 ENGLISH ...
Страница 30: ...30 Instruction Safety Information ENGLISH ...
Страница 31: ...Instruction Safety Information 31 ENGLISH ...
Страница 32: ...32 Instruction Safety Information ENGLISH ...
Страница 33: ...Instruction Safety Information 33 ENGLISH ...
Страница 34: ...34 Instruction Safety Information ENGLISH ...
Страница 35: ...Instruction Safety Information 35 ENGLISH ...
Страница 36: ...36 Instruction Safety Information ENGLISH ...
Страница 37: ...Instruction Safety Information 37 ENGLISH ...
Страница 38: ...38 Instruction Safety Information ENGLISH ...
Страница 39: ...Instruction Safety Information 39 ENGLISH ...
Страница 40: ...40 Instruction Safety Information ENGLISH ...
Страница 41: ...Instruction Safety Information 41 ENGLISH ...
Страница 42: ...42 Instruction Safety Information ENGLISH ...
Страница 43: ...Instruction Safety Information 43 ENGLISH ...
Страница 44: ...44 Instruction Safety Information ENGLISH ...
Страница 45: ...Instruction Safety Information 45 ENGLISH ...
Страница 46: ...46 Instruction Safety Information ENGLISH ...
Страница 47: ...Instruction Safety Information 47 ENGLISH ...
Страница 48: ...48 Instruction Safety Information ENGLISH ...
Страница 49: ...Instruction Safety Information 49 ENGLISH ...
Страница 50: ...50 Instruction Safety Information ENGLISH ...
Страница 51: ...Instruction Safety Information 51 ENGLISH ...
Страница 52: ...52 Instruction Safety Information ENGLISH ...
Страница 53: ...Instruction Safety Information 53 ENGLISH ...
Страница 54: ...54 Instruction Safety Information ENGLISH ...
Страница 55: ...Instruction Safety Information 55 ENGLISH ...
Страница 56: ...56 Instruction Safety Information ENGLISH ...
Страница 71: ...Using Windows 10 71 3 Click the New Desktop tile 4 Desktop 1 and Desktop 2 are created ENGLISH ...
Страница 88: ...88 Using Windows 10 3 To change the detailed settings of the PC press the All Settings tile ENGLISH ...
Страница 101: ...Using the PC 101 3 Go to Keyboard Backlight and select your desired options ENGLISH ...
Страница 104: ...104 Using the PC 2 The on screen picture turns to a headphone icon when you connect a headphone or earphones ENGLISH ...
Страница 106: ...106 Using the PC TIP A warning message will be displayed if the volume is high while this feature is on ENGLISH ...
Страница 113: ...Using the PC 113 2 When the Settings screen appears select Devices 3 Select Mouse Additional Mouse Options ENGLISH ...
Страница 133: ...Using the PC 133 2 When the Settings screen appears select Devices ENGLISH ...
Страница 135: ...Using the PC 135 4 Select a device to connect to 5 Complete the Bluetooth connection as directed ENGLISH ...
Страница 137: ...Using the PC 137 2 Connect the wired LAN cable to the LAN port ENGLISH ...
Страница 139: ...Using the PC 139 4 Select Network Internet Status Change adapter options ENGLISH ...
Страница 140: ...140 Using the PC 5 Right click Ethernet and select the Properties menu ENGLISH ...
Страница 141: ...Using the PC 141 6 Select Internet Protocol Version 4 TCP IPv4 and then click Properties ENGLISH ...
Страница 145: ...Using the PC 145 3 Select the Access Point you want to connect to and press Connect ENGLISH ...
Страница 159: ...Using Software 159 1 Select the All List Update needed menu item ENGLISH ...
Страница 161: ...Using Software 161 1 Select the Notification Setting menu 2 Set Auto Update Search to ON or OFF ENGLISH ...
Страница 164: ...164 Using Software 1 Press the icon on the taskbar ENGLISH ...
Страница 174: ...174 Restoring the System 1 Select Keep my files ENGLISH ...
Страница 175: ...Restoring the System 175 2 Check the current settings ENGLISH ...
Страница 178: ...178 Restoring the System 1 Select Remove everything ENGLISH ...
Страница 179: ...Restoring the System 179 2 Check the current settings ENGLISH ...
Страница 181: ...Restoring the System 181 4 Press Next to proceed with installation as guided ENGLISH ...
Страница 185: ...Setup and Upgrade 185 1 Reboot the system and press F2 2 In a few moments the system setup screen appears ENGLISH ...
Страница 200: ...200 Setup and Upgrade 7 When the following message appears select Yes and press Enter The PC will restart ENGLISH ...
Страница 206: ...206 Setup and Upgrade 3 Boots using the selected device ENGLISH ...
Страница 208: ...208 Setup and Upgrade 2 Select System Display ENGLISH ...
Страница 213: ...FAQ 213 2 Select System Display ENGLISH ...
Страница 218: ...218 FAQ 1 Select Keep my files ENGLISH ...
Страница 219: ...FAQ 219 2 Check the current settings ENGLISH ...
Страница 220: ...220 FAQ 3 If you need to change the settings press Change settings and press the Confirm button ENGLISH ...
Страница 222: ...222 FAQ 1 Select Remove everything ENGLISH ...
Страница 223: ...FAQ 223 2 Check the current settings ENGLISH ...
Страница 224: ...224 FAQ 3 If you need to change the settings press Change settings and press the Confirm button ENGLISH ...
Страница 225: ...FAQ 225 4 Press Next to proceed with installation as guided ENGLISH ...
Страница 231: ...FAQ 231 3 Select the Access Point you want to connect to and press Connect ENGLISH ...


