


Setup and Upgrade
213
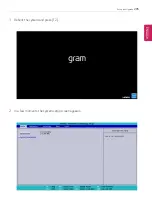
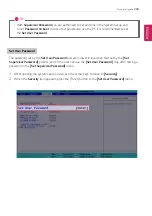
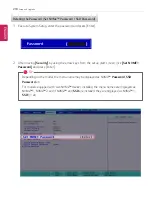
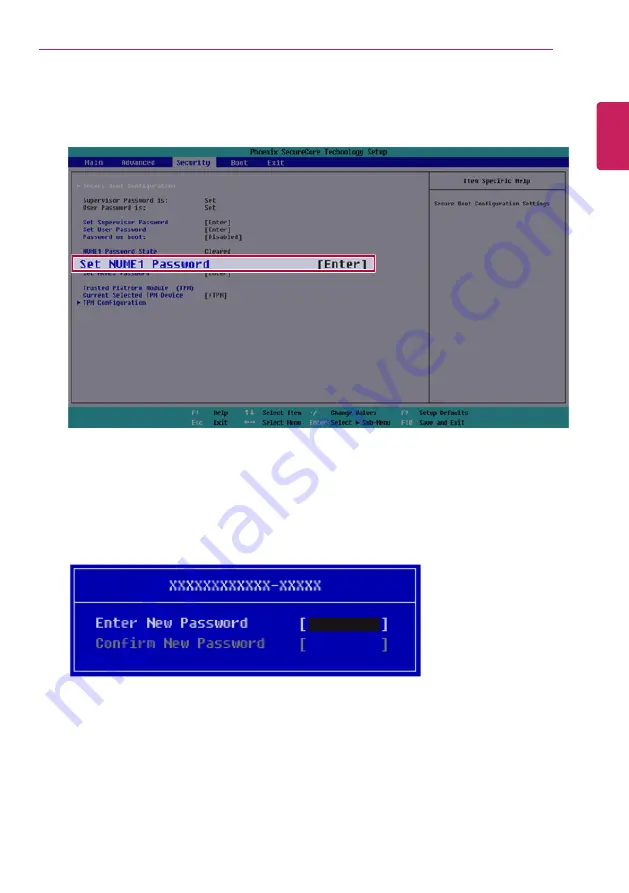
2
When the
Security
item appears, select
[Set NVME1 Password]
using the arrow keys and press
the [Enter] key.
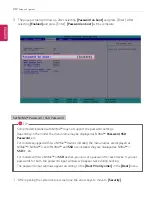
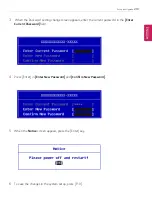
3
When the Password Setting screen appears, enter a password and press the [Enter] key. The
password should not exceed 12 characters and should consist of English letters (A - Z), numbers
(0 - 9), and special characters or a combination of them.
ENGLISH
Содержание 17Z90P Series
Страница 1: ...LG EASY GUIDE NOTEBOOK 17Z90P Series www lg com Copyright 2020 LG Electronics Inc All rights reserved ...
Страница 22: ...22 Introduction Important Safety Precautions Regulatory Notices ENGLISH ...
Страница 23: ...Introduction Important Safety Precautions 23 ENGLISH ...
Страница 24: ...24 Introduction Important Safety Precautions ENGLISH ...
Страница 25: ...Introduction Important Safety Precautions 25 ENGLISH ...
Страница 26: ...26 Introduction Important Safety Precautions ENGLISH ...
Страница 27: ...Introduction Important Safety Precautions 27 ENGLISH ...
Страница 28: ...28 Introduction Important Safety Precautions ENGLISH ...
Страница 29: ...Introduction Important Safety Precautions 29 ENGLISH ...
Страница 30: ...30 Introduction Important Safety Precautions ENGLISH ...
Страница 31: ...Introduction Important Safety Precautions 31 ENGLISH ...
Страница 32: ...32 Introduction Important Safety Precautions ENGLISH ...
Страница 33: ...Introduction Important Safety Precautions 33 ENGLISH ...
Страница 34: ...34 Introduction Important Safety Precautions ENGLISH ...
Страница 35: ...Introduction Important Safety Precautions 35 ENGLISH ...
Страница 36: ...36 Introduction Important Safety Precautions ENGLISH ...
Страница 37: ...Introduction Important Safety Precautions 37 ENGLISH ...
Страница 38: ...38 Introduction Important Safety Precautions ENGLISH ...
Страница 39: ...Introduction Important Safety Precautions 39 ENGLISH ...
Страница 40: ...40 Introduction Important Safety Precautions ENGLISH ...
Страница 41: ...Introduction Important Safety Precautions 41 ENGLISH ...
Страница 42: ...42 Introduction Important Safety Precautions ENGLISH ...
Страница 43: ...Introduction Important Safety Precautions 43 ENGLISH ...
Страница 44: ...44 Introduction Important Safety Precautions ENGLISH ...
Страница 45: ...Introduction Important Safety Precautions 45 ENGLISH ...
Страница 46: ...46 Introduction Important Safety Precautions ENGLISH ...
Страница 47: ...Introduction Important Safety Precautions 47 ENGLISH ...
Страница 48: ...48 Introduction Important Safety Precautions ENGLISH ...
Страница 49: ...Introduction Important Safety Precautions 49 ENGLISH ...
Страница 50: ...50 Introduction Important Safety Precautions ENGLISH ...
Страница 51: ...Introduction Important Safety Precautions 51 ENGLISH ...
Страница 52: ...52 Introduction Important Safety Precautions ENGLISH ...
Страница 53: ...Introduction Important Safety Precautions 53 ENGLISH ...
Страница 54: ...54 Introduction Important Safety Precautions ENGLISH ...
Страница 55: ...Introduction Important Safety Precautions 55 ENGLISH ...
Страница 56: ...56 Introduction Important Safety Precautions ENGLISH ...
Страница 57: ...Introduction Important Safety Precautions 57 ENGLISH ...
Страница 58: ...58 Introduction Important Safety Precautions ENGLISH ...
Страница 59: ...Introduction Important Safety Precautions 59 ENGLISH ...
Страница 60: ...60 Introduction Important Safety Precautions ENGLISH ...
Страница 73: ...Using Windows 10 73 3 The selected app is added to the Start menu or taskbar ENGLISH ...
Страница 76: ...76 Using Windows 10 3 Click the New Desktop tile ENGLISH ...
Страница 77: ...Using Windows 10 77 4 Desktop 1 and Desktop 2 are created 5 Select an app in the preview or desktop ENGLISH ...
Страница 78: ...78 Using Windows 10 6 The screen is toggled to the selected app or desktop ENGLISH ...
Страница 85: ...Using Windows 10 85 ENGLISH ...
Страница 94: ...94 Using Windows 10 3 To change the detailed settings of the PC press the All Settings tile ENGLISH ...
Страница 95: ...Using Windows 10 95 Using the Start Menu 1 Press the button and select the Settings menu ENGLISH ...
Страница 107: ...Using the PC 107 3 In the Keyboard Backlight option set the keyboard lighting and off time ENGLISH ...
Страница 117: ...Using the PC 117 2 When the Settings screen appears select Devices 3 Select Mouse Additional Mouse Options ENGLISH ...
Страница 135: ...Using the PC 135 2 When the Settings screen appears select Devices ENGLISH ...
Страница 137: ...Using the PC 137 4 Select a device to connect to 5 Complete the Bluetooth connection as directed ENGLISH ...
Страница 139: ...Using the PC 139 2 Connect the wired LAN cable to the LAN port ENGLISH ...
Страница 141: ...Using the PC 141 4 Select Network Internet Status Change adapter options ENGLISH ...
Страница 142: ...142 Using the PC 5 Right click Ethernet and select the Properties menu ENGLISH ...
Страница 143: ...Using the PC 143 6 Select Internet Protocol Version 4 TCP IPv4 and then click Properties ENGLISH ...
Страница 147: ...Using the PC 147 3 Select the Access Point you want to connect to and press Connect ENGLISH ...
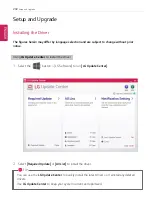
Страница 160: ...160 Using Software 1 Select the All List Update needed menu item ENGLISH ...
Страница 162: ...162 Using Software 1 Select the Notification Setting menu 2 Set Auto Update Search to ON or OFF ENGLISH ...
Страница 165: ...Using Software 165 1 Press the icon on the taskbar ENGLISH ...
Страница 173: ...Using Software 173 4 Follow the instructions to connect your smartphone and PC Android iPhone ENGLISH ...
Страница 190: ...190 Using Software ENGLISH ...
Страница 191: ...Using Software 191 2 When registration is complete it is displayed on the settings list ENGLISH ...
Страница 192: ...192 Using Software 3 Press OK to complete the setup ENGLISH ...
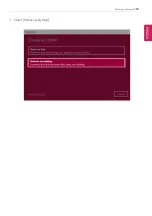
Страница 196: ...196 Restoring the System 1 Select Keep my files ENGLISH ...
Страница 199: ...Restoring the System 199 1 Select Remove everything ENGLISH ...
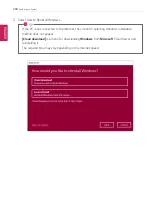
Страница 205: ...Setup and Upgrade 205 1 Reboot the system and press F2 2 In a few moments the system setup screen appears ENGLISH ...
Страница 226: ...226 Setup and Upgrade 3 Boots using the selected device ENGLISH ...
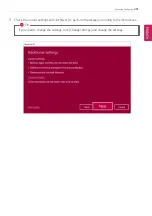
Страница 228: ...228 Setup and Upgrade 2 Select System Display ENGLISH ...
Страница 235: ...FAQ 235 2 Select System Display ENGLISH ...
Страница 240: ...240 FAQ 1 Select Keep my files ENGLISH ...
Страница 243: ...FAQ 243 1 Select Remove everything ENGLISH ...
Страница 251: ...FAQ 251 3 Select the Access Point you want to connect to and press Connect ENGLISH ...


