background image

DLP Personal Projector

25

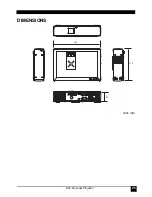
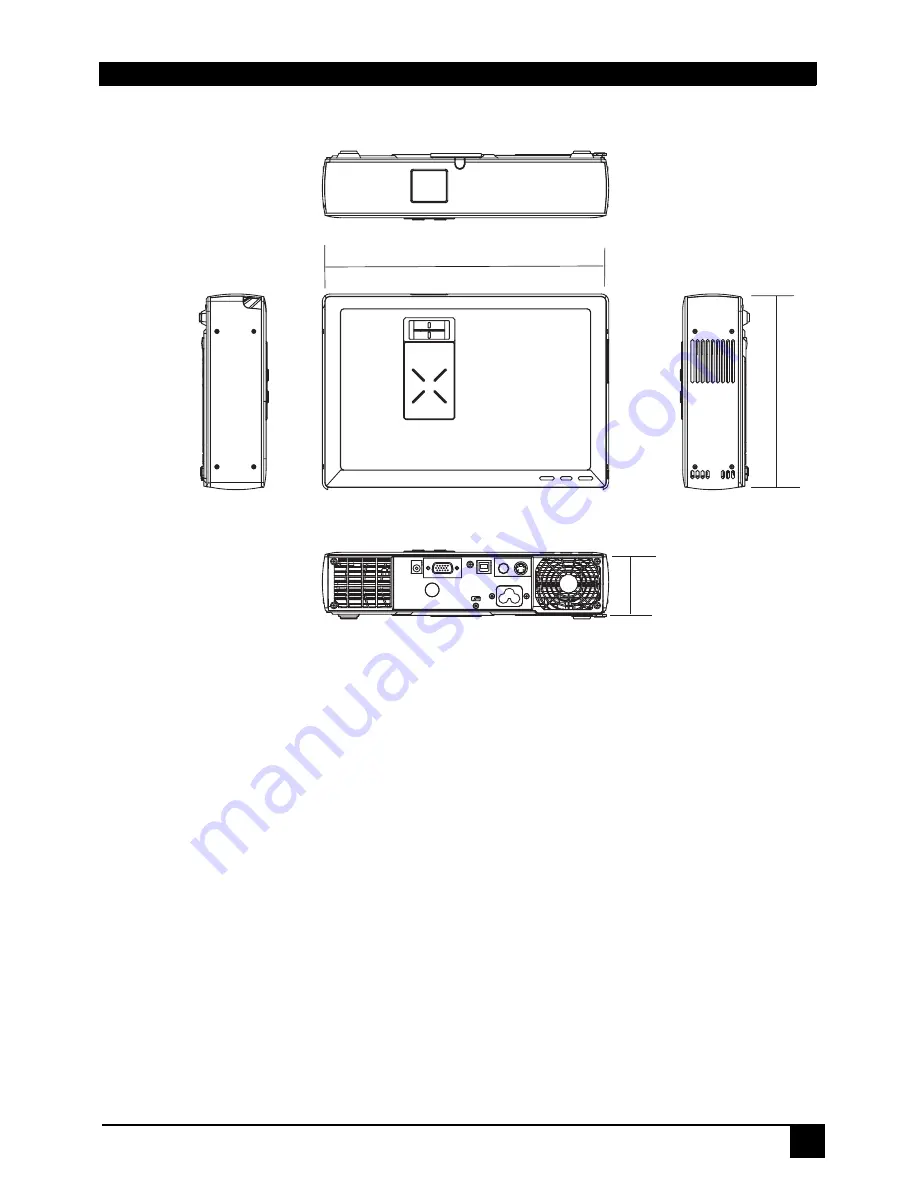
DIMENSIONS

Unit: mm

248

170

59

Содержание 1024X768 XGA

Страница 1: ...this user s guide for future reference OUTLINE This DLP Projector can display various computer signals and NTSC PAL SECAM video signals FEATURES 1 High Brightness 2 High Resolution 3 Compact Size Feather Weight for Portability 4 Durable Magnesium Alloy Body 5 RGB input Terminal 6 One Touch Auto Adjustment Function 7 Easy Keystone Adjustment ...

Страница 2: ...ise without the prior written permission of the company Disclaimer The company makes no representations or warranties either expressed or implied with respect to the contents hereof and specifically disclaims any warranties merchantability or fitness for any particular purpose Furthermore the company reserves the right to revise this publication and to make changes from time to time in the content...

Страница 3: ... Installing or Replacing Batteries 9 Installation 10 Display Size 10 Connecting to Various Equipment 11 Operation 12 Start Up 12 Digital Keystone Correction 13 Auto Adjustment 13 Source Selection 14 Menu System 14 1 VIDEO Menu 15 2 POSITION Menu 16 3 SPECIAL Menu 17 4 TRACKING Menu 18 Shutdown 19 Maintenance 20 Lamp Information 20 Use and Replacement of the Lamp 20 Lamp Replacement 20 Operative In...

Страница 4: ...iv DLP Personal Projector Specifications 23 Projector Specifications 23 Timing Chart 24 Dimensions 25 ...

Страница 5: ...ment Do not operate lamps beyond the rated lamp life Excessive operation of lamps beyond the rated life could cause them to explode on rare occasions 3 Never replace the lamp assembly or any electronic components unless the projector is unplugged 4 To reduce the risk of electric shock do not disassemble this appliance Take it to a qualified technician when service or repair is required Incorrect r...

Страница 6: ...atement CLASS B This equipment generates uses and can radiate radio frequency energy and if not installed and used in accordance with the instructions may cause harmful interference to radio communications However there is no guar antee that interference will not occur in a particular installation If this equipment does cause harmful interference to radio or television reception which can be deter...

Страница 7: ...y of these items are missing please contact personnel at the place of purchase Optional Accessories 1 150W lamp module 2 Macintosh adapter PO WE R SO U RCE M E NU B LA N K M U TE LA SER User s Guide Quick Start Guide Projector User s Guide 3 2 Converter Remote Control Batteries HDTV Cable Deluxe Soft Carry Case S Video Cable Video Cable USB Cable VGA Cable 220V 240V 110V Power Cord Quick Start Gui...

Страница 8: ...nnector VIDEO connector S VIDEO connector IR remote sensor Kensington lock AC power cord inlet R Projectionlens adjuster External control panel see External Control Panel on page 5 for more detailed information Open here to release the front cover Projection lens Adjuster foot Ventilation grill IR remote sensor Lamp door ...

Страница 9: ...age 21 for more detailed information POWER Press the POWER key to turn the projector on or off AUTO Automatically determines the best picture settings for current received signals PC Mode Only Lamp Indicator The Lamp Indicator will light up when the lamp needs service cooling or replacement See Lamp Information on page 20 for more detailed information SOURCE Selects signal sources from among PC Vi...

Страница 10: ...offers the following features Small and light for portability Full function remote control with laser pointer remote mouse function High quality manual zoom lens One key auto adjustment to display the best picture quality in PC mode Easy digital keystone correction through hot keys to correct distorted images High resolution Ultra high brightness projection lamp Ability to display 16 7 million col...

Страница 11: ... activated Serves as a Zoom key when the ZOOM function is activated BLANK Selects to display an entirely blue black green LG logo screen LASER Pointer MENU Press to display the menu system or to go back to the main menu and to leave the menu system Joystick Moves cursor When the OSD menu is on move the Joystick up and down to choose your desired item and move the Joystick left or right to make adj...

Страница 12: ...projection image and press MOUSE LEFT to release the item STILL Makes the projection image still RESIZE Scales the original input resolution ZOOM By pressing ZOOM button zoom rectangular displays in the center but to activate it customer should press ENTER button and then it can be adjusted by Joystick KEYSTONE Refer to Digital Keystone Correction on page 13 ...

Страница 13: ...rrectly replaced Replace only with the same or equiv alent type recommended by the manufacturer Dispose of used batteries according to the manufacturer s instructions Press and open the battery compartment lid in the direction 1 Install batteries as indicated by the diagram inside the compartment 2 Position the lid over the compartment and snap it back into place 3 ...

Страница 14: ...90 5 67 9 200 34 3 69 6 52 2 66 8 135 7 101 8 300 51 4 104 4 78 3 89 1 181 0 135 7 400 68 5 139 2 104 4 111 3 226 2 169 7 500 85 6 174 0 130 5 133 6 271 5 203 6 600 102 8 208 8 156 6 155 9 316 7 237 5 700 119 9 243 6 182 7 178 1 362 0 271 5 800 137 0 278 4 208 8 Display Size Max L Projection Distance cm Display Size Min Diagonal in A Width cm C Height cm Diagonal in B Width cm D Height cm 42 8 86 ...

Страница 15: ...lay HDTV images The following standards are supported in the HDTV function Please refer to Menu System on page 14 for information on the HDTV YPBPR OSD selections Connecting to Various Equipment It only takes a few seconds to connect your projector to your desktop or notebook computer VCR or other systems However a Mac adapter an optional accessory is needed for connection to Macintosh computers D...

Страница 16: ...ng in the ORANGE Leds light Press the Power button to turn on the projector Then the fan will start to operate while the ORANGE Led is blinking After 15 seconds LG logo will display and pictures will be on after the next 15 seconds Green Led on 3 Switch on all connected equipment 110V 220V POWER SOURCE MENU POWER SOURCE AUTO BLANK ...

Страница 17: ...d Press to correct keystoning at the top of the image Press to correct keystoning at the bottom of the image Auto Adjustment In some cases you may need to optimize the picture quality To do this press the AUTO key on the control panel of the projector or on the remote control The built in Intelligent Auto Adjustment function will re adjust settings to provide the best picture quality This function...

Страница 18: ...enu Press ENTER again to select items in the sub menu POWER SOURCE MENU POWER SOURCE AUTO BLANK Main Menu VIDEO POSITION SPECIAL TRACKING Sub Menu YPBPR Video S Video Contrast Brightness Color Tint Reset Keystone Zoom Resize Language Flip Horizontal Flip Vertical Blank Image Lamp Time PC RGB Contrast Brightness Color R Color G Color B Reset Horizontal Vertical Keystone Zoom Resize Language Flip Ho...

Страница 19: ...he color range of the image This function is not available when the input mode is PC Tint Adjusts the image to make it appear more red or green This function is not available when the input mode is PC or PAL signal Color R Color G Color B Increases or decreases the color temperature R G B of the image This function is only available when the input mode is PC Reset Returns all settings to the facto...

Страница 20: ...siton of the projected image Keystone Corrects any keystoning of the image Zoom Activates Zoom function Resize When in YPBPR Video and S Video modes users have two options for the image ratio 4 3 and 16 9 When in PC mode users have two options for the image ratio Scaled and Original JT30 XGA operates in SVGA and VGA modes and JT31 SVGA operates only in VGA mode ...

Страница 21: ... select the desired language from among English French German Italian Spanish Korean Simpli fied Chinese and Traditional Chinese Flip Horizontal Flip Vertical Blank Image Chooses blank image from among blue black green and LG logo Lamp Time Shows lamp usage time Default R Projects images when the projector is 180 degrees horizontally rotated Default Projects images when the projector is 180 degree...

Страница 22: ... Menu This sub menu only works in PC mode FUNCTION DESCRIPTION Auto Tracking It s the same function with the AUTO button on the remote control Clock Adjusts to fit in the desired image size Phase Adjusts to avoid the occurrence of flicker ...

Страница 23: ...r is turned off there is a 90 second cooling period before the projector can be re started 3 Disconnect the power cord from the wall socket Caution Please do not unplug the power cord before POWER is shut down or during the two minute cooling process If the projector is not properly shut down to protect the lamp the sys tem will detect this and cool the lamp for 90 seconds automatically before tur...

Страница 24: ...GH PRESS WHEN REPLACING THE LAMP TURN OFF THE PROJECTOR AND PULL OUT THE CORD FROM THE RECEPTACLE BEFORE REPLACING THE LAMP WAIT UNTIL THE LAMP BECOMES COOL MINIMUM 45 MINUTES TOUCHING THE LAMP WHEN IT IS HOT MAY CAUSE A BURN ON YOUR HAND HIGH PRESSURE LAMP WHEN HOT MAY EXPLODE IF IMPROPERLY HAN DLED To reduce the risk of injuries to fingers and damage to internal compo nents use caution when remo...

Страница 25: ...mp is lit or not Lamp Time over Error Orange Orange Tog gle 1400 hours Lamp Time 1500 hours Red Orange Lamp Time 1500 hours Please change the lamp to keep good performance Tempera ture error Orange Red Toggle 72 C Temperature 74 C Red Red Temperature 74 C The lamp temperature is very high Please turn off the projector Front cover closed Green Red Check whether the Front cover is closed Fan On Erro...

Страница 26: ...ct video system Adjust brightness contrast or saturation BLURRED IMAGE Press Auto on the control panel of the projector or the remote control unit to get better picture quality Adjust the focus Reposition the unit to improve its projection angle Ensure the distance between the unit and screen is within the adjustment range of the lens REMOTE CONTROLDOES NOT WORK Replace the batteries with new ones...

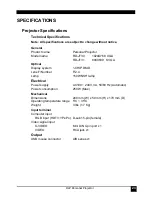
Страница 27: ...Optical Display system 1 CHIP DMD Lens F Number F 2 4 Lamp 150W NSH lamp Electrical Power supply AC100 240V 3A 50 60 Hz Automatic Power consumption 250 W Max Mechanical Dimensions 248 mm W x 59 mm H x 170 mm D Operating temperature range 5 C 35 C Weight 3 lbs 1 7 Kg Input terminal Computer input RGB input HDTV YPBPR D sub 15 pin female Video signal input S VIDEO Mini DIN 4 pin port x1 VIDEO RCA ja...

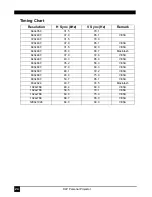
Страница 28: ... 640x480 31 5 60 0 VESA 640x480 35 0 66 7 Macintosh 640x480 37 9 72 8 VESA 640x480 43 3 85 0 VESA 800x600 35 2 56 3 VESA 800x600 37 9 60 3 VESA 800x600 48 1 72 2 VESA 800x600 46 9 75 0 VESA 800x600 53 7 85 1 VESA 832x624 49 7 74 5 Macintosh 1024x768 48 4 60 0 VESA 1024x768 56 5 70 1 VESA 1024x768 60 0 75 0 VESA 1024x768 68 7 85 0 VESA 1280x1024 64 0 60 0 VESA ...

Страница 29: ...DLP Personal Projector 25 DIMENSIONS Unit mm 248 170 59 ...

Отзывы: