background image

244

4. REAR SEAT ENTERTAINMENT SYSTEM OPERATION

GX_EMVN_OM60K84U_(U)

13.07.10     11:14

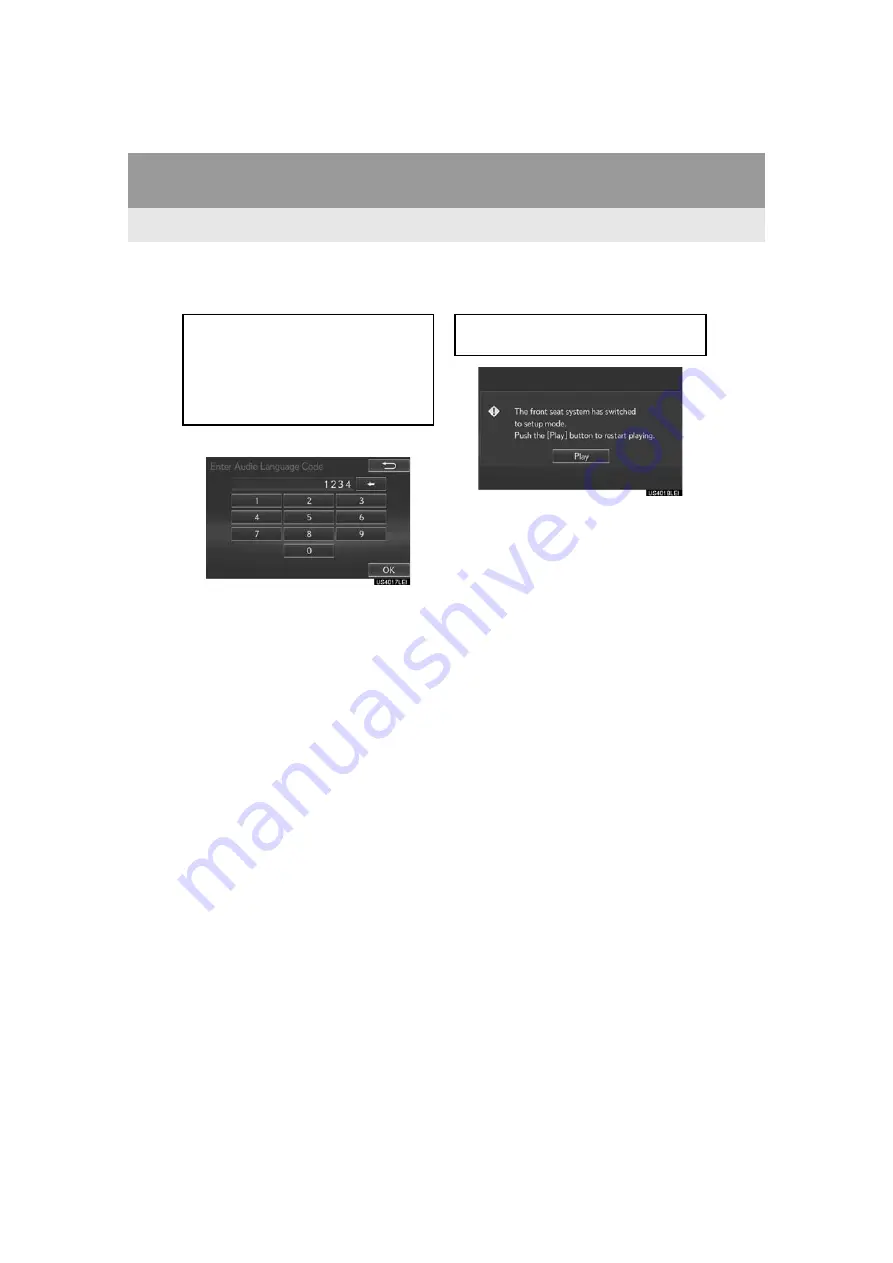
ENTER AUDIO/SUBTITLE/DVD

LANGUAGE CODE

1

Enter the 4-digit language code.

2

Select 

“OK”

.

SETUP OPERATION FROM THE

FRONT SEAT

Rear passengers can cancel this setup

operation by selecting 

“Play”

. The player

will resume normal play.

Likewise, a front passenger can cancel a

rear passenger’s selection of the setup

menu.

If 

“Other”

 on the “Audio Language”

screen, “Subtitle Language” screen or

“Menu Language” screen is selected,

the desired language to be heard or

read can be selected by entering a lan-

guage code. (

P.261)

This screen appears when a front pas-

senger selects the setup menu.

Содержание OM60K84U

Страница 1: ...4U_ U 13 07 02 13 05 1 QUICKGUIDE 9 2 BASICFUNCTION 27 3 NAVIGATIONSYSTEM 69 4 AUDIO VIDEOSYSTEM 155 5 VOICECOMMANDSYSTEM 279 6 INFORMATION 293 7 PHONE 297 8 LEXUSENFORMWITHSAFETY CONNECT 343 INDEX 377 TABLE OF CONTENTS ...

Страница 2: ...you to a destination thatisunfamiliartoyouinanefficientmanner The systemuses DENSOmaps Thecal culated routes may not be the shortest nor the least traffic congested Your own per sonal local knowledge or short cut may at times be faster than the calculated routes The navigation system s database includes Point of Interest categories to allow you to easily select destinations such as restaurants and...

Страница 3: ...the risk of injury to yourself and others NOTICE This is a warning against anything which may cause damage to the vehicle or its equipment if the warning is ignored You are informed about what you must or must not do in order to avoid or reduce the risk of damage to your vehicle and its equipment SYMBOLSUSEDIN ILLUSTRATIONS Safetysymbol The symbol of a circle with a slash through it means Do not D...

Страница 4: ...e Description Operational Outlines An outline of the operation is explained Main Operations The steps of an operation are explained Related Operations A main operation s supplementary operations are described Information Useful information for the user is described ...

Страница 5: ...nd only when it is safe How ever do not totally rely on voice guidance Use it just for reference If the system can not determine the current position correct ly there is a possibility of incorrect late or non voice guidance The data in the system may occasionally be incomplete Road conditions including driving restrictions no left turns street clo sures etc frequently change Therefore before follo...

Страница 6: ...38 2 Bluetooth SETTINGS 40 REGISTERING CONNECTING Bluetooth DEVICE 40 SETTING Bluetooth DETAILS 45 3 OTHER SETTINGS 55 GENERAL SETTINGS 55 VOICE SETTINGS 62 VEHICLE SETTINGS 64 1 BASIC OPERATION 72 QUICK REFERENCE 72 MAP SCREEN OPERATION 75 MAP SCREEN INFORMATION 83 TRAFFIC INFORMATION 90 2 DESTINATIONSEARCH 95 DESTINATION SEARCH SCREEN 95 SEARCH OPERATION 97 STARTING ROUTE GUIDANCE 110 3 ROUTE GU...

Страница 7: ... 257 7 TIPSFOR OPERATINGTHE AUDIO VISUALSYSTEM 265 OPERATING INFORMATION 265 1 VOICE COMMAND SYSTEM OPERATION 280 VOICE COMMAND SYSTEM 280 CASUAL SPEECH RECOGNIZATION 288 COMMAND LIST 289 1 INFORMATIONDISPLAY 294 RECEIVING DOPPLER WEATHER INFORMATION 294 DATA SERVICES SETTINGS 296 1 PHONEOPERATION HANDS FREESYSTEM FOR CELLULAR PHONES 298 QUICK REFERENCE 298 SOME BASICS 299 CALLING ON THE Bluetooth...

Страница 8: ... A CELLULAR PHONE 345 TYPE B FUNCTION ACHIEVED BY USING DCM AND THE NAVIGATION SYSTEM 350 TYPE C FUNCTION ACHIEVED BY USING DCM 353 2 LEXUS ENFORMWITH SAFETY CONNECT OPERATION 354 LEXUS App Suite 354 Destination Assist 364 eDestination 366 Lexus Insider 370 3 SETUP 374 LEXUS App Suite SETTINGS 374 ALPHABETICALINDEX 378 8 LEXUSENFORM WITH SAFETYCONNECT INDEX ...

Страница 9: ...2 STATUS DISPLAY 14 1 Setup SCREEN 16 2 Information SCREEN 18 1 REGISTERINGHOME 19 2 REGISTERINGPRESET DESTINATIONS 21 3 OPERATIONFLOW GUIDINGTHEROUTE 23 4 SETTINGHOME AS THE DESTINATION 24 1 FUNCTIONINDEX 25 1 BASIC FUNCTION 2 QUICK REFERENCE 3 NAVIGATIONOPERATION 4 FUNCTION INDEX QUICKGUIDE ...

Страница 10: ...10 GX_EMVN_OM60K84U_ U 13 07 02 13 05 1 BASIC FUNCTION 1 BUTTONS OVERVIEW ...

Страница 11: ...y the hands free operation screen 298 Press to display the Information screen 18 Press to display the Setup screen 16 Press to display the home screen 12 Press to display the air conditioning control screen Owner s Manual Press to display the map screen 72 Press to display the audio visual screen 158 ...

Страница 12: ...can display multiple information screens such as the navigation sys tem screen audio system screen and fuel consumption screen simultaneously When a screen is selected the selected screen is switched to a full screen display The home screen can be set to either a three way split screen or a two way split screen For details about setting the home screen P 32 ...

Страница 13: ...N 1 QUICK GUIDE 13 GX_EMVN_OM60K84U_ U 13 07 02 13 05 Two way split screen No Function Page Displays the condition of the Bluetooth connection 14 Select to change the display items area and the home screen layout 32 ...

Страница 14: ...o connection Poor Good An antenna for the Bluetooth connection is built into the instru ment panel The condition of the Bluetooth connection may deteriorate and the system may not function when a Bluetooth phone is used in the following conditions and or places The cellular phone is obstructed by certain objects such as when it is behind the seat or in the glove box or console box The cellular pho...

Страница 15: ...ccessible by radio waves No Service is displayed Rm is displayed when receiving in a roaming area While roam ing display Rm top left on the icon The receiving area may not be displayed depending on the type of phone you have The amount of battery charge left Empty Full The amount displayed does not always correspond with the amount displayed on the Bluetooth device The amount of battery charge lef...

Страница 16: ...16 GX_EMVN_OM60K84U_ U 13 07 02 13 05 2 QUICK REFERENCE 1 Setup SCREEN The items shown on the Setup screen can be set Press the SETUP button to dis play the Setup screen ...

Страница 17: ...rnal media settings 257 Select to set traffic information 147 Select to adjust the contrast and brightness of the screens turn the screen off etc 38 Select to set memory points home preset destinations address book entries areas to avoid navigation details or to delete previous destina tions 129 141 Select to set vehicle information such as maintenance information 64 Select to set the phone sound ...

Страница 18: ...el consumption etc Press the INFO APPS button to display the Information screen No Function Page Select to display the LEXUS App Suite screen 354 Select to display the fuel consumption screen Owner s Manual Select to display traffic information 90 Select to display weather information 294 Select to display the LEXUS Insider screen 370 ...

Страница 19: ...IDE GX_EMVN_OM60K84U_ U 13 07 02 13 05 3 NAVIGATION OPERATION 1 REGISTERING HOME Press the NAV button Select Dest Select GoHome Select Yes There are different kinds of meth ods to search for your home P 95 1 2 3 4 5 ...

Страница 20: ...X_EMVN_OM60K84U_ U 13 07 02 13 05 Select Enter Select OK Registration of home is complete Registering home in a different way P 130 Editing the name location phone num ber and icon P 131 Setting home as the destination P 98 6 7 ...

Страница 21: ...E GX_EMVN_OM60K84U_ U 13 07 02 13 05 2 REGISTERING PRESET DESTINATIONS Press the NAV button Select Dest Select one of the preset destination buttons Select Yes There are different kinds of meth ods to search for a destination P 95 1 2 3 4 5 ...

Страница 22: ... 07 02 13 05 Select Enter Select OK Registrationofpresetdestinationsiscom plete Registering preset destinations in a dif ferent way P 132 Editing the name location phone num ber and icon P 133 Setting preset destinations as the desti nation P 99 6 7 ...

Страница 23: ...IDING THE ROUTE Press the NAV button Select Dest There are different kinds of meth ods to search for a destination P 95 Select Go Select OK Selecting routes other than the one recom mended P 110 Guidance to the destination is displayed on the screen and can be heard via voice guidance 1 2 3 4 5 ...

Страница 24: ... 02 13 05 4 SETTING HOME AS THE DESTINATION Pressthe NAV button Select Dest Select GoHome Select OK Selecting routes other than the one recom mended P 110 Guidance to the destination is displayed on the screen and can be heard via voice guidance 1 2 3 4 ...

Страница 25: ...orientation 77 Displaying map Information 83 Displaying the estimated travel arrival time to the destination 116 Selecting the map mode 78 Displaying traffic information 90 Searchingfordestinations Page Searching for the destination 97 Changing the search area 98 Beforestartingorduringroute guidance Page Starting route guidance 110 Editing the route 123 Viewing the entire route map 117 Pausing gui...

Страница 26: ...ation Page Displaying vehicle maintenance 65 Hands freesystem forcellular phone Page Registering connecting a Bluetooth phone 40 Making a call on a Bluetooth phone 303 Receiving a call on the Bluetooth phone 309 Voicecommandsystem Page Operating the system with your voice 280 Peripheral monitoringsystem Page Viewing behind the rear of the vehicle Owner s Manual ...

Страница 27: ...uetooth PHONE FOR THE FIRST TIME 40 REGISTERING A Bluetooth AUDIO PLAYER FOR THE FIRST TIME 41 PROFILES 43 2 SETTINGBluetooth DETAILS 45 Bluetooth Setup SCREEN 45 REGISTERING A Bluetooth DEVICE 46 DELETING A Bluetooth DEVICE 48 CONNECTING A Bluetooth DEVICE 48 EDITING THE Bluetooth DEVICE INFORMATION 50 System Settings SCREEN 53 1 GENERALSETTINGS 55 GENERAL SETTINGS SCREEN 55 2 VOICE SETTINGS 62 V...

Страница 28: ...en the vehicle is stopped with the engine running always apply the parking brake for safety MAINTENANCE INFORMATION This system reminds users when to re place certain parts or components and shows dealer information if registered on the screen When the vehicle reaches a previously set driving distance or date specified for a scheduled maintenance check the Maintenance Reminder screen will be displ...

Страница 29: ...ATION BEFOREOPERATION 2 BASIC FUNCTION GX_EMVN_OM60K84U_ U 13 07 02 13 05 1 Press and hold the PWR VOL knob for 3 seconds or more RESTARTINGTHE SYSTEM When system response is extremely slow the system can be restarted ...

Страница 30: ... are performed by touching the touch screen directly with your finger Operation method Outline Main use Touch Quickly touch and release once Changing and selecting various set tings Drag Touch the screen with your finger and move the screen to the desired posi tion Scrolling the lists Flick Quickly move the screen by flicking with your finger Scrolling the map P 81 ...

Страница 31: ...ouch screen INFORMATION If the system does not respond to touch ing a screen button move your finger away from the screen and then touch it again Dimmed screen buttons cannot be oper ated The displayed image may become darker and moving images may be slightly dis torted when the screen is cold In extremely cold conditions the map may not be displayed and the data input by a user may be deleted Als...

Страница 32: ...n display 1 Select 2 Check that Customize Home Screen is displayed The home screen can display multiple information screens such as the naviga tion system screen audio system screen and fuel consumption screen simulta neously CUSTOMIZING THE HOME SCREEN The display items area on the home screen and the home screen layout can be changed No Function Page Select to change the dis play items area 33 S...

Страница 33: ...Select the desired item 2 Select the desired area CHANGING THE HOME SCREEN LAYOUT 1 Select Change Layout 2 Select the desired screen layout INFORMATION When the selected item is already being displayed and another area is selected for that item the item that it is replacing will be displayed in the original item s loca tion ...

Страница 34: ...ered via the screen ENTERINGLETTERSAND NUMBERS No Function Select to enter desired characters Text field Entered character s will be displayed During entering character s when there is only one available option for the next character s the next char acter s will be displayed in gray text in the text field automatically Gray text is entered by selecting this but ton Select to erase one character Se...

Страница 35: ...racters is entered or the number of matching items is 5 or less SELECTINGALLITEMS 1 Select SelectAll UnselectAll Unselect all items in the list LISTSCREEN DISPLAYINGTHELIST The list screen may be displayed after entering characters INFORMATION The number of matching items is shown on the right side of the screen If the num ber of matching items is more than 999 the system displays on the screen So...

Страница 36: ...elect to skip to the next or previ ous page Select and hold or to scroll through the displayed list This indicates the displayed screen s position If appears to the right of an item name the complete name is too long to display Select to scroll to the end of the name Select to move to the begin ning of the name SORTING The order of a list displayed on the screen can be sorted in the order of dis t...

Страница 37: ...but tons CHARACTERJUMPBUTTONS INLISTS Some lists contain character screen but tons ABC DEF etc which allow a direct jump to list entries that begin with the same letter as the character screen button INFORMATION Every time the same character screen button is selected the list starting with the subsequent character is displayed ...

Страница 38: ...the screen display and the image of the camera display can be adjusted The screen can also be turned off and or changed to either day or night mode For information regarding audio visual screen adjustment P 166 No Function Page Select to turn the screen off To turn it on press any but ton Select to turn day mode on off 39 Select to adjust the screen display 39 Select to adjust the camera display ...

Страница 39: ... This feature is available when the headlight is switched on INFORMATION If the screen is set to day mode with the headlight switch turned on this condition is memorized even with the engine turned off ADJUSTING THECONTRAST BRIGHTNESS The contrast and brightness of the screen can be adjusted according to the brightness of your surroundings Screen button Function Contrast Select to strengthen the c...

Страница 40: ... 3 Select Yes to register a phone 4 When this screen is displayed search for the device name displayed on this screen on the screen of your Bluetooth device For details about operating the Bluetooth device see the manual that comes with it To cancel the registration select Cancel REGISTERINGABluetooth PHONEFORTHEFIRSTTIME Tousethehands freesystem itisneces sarytoregisteraBluetooth phonewith the sy...

Страница 41: ...owing screen is dis played when registration is complete The system waits for connection requests coming from the registered device At this stage the Bluetooth functions are not yet available 7 Select OK when the connection sta tus changes from Connecting to Connected If an error message is displayed follow the guidance on the screen to try again REGISTERINGABluetooth AUDIOPLAYERFORTHE FIRSTTIME T...

Страница 42: ...layer on This function is not available when the Bluetooth connection setting of your audio player is set to off 2 Press the AUDIO button 3 Select Source 4 Select Bluetooth 5 Select Connect 6 Follow the steps in CONNECTING A Bluetooth DEVICE from STEP 2 P 48 Bluetooth is a registered trademark of Bluetooth SIG Inc ...

Страница 43: ...Device Profile Function Require ments Recom menda tions Bluetooth Phone HFP Hands Free Profile Hands free system Ver 1 0 Ver 1 6 OPP Object Push Profile Transferring the contacts Ver 1 1 Ver 1 2 PBAP Phone Book Access Profile Ver 1 0 Ver 1 1 MAP Message Access Profile Bluetooth phone message Ver 1 0 SPP Serial Port Profile LEXUS App Suite function Ver 1 1 Bluetooth Audio Player A2DP Advanced Audio...

Страница 44: ...e does not support HFP registering the Bluetooth phone or using OPP PBAP MAP or SPP profiles individually will not be possible If the connected Bluetooth device version is older than recommended or incompatible the Bluetooth device function may not work properly Refer to http www lexus com MobileLink to find approved Bluetooth phones for this system ...

Страница 45: ...tton 2 Select Bluetooth 3 Select the desired item to be set Bluetooth is a registered trademark of Bluetooth SIG Inc Bluetooth Setup SCREEN Function Page Registering a Bluetooth device 46 Deleting a Bluetooth device 48 Connecting a Bluetooth device 48 Editing the Bluetooth device in formation 50 Bluetooth system settings 53 ...

Страница 46: ...hen 5 Bluetooth devices have al ready been registered A registered device needs to be replaced Select Yes and select the device to be replaced Bluetooth is a registered trademark of Bluetooth SIG Inc DISPLAYING THE Bluetooth Setup SCREENINA DIFFERENT WAY REGISTERINGABluetooth DEVICE Up to 5 Bluetooth devices can be reg istered Bluetooth compatible phones HFP and audio players AVP can be regis tere...

Страница 47: ...e Pairing compatible Bluetooth devices Depending on the type of Bluetooth device being con nected a message confirming registration may be displayed on the Bluetooth device s screen Respond and operate the Bluetooth device according to the confir mation message 5 Check that the following screen is dis played when registration is complete The system waits for connection requests coming from the reg...

Страница 48: ... App Suite service Supported profile icons for currently con nected devices will illuminate Dimmed icons can be selected to connect to the phone audio function directly Bluetooth is a registered trademark of Bluetooth SIG Inc DELETINGABluetooth DEVICE INFORMATION When deleting a Bluetooth phone the contact data will be deleted at the same time CONNECTINGABluetooth DEVICE Up to 5 Bluetooth devices ...

Страница 49: ...tered device that was last connected if it is nearby CONNECTING MANUALLY 1 Press the SETUP button 2 Select Bluetooth 3 Follow the steps in CONNECTING A Bluetooth DEVICE from STEP 2 P 48 Bluetooth is a registered trademark of Bluetooth SIG Inc INFORMATION It may take time if the device connection is carried out during Bluetooth audio playback Depending on the type of Bluetooth device being connecte...

Страница 50: ... 2 Select the desired device to be edited 3 Select DeviceInfo Bluetooth is a registered trademark of Bluetooth SIG Inc If a Bluetooth phone is disconnected due to poor reception from the Bluetooth network when the engine switch is in ACCESSORY or IGNI TION ON mode the system automati cally reconnects the Bluetooth phone EDITINGTHEBluetooth DEVICEINFORMATION The Bluetooth device s information can b...

Страница 51: ...luetooth audio playerconnectionmethod P 52 Device address is unique to the de vice and cannot be changed Phone number of the Bluetooth phone Compatibility profile of the Bluetooth device Select to reset all setup items INFORMATION If 2 Bluetooth devices have been regis tered with the same device name the devices can be distinguished referring to the device s address Depending on the type of phone ...

Страница 52: ...e audio player Device Select to connect the audio play er to the audio system Depending on the audio player the Vehi cle or Device connection method may be best As such refer to the manual that comes with the audio player To reset the connection method select Default CHANGINGADEVICE NAME INFORMATION Even if the device name is changed the name registered in your Bluetooth device does not change SET...

Страница 53: ... con firmed and changed No Information Page Select to set Bluetooth connection on off 54 Displays system name Can be changed to a desired name 54 PIN code used when the Bluetooth device was registered Can be changed to a desired code 54 Device address is unique to the device and cannot be changed Selecttosetthephonecon nection status display on off Selecttoset the connection status display of the ...

Страница 54: ...f The Bluetooth device is disconnected and the system will not connect to it next time 1 Select Bluetooth Name 2 Enter a name and select OK 1 Select Bluetooth PIN 2 Enter a PIN code and select OK Bluetooth is a registered trademark of Bluetooth SIG Inc CHANGING Bluetooth Power INFORMATION While driving the auto connection state can be changed from off to on but can not be changed from on to off ED...

Страница 55: ...eral 3 Select the items to be set Settings are available for auto screen change operation sounds etc GENERALSETTINGSSCREEN No Function Select to change the time zone and set the daylight saving time and auto maticadjustmentoftheclockbyGPS on off P 56 Select to change the language Select to change the unit of measure for distance ...

Страница 56: ...ns For details contact your Lexus deal er Select to update Gracenote data base versions For details contact your Lexus dealer Select to display the software infor mation Notices related to third party software used in this product are en listed This includes instructions for obtainingsuchsoftware whereappli cable No Function CLOCK SETTINGS Used for changing time zones and the on off settings of da...

Страница 57: ...to adjust the time zone MANUALCLOCKSETTING 1 Display the Clock screen P 56 2 Select the items to be set e g 1 00 to 1 29 1 00 1 30 to 1 59 2 00 When Auto Adjust by GPS is turned Off the clock can be manually adjust ed No Function Select to set the time forward one hour and to set the time back one hour Select to set the time forward one minute and to set the time back one minute Rounds to the near...

Страница 58: ...used as the startup and screen off Images When the engine switch is in ACCESSORY or IGNITION ON mode theinitialscreenwillbedisplayed P 28 When Screen Off on the Display screen is selected the screen is turned off and the desired screen off image that issetis displayed Toturnthescreen off P 38 No Function Page Select to copy images from a USB memory 59 Select to delete images 61 Select to set an im...

Страница 59: ...ry if it is not turned on 3 Select Copy fromUSB 4 Select the desired images from the list and then select Copy The selected image is displayed on the right side of the screen If the selected image file is broken or incompatible will be displayed The remaining number of image files that can be transferred is displayed at the bot tom of the screen 5 Select Yes when the confirmation screen appears ...

Страница 60: ... I m a g e case sensi tive If a different folder name is used the navigation system will not recognize the image files The compatible file extensions are JPG and JPEG An image s file name including file exten sion can be up to 32 characters Image files of 5 MB or less can be trans ferred Up to 10 images can be transferred to the navigation system No Function Select to set an image as the startup i...

Страница 61: ...en the confirmation screen appears 1 Display the General Settings screen P 55 2 Select DeletePersonalData 3 Select Delete 4 Select Yes when the confirmation screen appears Registered or changed personal settings will be deleted or returned to their default conditions For example General settings Navigation settings Audio settings Phone settings Lexus Enform settings DELETING PERSONAL DATA ...

Страница 62: ... 02 13 05 2 VOICE SETTINGS 1 Press the SETUP button 2 Select Voice 3 Select the items to be set Voice guidance etc can be set INFORMATION Voice Settings screen can also be dis played from the voice recognition top screen P 282 VOICESETTINGSSCREEN ...

Страница 63: ...dance on off Select to set the voice guidance dur ing audio visual and or air condi tioning system use on off Select to set the voice recognition prompts on off When On is selected expanded voice commands can be operated using voice commands P 287 Select to set the voice prompt inter rupt on off Select to set the beep sound of navi gation guidance Select to reset all setup items ...

Страница 64: ... 2 Select Vehicle 3 Select the desired item to be set Settings are available for maintenance vehiclecustomizationandintuitivepark ing assist sensor No Function Page Select to set mainte nance 65 Select to set vehicle cus tomization Owner s Manual Select to set intuitive parking assist Owner s Manual ...

Страница 65: ... to set the condition of parts or components Select to add new information items separately from provided ones Select to cancel all conditions which have been entered Selecttoresettheitemwhichhasex pired a condition Select to call the registered dealer Select to register edit dealer infor mation P 67 When set to on the indicator will illu minate The system is set to give maintenance information wi...

Страница 66: ...o enter the driving distance until the next maintenance check Select to cancel the conditions which have been entered Select to reset the conditions which have expired INFORMATION For scheduled maintenance information refer to Warranty and Services Guide Owner s Manual Supplement Scheduled Maintenance Depending on driving or road conditions the actual date and distance that mainte nance should be ...

Страница 67: ...edited DEALER SETTING Dealer information can be registered in thesystem Withdealerinformationreg istered route guidance to the dealer is available No Function Page Select to enter the name of a dealer 68 Select to enter the name of a dealer member 68 Select to set the location 68 Select to enter the phone number 68 Select to delete the dealer information displayed on the screen Select to set the d...

Страница 68: ...TACT NAME 1 Select Edit next to Dealer or Con tact 2 Enter the name and select OK EDITING THE LOCATION 1 Select Edit next to Location 2 Scroll the map to the desired point P 82 and select OK EDITING PHONENUMBER 1 Select Edit next to Phone 2 Enter the phone number and select OK ...

Страница 69: ...SCALE 75 ORIENTATION OF THE MAP 77 SWITCHING THE MAP MODE 78 SCREEN SCROLL OPERATION 81 ADJUSTING LOCATION IN SMALL INCREMENTS 82 3 MAP SCREEN INFORMATION 83 DISPLAYING MAP INFORMATION 83 DISPLAYING INFORMATION ABOUT THE ICON WHERE THE CURSOR IS SET 87 STANDARD MAP ICONS 89 4 TRAFFIC INFORMATION 90 DISPLAYING TRAFFIC INFORMATION ON THE MAP 93 1 BASIC OPERATION NAVIGATIONSYSTEM ...

Страница 70: ...SECTION AND FREEWAY 107 SEARCHING BY MAP 109 SEARCHING BY COORDINATES 109 3 STARTINGROUTE GUIDANCE 110 STARTING ROUTE GUIDANCE 110 PAUSING GUIDANCE 114 1 ROUTEGUIDANCE SCREEN 115 SCREEN FOR ROUTE GUIDANCE 115 ROUTE OVERVIEW 117 DURING FREEWAY DRIVING 118 WHEN APPROACHING INTERSECTION 120 TURN LIST SCREEN 120 TURN BY TURN ARROW SCREEN 121 2 TYPICAL VOICEGUIDANCE PROMPTS 122 3 EDITING ROUTE 123 ADDI...

Страница 71: ...LETING PREVIOUS DESTINATIONS 140 1 DETAILED NAVIGATION SETTINGS 141 SCREENS FOR NAVIGATION SETTINGS 142 2 TRAFFICSETTINGS 147 SCREEN FOR TRAFFIC SETTINGS 147 AUTO AVOID TRAFFIC 148 1 GPS GLOBAL POSITIONING SYSTEM 149 LIMITATIONS OF THE NAVIGATION SYSTEM 149 2 MAP DATABASE VERSION AND COVERED AREA 152 MAP INFORMATION 152 ABOUT THE MAP DATA 153 4 MEMORYPOINTS 5 SETUP 6 TIPS FORTHE NAVIGATION SYSTEM ...

Страница 72: ...eading up sym bol Indicates whether the map orientation is set to north up or heading up The letter s beside this symbol indicate the vehicle s heading direction e g N for north In 3D map only a heading up view is available 77 Options button Selecttodisplaythe NavigationOptions screen 74 GPS mark Global Position ing System Shows that the vehicle is receiving signals from the GPS 149 ...

Страница 73: ...ootprint map screen 76 Current position button Select to display the current position address Voice guidance button Select to repeat voice guidance 122 Destination but ton Select to display the Destination screen 95 Speed limit icon Indicates the speed limit on the current road The display of the speed limit icon can be set to on off 83 Route informa tion bar Displays the current street name or th...

Страница 74: ...ptions screen press the NAV button then select Options on the map screen No Function Page Select to display the desired map configuration 78 Select to set display of the map information such as POI icons route trace speed limit etc 83 Select to display the map version and coverage area 152 Select to edit the set route 123 Select to pause or resume route guidance 114 Select to display the overview ...

Страница 75: ...n manually P 145 INFORMATION While driving the current position mark is fixed on the screen and the map moves The current position is automatically set as the vehicle receives signals from the GPS Global Positioning System If the current position is not correct it is auto matically corrected after the vehicle receives signals from the GPS After the battery disconnection or on a new vehicle the cur...

Страница 76: ...d to display the footprint map INFORMATION If the map or the current position is moved to the area which is not covered by the footprint map the screen scale automatically changes to 150 ft 50 m On the footprint map a one way street is displayed by Scrolling on the footprint map is not avail able while driving Building footprints in the database were created and provided by NAVTEQ 3D CITY MODEL MA...

Страница 77: ...ATING3D MAP 3D map and 3D city model map can be rotated when arrows appear around the cursor while scrolling INFORMATION The viewing angle of the 3D map can be changed P 144 ORIENTATIONOFTHEMAP The orientation of the map can be changed between 2D north up 2D heading up and 3D heading up by se lecting the orientation symbol displayed at the top left of the screen ...

Страница 78: ...up Heading up symbol The direction of vehicle travel is always up 3D Heading up symbol The direction of vehicle travel is always up The letter s beside this symbol indicate the vehicle s heading direction e g N for north 1 Select Options on the map screen 2 Select Map Mode 3 Select the desired configuration button SWITCHINGTHEMAPMODE ...

Страница 79: ...s the main map No Function Page Select to display the single map screen 79 Select to display the dual map screen 79 Select to display the com pass mode screen 80 Select to display the turn list screen 120 Selectto display thefreeway exit list screen 118 Select to display the inter section guidance screen or the guidance screen on the freeway 120 Select to display the turn by turn arrow screen 121 ...

Страница 80: ...raffic infor mation 90 Select to display eDestina tion icons 366 Select to change the map scale 75 Information about the destination cur rent position and a compass is displayed on the screen INFORMATION The destination mark is displayed in the direction of the destination When driv ing refer to the longitude and latitude coordinates and the compass to make sure that the vehicle is headed in the d...

Страница 81: ...iredpointtothecenterofthescreenfor looking at a point on the map that is dif ferent from the current position No Information Function Cursor mark Distance from the current position to the cursor mark Select to set as a destination When selecting Goto onthe fol lowing map screen the navigation system performs a search for the route P 110 If a destination has already been set Goto and AddtoRoute wil...

Страница 82: ...JUSTINGLOCATIONIN SMALLINCREMENTS The cursor location can be adjusted in small increments when Adjust Location is selected on the setting map screen Also when changing the location of memory points on the editing screen P 136 and adjusting the current po sition mark manually on the Calibra tion screen P 145 8 directional arrows may appear for this purpose ...

Страница 83: ...n set to on the indicator will illuminate DISPLAYINGMAP INFORMATION Information such as POI icons route trace speed limit etc can be displayed on the map screen No Function Page Select to display the select ed POI icons Select to select or change POI icons 84 Select to display eDestina tions 366 Select to display route trace 86 Select to display traffic infor mation 90 Select to display speed limi...

Страница 84: ...gePOI is displayed 3 SelectthedesiredPOIcategoryandse lect OK SELECTINGTHEPOIICONS No Information Function Page Displays up to 5 selected POI icons on the map screen Select to cancel the select ed POI icons Displays up to 6 POI icons as favorite POI categories 143 Select to display other POI categories if the desired POIs cannot be found on the screen 85 Select to search for the nearest POIs 85 ...

Страница 85: ...Select to display all POI categories To add more POI catego ries select More DISPLAYING THE LOCAL POI LIST 1 Select FindLocalPOI 2 Select the desired POI Near Select to search for POIs near the current position or along the route 3 Check that the selected POI is dis played on the map screen P 81 POIs that are within 20 miles 32 km of the current position will be listed from among the selected cate...

Страница 86: ...tion Along My Route Select to search for POIs along the route 1 Display the Map Information screen P 83 2 Select RouteTrace The Route Trace indicator illuminates and the route trace starts 3 Checkthatthetraveledlineisdisplayed ROUTE TRACE The traveledroute canbestoredandre traced on the map screen This feature is availablewhenthemapscaleis30miles 50 km or less ...

Страница 87: ...e recorded route trace 1 Place the cursor over an icon 2 Select Info POI information Memory point information INFORMATION The traveled route can be stored up to 124 miles 200 km DISPLAYINGINFORMATION ABOUTTHEICONWHERE THECURSORISSET When the cursor is placed over an icon on the map screen the name bar is dis played on the upper part of the screen If Info appears on the right side of the name bar d...

Страница 88: ...P 134 Select to set as a destination Select to call the registered number Selecttodeletedestinationormemo ry point Select to display the edit memory point screen Select to display detailed information INFORMATION Even when traffic information is not cur rently being received traffic information and Info will be displayed for a while after traffic information has been received ...

Страница 89: ...9 1 BASICOPERATION 3 NAVIGATION SYSTEM GX_EMVN_OM60K84U_ U 13 07 02 13 05 STANDARDMAPICONS Icon Name Island Park Industry Business facility Airport Military University Hospital Stadium Shopping mall Golf ...

Страница 90: ... APPS button 2 Select TrafficIncidents 3 Select the desired item Traffic data can be received via HD or LEXUSAppSuitetodisplaytrafficinfor mation on the map screen No Function Page Select to display a list of current traffic information 91 Select to display a map with predictive traffic data 92 ...

Страница 91: ...ion for the current road On Current Route Select to display traf fic information for the set route When set to on the indicator will illuminate 4 Check that the traffic information is dis played Detail Select to display detailed traffic in formation DISPLAYING TRAFFIC INFORMATION A list of current traffic information can be displayed along with information on the incident s distance and position r...

Страница 92: ...ic informa tion Then select Info The time of the predictive traffic informa tion can be displayed in 15 minute steps up to 45 minutes Moves the time forward 15 minutes Moves the time back 15 minutes 4 Check that the traffic information is dis played Detail Select to display detailed traffic in formation DISPLAYING PREDICTIVE TRAFFICINFORMATION A map with predictive trafficdatacan be displayed ...

Страница 93: ...5 1 Select Options on the map screen 2 Select MapInformation 3 Select Traffic information When set to on the indicator will illuminate 4 Check that the traffic information is dis played On the map screen On the freeway information screen DISPLAYINGTRAFFIC INFORMATIONONTHEMAP ...

Страница 94: ... Select to display traffic information and start voice guidance for the traffic infor mation The color of the arrow changes de pending on the traffic information re ceived The indicator is displayed as follows Traffic information has been received Traffic information has been received via HD No icon Any traffic information has not been received ...

Страница 95: ...7 02 13 05 3 NAVIGATION SYSTEM 2 DESTINATION SEARCH 1 DESTINATION SEARCH SCREEN The Destination screen enables to search for a destination To display the Destina tion screen press the NAV button then select Dest on the map screen ...

Страница 96: ... to search for a destination from previously set destinations 106 Select to search for a destination from a registered entry in Address Book 106 Select to search for a destination from emergency service points 107 Select to search for a destination by intersection or freeway entrance exit 107 Select to search for a destination by the last displayed map 109 Select to search for a destination by coo...

Страница 97: ...ect Go when the confirm destina tion screen is displayed No Function Select to adjust the position in small er increments P 82 Select to register as a memory point Select to search for the route P 110 If a destination has already been set Go Directly and Add to Route will be displayed Go Directly Select to delete the existing destination s and set a new one Add to Route Select to add a des tinatio...

Страница 98: ...change countries select the United States Canada or Mexico tab For map database information and updates P 152 1 Display the Destination screen P 97 2 Select GoHome The navigation system performs a search for the route and the entire route map is displayed P 110 SELECTINGSEARCHAREA The selected state province can be changed to set a destination from a different state province by using Address Point...

Страница 99: ...the entire route map is displayed P 110 1 Display the Destination screen P 97 2 Select Address 3 Select the desired search method SETTINGPRESET DESTINATIONSAS DESTINATION To use this function it is necessary to registerpresetdestinationstothepreset screen buttons 1 5 P 132 SEARCHINGBYADDRESS Thereare2methodstosearchforades tination by address No Function Page Select to search by city 100 Select to...

Страница 100: ...reen will be displayed Select the desired address 1 Select StreetAddress 2 Enter a house number and select OK 3 Enter a street name and select OK 4 Select the desired street name 5 Enter a city name and select OK 6 Select the desired city name If the same address exists the address list screen will be displayed Select the desired address SEARCHINGBYCITY SEARCHING BY STREET ADDRESS INFORMATION A st...

Страница 101: ...e displayed Select the desired POI SEARCHINGBYPOINTOF INTEREST Thereare4methodstosearchforades tination by Points of Interest No Function Page Select to search by name 101 Select to search by catego ry 103 Select to search by phone number 105 Select to search by eDesti nation 368 SEARCHINGBYNAME No Function Page Select to search for POI in the desired city 102 Select to search for POI from the cat...

Страница 102: ... RIES 1 Select Category 2 Select the desired category If there is more than 1 detailed item of the selected category the detailed list will be displayed List All Categories Select to display all POI categories 3 Select the desired POI SEARCHING FOR POI USING WEBSEARCH 1 Select next to Web Search to se lect a search engine 2 Select the desired search engine icon The selected search engine icon will...

Страница 103: ...rocedure on how to conduct a search via a search engine go to SET TING A DESTINATION USING LEXUS App Suite P 360 and fol low the steps from 3 onward SEARCHINGBYCATEGORY No Function Select to set the search point from near the current position Select to search for POIs along the set route Select to set the search point from near a city center P 104 Select to set the search point from near a destina...

Страница 104: ...02 When Near a City Center in XX is se lected 1 Select Near aCityCenterin XX 2 Enter a city name and select OK Last 5 Cities Select the city name from the list of the last 5 cities 3 Select the desired city name 4 Select OK when the city center map screen is displayed 5 Follow the steps from 3 onward in SEARCHING BY CATEGORY P 103 XX represents the selected search area name INFORMATION The names o...

Страница 105: ...will be displayed SEARCHINGBY PHONE NUMBER INFORMATION If there is no match for the entered phone number a list of identical numbers with different area codes will be displayed DESTINATIONSEARCHBY DESTINATIONASSIST The destination can be searched by call ing an operator of Destination Assist You can request either a specific busi ness address or ask for help locating your desired destination P 364...

Страница 106: ...elete Select to delete the previous des tination P 140 1 Display the Destination screen P 97 2 Select AddressBook 3 Select the desired address book entry Options Selecttoregisteroreditaddress book entries P 135 SEARCHINGFROM PREVIOUSDESTINATIONS INFORMATION The previous start point and up to 100 previously set destinations are displayed on the screen SEARCHINGBYADDRESS BOOK To use this function it...

Страница 107: ...lay the Destination screen P 97 2 Select Intersection Freeway 3 Select the desired method SEARCHINGBY EMERGENCY INFORMATION The navigation system does not guide in areas where route guidance is unavail able P 150 SEARCHINGBY INTERSECTIONAND FREEWAY Thereare2methodstosearchforades tination by Intersection Freeway No Function Page Select to search by inter section 108 Select to search by freeway ent...

Страница 108: ...in a city the list of intersections will be displayed 1 Select Freeway Entrance Exit 2 Enter a freeway name and select OK 3 Select the desired freeway 4 Select Entrance or Exit 5 Enter the name of the second intersect ing street and select OK 6 Select the desired entrance or exit name SEARCHINGBY INTERSECTION SEARCHING BY FREEWAY ENTRANCE EXIT INFORMATION Be sure to use the complete name of the fr...

Страница 109: ...dd to Route will be displayed Goto Select todeletetheexistingdes tination s and set a new one AddtoRoute Select to add a destination The navigation system performs a search for the route and the entire route map is displayed P 110 1 Display the Destination screen P 97 2 Select Coordinates 3 Enter the latitude and longitude and se lect OK SEARCHINGBYMAP By selecting Map the last displayed lo cation...

Страница 110: ...mode CAUTION Be sure to obey traffic regulations and keep road conditions in mind while driv ing If a traffic sign on the road has been changed the route guidance may not indicate such changed information INFORMATION The route for returning may not be the same as that for going The route guidance to the destination may not be the shortest route or a route without traffic congestion Route guidance ...

Страница 111: ...screen is displayed 3ROUTES SELECTION No Function Select to display the quickest route Select to display the alternative route Select to display the route that is the shortest distance to the set destina tion Select to display the information about the 3 routes P 111 No Information Time necessary for the entire trip Distance of the entire trip Distance of the toll road Distance of the freeway Dist...

Страница 112: ...position Distance to the next turn Turn direction at the intersection Select to display the map of the se lected point INFORMATION However not all road names on the route may appear on the list If a road changes its name without requiring a turn such as on a street that runs through 2 or more cities the name change will not appear on the list The street names will be dis played in order from the s...

Страница 113: ...destinations 124 Select to delete destina tions 125 Select to reorder destina tions 124 Select to set route prefer ences 125 Select to change route type 126 INFORMATION Even if the Freeways indicator is dimmed the route cannot avoid including a freeway in some cases P 125 If the calculated route includes a trip by ferry the route guidance shows a sea route After traveling by ferry the current posi...

Страница 114: ...114 2 DESTINATION SEARCH GX_EMVN_OM60K84U_ U 13 07 02 13 05 1 Select Options on the map screen 2 Select PauseGuidance 1 Select ResumeGuidance PAUSINGGUIDANCE RESUMING GUIDANCE ...

Страница 115: ...nd an ar row indicating the turning direction Guidance route Current position Current street name or route infor mation INFORMATION If the vehicle goes off the guidance route the route is searched again For some areas the roads have not been completely digitized in our database For this reason the route guidance may select a road that should not be traveled on When arriving at the set destination ...

Страница 116: ...lay be tween the estimated travel time and the estimated arrival time Select to change the display be tween the current street name and the distance with the estimated trav el arrival time INFORMATION When the vehicle is on the guidance route the distance measured along the route is displayed Travel time and arrival time are calculated based on the average speed for the specified speed limit When ...

Страница 117: ...ions on the map screen 2 Select Route Overview 3 Check that the entire route map is dis played For details about this screen P 110 DISTANCEANDTIME TO DESTINATION When driving on the guidance route with more than 1 destination set a list of the distance with estimated travel arriv al time from the current position to each destination is displayed ROUTEOVERVIEW The entire route from the current posi...

Страница 118: ...elect to display the selected map of the exit vicinity Select to scroll to farther road traffic facilities Select to scroll to closer road traffic facilities WHENAPPROACHING FREEWAYEXIT OR JUNCTION When the vehicle approaches an exit or junction the freeway guidance screen will be displayed No Information Function Next exit or junction name Distancefromthecurrentpositionto the exit or junction Sel...

Страница 119: ...dance screen To return to the tollgate guidance screen select Remaining distance bar to the guid ance point REALFREEWAYJUNCTION VIEW When the vehicle approaches a junc tion the junction view with signage will be displayed No Information Function Next junction or street name Select to hide the real freeway junc tion view To return to the real free way junction view select Distancefromthecurrentposi...

Страница 120: ...pproaches an inter section the intersection guidance screen will be displayed No Information Function Next street name Select to hide the intersection guid ance screen To return to the inter section guidance screen select Distance to the intersection Remaining distance bar to the guid ance point TURN LIST SCREEN No Information Turn direction Distance between turns Next street or destination name ...

Страница 121: ...by Turn Arrow on the Map Mode screen P 78 2 Check that the turn by turn arrow screen is displayed TURN BY TURNARROW SCREEN On this screen information about the next turn on the guidance route can be displayed No Information Exit number or street name Turn direction Distance to the next turn ...

Страница 122: ...pe cially when you are driving on IPD roads roads that are not completely digitized in our database The route guidance may not have the updated information such as the direction of a one way street INFORMATION If a voice guidance command cannot be heard select on the map screen to hear it again To adjust the voice guidance volume P 62 Voice guidance may be made early or late If the system cannot d...

Страница 123: ...ditRoute 4 Select the item to be set 5 Check that the entire route map is dis played P 110 No Function Page Select to add destinations 124 Select to delete destina tions 125 Select to reorder destina tions 124 Select to set route prefer ences 125 Select to change route type 126 Select to set detours 126 Select to start from adja cent road 128 ...

Страница 124: ...rch P 95 4 Select AddDestinationHere to insert the new destination into the route 1 Display the Route screen P 123 2 Select Reorder 3 Select the desired destination and se lect Move Up or Move Down to change the arrival order Then select OK ADDINGDESTINATIONS REORDERING DESTINATIONS When more than 1 destination has been set the arrival order of the destinations can be changed ...

Страница 125: ... Delete All Select to delete all destina tions on the list If more than 1 destination has been set the system will recalculate the route s to the set destination s as necessary 1 Display the Route screen P 123 2 Select Preferences 3 Select the desired route preferences and select OK When set to on the indicator will illuminate DELETINGDESTINATIONS SETTINGROUTE PREFERENCES The conditions to determi...

Страница 126: ...cting the desired route type 4 The entire route from the starting point to the destination is displayed For details about this screen P 110 1 Display the Route screen P 123 2 Select Detour 3 Select the desired detour distance SELECTINGROUTETYPE DETOURSETTING During the route guidance the route can be changed to detour around a sec tion of the route where a delay is caused by road repairs an accide...

Страница 127: ...gestion information received from traffic in formation P 90 INFORMATION This picture shows an example of how the system would guide around a delay caused by a traffic jam This position indicates the location of a trafficjamcausedbyroadrepairs anac cident etc This route indicates the detour suggest ed by the system When the vehicle is on a freeway the detour distance selections are 5 15 and 25 mile...

Страница 128: ...DJACENT ROAD When a freeway and a surface road run in parallel the system may show the guidance route going on the freeway while driving on the surface road or vice versa If this happens you can instantly choose the adjacent road for the route guid ance INFORMATION When there is no adjacent road this screen button will not be displayed ...

Страница 129: ... entries areas to avoid can be set as memory points The registered points can be used as the destinations P 95 Registered areas to avoid will be avoid edwhenthesystemsearchesforaroute No Function Page Select to set home 130 Selecttoset preset destina tions 132 Select to set the address book 134 Select to set areas to avoid 137 Select to delete previous destinations 140 Select to set detailed navi ...

Страница 130: ... SetHomeLocation 2 Select the desired item to search for the location P 95 3 Select OK when the editing home screen appears SETTINGUPHOME If home has been registered that infor mation can be recalled by selecting Go Home on the Destination screen P 98 No Function Page Select to register home 130 Select to edit home 131 Select to delete home 131 REGISTERINGHOME ...

Страница 131: ...ct OK 1 Select Delete 2 Select Yes when the confirmation screen appears EDITING HOME No Function Page Select to edit the home name 136 Select to set display of the home name on off Select to edit location infor mation 136 Select to edit the phone number 136 Select to change the iconto be displayed on the map screen 135 DELETING HOME ...

Страница 132: ...tion 4 Select OK when the editing preset destination screen appears P 133 SETTINGUPPRESET DESTINATIONS If a preset destination has been regis tered that information can be recalled by using preset destinations on the Destination screen P 99 No Function Page Select to register a preset destination 132 Selectto edit apreset desti nation 133 Select to delete a preset destination 133 REGISTERINGPRESET...

Страница 133: ...tination to be de leted and select Delete 3 Select Yes when the confirmation screen appears EDITING PRESET DESTINATIONS No Function Page Select to edit the preset destination name 136 Select to set display of the preset destination name on off Select to edit location infor mation 136 Select to edit the phone number 136 Select to change the iconto be displayed on the map screen 135 DELETING PRESET ...

Страница 134: ... search for the location P 95 3 Select OK when the editing address book entry screen appears P 135 SETTINGUPADDRESSBOOK Points on the map can be registered No Function Page Select to register address book entries 134 Select to edit address book entries 135 Select to delete address book entries 137 REGISTERINGADDRESS BOOK ENTRIES INFORMATION Up to 100 address book entries can be registered ...

Страница 135: ...g the Page 1 Page 2 or WithSound tab With Sound Select the memory points with a sound EDITING ADDRESSBOOK ENTRIES The icon name location and or phone number of a registered address book entry can be edited No Function Page Select to edit the address book entry name 136 Select to set display of the address book entry name on off Select to edit location infor mation 136 Select to edit the phone numb...

Страница 136: ...t next to Name 2 Enter a name and select OK CHANGINGTHE LOCATION 1 Select Edit next to Location 2 Scroll the map to the desired point P 82 and select OK CHANGINGPHONENUMBER 1 Select Edit next to Phone 2 Enter the phone number and select OK A sound for some address book entries can be set When the vehicle approach es the location of the address book en try the selected sound will be heard INFORMATI...

Страница 137: ... 1 Display the Navigation Settings screen P 129 2 Select Areas toAvoid 3 Select the desired item DELETING ADDRESS BOOK ENTRIES SETTINGUPAREASTO AVOID Areas to be avoided because of traffic jams construction work or other rea sons can be registered as Areas to Avoid No Function Page Select to register areas to avoid 138 Select to edit areas to avoid 138 Select to delete areas to avoid 140 ...

Страница 138: ...id screen appears 1 Select Edit 2 Select the area and select OK REGISTERING AREAS TO AVOID INFORMATION If a destination is entered in the area to avoid or the route calculation cannot be made without running through the area to avoid a route passing through the area to be avoided may be shown Up to 10 locations can be registered as points areas to avoid EDITINGAREAS TOAVOID The name location and o...

Страница 139: ...xt to Location 2 Scroll the map to the desired point P 82 and select OK CHANGINGTHEAREASIZE 1 Select Edit next to Size 2 Select either or to change the size of the area to be avoid ed and select OK No Function Page Select to edit the name of the area to avoid 139 Select to set display of the area to avoid name on off Select to edit area location 139 Select to edit area size 139 Select to set the a...

Страница 140: ...Select Yes when the confirmation screen appears 1 Display the Navigation Settings screen P 129 2 Select DeletePreviousDest 3 Selectthepreviousdestinationtobede leted and select Delete 4 Select Yes when the confirmation screen appears DELETING AREAS TO AVOID DELETINGPREVIOUS DESTINATIONS Previous destinations can be deleted ...

Страница 141: ...TION SYSTEM 5 SETUP 1 DETAILED NAVIGATION SETTINGS 1 Press the SETUP button 2 Select Navigation 3 Select Detailed Navi Settings 4 Select the items to be set Settings are available for pop up infor mation favorite POI categories low fuel warning etc ...

Страница 142: ... screen 143 Select to set display of low fuel warning on off 143 Select to set IPD road guid ance on off Select to set the voice guid ance for the next street name on off Select to set display of the 3D city model map on off Select to change the view ing angle of the 3D map 144 Select to adjust the current position mark manually or to adjust miscalculation of the distance caused by tire replacemen...

Страница 143: ...lect the desired POI category List All Categories Select to display all POI categories 5 Select the desired POI icon 1 Display the Detailed Navi Settings screen P 141 2 Select LowFuel Warning 3 Select On or Off FAVORITE POI CATEGORIES SELECTPOIICONS Up to 6 POI icons which are used for selecting POIs on the map screen can be selected as favorites LOW FUELWARNING When the fuel level is low a warnin...

Страница 144: ...arby gas station 3 Select Enter to set as a destination Info Select to display gas station informa tion P 87 1 Display the Detailed Navi Settings screen P 141 2 Select 3DMapViewingAngle 3 Select Up or Down to change the viewing angle Default Select to set the initial angle A nearby gas station can be selected as a destination CHANGING VIEWING ANGLE OF 3D MAP ...

Страница 145: ...ctanarrowtoadjustthedirectionof the current position mark and select OK CURRENT POSITION TIRE CHANGE CALIBRATION Thecurrentposition markcanbeadjust ed manually Miscalculation of the dis tance caused by tire replacement can also be adjusted For additional information on the accu racy of a current position P 149 When driving the current position mark will be automatically corrected by GPS signals If...

Страница 146: ...ation starts automatically The tire change calibration function will be used when replacing the tires This function will adjust miscalculation caused by the circumference difference between the old and new tires INFORMATION If this procedure is not performed when the tires are replaced the current posi tion mark may be incorrectly displayed ...

Страница 147: ...EENFORTRAFFIC SETTINGS No Function Select to set the avoid traffic function auto manual P 148 Selecttosettheusageoftrafficinfor mation for the estimated arrival time on off Select to set the display of an arrow of free flowing traffic on off Select to set to on off whether to consider the predictive traffic infor mation P 92 with estimated ar rivaltimeanddetouredroutesearch Select to set traffic i...

Страница 148: ...t to select manually whether or not to change routes when conges tion information of the guidance route has been received In this mode a screen will appear to ask if you wish to reroute Select to not reroute when conges tion information for the guidance route has been received When the navigation system calculates a new route the following screen will be displayed No Function Select to start route...

Страница 149: ...e map screen Tunnels tall buildings trucks or even the placement of objects on the instrument panel may obstruct the GPS signals TheGPSsatellitesmay not sendsignalsdue to repairs or improvements being made to them Even when the navigation system is receiv ing clear GPS signals the vehicle position maynotbe shown accuratelyorinappropri ate route guidance may occur in some cas es LIMITATIONSOFTHE NA...

Страница 150: ...idance If you set more than 1 destination but skip any of them auto reroute will display a route returning to the destination on the previous route When turning at an intersection for which there is no route guidance When passing through an intersection for which there is no route guidance During auto reroute the route guidance may not be available for the next turn to the right or left During hig...

Страница 151: ...tem uses tire turning data and is designed to work with factory specified tires for the vehicle Installing tires that are larger or smaller than the originally equipped diameter may cause inaccurate display of the current position The tire pressure also affects the diame ter of the tires so make sure that the tire pressure of all 4 tires is correct ...

Страница 152: ...ta 4 Check that the map data screen is dis played MAPINFORMATION Coverage areas and legal information can be displayed and map data can be updated No Function Map version Select to update map Select to display map coverage ar eas Select to display legal information INFORMATION Map data updates are available for a fee Contact your Lexus dealer for further information ...

Страница 153: ...contained in a SD card that is inserted in the SD card slot located at the bottom of the audio control panel Do not eject the SD card as doing so may deactivate the navigation system NOTICE Do not edit or delete the map data on the SD card as doing so may deactivate the navigation system INFORMATION microSDHC Logo is a trademark of SD 3C LLC ...

Страница 154: ...154 6 TIPSFORTHENAVIGATION SYSTEM GX_EMVN_OM60K84U_ U 13 07 02 13 05 ...

Страница 155: ...0 11 14 1 QUICK REFERENCE 158 2 SOME BASICS 160 TURNING THE SYSTEM ON AND OFF 160 SELECTING AN AUDIO SOURCE 161 DISC SLOT 162 USB AUX PORT 163 SOUND SETTINGS 164 AUDIO SCREEN ADJUSTMENT 166 VOICE COMMAND SYSTEM 167 1 BASIC OPERATION AUDIO VIDEOSYSTEM ...

Страница 156: ...SPLAYING THE RADIO ID 185 PRESETTING A CHANNEL 186 SELECTING A CHANNEL FROM THE LIST 186 IF THE SATELLITE RADIO TUNER MALFUNCTIONS 187 3 INTERNET RADIO 188 LISTENING TO INTERNET RADIO 188 1 CD 189 OVERVIEW 189 PLAYING AN AUDIO CD 193 PLAYING AN MP3 WMA AAC DISC 194 2 DVD 195 OVERVIEW 195 DVD OPTIONS 199 3 USB MEMORY 202 OVERVIEW 202 USB AUDIO 206 4 iPod 207 OVERVIEW 207 iPod AUDIO 212 iPod VIDEO 2...

Страница 157: ...E RADIO 235 USING THE RADIO INTERNET RADIO BROADCAST 237 PLAYING AN AUDIO CD CD TEXT 237 PLAYING MP3 WMA AAC DISCS 238 PLAYING DVD VIDEO 239 PLAYING A USB MEMORY 245 PLAYING iPod 246 PLAYING Bluetooth AUDIO 248 USING THE AUX MODE 249 USING THE VIDEO MODE 249 CHANGING SETTINGS 251 IF THE REAR SEAT ENTERTAINMENT SYSTEM MALFUNCTIONS 253 1 STEERINGSWITCHES 254 1 AUDIOSETTINGS 257 AUDIO SETTINGS SCREEN...

Страница 158: ..._ U 13 07 10 11 14 1 BASIC OPERATION 1 QUICK REFERENCE CONTROLSCREEN Operationssuchasselectingapresetstationandadjustingthesoundbalancearecar ried out on the screen Press the AUDIO button to display the audio visual screen ...

Страница 159: ...sc 189 Playing a DVD 195 Playing a USB memory 202 Playing an iPod 207 Playing a Bluetooth device 214 Using the AUX port 221 Playing the VTR 224 Using the rear seat entertainment system 227 Using the steering wheel audio switches 254 Audio system settings 257 INFORMATION The display and button positions will differ depending on the type of the system If equipped ...

Страница 160: ...CAUTION For vehicles sold in U S A Part 15 of the FCC Rules FCC WARNING Changes or modifications not expressly approved by the party responsible for compliance could void the user s authority to operate the equipment Laser products USE OF CONTROL OR ADJUSTMENT OR PERFORMANCE OF PROCEDURES OTHER THAN THOSE SPECIFIED HEREIN MAY RESULT IN HAZARDOUS RADIATION EXPOSURE THE USE OF OPTICAL INSTRUMENTS WI...

Страница 161: ...button 2 Select Source 3 Select the desired source 1 Select Source 2 Select Reorder 3 Select the desired audio source then or to reorder SELECTINGANAUDIO SOURCE INFORMATION Dimmed screen buttons cannot be oper ated When there are two pages select or to change the page REORDERING THE AUDIO SOURCE ...

Страница 162: ... 1 Press the button and remove the disc DISCSLOT INSERTING ADISC EJECTINGADISC NOTICE Never try to disassemble or oil any part of the DVD player Do not insert anything other than a disc into the slot INFORMATION The player is intended for use with 4 7 in 12 cm discs only When inserting a disc gently insert the disc with the label facing up ...

Страница 163: ...e auxiliary box INFORMATION Up to two portable players can be con nected to the USB port at the same time Even if a USB hub is used to connect more than two USB devices only the first two connected devices will be recog nized To operate the Video functions such as iPod video or VTR a 4 pole AUX cable is necessary However depending on the cable specifications the video function may not work properl...

Страница 164: ...red items to be set SOUNDSETTINGS DSP CONTROL No Function The system adjusts to the optimum volume and tone quality according to vehicle speed to compensate for in creased vehicle noise This function creates asurrounded by sound effect The system adjusts to the optimum volume for files with different record ing levels ...

Страница 165: ... and bass BALANCE A good balance of the left and right ste reo channels and of the front and rear sound levels is also important Keepinmindthatwhenlisteningtoaste reo recording or broadcast changing the right left balance will increase the volume of 1 group of sounds while de creasing the volume of another No Function Select or to adjust high pitched tones Select or to adjust mid pitched tones Sel...

Страница 166: ...n the option screen 3 Select the desired item to be adjusted AUDIOSCREEN ADJUSTMENT SCREENSIZE SETTINGS Thescreensizecanbeselectedforeach type of media No Function Select to display a 4 3 screen with either side in black Select to enlarge the image horizon tally and vertically to full screen Select to enlarge the image by the same ratio horizontally and vertically CONTRAST BRIGHTNESS COLORAND TONE...

Страница 167: ...the screen Tone Select to strengthen the tone of the screen Tone Select to weaken the tone of the screen Contrast Select to strengthen the contrast of the screen Contrast Select to weaken the contrast of the screen Brightness Select to brighten the screen Brightness Select to darken the screen INFORMATION Depending on the audio source some functions may not be available VOICECOMMANDSYSTEM The voic...

Страница 168: ...ATION 1 AM FM RADIO CONTROLSCREEN OVERVIEW The radio operation screen can be reached by the following methods Press the AUDIO button to display the audio control screen Select Source and select AM or FM to change the radio mode Top screen Option screen ...

Страница 169: ...nel selection screen Select to display the cache radio operation buttons Select to display the audio setting screen Select to display the sound setting screen Select to display the option screen Select to store information of the audio currently being broadcast on the radio Select to turn HD radio mode on off When the HD Radio indicator is off the station list shows only analog broadcasts ...

Страница 170: ...elected category Select to select a program type channel category FM only Select to display traffic messages Analog FM only Select to display RBDS text messages Turn to step up down frequencies Turn to move up down the list Press to select a preset station Press and hold to seek for a station Turn to adjust volume Press to turn the audio system on off Press and hold to restart the audio system INF...

Страница 171: ... Yes ontheconfirmationscreen 4 Select OK aftersettingthenewpreset station 1 Select Options 2 Select Station List PRESETTINGASTATION Radio mode has a mix preset function which can store up to 36 stations 6 sta tionsperpagex6pages fromanyofthe AM FM or SAT bands INFORMATION The number of preset radio stations dis played on the screen can be changed P 259 SELECTINGASTATIONFROM THELIST A station list ...

Страница 172: ...SHINGTHE STATIONLIST 1 Select Refresh on the Station List screen and the following screen will be displayed Cancel Refresh Select to cancel the re fresh Source Select to change to another au dio source while refreshing INFORMATION The audio system sound is muted during refresh operation In some situations it may take some time to update the station list ...

Страница 173: ...LLY The broadcast cached in the program cache can be played back manually No Function Hides the cache operation buttons Select Skips backward 2 minutes Select and hold Fast rewinds contin uously Returns to the live radio broadcast Pauses the playback To restart se lect Select Skips forward 2 minutes Select and hold Fast forwards con tinuously Red vertical bar Shows what portion of the cached broad...

Страница 174: ...ned off If noise or silence occurs during the cach ing process cache writing will continue with the noise or silence recorded as is In this case the cached broadcast will con tain the noise or silence when played back RADIOBROADCASTDATA SYSTEM This audio system is equipped with Ra dio Broadcast Data Systems RBDS RBDS mode allows text messages to be received from radio stations that utilize RBDS tr...

Страница 175: ...ist is in the following order Classical Country EasyLis Easy Listening Inform Information Jazz News Oldies Other Pop Music Religion Rock R B Rhythm and Blues Sports Talk Traffic Not available when HD Radio indicator is off Alert Emergency Alert 3 Select TYPE SEEK and the system will start to seek for stations in the rele vant program type SELECTING A DESIRED PROGRAMTYPE INFORMATION If no relevant ...

Страница 176: ...OGY HD Radio Technology is the digital evolution of analog AM FM radio Your radio product has a special receiver which allows it to receive digital broad casts where available in addition to the analog broadcasts it already receives Digital broadcasts have better sound quality than analog broadcasts as digital broadcasts provide free crystal clear audio with no static or distortion For more inform...

Страница 177: ...cted the music tag moves from the radio into the iPod When the iPod is connected to iTunes the tagged information of the songs which were tagged while listening to the radio can be viewed Then a user may decide to pur chase the song or CD Album which had been listened to on their radio AVAILABLEHDRadio TECHNOLOGY MULTICAST On the FM radio frequency most digital stations have multiple or supplement...

Страница 178: ...n digital The HD logo will first appear in a gray color indicating the station is indeed an analog and a digital station Once the digital signal is acquired the logo will change to a bright orange color The song title artist name and music genre will appear on the screen when available by the radio station As a user works through the analog radio stations where applicable the radio receiver will a...

Страница 179: ...nnelhadbeenplay ing Theradiodoes not have ac cess to digital signals at the moment This is normal behavior wait until the digital signal returns If out of the coverage area seek a new sta tion Audio mute delay when se lecting an HD2 HD3 mul ticast channel preset The digital multicast con tentisnotavailableuntilHD Radio broadcast can be decoded and make the au dio available This takes up to 7 secon...

Страница 180: ...VN_OM60K84U_ U 13 07 10 11 14 2 XM Satellite Radio CONTROLSCREEN OVERVIEW The radio operation screen can be reached by the following methods Press the AUDIO button to display the audio control screen Select Source and select SAT ...

Страница 181: ...181 2 RADIOOPERATION GX_EMVN_OM60K84U_ U 13 07 10 11 14 4 AUDIO VIDEO SYSTEM CONTROLPANEL ...

Страница 182: ...ay text messages Select to select a program type channel category Select to scan for receivable channels Select to tune to preset stations channels Select to change the page of preset buttons Turn to step up down channels Turn to move up down the list Press to select a preset channel Press and hold to seek for a channel Turn to adjust volume Press to turn the audio system on off Press and hold to ...

Страница 183: ...For complete information on subscrip tion rates and terms or to subscribe to XM Satellite Radio U S A Refer to www siriusxm com or call 1 877 515 3987 Canada Refer to www xmradio ca or call 1 877 438 9677 NOTICE XM Radio Services Legal Disclaimers and Warnings Fees and Taxes Subscription fee taxes one time activation fee and other fees may apply Subscription fee is con sumer only All fees and prog...

Страница 184: ...ribers listen to XM on satellite radio receivers for the car home and portable use More information about XM is available online at www siriusxm com U S A or www xmradio ca Canada INFORMATION XM Radio Services Subscription Instructions For XM Services requiring a subscrip tion such as XM Radio and some Info tainment data services the following paragraph shall be included Required XM Radio and some...

Страница 185: ...service agreement Customers should have their radio ID ready the radio ID can be found by tun ing to CH 000 on the radio For details see DISPLAYING THE RADIO ID below All fees and programming are the responsibility of XM Satellite Radio and are subject to change SATELLITE TUNER TECHNOLOGY NOTICE Lexus s satellite radio tuners are award ed Type Approval Certificates from XM Satellite Radio Inc as p...

Страница 186: ...e the preset channel to a different one select and hold the preset station channel 3 Select Yes ontheconfirmationscreen 4 Select OK aftersettingthenewpreset channel 1 Select Channel List 2 Select the desired program type 3 Select the desired channel and select OK PRESETTINGACHANNEL SELECTINGACHANNEL FROMTHELIST ...

Страница 187: ...nnel you selected is not authorized Wait for about 2 seconds until the radio returns to the previous channel or CH 001 If it does not change automatically select another channel To listen to the premium channel contact XM Satellite Radio SAT No Signal The XM signal is too weak at the current location Wait until your ve hicle reaches a location with a stronger signal Loading The unit is acquiring a...

Страница 188: ... is theabilitytolistentointernetradio Inor der to use this service a compatible phone and the navigation system needs to be set up For details P 354 INFORMATION Other applications can be activated while listening to internet radio An iPhone cannot be connected via Bluetooth and USB connection at the same time However it is possible to recharge an iPhone while using applica tions by connecting via ...

Страница 189: ...SYSTEM 3 MEDIA OPERATION 1 CD CONTROLSCREEN OVERVIEW The CD operation screen can be reached by the following methods Inserting a disc P 162 Press the AUDIO button to display the audio control screen Select Source and select DISC Audio CD MP3 WMA AAC disc ...

Страница 190: ...190 3 MEDIA OPERATION GX_EMVN_OM60K84U_ U 13 07 02 13 05 CONTROLPANEL ...

Страница 191: ...ying on the list screen Select to display the sound setting screen Select to display the audio setting screen Select to set random playback Select to set repeat playback Shows progress Select to play pause Select to select a folder Turn to select a track file Turn to move the cursor up down on the list Press to select the list Press to select a track file Press and hold to fast forward rewind Turn...

Страница 192: ...contains CD DA files and MP3 WMA AAC files only the CD DA files can be played back If a CD TEXT disc is inserted the title of the disc and track will be displayed Up to 32 char acters can be displayed If CD information is not obtained from CD only the track number may be displayed ...

Страница 193: ...eat off 1 Select Each time is selected the mode changes as follows random 1 disc random off PLAYINGANAUDIOCD REPEATING The track currently being listened to can be repeated INFORMATION When is selected RPT appears on the screen RANDOM ORDER Tracks can be automatically and ran domly selected INFORMATION When is selected RAND appears on the screen ...

Страница 194: ... 1 Select Each time is selected the mode changes as follows random 1 folder random folder random 1 disc random off PLAYINGANMP3 WMA AACDISC REPEATING Thefileorfoldercurrentlybeinglistened to can be repeated INFORMATION Each time is selected RPT FLD RPT appears on the screen RANDOM ORDER Files or folders can be automatically and randomly selected INFORMATION Each time is selected RAND FLD RAND appe...

Страница 195: ... in DVD video mode only the DVD s audio can be heard The playback condition of some DVD discs may be determined by the DVD software producer This DVD player plays a disc as the software producer intended As such some functions may not work properly Be sure to read the instruction manual that comes with the individual DVD disc P 267 OVERVIEW The DVD operation screen can be reached by the following ...

Страница 196: ...196 3 MEDIA OPERATION GX_EMVN_OM60K84U_ U 13 07 02 13 05 CONTROLSCREEN CONTROLPANEL ...

Страница 197: ...en Select to display the DVD setting screen Shows progress During playback Select to fast forward During a pause Select to slow forward Select to play pause Select to stop the video screen Select to rewind Select to display the menu control key Select to display full screen video Turn to select a chapter Press to select a chapter Press and hold to fast forward rewind Turn to adjust volume Press to...

Страница 198: ...u may be startled by louder sound effects or when you change to a different audio source The louder sounds may have a sig nificant impact on the human body or pose a driving hazard Keep this in mind when you adjust the volume INFORMATION According to the DVD disc some menu items can be selected directly For details see the manual that comes with the DVD disc provided separately If appears on the s...

Страница 199: ...lect to display the title search screen 200 Select to display the prede termined scene on the screen and start playing Select to display the audio selection screen 200 Select to display the subtitle selection screen 200 Select to display the angle selection screen 200 Select to change the screen size 166 Select to display the image quality adjustment screen 166 ...

Страница 200: ...htime Change isselected thelan guage the subtitles are displayed in is changed The languages available are restricted to those available on the DVD disc When Hide is selected the subtitles can be hidden 1 Select Angle 2 Each time Change is selected the an gle is changed The angles available are restricted to those available on the DVD disc SEARCHINGBYTITLE CHANGINGTHE AUDIO LANGUAGE CHANGING THE S...

Страница 201: ...el this setup operation by touching Play The player will resume normal play Likewise a rear passenger can cancel a front passenger s selection of the setup menu To lock the rear seat entertainment system see OPERATION FROM THE FRONT SEATS on page 234 SETUP OPERATION FROM THEREAR SEAT This screen appears when a rear pas senger selects the setup menu ...

Страница 202: ...U 13 07 02 13 05 3 USB MEMORY CONTROLSCREEN OVERVIEW The USB memory operation screen can be reached by the following methods Connecting a USB memory P 163 Press the AUDIO button to display the audio control screen Select Source and select USB ...

Страница 203: ...203 3 MEDIA OPERATION GX_EMVN_OM60K84U_ U 13 07 02 13 05 4 AUDIO VIDEO SYSTEM CONTROLPANEL ...

Страница 204: ...een To return to the top screen select Now Playing on the list screen Select to display the sound setting screen Select to display the audio settings screen Select to set random playback Select to set repeat playback Shows progress Select to play pause Turn to select a track file Turn to move the cursor up down on the list Press to select the list Press to select a track file Press and hold to fas...

Страница 205: ... this may damage the USB memory or the terminal etc Do not leave your portable player in the car In particular high temperatures inside the vehi cle may damage the portable player Do not push down on or apply unnecessary pressure to the portable player while it is con nected as this may damage the portable player or its terminal Do not insert foreign objects into the port as this may damage the po...

Страница 206: ...Each time is selected the mode changes as follows random 1 folder album random folder album random all folder album random off USBAUDIO REPEATING The file track or folder album currently being listened to can be repeated INFORMATION Each time is selected RPT FLD RPT appears on the screen RANDOM ORDER Files tracks or folders albums can be automatically and randomly selected INFORMATION Each time is...

Страница 207: ...ec essary However depending on the cable specifications the video function may not work properly For more information contact your Lexus dealer OVERVIEW The iPod operation screen can be reached by the following methods Connecting an iPod P 163 Press the AUDIO button to display the audio control screen Select Source and select iPod DEVICE NAME iPod audio iPod video ...

Страница 208: ...208 3 MEDIA OPERATION GX_EMVN_OM60K84U_ U 13 07 02 13 05 CONTROLPANEL ...

Страница 209: ...To return to the top screen select Now Playing on the list screen Select to display the play mode selection screen To return to the top screen select Now Playing on the list screen Select to display the sound setting screen Select to display the sound setting screen Select to display the audio settings screen Select to set random playback Select to set repeat playback Shows progress Shows progress...

Страница 210: ...Press and hold to restart the audio sys tem CAUTION Do not operate the player s controls or connect the iPod while driving NOTICE Depending on the size and shape of the iPod that is connected to the system the lid may not close fully In this case do not forcibly close the lid as this may damage the iPod or the termi nal etc Do not leave your portable player in the car In particular high temperatur...

Страница 211: ...splay iPod cover art and the iPod may not be operated while the cover art display is in process When an iPod is connected and the audio source is changed to iPod mode the iPod will resume playing from the same point it was last used Depending on the iPod that is connected to the system certain functions may not be avail able For viewing videos from an iPod it is necessary to set Video Sound Input ...

Страница 212: ...e is selected the mode changes as follows track shuffle album shuffle off iPodAUDIO REPEATING The track currently being listened to can be repeated INFORMATION When is selected RPT appears on the screen RANDOM ORDER Tracks or albums can be automatically and randomly selected INFORMATION Each time is selected Shuffle ALB Shuffle appears on the screen ...

Страница 213: ...ettings to change iPodVIDEO To change to iPod video mode select Browse ontheiPodaudioscreen then select the Videos tab and select the desired video file iPodVIDEOOPTIONS No Function Page Select to change the screen size 166 Select to display the image quality adjustment screen 166 Select to change audio set tings 257 ...

Страница 214: ... awirelessdatasystemcapableofplayingpor table audio music without cables If your device does not support Bluetooth the Bluetooth audio system will not function OVERVIEW The Bluetooth audio operation screen can be reached by the following methods Dependingonthetypeofportableplayerconnected somefunctionsmaynotbeavail able and or the screen may look differently than shown in this manual Connecting a ...

Страница 215: ...215 3 MEDIA OPERATION GX_EMVN_OM60K84U_ U 13 07 02 13 05 4 AUDIO VIDEO SYSTEM CONTROLSCREEN CONTROLPANEL ...

Страница 216: ...playlist screen To return to the top screen select Now Playing on the list screen Select to display the sound settings screen Select to set random playback Select to set repeat playback Shows progress Select to play Select to pause Turn to select a track file Turn to move the cursor up down on the list Press to select the list Press to select a track file Press and hold to fast forward rewind Pres...

Страница 217: ...nd the Bluetooth antennas The radio waves may affect the operation of such devices Before using Bluetooth devices users of any electrical medical device other than implant able cardiac pacemakers cardiac resynchronization therapy pacemakers or implantable cardioverter defibrillators should consult the manufacturer of the device for information about its operation under the influence of radio waves...

Страница 218: ...when Bluetooth audio is being played For operating the portable player see the instruction manual that comes with it If the Bluetooth device is disconnected due to poor reception from the Bluetooth net work when the engine switch is in ACCESSORY or IGNITION ON mode the system automatically reconnects the portable player If the Bluetooth device is disconnected on purpose such as it was turned off t...

Страница 219: ...the Bluetooth audio control screen 2 For more information P 48 1 Select Each time is selected the mode changes as follows track repeat album repeat off CONNECTINGABluetooth DEVICE To use the Bluetooth audio system it is necessary to register a Bluetooth de vice with the system LISTENINGTOBluetooth AUDIO REPEATING The track or album currently being lis tened to can be repeated INFORMATION Each time...

Страница 220: ...07 02 13 05 1 Select Each time is selected the mode changes as follows album random all track random off RANDOM ORDER Tracks or albums can be automatically and randomly selected INFORMATION Each time is selected RAND ALB RAND appears on the screen ...

Страница 221: ... 13 05 4 AUDIO VIDEO SYSTEM 6 AUX CONTROLSCREEN OVERVIEW The AUX operation screen can be reached by the following methods Connecting a device to the AUX port P 163 Press the AUDIO button to display the audio control screen Select Source and select AUX ...

Страница 222: ... U 13 07 02 13 05 CONTROLPANEL No Function Select to display the audio source selection screen Select to display the sound setting screen Turn to adjust volume Press to turn the audio system on off Press and hold to restart the audio system ...

Страница 223: ...ase do not forcibly close the lid as this may damage the portable audio device or the terminal etc Do not leave portable audio device in the vehicle The temperature inside the vehicle may become high resulting in damage to the player Do not push down on or apply unnecessary pressure to the portable audio device while it is connected as this may damage the portable audio device or its terminal Do n...

Страница 224: ...able specifications the video function may not work properly For more information contact your Lexus dealer While driving video will not be displayed Only sound will be output OVERVIEW The VTR operation screen can be reached by the following methods Connecting a device to the AUX port P 163 Press the AUDIO button to display the audio control screen Select Source and select A V ...

Страница 225: ...to display the audio source selection screen Select to display the sound setting screen Select to display the audio setting screen Select to display the option screen P 226 Select to display full screen video Turn to adjust volume Press to turn the audio system on off Press and hold to restart the audio system ...

Страница 226: ...RATION GX_EMVN_OM60K84U_ U 13 07 02 13 05 1 Select Options 2 Select the desired settings to change VTROPTIONS No Function Page Selecttochangethescreen size 166 Select to display the image quality adjustment screen 166 ...

Страница 227: ... is designed for the rear passengers to enjoy audio andDVDvideoseparatelyfromthefrontaudio visualsystem Therearseatentertain ment system can be used when the engine switch is in ACCESSORY or IGNITION ON mode No Name Front audio visual system Displays Rear seat entertainment system controller Headphone volume control dials and headphone jacks HDMI port A V input port If equipped ...

Страница 228: ...es DISPLAY A display is installed in the back of each front seat When audio video equip ment is connected to the A V input port or HDMI port rear passengers can en joy different audio sources on each dis play P 249 REARSEATENTERTAINMENT SYSTEMCONTROLLER BEFOREUSING THE CONTROLLER FORNEW VEHICLE OWNERS INFORMATION An insulating sheet is set to prevent the batteries from being discharged REPLACING T...

Страница 229: ...ystem controller will not function properly The operational range is reduced When using AA batteries Batteries can be purchased at your Lexus dealer electric appliance shop or camera stores Replace only with the same or equiva lent type recommended by your Lexus dealer Dispose of used batteries according to the local laws HEADPHONEJACKS Adjust the volume when you connect the headphones to the jack...

Страница 230: ...s Contact your Lexus dealer for further details This screen appears for a few seconds when the engine switch is in ACCESSORY or IGNITION ON mode 1 Press the button When the switch is moved to R opera tions can be performed on the right screen When switch is moved to L operations can be performed on the left screen HEADPHONES To listen to the rear audio use head phones CAUTIONSCREEN TURNINGTHEREARD...

Страница 231: ...e the display is off some remote con trol buttons can be operated 1 Press the SOURCE button to display the audio source selection screen TURNINGTHEREARDISPLAY OFFUSINGTHEREMOTE CONTROLLER CHANGINGTHESOURCE No Function Press to display the audio source se lection screen Press to select an icon Press to input the selected icon ...

Страница 232: ...t or right side edge of the icons list Then press the or but ton on the controller 1 Select The indicator is highlighted If the below message is appeared on the screen when the audio source is selected use after the is turned on CHANGINGTHESPEAKER OUTPUT When the is turned on the rear seat entertainment system can be oper ated in link with front audio visual sys tem ...

Страница 233: ...ay have a significant impact on the human body or pose a driving hazard Keep this in mind when you adjust the volume Removed battery and other parts Keep away from children These parts are small and if swallowed by a child they can cause choking Failure to do so could result in death or serious injury NOTICE Cleaning the display Wipe the display with a dry soft cloth If the screen is wiped with a ...

Страница 234: ...indicator is high lighted OPERATIONFROMTHE FRONTSEATS The rear seat display can be operated from the front seats No Function Turns the rear screen on or off Locks the system so passengers in the rear seats cannot operate the rear entertainment system When the Speaker Output is turned on the rear seat entertain ment system can be operated in link with front audio visual system P 235 ...

Страница 235: ...t or Left Right Link with the mode of right side display Left Link with the mode of left side dis play 1 Display the audio source selection screen P 231 2 Select AM FM or SAT CONTROLSCREEN CHANGINGTHESPEAKER OUTPUT USINGTHERADIO When a different audio source is select ed at the front seats radio mode cannot be selected at the rear seats ...

Страница 236: ...ation channel Press to select a station channel Press and hold to seek for a sta tion channel Press to select a station channel Press and hold to seek for a sta tion channel CACHINGA RADIO PROGRAM While the cache radio is playing on the front seat the below screen will be dis played No Function Returns to the live radio broadcast ...

Страница 237: ...ode can be changed to the DISC mode CONTROLSCREEN CONTROLLER USINGTHERADIO INTERNET RADIOBROADCAST One of Apps s features is the ability to listen to internet radio In order to use this service an Apps compatible phone and the navigation system needs to be set P 354 PLAYINGANAUDIOCD CD TEXT No Function Select to set repeat playback Select to set random playback No Function Press to play pause Pres...

Страница 238: ...C Even the DISC button is pressed the mode can be changed to the DISC mode CONTROLSCREEN CONTROLLER PLAYINGMP3 WMA AAC DISCS No Function Select to set repeat playback Select to set random playback No Function Press to select a folder Press to play pause Press to fast forward rewind Press to select a file Press and hold to fast forward rewind ...

Страница 239: ...INGDVDVIDEO No Function Press to select an Icon Press to select a DISC mode Press to input the selected icon Press to play pause Press to fast forward A disc during playback and forward slowly during pause Press to stop the screen Press to display the menu screen Press to display the option screen Press to display the title selection screen Selecting a chapter Press and hold to fast forward or re ...

Страница 240: ...h the DVD vid eo disc provided sepa rately Press and hold to rewind during playback Select to stop the video Select to pause resume the video screen Pressandholdtofastfor ward during playback and play in slow motion when the player is paused Select to display the title search screen 241 Select to display the pre determined scene on the screen and start playing Select to display the au dio selectio...

Страница 241: ...anged The languages available are restricted to those available on the DVD disc When Hide is selected the subtitles can be hidden CHANGING THE AUDIO LAN GUAGE 1 Select Audio 2 Each time Audio is selected the audio language is changed The languages available are restricted to those available on the DVD disc CHANGING THEANGLE 1 Select Angle 2 Each time Angle is selected the angle is changed The angl...

Страница 242: ...sired language to be heard on the Audio Language screen If the desired language to be heard cannot be found on this screen select Other and enter a language code P 244 SUBTITLE LANGUAGE 1 Select SubtitleLanguage 2 Select the desired language to be read on the Subtitle Language screen If the desired language to be read cannot be found on this screen select Other and enter a language code P 244 SETU...

Страница 243: ... the Setup Menu 1 screen 2 Enter the 4 digit personal code on the Enter Key Code screen If the wrong numbers are entered select to delete the numbers 3 Select a parental level 1 8 on the Se lect Restriction Level screen DYNAMICRANGE 1 Select Dynamic Range on the Setup Menu 2 screen 2 Select MAX STD or MIN The language on the DVD video menu can be changed The multi angle mark can be turned on or of...

Страница 244: ...ancel this setup operation by selecting Play The player will resume normal play Likewise a front passenger can cancel a rear passenger s selection of the setup menu If Other on the Audio Language screen Subtitle Language screen or Menu Language screen is selected the desired language to be heard or read can be selected by entering a lan guage code P 261 This screen appears when a front pas senger ...

Страница 245: ...a different audio source is select ed at the front seats USB mode cannot be selected at the rear seats No Function Select to set repeat playback Select to set random playback No Function Press to select a folder album Press to play pause Press to fast forward rewind Press to select a file track Press and hold to fast forward rewind INFORMATION Depending on the USB memory that is connected to the s...

Страница 246: ... at the front seats iPod mode cannot be selected at the rear seats iPodAUDIO No Function Select to set repeat playback Select to set random playback Select to display the iPod video con trol screen No Function Press to play pause Press to fast forward rewind Press to select a track Press and hold to fast forward rewind iPod VIDEO If iPod mode isselected again atthe rear seatswheniPodvideoisbeingdi...

Страница 247: ...the SOURCE button and the sys tem will return to the iPod video control screen CONTROLLER No Function Select to display the iPod audio con trol screen No Function Press to play pause Press to fast forward rewind Press to select a file Press and hold to fast forward rewind INFORMATION Depending on the iPod that is connected to the system certain functions may not be available ...

Страница 248: ...When a different audio source is select ed at the front seats Bluetooth audio mode cannot be selected at the rear seats No Function Select to set repeat playback Select to set random playback No Function Press to select an album Press to play pause Press to fast forward rewind Press to select a track Press and hold to fast forward rewind INFORMATION Depending on the portable player that is connect...

Страница 249: ... source is select ed at the front seats AUX mode cannot be selected at the rear seats USINGTHEVIDEOMODE The rear seat entertainment system plays videos and sound when audio vid eo equipment is connected to the port INFORMATION The volume can be adjusted using the vehicle s audio controls All other operations must be made on the audio video equipment itself For details about operation of audio vide...

Страница 250: ... mode different sound visual modes can be enjoyed for the left and right screens when is off USING THE HDMIPORT About the HDMI terminal the interface thatisconnectedvideoandaudiotosys tem and audio video device You can enjoy the high definition video and au dio by connecting the single cable to the HDMI terminal and the system NOTICE When the HDMI port and or headphone jack is not in use keep the ...

Страница 251: ...n appears CHANGINGSETTINGS CONTRAST BRIGHTNESS COLOR AND TONE ADJUSTMENT Screen button Function Brightness Select to brighten the screen Brightness Select to darken the screen Contrast Select to strengthen the contrast of the screen Contrast Select to weaken the contrast of the screen Color G Select to strengthen the green color of the screen Color R Select to strengthen the red color of the scree...

Страница 252: ...I indicator is highlighted CHANGINGTO PALFORMAT Turn PAL Video on when PAL format equipment is connected to the A V in put port SETTINGLCD AI Automatically determines the tone of the video image and sets the contrast to an optimum level displaying a sharp im age INFORMATION Because the image quality is automatically adjusted when the LCD AI indicator is on brightness and contrast adjustment become...

Страница 253: ... The following causes are possible There is a problem inside the system Eject the disc The inside of the player unit may be too hot due to a very high ambient tempera ture Eject the disc and allow the player to cool down If No supported data appears on the screen Itindicates that the iPodor USBhas no playable data If a disc which is not play able is inserted No supported data will also appear on t...

Страница 254: ...ERING SWITCHES Volume control switch Somepartsoftheaudio visualsystemcanbeadjustedusingtheswitchesonthesteer ing wheel No Switch Volume control switch switch MODE switch Mode Operation Function All Press Volume up down Press and hold 0 8 sec or more Volume up down continuously ...

Страница 255: ...p down Press and hold 1 5 sec or more Fast up down CD Press Track up down Press and hold 0 8 sec or more Fast forward rewind MP3 WMA AAC disc Press File up down Press and hold 0 8 sec or more Fast forward rewind DVD Press Chapter up down Press and hold 0 8 sec or more Fast forward rewind USB Press File Track up down Press and hold 0 8 sec or more Fast forward rewind iPod Press Track File up down P...

Страница 256: ...on AM FM SAT AUX VTR Press Change audio modes Press and hold 0 8 sec or more Mute CD MP3 WMA AAC disc DVD USB iPod BT audio APPS Press Change audio modes Press and hold 0 8 sec or more Pause INFORMATION In the APPS mode some of the operations may be done on the screen it will depend on the selected APPS ...

Страница 257: ...D video mode Detailed audio settings can be pro grammed AUDIOSETTINGSSCREEN No Function Page Select to set the iPod audio signal input settings 258 Select to set the video signal format settings 258 Select to change the number of preset radio stations dis played on the screen 259 Select to set detailed cover art settings 259 Select to set detailed DVD settings 260 ...

Страница 258: ... 257 2 Select iPodSettings 3 Select VideoSoundInput 4 Select a screen button for the desired setting 1 Display the audio setting screen P 257 2 Select ExternalVideoSettings 3 Select VideoSignal Switch 4 Select a screen button for the desired setting iPodSETTINGS EXTERNALVIDEOSETTINGS ...

Страница 259: ...e desired button to be set SETTING THE NUMBER OF RADIO PRESETS COVER ART SETTINGS No Function Select on off to set the cover art dis play in DISC mode Select on off to set the cover art dis play in USB mode Select on off to set the priority of the Gracenote database in USB mode Select on off to set the cover art dis play in iPod mode Select on off to set the priority of the Gracenote database in i...

Страница 260: ... on this screen select Other and enter a language code P 261 SUBTITLE LANGUAGE 1 Select SubtitleLanguage 2 Select the desired language to be read on the Subtitle Language screen If the desired language to be read cannot be found on this screen select Other and enter a language code P 261 MENU LANGUAGE 1 Select MenuLanguage 2 Select the desired language to be read on the Menu Language screen If the...

Страница 261: ...E MENU LANGUAGE CODE 1 Enter the 4 digit language code 2 Select OK The multi angle mark can be turned on or off on the screen while discs that are multi angle compatible are being played The level of viewer restrictions can be changed Discs that are inserted while the vehicle is in motion will automatically start play ing Certain discs may not play The difference between the lowest vol ume and the...

Страница 262: ...18 Arabic 0119 Assamese 0125 Aymara 0126 Azerbaijani 0201 Bashkir 0205 Byelorussian 0207 Bulgarian 0208 Bihari 0209 Bislama 0214 Bengali Bangla 0215 Tibetan 0218 Breton 0301 Catalan 0315 Corsican 0319 Czech 0325 Welsh 0401 Danish 0426 Bhutani 0515 Esperanto 0520 Estonian 0521 Basque 0601 Persian 0609 Finnish 0610 Fiji 0615 Faroese 0625 Frisian 0701 Irish 0704 Scottish Gaelic 0712 Galician 0714 Gua...

Страница 263: ... Latin 1214 Lingala 1215 Laotian 1220 Lithuanian 1222 Latvian Lettish 1307 Malagasy 1309 Maori 1311 Macedonian 1312 Malayalam Code Language 1314 Mongolian 1315 Moldavian 1318 Marathi 1319 Malay 1320 Maltese 1325 Burmese 1401 Nauru 1405 Nepali 1415 Norwegian 1503 Occitan 1513 Afan Oromo 1518 Oriya 1601 Panjabi 1612 Polish 1619 Pashto Pushto 1721 Quechua 1813 Rhaeto Romance 1814 Kirundi 1815 Romania...

Страница 264: ...ti 1920 Sesotho 1921 Sundanese 1923 Swahili 2001 Tamil 2005 Telugu 2007 Tajik 2008 Thai 2009 Tigrinya 2011 Turkmen 2012 Tagalog 2014 Setswana 2015 Tongan 2018 Turkish 2019 Tsonga 2020 Tatar 2023 Twi 2111 Ukrainian 2118 Urdu 2126 Uzbek Code Language 2209 Vietnamese 2215 Volapük 2315 Wolof 2408 Xhosa 2515 Yoruba 2621 Zulu Code Language ...

Страница 265: ...h you are listening to However this does not indicate a malfunction RADIO Usually a problem with radio reception does not mean there is a problem with the radio it is just the normal result of conditions outside the vehicle For example nearby buildings and ter rain can interfere with FM reception Powerlinesorphonewirescaninterfere with AM signals And of course radio signals have a limited range Th...

Страница 266: ...el may reduce static and fluttering Station swapping If the FM signal being lis tened to is interrupted or weakened and there is another strong station nearby on the FM band the radio may tune in the sec ond station until the original signal can be picked up again Fading AM broadcasts are reflected by the upper atmosphere especially at night These reflected signals can interfere with those receive...

Страница 267: ...ng On hot days use the air conditioning system to cool the inside of the vehicle before using the player Bumpy roads or other vibrations may make the DVD player skip If moisture gets into the DVD player the discs may not be able to be played Remove the discs from the player and wait until it dries Use only discs marked as shown above The following products may not be playable on your player SACD d...

Страница 268: ...shown in the illustrations The use of such discs may damage the player or it may be impossible to eject the disc This system is not designed for use of Dual Discs Do not use Dual Discs because they may cause damage to the player Do not use discs with a protection ring The use of such discs may damage the player or it may be impossible to eject the disc Do not use printable discs The use of such di...

Страница 269: ...c device CD R CD RW discs that have not been subject to the finalizing process a pro cess that allows discs to be played on a conventional CD player cannot be played It may not be possible to play CD R CD RW discs recorded on a music CD recorder or a personal computer because of disc characteristics scratches or dirt on the disc or dirt condensation etc on the lens of the unit It may not be possib...

Страница 270: ...e are cases when it cannot be used MARKS SHOWN ON DVD VIDEO DISCS DVD VIDEO DISCS This DVD player conforms to NTSC PAL color TV formats DVD video discs conforming to another format such as SECAM cannot be used Code Country All All countries 1 North America NTSC PAL Indicates NTSC PAL format of color TV Indicates the number of audio tracks Indicates the number of language subtitles Indicates the nu...

Страница 271: ...her scenes Level 1 DVD video discs for children can be played Level 2 7 DVD video discs for children and G rated movie can be played Level 8 All types of the DVD video discs can be played Multi angle feature The same scene can be enjoyed from different angles Multi language feature The subtitle and audio language can be selected Region codes The region codes are pro videdon DVD players and DVD dis...

Страница 272: ...iPhone iPod touch 1st through 4th genera tion iPod classic and iPod nano 1st through 6th generation USB works with iPhone 5 iPhone 4S iPhone 4 iPhone 3GS iPhone 3G iPhone iPod touch 1st through 5th generation iPod classic and iPod nano 1st through 7th generation Bluetooth technology works with iPhone 5 iPhone 4S iPhone 4 iPhone 3GS iPhone 3G iPhone and iPod touch 2nd through 5th generation The fol...

Страница 273: ...torage class Item USB DISC Compatible file format audio MP3 WMA AAC Folders in the device Maximum 3000 Maximum 192 Files in the device Maximum 9999 Maximum 255 Files per folder Maximum 255 File type Frequency kHz MP3 files MPEG 1 LAYER 3 32 44 1 48 MP3 files MPEG 2 LSF LAYER 3 16 22 05 24 WMA files Ver 7 8 9 9 1 9 2 32 44 1 48 AAC files MPEG4 AAC LC 11 025 12 16 22 05 24 32 44 1 48 File type Bit r...

Страница 274: ...C tag that is used in the same way as an ID3 tag WMA AAC tags carry informa tion such as track title and artist name The emphasis function is available only when playing MP3 WMA files recorded at 32 44 1 and 48 kHz This system can play back AAC files encoded by iTunes The sound quality of MP3 WMA files gen erally improves with higher bit rates In order to achieve a reasonable level of sound qualit...

Страница 275: ... information in an MP3 file This embedded information can include the track number track title the artist s name the album title the music genre the year of production comments cover art and other data The contents can be freely edited using software with ID3 tag editing func tions Although the tags are restricted to a number of characters the information can be viewed when the track is played bac...

Страница 276: ...n mark and file extension Each folder must contain fewer than 8 hierarchies Playlists created using WINAMP soft ware have a playlist file extension m3u MP3 is an audio compression standard determined by a working group MPEG of the ISO International Standard Organiza tion MP3 compresses audio data to about 1 10 the size of that on conventional discs WMA Windows Media Audio is an audio compression f...

Страница 277: ...his indicates that no MP3 WMA AAC files are included in the USB memory iPod iPod Error This indicates a problem in the iPod or its con nection No music files found This indicates that there is no music data in the iPod No video files found This indicates that no video files are included in the iPod Please check the iPod firmware version This indicates that the software version is not compatible Pe...

Страница 278: ...278 7 TIPSFOROPERATING THE AUDIO VISUAL SYSTEM GX_EMVN_OM60K84U_ U 13 07 02 13 05 ...

Страница 279: ... 13 06 28 17 22 1 VOICE COMMAND SYSTEM 280 USING THE VOICE COMMAND SYSTEM 280 VOICE COMMAND SYSTEM OPERATION 281 EXPANDED VOICE COMMANDS 287 2 CASUAL SPEECH RECOGNIZATION 288 3 COMMAND LIST 289 1 VOICECOMMANDSYSTEM OPERATION VOICECOMMANDSYSTEM ...

Страница 280: ...GTHEVOICE COMMANDSYSTEM STEERING SWITCH MICROPHONE INFORMATION Wait for the confirmation beep before speaking a command Voice commands may not be recognized if Spoken too quickly Spoken at a low or high volume The roof or windows are open Passengers are talking while voice com mands are spoken The air conditioning speed is set high The air conditioning vents are turned towards the microphone In th...

Страница 281: ...or example Say Find nearby dining Call John Smith etc If a desired outcome is not shown or if no selections are available perform one of the following to return to the previous screen Say Go back Select Go Back To cancel voice recognition select or press and hold the talk switch VOICECOMMANDSYSTEM OPERATION The voice commands of multifunction can be confirmed by selecting a tab The tabs are found ...

Страница 282: ... be dis played on the screen and voice com mand reception will restart If a voice command cannot be recog nized 2 consecutive times the voice command guidance system will say Paused To restart voice recognition push the talk switch To cancel voice rec ognition press and hold the talk switch Then voice recognition will be sus pended Voice Recognition Prompts can be set to on or off on the Voice Set...

Страница 283: ...dress 3 Say house number street name city name State continuously A confirmation screen will be displayed showing the recognition results If multiple matching items are found a selection screen will be displayed Say Number or select the number Some areas cannot be recognized by the voice recognition system VOICECOMMAND EXAMPLE LAUNCH LEXUS App Suite APPLICATION VOICE COMMAND EXAMPLE PERFORMINGA DE...

Страница 284: ...g the house number can be skipped Even if the state set using voice recogni tion is different from the set state in the Address screen which was set when a destination was set manually the set state in the Address screen will not change P 99 The house number voice recognition conditions are outlined below Numerals 10 digits or less Numerals and cardinal direction or a hyphen and numerals A total o...

Страница 285: ...database is only compati ble with the USB or iPod mode The list screens can be operated by selecting a screen button as well as by recognizing the voice commands A USB memory or iPod must be con nected to enable track searching and playback P 202 207 When a USB memory or iPod is con nected recognition data is created so tracks can be searched using voice com mands Recognition data is updated under...

Страница 286: ... Other Short or abbreviated names in the con tacts list may not be recognized Change names in the contacts list to full names Sometimes a voice recognition result confirmation screen will be displayed After confirming the result say Yes or No When the system recognizes multiple names from the contacts list a name can didate list will be displayed on the screen If the desired name is not displayed ...

Страница 287: ...ze additional numbers say the complete number without stopping Calling to other phone number 3 Say Call or push the switch on the steering wheel VOICECOMMAND EXAMPLE DIAL NUMBER When the system recognizes multiple phone numbers a phone number candi date list will be displayed on the screen Pressing the switch on the steering wheel makes a call to the top entry on the list If the desired phone numb...

Страница 288: ... cannot be recognized completely the command input screen will be displayed Search results will be shown based on the part of the command that was recognized EXPRESSIONEXAMPLESFOR EACH FUNCTION Command Expression examples Go Home Navigate to my house Take me home Enter an Address I need a route to a street address Give me a street Find Nearby POI category Search for a Restau rants around here I ne...

Страница 289: ...ce recognition language is set to English Navi For example Gas stations Restaurants etc Recognizable voice commands and their actions are shown below Voice recognition language can be changed P 55 Command Action Help Prompts voice guidance to offer examples of commands or operation methods Go Back Returns to the previous screen Go to tab Displays the command list of the selected tab Command Action...

Страница 290: ...cts phonetypes Place a call to the said phone type of the contact from the phone book Command Action Play Playlist playlists Plays tracks from the selected playlist Play Artist artist Plays tracks from the selected artist Play Song songs Plays the selected track Play Album albums Plays tracks from the selected album Command Action Destination Assist Connects the system to the Lexus Enform with Saf...

Страница 291: ...er Decreases the temperature of the air conditioning system Turn Music On Turns the audio system on Turn Music Off Turns the audio system off AM Radio Selects AM radio mode FM Radio Selects FM radio mode Sirius XM Selects satellite radio mode Disc Selects the selected disc mode USB Selects USB audio mode iPod Selects iPod audio mode Bluetooth Audio Selects Bluetooth audio mode A V Selects VTR mode...

Страница 292: ...292 1 VOICECOMMAND SYSTEMOPERATION GX_EMVN_OM60K84U_ U 13 07 02 13 05 ...

Страница 293: ...6 7 8 GX_EMVN_OM60K84U_ U 13 06 28 17 22 1 RECEIVING DOPPLER WEATHER INFORMATION 294 DISPLAYING DOPPLER WEATHER INFORMATION 294 2 DATA SERVICES SETTINGS 296 SETTING DOWNLOAD METHODS 296 1 INFORMATIONDISPLAY INFORMATION ...

Страница 294: ... a Bluetooth phone For details about the LEXUSAppSuiteapplication P 348 DISPLAYINGDOPPLER WEATHERINFORMATION No Function Select to display the weather of the current location P 295 Select to display the weather of a de sired location in the recently checked locations list Select to display the weather of a de sired location in the national cities list Select to display the weather of a de sired lo...

Страница 295: ... tab to be displayed When the Current tab is selected When the 3 Day tab is selected When a specific day is selected weather information for that day will be displayed When the 6 12Hour tab is selected DISPLAYING THEWEATHER OFTHECURRENTLOCATION INFORMATION If weather is set to the home screen the weather screen of the current location will be displayed ...

Страница 296: ...affic information and weather information can be received via the HD radio and by the LEXUS App Suite ap plication on a Bluetooth phone The receiving method can be set to both or only via the HD radio For details about the LEXUS App Suite application P 348 No Function Select to receive data service infor mationviaboththe HDradioandthe LEXUS App Suite application on a Bluetooth phone When both meth...

Страница 297: ...PAD 308 BY OFF HOOK SWITCH 308 4 RECEIVING ONTHE Bluetooth PHONE 309 INCOMING CALLS 309 5 TALKING ONTHEBluetooth PHONE 310 INCOMING CALL WAITING 312 6 Bluetooth PHONE MESSAGE FUNCTION 313 RECEIVING A MESSAGE 314 CHECKING MESSAGES 315 REPLYING TO A MESSAGE QUICK REPLY 316 CALLING THE MESSAGE SENDER 318 1 PHONE MESSAGE SETTINGS 320 PHONE MESSAGE SETTINGS SCREEN 320 Sound Settings SCREEN 321 Contact ...

Страница 298: ...n or the switch on the steering wheel Severalfunctionsareavailabletooperateoneachscreenthatisdisplayedbyselecting the 4 tabs Function Page Phone operation Registering connecting Bluetooth device 40 Calling on the Bluetooth phone 303 Receiving on the Bluetooth phone 309 Talking on the Bluetooth phone 310 Message function Using the Bluetooth phone message function 313 Setting up a phone Phone settin...

Страница 299: ...of such devices Before using Bluetooth devices users of any electrical medical device other than implantable cardiac pacemakers cardiac resynchronization therapy pace makers or implantable cardioverter defibrillators should consult the manufac turer of the device for information about its operation under the influence of radio waves Radio waves could have unex pected effects on the operation of su...

Страница 300: ...ook switch REGISTERING CONNECTINGABluetooth PHONE Touse the hands free systemfor cellular phones it is necessary to register a cel lular phone with the system P 40 Bluetooth PHONE CONDITIONDISPLAY The condition of the Bluetooth phone appears on the upper right side of the screen P 14 USINGTHEPHONESWITCH MICROPHONE By pressing the phone switch a call can be received or ended without taking your han...

Страница 301: ...rnately with the other party on the phone If both parties speak at the same time the other party may not hear what has been said This is not a malfunc tion Keep call volume down Otherwise the other party s voice may be audible out side the vehicle and voice echo may increase When talking on the phone speak clearly towards the microphone The other party may not hear you clearly when Driving on an u...

Страница 302: ...n the system can be ini tialized Contact data Call history data Favorites data Image data All phone settings Message settings ABOUTTHECONTACTSIN THECONTACTLIST INFORMATION When a phone s registration is deleted the above mentioned data is also deleted WHENSELLINGOR DISPOSINGOFTHEVEHICLE A lot of personal data is registered when the hands free system is used When selling or disposing of the vehicle...

Страница 303: ...tch on the steering wheel AfteraBluetooth phonehasbeenreg istered a call can be made using the hands free system There are several methods by which a call can be made as described below How to make a call list Page By favorites list 304 By call history 304 By contacts list 305 By dial pad 308 By e mail SMS MMS 318 By POI call 83 By off hook switch 308 By LEXUS App Suite 361 By voice command system...

Страница 304: ...all screen is dis played 1 Display the phone top screen P 303 2 Select the Call History tab and select or the desired contact The icons of call type are displayed Missed call Incoming call Outgoing call BYFAVORITESLIST Callscanbemadeusingregisteredcon tacts which can be selected from a con tact list P 330 BYCALLHISTORY Up to 30 of the latest call history items missed incoming and outgoing can be s...

Страница 305: ... only the most recent call is listed in call history When a phone number registered in the contact list is received the name is dis played Number withheld calls are also memo rized in the system International phone calls may not be made depending on the type of cellular phone you have The list should group together consecu tive entries with the same phone number and same call type For example two ...

Страница 306: ... screen is dis played when the operation is complete When Automatic Contact History Transfer is set to off P 322 1 Select the Contacts tab 2 Select the desired item 3 Check that a confirmation screen is dis played when the operation is complete WHEN THE CONTACT IS EMPTY No Function Select to always transfer all the con tacts from a connected cellular phone automatically Select to transfer all the ...

Страница 307: ...ACT TO THE CON TACT LIST from STEP 2 P 326 No Function Select to transfer the contacts from the connected cellular phone Select to add a new contact manual ly Select to cancel transferring INFORMATION Manual transfer operation cannot be per formed while driving If your cellular phone is neither PBAP nor OPP compatible the contacts cannot be transferred Depending on the type of Bluetooth phone It m...

Страница 308: ... 1 Press the switch on the steering wheel to display the phone top screen 2 Press the switch on the steering wheel to display the Call History screen 3 Press the switch on the steering wheel to call the latest history item 4 Check that the Call screen is dis played BYDIALPAD INFORMATION Depending on the type of Bluetooth phone being connected it may be neces sary to perform additional steps on the...

Страница 309: ...me control switch on the steering wheel INCOMINGCALLS When a call is received this screen is displayed with a sound INFORMATION During international phone calls the other party s name or number may not be displayed correctly depending on the type of cellular phone you have The incoming call display mode can be set P 335 The ringtone that has been set in the Sound Settings screen sounds when there ...

Страница 310: ... appears when a number that contains a w is dialed in hands free mode 311 Select to hang up the phone Select or to adjust thevolumeoftheotherpar ty s voice Select to start talking with the other party 312 INFORMATION Changing from hands free call to cellular phone call is not possible while driving When cellular phone call is changed to hands free call the hands free screen will be displayed and i...

Страница 311: ...character string that consists of numbers and the characters p or w e g 056133w0123p 1 When the p pause tone is used the tone data up until the next pause tone will be automatically sent after 2 seconds have elapsed When the w pause tone is used the tone data up until the next pause tone will be automatically sent after a user operation is performed Release tones can be used when auto mated operat...

Страница 312: ...Each time is selected or the switch on the steering wheel is pressed during an interrupted call the party who is on hold will be switched TRANSMIT VOLUME SETTING INFORMATION The sound quality of the voice heard from the other party s speaker may be nega tively impacted To reset the transmit volume select Default Transmit Volume is dimmed when mute is on INCOMINGCALLWAITING When a call is interrupt...

Страница 313: ...elect to change to phone mode Received messages can be forwarded from the connected Bluetooth phone enabling checking and replying using the navigation system Depending on the type of Bluetooth phone connected received messages may not be transferred to the message inbox If the phone does not support the mes sage function this function cannot be used Function Page Receiving a message 314 Checking ...

Страница 314: ... call the message sender INFORMATION Depending on the cellular phone used for receiving messages or its registration status with the navigation system some information may not be displayed The pop up screen is separately available for incoming e mail and SMS MMS mes sages under the following conditions E mail Incoming E mail Display is set to Full Screen P 333 E mail Notification Popup is set to o...

Страница 315: ...ancelthisfunction select Stop When Automatic Message Read out is set to on messages will be au tomatically read out P 333 Select to make a call to the sender INFORMATION Reading a text message is not available while driving Depending on the type of Bluetooth phone being connected it may be necessary to perform additional steps on the phone Messages are displayed in the appropriate connected Blueto...

Страница 316: ...sg 4 Select the desired message 5 Select Send While the message is being sent a sending message screen is displayed To cancel sending the message select Cancel 6 Check that a confirmation screen is dis played when the operation is complete If an error message is displayed follow the guidance on the screen to try again REPLYINGTOAMESSAGE QUICKREPLY 15 messages have already been stored ...

Страница 317: ...ed while driving INFORMATION To reset the edited quick reply messages select Default Quick Message 1 I am driving and will arrive in approximately ETA minutes This message cannot be edited and will automatically fill in ETA with the navigation calculated estimated time of arrival on the confirm message screen If there are waypoints set ETA to the next waypoint will be shown If there is no route cu...

Страница 318: ...screen is dis played CALLING FROM A NUMBER WITHIN AMESSAGE 1 Display the message inbox screen P 313 2 Select the desired message 3 Select the text area 4 Select the desired number Identified phone numbers contained in the message are displayed CALLINGTHEMESSAGE SENDER Calls can be made to an e mail SMS MMS message sender s phone number This operation can be performed while driving Calls can be mad...

Страница 319: ...OM60K84U_ U 13 07 02 13 05 5 Check that the Call screen is dis played CALLING FROM THE INCOMING MESSAGE SCREEN P 314 INFORMATION A series of numbers may be recognized as a phone number Additionally some phone numbers may not be recognized such as those for other countries ...

Страница 320: ...1 Press the SETUP button on the Remote Touch 2 Select Phone 3 Select the item to be set PHONE MESSAGESETTINGS SCREEN No Information Page Registering connecting a phone 40 Sound settings 321 Contact call history set tings 322 Messaging settings 333 Phone display settings 335 ...

Страница 321: ...n P 303 2 Select Settings 1 Display the Phone Message Settings screen P 320 2 Select SoundSettings 3 Select the desired item to be set DISPLAYING THEPHONE MESSAGESETTINGSSCREEN INADIFFERENTWAY SoundSettings SCREEN The call and ringtone volume can be ad justed A ringtone can be selected ...

Страница 322: ...elect or to adjust the incom ing SMS MMS tone volume Select to set the desired incoming e mail tone Select or to adjust the incom ing e mail tone volume Select or to adjust the default volume of the other party s voice Select to reset all setup items INFORMATION Depending on the type of phone certain functions may not be available Contact Call History Settings SCREEN The contact can be transferred...

Страница 323: ...ones select to set automatic contact history transfer on off Whensettoon thephone s contactdataandhistoryare automatically transferred Select to update contacts from the connected phone 324 Select to sort contacts by the first name or last name field Select to add contacts to the favorites list 330 Select to delete contacts from the favorites list 332 Select to set the transferred contact image di...

Страница 324: ... need to be disconnected Depending on the type of Bluetooth phone being connected it may be neces sary to perform additional steps on the phone FOR PBAP INCOMPATIBLE BUT OPP COMPATIBLE Bluetooth PHONES 1 Select UpdateContactsfromPhone 2 Select Replace Contacts or Add Contacts Replace Contacts Select to transfer the contact from the connected cellular phone and replace the current one Add Contacts ...

Страница 325: ... Bluetooth phone To cancel this function select Cancel 4 Select Done when it appears on the screen 5 Check that a confirmation screen is dis played when the operation is complete UPDATING THE CONTACTS IN A DIFFERENTWAY FROMTHE Call History SCREEN 1 Display the phone top screen P 303 2 Select the Call History tab and select a contact not yet registered in the con tact list 3 Select Update Contact F...

Страница 326: ... Enter the phone number and select OK 4 Select the phone type for the phone number 5 To add another number to this contact select Yes REGISTERING A NEW CONTACTTOTHECONTACT LIST New contact data can be registered Upto4numbersperpersoncanbereg istered For PBAP compatible Bluetooth phones this function is available when Automatic Contact History Transfer is set to off P 322 ...

Страница 327: ...contact not yet registered in the con tact list 3 Select Add toContacts 4 Follow the steps in REGISTERING A NEW CONTACT TO THE CONTACT LIST from STEP 2 P 326 1 Select EditContacts 2 Select the desired contact 3 Select corresponding to the de sired name or number EDITING THECONTACT DATA For PBAP compatible Bluetooth phones this function is available when Automatic Contact History Transfer is set to...

Страница 328: ...EW CONTACT TO THE CONTACT LIST from STEP 3 P 326 EDITING THE CONTACT IN A DIFFERENT WAY FROM THE ContactDetails SCREEN 1 Display the phone top screen P 303 2 Select the Contacts Call History tab or the Favorites tab and select the desired contact 3 Select Edit Contact E mail Addresses Select to display all registered e mail addresses for the contact 4 Follow the steps in EDITING THE CONTACT DATA f...

Страница 329: ...03 2 Select the Contacts Call History tab or the Favorites tab and select the desired contact 3 Select DeleteContact 4 Select Yes when the confirmation screen appears DELETINGTHE CONTACT DATA For PBAP compatible Bluetooth phones this function is available when Automatic Contact History Transfer is set to off P 322 INFORMATION Multiple data can be selected and deleted at the same time INFORMATION W...

Страница 330: ...s complete When 15 contacts have already been registered to the favorites list 1 When 15 contacts have already been registered to the favorites list a regis tered contact needs to be replaced Select Yes when the confirmation screen appears to replace a contact 2 Select the contact to be replaced 3 Check that a confirmation screen is dis played when the operation is complete FAVORITES LIST SETTING ...

Страница 331: ... list name to be regis tered in the favorites list When selected gray is changed to yellow and the contact is registered in the favorites list Registering contacts in the favorites list in a different way from the Contact De tails screen 1 Display the phone top screen P 303 2 Select the Contacts tab or the Call History tab and select the desired con tact 3 Select AddFavorite 4 Check that a confirm...

Страница 332: ...appears 4 Check that a confirmation screen is dis played when the operation is complete Deleting contacts in the favorites list in a different way from the Contacts screen 1 Display the phone top screen P 303 2 Select the Contacts tab 3 Select yellow at the beginning of the contact list name to be deleted from the favorites list When selected yellow is changed to gray and the data is deleted from ...

Страница 333: ...lect the Contacts Call History tab or the Favorites tab and select the desired contact to delete 3 Select RemoveFavorite 4 Select Yes when the confirmation screen appears 5 Check that a confirmation screen is dis played when the operation is complete 1 Display the Phone Message Settings screen P 320 2 Select MessagingSettings 3 Select the desired item to be set MessagingSettings SCREEN ...

Страница 334: ...s dis played it can be operated by selecting the switches on the screen Drop Down When an SMS MMS message is received a message is dis playedontheuppersideofthescreen Select to change the incoming e mail display Full Screen When an e mail is re ceived the incoming e mail display screen is the displayed and it can be operated by selecting the switches on the screen Drop Down When an e mail is re ce...

Страница 335: ...A DIFFERENT WAY PhoneDisplaySettings SCREEN No Function Select to change the incoming call display Full Screen When a call is re ceived the hands free screen is dis played it can be operated by selecting the switches on the screen Drop Down A message is dis played on the upper side of the screen Select to set display of the contact history transfer completion message on off Select to reset all set...

Страница 336: ...tem The hands free sys tem or Bluetooth device does not work The connected de vice may not be a compatible Bluetooth cellular phone For a list of specific devices which operation has been confirmed on this system check with your Lexus dealer or the following website http www lexus com MobileLink The Bluetooth ver sion of the connected cellular phone may be older than the specified version Use a ce...

Страница 337: ...ter the correct passcode on the cel lular phone The registration op eration has not been completed on the cellular phone side Complete the regis tration operation on the cellular phone approve registration on the phone Old registration in formation remains on either this system or the cellular phone Delete the existing registration informa tion from both this system and the cellu lar phone then re...

Страница 338: ...atic Bluetooth connec tion on this system to on when the engine switch is in ACCES SORY or IGNI TION ON mode 54 Unable to dial Please check your phone message is displayed Bluetooth function is not enabled on the cellular phone Enable the Bluetooth function on the cellular phone Old registration in formation remains on either this system or the cellular phone Delete the existing registration infor...

Страница 339: ...84U_ U 13 07 02 13 05 When making receiving a call Symptom Likely cause Solution Page Cellular phone This system A call cannot be made received Your vehicle is in a No Service area Move to where No Service no longer appears on the dis play ...

Страница 340: ...the following website http www lexus com MobileLink Automatic contact transfer function on this system is set to off Set automatic con tact transfer function on this system to on 322 Passcode has not been entered on the cellular phone Enter the passcode on the cellular phone if requested default passcode 1234 Transfer operation on the cellular phone has not completed Complete transfer operation on...

Страница 341: ...33 New message notifi cations are not dis played Notification of SMS MMS E mail recep tion on this system is set to off Set notification of SMS MMS E mail reception on this sys tem to on 333 Automatic message transfer function is not enabled on the cellular phone Enable automatic transfer function on the cellular phone Symptom Likely cause Solution Page Cellular phone This system The Bluetooth con...

Страница 342: ...loser to this system The cellular phone is the most likely cause of the symptom Turn the cellular phone off remove and reinstall the bat tery pack and then restart the cellular phone Enable the cellular phone s Bluetooth connection Stop the cellular phone s security soft wareandcloseallap plications Before using an ap plication installed on the cellular phone carefully check its source and how its...

Страница 343: ...EXUS App Suite 354 LINKING LEXUS App Suite AND NAVIGATION LOCAL FUNCTION 359 App Suite KEYBOARD OPERATION 362 2 Destination Assist 364 MAKE A CALL WITH Destination Assist 364 3 eDestination 366 DOWNLOADING eDestinations 366 SEARCHING eDestinations 368 DISPLAYING eDestination ICONS 369 4 Lexus Insider 370 NEW MESSAGE NOTIFICATION 370 VIEWING AND PLAYING RECEIVED Lexus Insider MESSAGES 371 1 LEXUSAp...

Страница 344: ...st and eDestination are available in the contiguous United States Lexus Insider is available in the contiguous 48 states and Canada Safety Connect includes four features Automatic Collision Notification Emergency Assistance and Stolen Vehicle Location are available in the United States including Hawaii and Alaska and in Canada and Enhanced Roadside Assistance is available in the United States exce...

Страница 345: ... FUNCTION ACHIEVED BY USING A CELLULAR PHONE TheLEXUSAppSuiteservicerequiresacompatiblecellularphonewithdataconnec tion LEXUS App Suite is a service that enables downloadable applications to be displayed on and operated from the navigation screen Before LEXUS App Suite can be used a few actions need to be performed first P 348 ...

Страница 346: ...ing the LEXUS Enform application on your phone com munication is relayed between the navigation system the appli cation server and the content provider if you have a data connection Applications Downloaded App Suite applications provide access to audiovi sual content from a content provider when connected with a compatible phone with a data connection Navigation system Content received via a cellu...

Страница 347: ...ngs Downloaded Application Downloaded Application Content BEFOREUSINGTHE FUNCTION SUBSCRIPTION AVAILABILITY OFSERVICE INFORMATION When using LEXUS App Suite depend ing on the details of your cellular phone contract data usage fees may apply Confirm data usage fees before using this service In this section the required actions to activate applications connect a cellular phone to the navigation syst...

Страница 348: ...m application on your phone PREPARATIONBEFORE USINGLEXUSAppSuite SETUP REQUIRED TO USE LEXUS AppSuite 1 Lexus Enform user registration 2 Download the LEXUS Enform appli cation to your cellular phone 3 Register and connect the cellular phone to the navigation system 4 Download App Suite Applications to navigation system USER REGISTRATION When purchasing the vehicle an email addressisregisteredatyou...

Страница 349: ...ownload See P 355 step 2 for more information once download has started DOWNLOADING AND LOGGING INTOTHE LEXUS ENFORM APPLICATION INFORMATION Applications can only be used when the LEXUS Enform application has been downloaded to your cellular phone and the application is running LEXUS App Suite operational proce dures can also be confirmed by visiting http www lexus com enform In order to download ...

Страница 350: ...and navigation system These are subscription based telematics services that use Global Positioning System GPS data embedded cellular technology to provide safety and security as well as convenience features to subscribers The services are supported by Lexus designated response center which operates 24 hours per day 7 days per week The services are available by subscription on select telematics har...

Страница 351: ...e in the contiguous 48 states and Canada Enrollment in Lexus Enform with Safety Connect via your dealership is required to activate all services BEFOREUSINGTHE FUNCTION SUBSCRIPTION AVAILABILITY OFSERVICE S ACTIVATIONOFSERVICE S Certification for Lexus Enform with Safety Connect NOTE This device complies with part 15 of the FCC Rules Operation is subject to the following two conditions 1 This devi...

Страница 352: ... Enform with Safety Connect complies with the FCC guide lines in addition to those standards INFORMATION Available beginning Fall 2009 on select Lexus models Contact with the Lexus Enform with Safety Connect response center is dependent upon the telematics device being in operative condition cel lular connection availability navigation map data and GPS satellite signal recep tion which can limit t...

Страница 353: ...M60K84U_ U 13 07 02 13 05 8 LEXUS ENFORM WITH SAFETY CONNECT 4 TYPE C FUNCTION ACHIEVED BY USING DCM Of the functions included in Lexus Enform with Safety Connect Safety Connect is achieved through the operation of the DCM For details refer to Owner s Manual ...

Страница 354: ...le contents of a cellular phone to be displayed on and operated from the navigation screen Before LEXUS App Suite can be used a few actions need to be performed first P 348 For details about the function and ser vice of each application refer to http www lexus com enform No Function Page Select to activate an appli cation Select to update all the ap plications 355 Select to reorder the appli catio...

Страница 355: ... other functions while downloading Cancel Select to cancel updating 3 Check that downloading is completed From the Update screen From the other screen UPDATINGANAPPLICATION When LEXUS App Suite is activated an application may need to be updated By updating an application can be updated tothelatestversion Toupdatetheappli cation it is necessary to download the updated data and install it If an upda...

Страница 356: ...G THE UPDATED DATA 1 Select Install 2 Select Continue Later Select to postpone the installation of the updated data and go back to the pre vious screen No Function Select to install later When this screen button is selected the screen will return to the last displayed screen To install the updated data P 356 Select to display detailed update data information Select to install the updated data Foll...

Страница 357: ...operate other function while installing 4 Select OK after the installing is com plete 1 Display the LEXUS App Suite screen P 354 2 Select Reorder 3 Select the desired application to be moved 4 Select or to move the applica tion and select OK INFORMATION LEXUS App Suite function cannot be operated while installing REORDERING THE APPLICATIONS Order of the applications can be changed ...

Страница 358: ...ooting assistance please visit the Lexus website or contact your dealer The cellular phone cannot be connected Refer to http www lexus com enform to confirm if the phone is com patible or not This feature is unavailable during a handsfree call A hands free call is in progress After the hands free call is fin ished perform the operation To use the services an active application needs to be run ning...

Страница 359: ...he NAV button 2 Select Dest 3 Select Web Search 4 Check that the Web Search screen is displayed LINKINGLEXUSAppSuite ANDNAVIGATIONLOCAL FUNCTION The navigation can set a destination and make a hands free call via LEXUS App Suite For details about the function and service of each application refer to http www lexus com enform ...

Страница 360: ...elect Go 4 Select Map 5 Select Goto 6 Select OK to start guidance SETTING A DESTINATION USING LEXUS App Suite Locations that were searched using LEXUS App Suite can be set as a desti nation For the operation of the route guidance screen and the function of each screen button P 110 These application screens are shown for illustrative purposes and the actual screens may vary based on application ...

Страница 361: ... and select Go 4 Select Call 5 Select Yes Cancel Select to cancel making a phone call 6 Check that the Call screen is dis played MAKINGAPHONE CALL USINGLEXUS AppSuite Phone calls can be made to locations which were searched using LEXUS App Suite For phone operation and the function of each screen button P 310 These application screens are shown for illustrative purposes and the actual screens may ...

Страница 362: ...d on the character entering space AppSuiteKEYBOARD OPERATION Information can be entered into an ap plication by the software keyboard or voice recognition function For details about the function and service of each application refer to http www lexus com enform The keyboard layout can be changed P 55 USING THE SOFTWARE KEYBOARD For details on operating the keyboard P 34 These application screens a...

Страница 363: ...layed P 280 4 System will prompt for user input End of user s speech will be detected auto matically and the system will prompt for any additional information if needed 5 Search results will be displayed on the screen ENTERINGA KEYWORD USING THE VOICE RECOGNITIONFUNCTION Alternatively the application can be opened by the launch Lexus App Suite Voice Command P 283 These application screens are show...

Страница 364: ...el To hang up the phone select Disconnect or press the switch on the steering wheel Destination Assist provides you with live assistanceforfindingdestinationsviathe Lexus Enform with Safety Connect re sponse center You can request either a specific business address or ask for help locating your desired destination by category such as restaurants gas stations shopping centers or other Points of Int...

Страница 365: ...e agent helps you determine your location of choice this screen is displayed Select the button of the screen for the appropriate action Mark Select to mark the POI on the map screen Enter Select to set as a destination Detail Select to display the detailed in formation If is selected the registered phone number can be called ...

Страница 366: ...end them to your vehicle s navigation system Up to 200 locations can be stored online and accessed or updated at any time INFORMATION You must first go online at www lexus com drivers to view the Owners site where you will need to regis ter and log in After this personalized folders that contain the locations to be sent to your vehicle can be created See Lexus Enform with Safety Connect Guide for ...

Страница 367: ...02 13 05 8 LEXUS ENFORM WITH SAFETY CONNECT 3 Select Pointof Interest 4 Select eDestination 5 Select Download 6 Select Yes when the confirmation screen appears 7 Check that downloading is started Most recent online eDestination data will be loaded to the navigation system ...

Страница 368: ...RMWITHSAFETY CONNECTOPERATION GX_EMVN_OM60K84U_ U 13 07 02 13 05 1 Press the NAV button 2 Select Dest 3 Select Pointof Interest 4 Select eDestination 5 Select the desired eDestination catego ry SEARCHINGeDestinations ...

Страница 369: ...ion 7 Select the desired appropriate action 1 Select Options 2 Select MapInformation 3 Select eDestination The eDestination indicator illuminates Mark Select to mark the POI on the map screen Go Select to set the POI as a destina tion with route directions If is selected the registered phone number can be called DISPLAYINGeDestination ICONS ...

Страница 370: ...sturnedtoACCESSORYor IGNITION ON mode Lexus Insider is an optional service that can send audio messages or articles to participating owners vehicles via the navigation system Potential Lexus Insidersubjectsmightinclude for exam ple Lexus vehicle technology tips up dates on regional Lexus events or audio excerpts from Lexus Magazine articles NEWMESSAGE NOTIFICATION Whenthevehicleisfirstpoweredonand...

Страница 371: ...the INFO APPS button 2 Select LexusInsider 3 Select the desired article title Read All Select to listen to all stored Lexus Insider broadcasts To disrupt the audio read of Lexus Insider press the MODE switch on the steering wheel or press the AUDIO button on the audio system VIEWING AND PLAYING RECEIVEDLexusInsider MESSAGES ...

Страница 372: ...n be used to move to the previous or next article To stop listening to the broadcast select Stop or press the PWR VOL knob on the audio system MESSAGEICONS Icons appear at the left of the Lexus Insider story titles and indicate as shown in below Icon Article Unread article Previously read article Unread article with downloadable Point of Interest POI Previously read article with downloadable Point...

Страница 373: ... Enter can be selected to download a POI to the naviga tion system 4 Select Go to set the POI as a destina tion with route directions 1 Display the LEXUS Insider screen P 371 2 Select Delete 3 Select the item to be deleted and select Delete 4 Select Yes when the confirmation screen appears DOWNLOADING APOI Some Lexus Insider stories will contain a downloadable POI relevant to the con tent DELETING...

Страница 374: ...374 GX_EMVN_OM60K84U_ U 13 07 02 13 05 3 SETUP 1 LEXUS App Suite SETTINGS 1 Press the SETUP button 2 Select LEXUSApp Suite 3 Select the items to be set Settings are available for LEXUS App Suite ...

Страница 375: ...desired level by selecting the appropriate number SCREENFORLEXUSAppSuite SETTINGS No Function Page Select to set the voice guid ance volume 375 Select to set the pop up re minder for cellular phone data usage 376 Select to set Lexus Insider settings 376 Select to reset all setup items VOICE VOLUME SETTINGS The voice guidance volume can be ad justed ...

Страница 376: ... 374 2 Select LEXUSInsider 3 Select the items to be set PHONEDATA PLAN POP UP SETTINGS The phone data plan pop up can be set when a paid application is downloaded Lexus Insider SETTINGS Lexus Insider settings notification and opt in or out of article receipt can be changed No Function SelecttosetthereceivingofLexusIn sider articles yes no Select to set the new message notifi cation on off Select t...

Страница 377: ...377 1 2 3 4 5 6 7 8 GX_EMVN_OM60K84U_ U 13 06 28 17 22 INDEX ...

Страница 378: ...istening to Bluetooth audio 219 Overview 214 Bluetooth phone message function 313 Calling the message sender 318 Checking messages 315 Receiving a message 314 Replying to a message quick reply 316 Bluetooth settings 40 Buttons overview 10 C Calling on the Bluetooth phone 303 By call history 304 By contacts list 305 By dial pad 308 By favorites list 304 By off hook switch 308 Casual speech recogniz...

Страница 379: ...ore using the function 351 Function index 25 Functional overview 344 G General settings 55 General settings screen 55 GPS global positioning system 149 Limitations of the navigation system 149 H Home screen 12 Status display 14 Home screen operation 32 I Information 293 Information display 294 Information screen 18 Initial screen 28 Internet radio 188 Listening to internet radio 188 iPod 207 iPod ...

Страница 380: ...129 Memory points settings 129 Deleting previous destinations 140 Setting up address book 134 Setting up areas to avoid 137 Setting up home 130 Setting up preset destinations 132 N Navigation operation 19 Navigation system 69 O Operating information 265 DVD player and disc 267 Error messages 277 File information 273 iPod 272 Radio 265 Terms 275 Operation flow guiding the route 23 Other settings 55...

Страница 381: ...troller 231 Turning the rear display on off 230 Using the radio 235 Using the radio Internet radio broadcast 237 Using the video mode 249 Rear seat entertainment system features 227 Using the AUX mode 249 Rear seat entertainment system operation 227 Receiving doppler weather information 294 Displaying doppler weather information 294 Receiving on the Bluetooth phone 309 Incoming calls 309 Registeri...

Страница 382: ...ooth setup screen 45 Connecting a Bluetooth device 48 Deleting a Bluetooth device 48 Editing the Bluetooth device information 50 Registering a Bluetooth device 46 System settings screen 53 Setting home as the destination 24 Setup 141 257 320 374 Setup operation from the rear seat 201 Setup screen 16 Some basics 160 299 About the contacts in the contact list 302 Audio screen adjustment 166 Disc slo...

Страница 383: ... 336 Typical voice guidance prompts 122 U USB memory 202 Overview 202 USB audio 206 V Vehicle settings 64 Maintenance 65 Voice command system 279 Expanded voice commands 287 Using the voice command system 280 Voice command system operation 281 Voice command system operation 280 Voice settings 62 Voice settings screen 62 VTR 224 Overview 224 VTR options 226 W What to do if 336 X XM satellite radio ...

Страница 384: ...384 GX_EMVN_OM60K84U_ U 13 06 28 17 22 Map database information and updates ...

Страница 385: ...385 GX_EMVN_OM60K84U_ U 13 06 28 17 22 ...

Страница 386: ...386 GX_EMVN_OM60K84U_ U 13 06 28 17 22 ...

Страница 387: ...387 GX_EMVN_OM60K84U_ U 13 06 28 17 22 ...

Страница 388: ...388 GX_EMVN_OM60K84U_ U 13 06 28 17 22 ...

Страница 389: ...389 GX_EMVN_OM60K84U_ U 13 06 28 17 22 ...

Страница 390: ...390 GX_EMVN_OM60K84U_ U 13 06 28 17 22 ...

Страница 391: ...84U_ U 13 07 03 10 19 Gracenote the Gracenote logo and logotype Powered by Gracenote MusicID Playlist Plus and MediaVOCS are either registered trademarks or trademarks of Gracenote Inc in the United States Certification ...

Страница 392: ...itions 1 Thisdevice may not causeharmfulinterference and 2 this de vice must accept any interference received including interference that may cause undesired operation FCC WARNING Changes or modifications not expressly approved by the party responsible for com pliance could void the user s authority to operate the equipment ...

Страница 393: ...his device may not cause interference and 2 this device must accept any interference including interference that may cause undesired operation of the device Le présent appareil est conforme aux CNR d Industrie Canada applicables aux appareils radio exempts de licence L exploitation est autorisée aux deux conditions suivantes 1 l appareil ne doit pas produire de brouillage et 2 l utilisateur de l a...

Отзывы: