background image


17

c

Click Next.

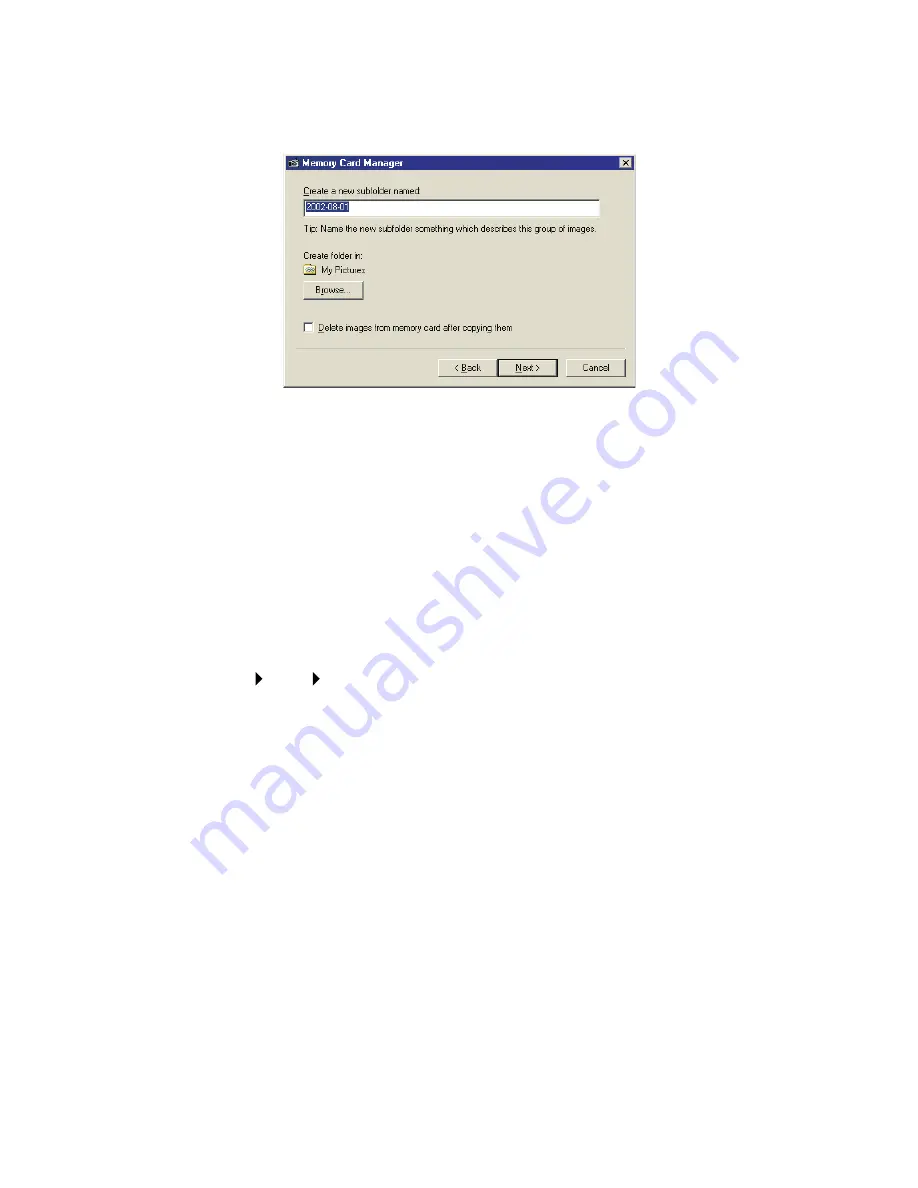
Another Memory Card Manager dialog box appears.

d

Enter a name for this set of images.

e

Browse to select a folder on your hard drive where you want to 
store your photos, and then create a new subfolder.

f

Click Next.

FotoSlate launches. Your photos appear in the left pane.

2

From the toolbar, click Add Page.

3

Select a template for your photo.

If you are printing on a 4x6 photo card, select 
Sheet

4x6

Portrait. 

4

Click OK.

5

Left-click and drag the photo that you want to print into the template.

6

If you like, you can edit your photo in the template.

Note: Your editing changes will be saved to the template only, 

not to the original photo.

a

Click Adjust on the toolbar, and then select one of these 
options:

Scroll

Crop

Zoom In

Zoom Out

Содержание Z65p

Страница 1: ...www lexmark com Photo Guide October 2002 Z65p Photo Jetprinter ...

Страница 2: ...ation to products programs or services do not imply that the manufacturer intends to make these available in all countries in which it operates Any reference to a product program or service is not intended to state or imply that only that product program or service may be used Any functionally equivalent product program or service that does not infringe any existing intellectual property right may...

Страница 3: ...ing the software to meet your printing needs 7 Printing from paper tray 1 8 Printing from paper tray 2 11 Printing photos 14 Printing a digital photo on a photo card 14 Designing pages for a photo album 19 Creating a custom template 21 Printing multiple images on one sheet 22 Cropping photos 23 Personalizing fabric with pictures 24 Troubleshooting checklist 26 ...

Страница 4: ...r feeding Each paper tray has a paper guide Paper release lever Press when removing paper Each paper tray has a paper release lever Memory card slots Insert a memory card into one of these four slots to access your photos Paper tray 1 front Load custom size paper plain inkjet paper or specialty paper for special projects Paper tray 1 has a paper type sensor that automatically detects the following...

Страница 5: ...tray 1 front or paper tray 2 rear If this button is flashing press it once to clear a paper jam Power button Press to turn the printer on or off Paper exit tray Extend to hold paper as it exits Front cover Open to install cartridges or clear a paper jam USB cable connector Power supply connector ...

Страница 6: ...mory card Your printer supports the following digital media CompactFlash I and II IBM Microdrive Secure Digital MultiMedia Card Memory Stick Smartmedia The USB Card Reader on your printer has four slots to accommodate these media This illustration shows you where to insert each of the supported memory cards Memory Stick CompactFlash I and II IBM Microdrive Secure Digital MultiMedia Card Smartmedia...

Страница 7: ...o the USB Card Reader the following message appears Make the selections based on your preferences If you select Copy images to hard drive and then click Next another dialog box appears Browse to select a folder where you want to store your photos and then create a new subfolder for your photos The default folder is My Pictures and the default subfolder name is the current date When you have comple...

Страница 8: ...the following way to prevent data loss 1 Double click the My Computer icon on your desktop 2 Right click the icon for the removable disk drive supporting your memory card The icon looks similar to the one shown 3 Select Eject from the drop down menu 4 Click OK on the Eject dialog box 5 Remove your memory card from the USB Card Reader For help ...

Страница 9: ...eader 2 Click Start Programs USB Card Reader Digital Media Formatter 3 Follow the instructions on your screen to format your memory card Using the software to select your printer settings Print quality and paper type To select a print quality or paper type setting 1 With your document open click File Print Properties or Preferences I Want To menu This online easy to use projects menu helps you pri...

Страница 10: ... tray 1 and ink levels Troubleshooting Printing a test page To open the Lexmark Solution Center From your desktop double click the Lexmark Z65 Solution Center icon or Click Start Programs or All Programs Lexmark Z65 Lexmark Z65 Solution Center Click Help on any tab to view the printer software Help Print quality Paper recommendation Quick Print Plain inkjet multipurpose office or xerographic Norma...

Страница 11: ...nsions If you load transparencies or plain coated photo or glossy paper into paper tray 1 your printer detects the paper type and automatically adjusts the Paper Type setting in the printer software for you To print a document from this tray 1 Load the paper with the print side facing you against the right side of the paper tray Width 76 2 to 215 9 mm 3 0 to 8 5 in Length 127 to 432 mm 5 0 to 17 0...

Страница 12: ...sh the paper too far into the printer For example A4 and letter size paper should extend beyond the top of paper tray 1 3 Make sure the paper tray 1 button is selected 4 Follow these steps to open the printer software and print your document a With your document open click File Print Properties or Preferences b From the Quality Speed tab select a print quality Paper tray 1 button ...

Страница 13: ...ay override your paper tray selection You may need to make your paper tray selection within the application d From the Paper Setup tab make sure the Paper Type is set to Automatic if you want the paper type to be detected automatically or to the paper type for your document e Click OK f Click OK or Print ...

Страница 14: ...on A4 or letter size paper This paper tray does not have a paper type sensor so you will need to select a paper type in the printer software To print a document from this tray 1 Load the paper with the print side facing you against the right side of the paper tray ...

Страница 15: ...mple A4 and letter size paper should extend beyond the top of paper tray 2 3 Make sure the paper tray 2 button is selected 4 Follow these steps to open the printer software and print your document a With your document open click File Print Properties or Preferences b From the Quality Speed tab select a print quality c From the Paper Setup tab make sure Paper Source is set to Printer Setting or Tra...

Страница 16: ...13 d Select a paper type Note Some software applications may override your paper tray selection e Click OK f Click OK or Print ...

Страница 17: ...ital photo on a photo card Step 1 Load the paper 1 Load up to 10 photo cards vertically against the right side of paper tray 1 When you load photo cards make sure You carefully read the instructions that came with your cards The print side is facing you You do not push the cards too far into the printer All the cards have the same dimensions ...

Страница 18: ...15 2 Squeeze and slide the paper guide to the left edge of the cards 3 Make sure the paper tray 1 button is selected Paper tray 1 button ...

Страница 19: ...rd slot For help see page 3 Note Insert only one memory card at a time The Memory Card Manager dialog box appears a Select Copy images to hard drive Note Be sure to select this option if you want to save images to a template when your memory card is not inserted b Select Launch FotoSlate ...

Страница 20: ... the left pane 2 From the toolbar click Add Page 3 Select a template for your photo If you are printing on a 4x6 photo card select Sheet 4x6 Portrait 4 Click OK 5 Left click and drag the photo that you want to print into the template 6 If you like you can edit your photo in the template Note Your editing changes will be saved to the template only not to the original photo a Click Adjust on the too...

Страница 21: ...ing changes are saved to the template only not to the original photo Note You can find more information on editing your photos in the FotoSlate Help or the FotoSlate User Guide Step 3 Print your photo 1 When you are ready to print your photo click File Print Properties or Preferences 2 From the I Want To menu click Print a photograph I Want To menu ...

Страница 22: ...y 1 Front 6 From Print Properties click OK 7 From the Print screen click OK or Print 8 To prevent smudging remove each photo as it exits the printer and let it dry completely before stacking Designing pages for a photo album Step 1 Select photos for your album 1 Access your photos To access photos from a memory card see page 16 2 If you want access more images using FotoSlate a From the toolbar cl...

Страница 23: ...mplate a Select a page type from the Folder tree in the left pane Choose an Album page to display your photos in a photo album Choose a Sheet page to maximize the printed area Choose a template with a text box if you plan to add text to your template b Select a template from those shown in the right pane c Click OK The template now appears in the right pane of the main window 3 Repeat the steps ab...

Страница 24: ...lick an image on a page and drag it to an image box on another page If the new image box already contains an image the two images switch positions Step 6 Save your layout 1 Click File Save Layout As 2 Name your layout and designate a folder for it 3 Click Save Step 7 Print your layout For help see page 18 Creating a custom template 1 Click Designer on the toolbar The FotoSlate Template Designer sc...

Страница 25: ...ct Use Content c Click Define Content and then type the desired text in the Enter Text dialog box d Click OK e Click OK again 4 Save your template a Click Save b In the Save As Template dialog box enter a name for your template c Click OK 5 Close the Template Designer dialog box Printing multiple images on one sheet 1 Click an image in the left pane ...

Страница 26: ...ne image select Create one page per image To fill your template with different images select Fill pages with multiple images Then add other images to your template For help see Step 3 Add photos to your templates on page 20 6 Click OK Cropping photos 1 Double click a photo in your layout The photo opens in the Image Editor 2 Click Crop from the toolbar An editing window appears over the photo ...

Страница 27: ...ios on the editing window and then select from the available size ratios 4 Click OK The editing window turns into a dashed box 5 Click Accept from the toolbar Personalizing fabric with pictures 1 Open a photo in your photo application For help see Step 2 Access your photo on page 16 2 Load up to 25 iron on transfers into paper tray 1 with the blank side facing you ...

Страница 28: ... screen select a paper size and then click OK 9 From the Print Style tab select Mirror 10 From the Paper Setup tab under Specialty Paper select Iron On Transfer 11 From the Paper Setup tab make sure Paper Source is set to Printer Setting or Tray 1 Front 12 From Print Properties click OK 13 From the Print screen click OK or Print 14 To prevent smudging remove each iron on transfer as it exits the p...

Страница 29: ... an electrical outlet Are both your printer and computer on Is your USB cable securely attached at both ends Did you remove the sticker and transparent tape from the back and bottom of both print cartridges Is the black cartridge P N 82 in the left carrier and the color cartridge P N 83 or 88 in the right carrier Is the paper loaded correctly Make sure you do not push the paper too far into the pr...

Страница 30: ... test page a Open the Lexmark Z65 Solution Center see page 7 b From the Troubleshooting tab click Print a test page If the test page prints the problem may be with your external devices not your printer Check the documentation that came with your external devices for help If the test page does not print refer to the printer software Help see page 7 for further troubleshooting information For addit...

Страница 31: ...rized changes or modifications to this equipment Unauthorized changes or modifications could void the user s authority to operate this equipment Note To assure compliance with FCC regulations on electromagnetic interference for a Class B computing device use a properly shielded and grounded cable such as Lexmark part number 1329605 for parallel attach or 12A2405 for USB attach Use of a substitute ...

Страница 32: ...ficientproducts and to reduce air pollution caused by power generation Companies participating in this program introduce products that power down when they are not being used This feature will cut the energy used by up to 50 percent Lexmark is proud to be a participant in this program As an ENERGY STAR Partner Lexmark International Inc has determined that this product meets the ENERGY STAR guideli...

Страница 33: ...esignated location You are responsible for loss of or damage to a product in transit to the Remarketer or the designated location When warranty service involves the exchange of a product or part the item replaced becomes the property of the Remarketer or Lexmark The replacement may be a new or repaired item The replacement item assumes the remaining warranty period of the original product Replacem...

Страница 34: ... to the amount you paid for the product that caused the damages This limitation of liability will not apply to claims by you for bodily injury or damage to real property or tangible personal property for which Lexmark is legally liable IN NO EVENT WILL LEXMARK BE LIABLE FOR ANY LOST PROFITS LOST SAVINGS INCIDENTAL DAMAGE OR OTHER ECONOMIC OR CONSEQUENTIAL DAMAGES This is true even if you advise Le...

Страница 35: ...sign are trademarks of Lexmark International Inc registered in the United States and or other countries Photo Jetprinter is a trademark of Lexmark International Inc October 2002 Lexmark International Inc 740 West New Circle Road Lexington Kentucky 40550 ...

Отзывы: