•
Keep the printer:
–
Clean, dry, and free of dust.
–
Away from stray staples and paper clips.
–
Away from the direct airflow of air conditioners, heaters, or ventilators.
–
Free from direct sunlight and humidity extremes.
•
Observe the recommended temperatures and avoid fluctuations:
Ambient temperature 10 to 32.2°C (50 to 90°F)
Storage temperature
-40 to 43.3°C (-40 to 110°F)
•
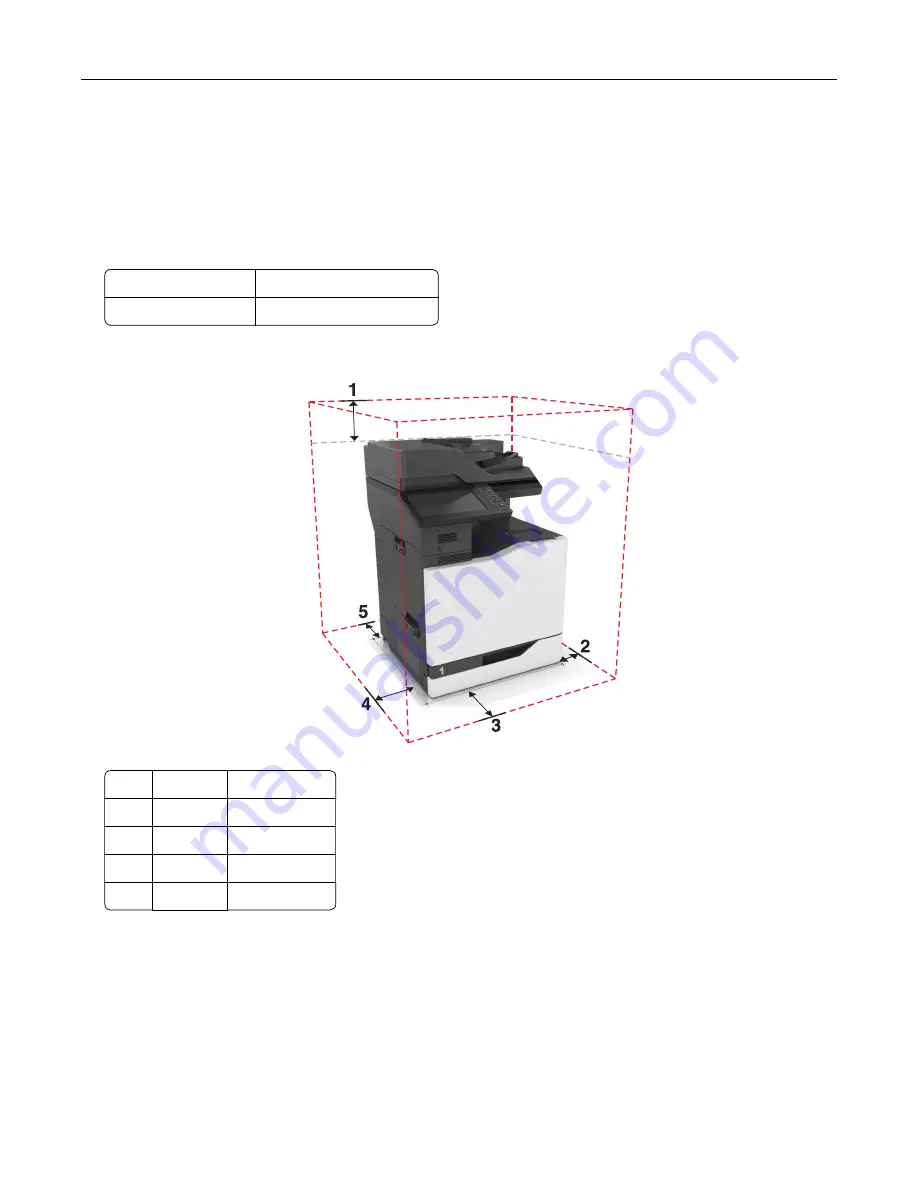
Allow the following recommended amount of space around the printer for proper ventilation:
1
Top
330 mm (13 in.)
2
Right side 152 mm (6 in.)
3
Front
381 mm (15 in.)
4
Left side
457 mm (18 in.)
5
Rear
203 mm (8 in.)
Printer configurations
Note:
Make sure to configure the printer on a flat, sturdy, and stable surface.
Learning about the printer
12
Содержание XC8155
Страница 66: ...5 Touch Scan Here If necessary change the scan settings 6 Scan the document Scanning 66 ...
Страница 159: ... Scanner glass pad 3 Close the scanner cover Emptying the hole punch box 1 Open door J Maintaining the printer 159 ...
Страница 160: ...2 Remove and empty the hole punch box 3 Insert the hole punch box 4 Close door J Maintaining the printer 160 ...
Страница 170: ...2 Remove the waste toner bottle 3 Remove the imaging unit 4 Remove the photoconductor unit Maintaining the printer 170 ...
Страница 172: ...Replacing an imaging unit 1 Open door A 2 Remove the waste toner bottle Maintaining the printer 172 ...
Страница 176: ...3 Remove the pick roller 4 Unpack the new pick roller Maintaining the printer 176 ...
Страница 186: ...4 Insert the new transfer roller 5 Remove the white packing material 6 Close door B Maintaining the printer 186 ...
Страница 193: ...2 Open door G 3 Remove the staple cartridge 4 Unpack the new staple cartridge Maintaining the printer 193 ...
Страница 195: ...2 Open door G 3 Pull out the staple cartridge holder Maintaining the printer 195 ...
Страница 218: ...2 Open door G 3 Pull out the staple cartridge holder Clearing jams 218 ...
Страница 222: ... Area J1 Areas J3 and J4 Areas J5 and J6 3 Close door J Clearing jams 222 ...
Страница 227: ...5 Insert the staple cartridge holder 6 Close door J Clearing jams 227 ...
Страница 284: ...Installing the staple finisher 1 Turn off the printer 2 Open door C 3 Remove the paper bail Upgrading and migrating 284 ...
Страница 287: ...4 Open the covers at the side of the caster base 5 Open door C Upgrading and migrating 287 ...


