•
Keep the printer:
–
Clean, dry, and free of dust.
–
Away from stray staples and paper clips.
–
Away from the direct airflow of air conditioners, heaters, or ventilators.
–
Free from direct sunlight and humidity extremes.
•
Observe the recommended temperatures and avoid fluctuations:
Ambient temperature 10 to 32.2°C (50 to 90°F)
Storage temperature
-40 to 40°C (-40 to 104°F)
•
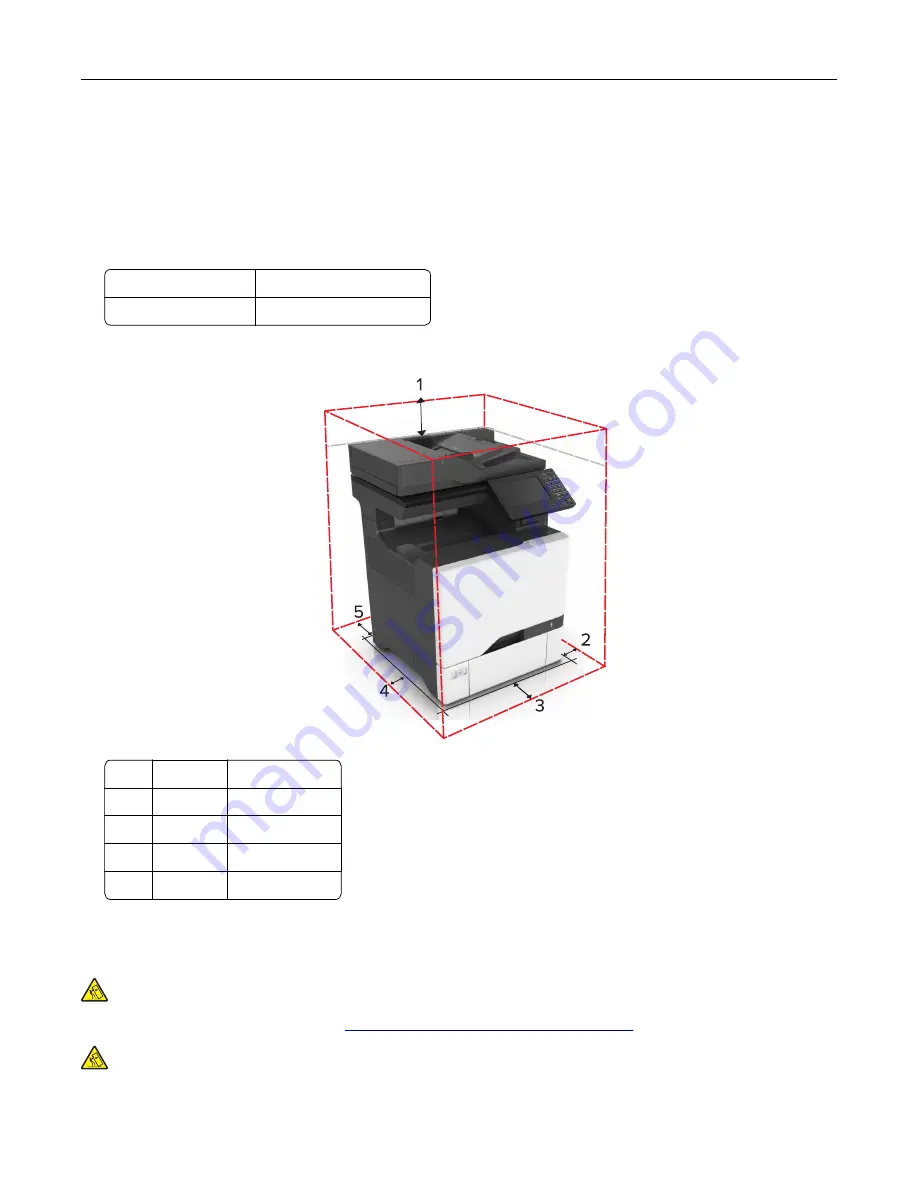
Allow the following recommended amount of space around the printer for proper ventilation:
1
Top
229 mm (9 in.)
2
Right side 178 mm (7 in.)
3
Front
508 mm (20 in.)
4
Left side
127 mm (5 in.)
5
Rear
101.6 mm (4 in.)
Printer configurations
CAUTION—TIPPING HAZARD:
Installing one or more options on your printer or MFP may require a
caster base, furniture, or other feature to prevent instability causing possible injury. For more information
on supported configurations, see
www.lexmark.com/multifunctionprinters
.
CAUTION—TIPPING HAZARD:
To reduce the risk of equipment instability, load each tray separately.
Keep all other trays closed until needed.
You can configure your printer by adding three optional 550
‑
sheet trays.
Learning about the printer
12
Содержание XC4140
Страница 60: ...5 Touch Scan Here If necessary change the scan settings 6 Scan the document Scanning 60 ...
Страница 154: ...4 Insert the new toner cartridge 5 Close door B Replacing the imaging unit 1 Open door B Maintaining the printer 154 ...
Страница 155: ...2 Remove the waste toner bottle 3 Remove the imaging kit Maintaining the printer 155 ...
Страница 157: ...8 Insert the black toner cartridge 9 Insert the imaging kit Maintaining the printer 157 ...
Страница 158: ...10 Insert the waste toner bottle 11 Close door B Replacing the imaging kit 1 Open door B Maintaining the printer 158 ...
Страница 159: ...2 Remove the waste toner bottle 3 Remove the imaging kit Maintaining the printer 159 ...
Страница 161: ...8 Insert the toner cartridges 9 Insert the new imaging kit Maintaining the printer 161 ...
Страница 173: ...4 Insert the new ADF separator roller until it clicks into place 5 Close door E Maintaining the printer 173 ...
Страница 187: ...2 Remove the jammed paper Note Make sure that all paper fragments are removed Clearing jams 187 ...
Страница 189: ...2 Open the duplex cover 3 Remove the jammed paper Note Make sure that all paper fragments are removed Clearing jams 189 ...
Страница 190: ...4 Close the duplex cover and door A Clearing jams 190 ...
Страница 236: ...4 Insert the memory card until it clicks into place Upgrading and migrating 236 ...
Страница 239: ...5 ISP extended cable 4 Install the ISP into its housing Upgrading and migrating 239 ...
Страница 240: ...5 Attach the housing to the controller board access cover Upgrading and migrating 240 ...
Страница 246: ...5 Open door B 6 Open door C Upgrading and migrating 246 ...


