background image

Maintaining the printer

Cleaning the exterior of the printer

1

Make sure that the printer is turned off and unplugged from the wall outlet.

CAUTION—SHOCK HAZARD: To avoid the risk of electric shock when cleaning the exterior of the printer,

unplug the power cord from the wall outlet and disconnect all cables to the printer before proceeding.

2

Remove all paper from the printer.

3

Dampen a clean, lint-free cloth with water.

Warning—Potential Damage: Do not use household cleaners or detergents, as they may damage the finish of the

printer.

4

Wipe only the outside of the printer.

Warning—Potential Damage: Using a damp cloth to clean the interior may cause damage to your printer.

5

Make sure all areas of the printer are dry before beginning a new print job.

Cleaning the scanner glass

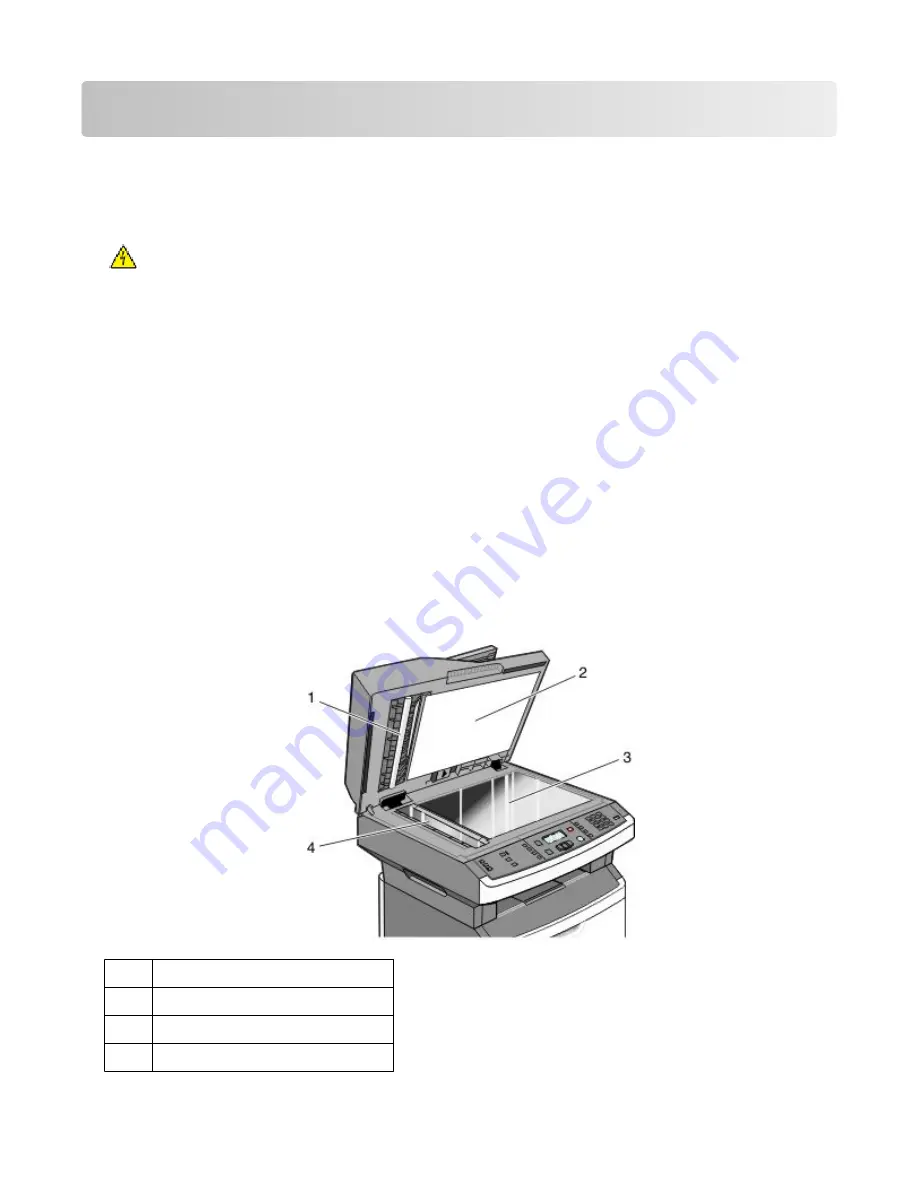
If you encounter print quality problems, such as streaks on copied or scanned images, clean the areas shown.

1

Slightly dampen a soft, lint-free cloth or paper towel with water.

2

Open the scanner cover.

1

White underside of the ADF cover

2

White underside of the scanner cover

3

Scanner glass

4

ADF glass

Maintaining the printer

3

Содержание X264

Страница 1: ...Lexmark X264dn X363dn X364dn and X364dw Maintenance Guide September 2009 www lexmark com...

Страница 2: ...supplies 5 Checking the status of supplies from a network computer 5 Moving the printer to another location 6 Shipping the printer 6 Ordering supplies 7 Ordering toner cartridges 7 Ordering a photoco...

Страница 3: ...use household cleaners or detergents as they may damage the finish of the printer 4 Wipe only the outside of the printer Warning Potential Damage Using a damp cloth to clean the interior may cause da...

Страница 4: ...parator rollers After you have copied over 50 000 copies using the ADF clean the ADF separator rollers 1 Open the ADF cover 2 Unlock the separator roll 3 Remove the separator roll 4 Use a clean lint f...

Страница 5: ...pplies right side up in their original packing until you are ready to use them Do not expose supplies to Direct sunlight Temperatures above 35 C 95 F High humidity above 80 Salty air Corrosive gases H...

Страница 6: ...the wall outlet Disconnect all cords and cables from the printer before moving it Use the handholds located on both sides of the printer to lift it Make sure your fingers are not under the printer wh...

Страница 7: ...g toner cartridges When 88 Cartridge Low appears or when the print becomes faded 1 Remove the toner cartridge 2 Firmly shake the cartridge side to side and front to back several times to redistribute...

Страница 8: ...when you experience faded print remove the toner cartridge Firmly shake it side to side and front to back several times to redistribute the toner and then reinsert it and continue printing When shaki...

Страница 9: ...n on the base of the photoconductor kit and then pull the toner cartridge out using the handle 3 Unpack the new toner cartridge 4 Shake the cartridge in all directions to distribute the toner Maintain...

Страница 10: ...he photoconductor kit reaches a page maximum by showing 84 PC Kit life warning or 84 Replace PC Kit on the display You can also see the status of the photoconductor kit by printing a menu settings pag...

Страница 11: ...ering the front door 2 Pull the photoconductor kit and toner cartridge out of the printer as a unit by pulling on the toner cartridge handle 3 Place the unit on a flat clean surface 4 Press the button...

Страница 12: ...time Extended light exposure can cause print quality problems 6 Insert the toner cartridge into the photoconductor kit by aligning the rollers on the toner cartridge with the tracks Push the toner car...

Страница 13: ...eset the counter see the instruction sheet that came with the new photoconductor kit Warning Potential Damage Resetting the photoconductor counter without replacing the photoconductor may damage your...

Отзывы: