Lexmark Prospect Pro205 Скачать руководство пользователя страница 2

Important Message About Cartridge Recycling!

Please Read Before Opening Your Inkjet Cartridge Box

At Lexmark, we take our commitment to the environment seriously, and we encourage our customers to participate in our easy, no-cost method
for returning empty Lexmark cartridges to Lexmark for proper recycling. We will insure that cartridges are properly handled with zero waste to
landfills.

Go to 

www.lexmark.com/recycle

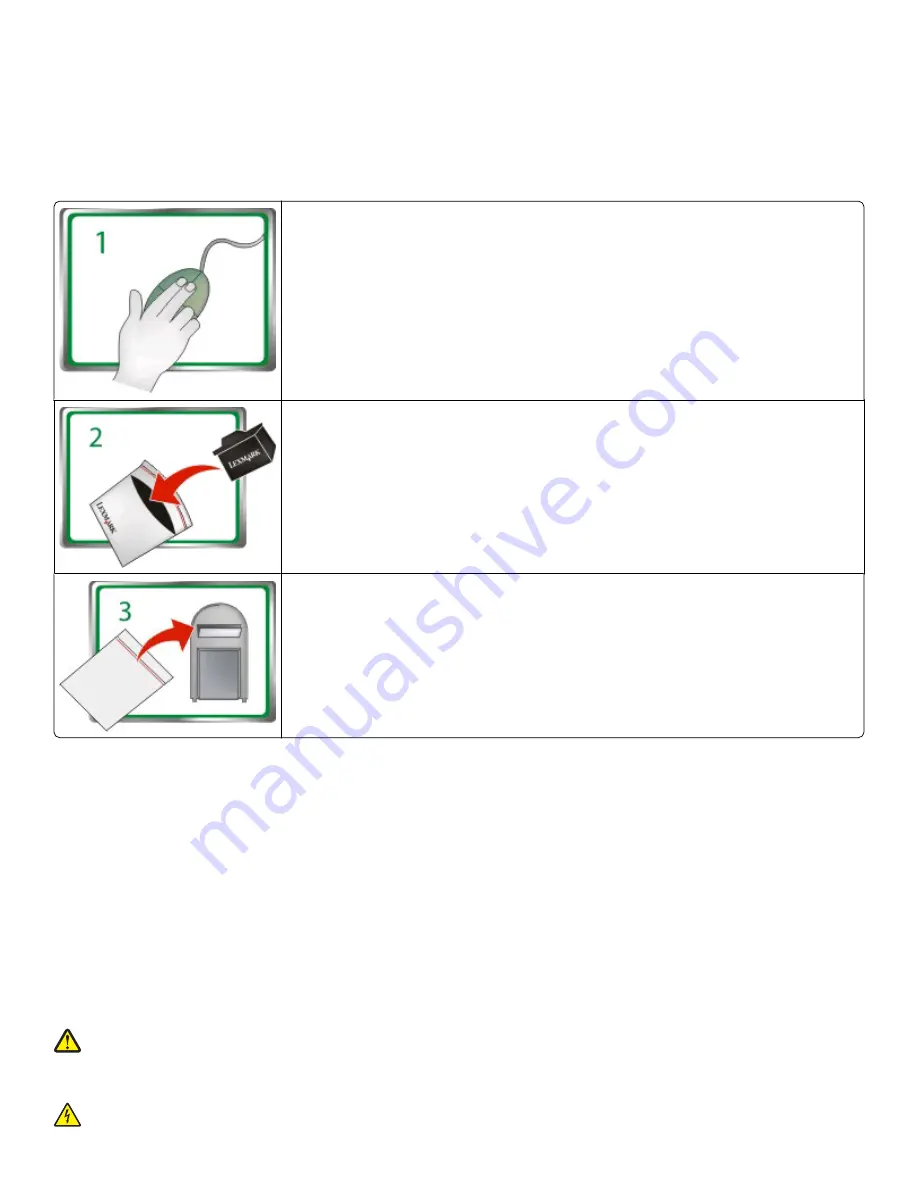
. Follow instructions to request postage-paid bags. Bags usually arrive

within 7–10 days.

Place the empty Lexmark-branded inkjet cartridge(s) in the postage-paid return bag, and then seal the bag.
If you’re sending single-color tanks, we recommend that you send at least two at a time to maximize the
environmental benefits.

Mail the bag to Lexmark’s recycling partner. The bag is pre-addressed.

Visit 

www.lexmark.com/recycle

 to learn more about recycling.

Lexmark-branded cartridges are always made with all new parts, though components may contain recycled material. For warranty returns, call
1-800-332-4120.

This patented printer is licensed for, and designed to work with, only genuine Lexmark inkjet cartridges for the life of the patented printer. You
agree to: (1) use only genuine Lexmark inkjet cartridges with this printer except as otherwise provided below, and (2) pass this license/agreement
to any subsequent user of this printer. The patented Lexmark inkjet cartridges and their contents are licensed subject to a restriction that they may
be used only once. After this single use, the license to use the print cartridges and their contents terminates, and you agree to return them only to
Lexmark for recycling. Replacement inkjet cartridge(s) sold without these terms are available through 

www.lexmark.com

 and may be refilled by

you, or a third party, as the only cartridge alternative to be used with the licensed printer.

Important safety information

Connect the power cord to a properly grounded electrical outlet that is near the product and easily accessible.

Do not place or use this product near water or wet locations.

Use only the power supply and power cord provided with this product or the manufacturer's authorized replacements.

Use only the telecommunications (RJ-11) cord provided with this product or a 26 AWG or larger replacement when connecting this product to the
public switched telephone network.

CAUTION—POTENTIAL INJURY: 

 Do not cut, twist, bind, crush, or place heavy objects on the power cord. Do not subject the power cord to

abrasion or stress. Do not pinch the power cord between objects such as furniture and walls. If any of these things happen, a risk of fire or
electrical shock results. Inspect the power cord regularly for signs of such problems. Remove the power cord from the electrical outlet before
inspecting it.

CAUTION—SHOCK HAZARD: 

Do not use the fax feature during a lightning storm. Do not set up this product or make any electrical or cabling

connections, such as the fax feature, power cord, or telephone, during a lightning storm.

Содержание Prospect Pro205

Страница 1: ...Lexmark Prospect Pro200 Series Quick Reference Guide April 2009 www lexmark com...

Страница 2: ...and their contents are licensed subject to a restriction that they may be used only once After this single use the license to use the print cartridges and their contents terminates and you agree to r...

Страница 3: ...es 15 Maintaining ink cartridges 16 Using the printer software 18 Minimum system requirements 18 Installing the printer software 18 Using the Windows printer software 19 Using the Macintosh printer so...

Страница 4: ...g to a local or network computer 28 Scanning to a flash drive or memory card 29 Scanning directly to e mail using the printer software 29 Scanning to a PDF 30 Canceling scan jobs 30 Troubleshooting 31...

Страница 5: ...e click User s Guide Help using the printer software Software Help installed automatically with the printer software 1 Click Help from any printer software program or application The latest supplement...

Страница 6: ...ication or flash drive for presentation Use recycled paper Conserving ink Use Quick Print or Draft Mode These modes can be used to print documents using less ink than normal and are ideal for printing...

Страница 7: ...color faxing at 33 6 Kbps modem speed Other fax features include 99 speed dials automatic redial junk fax blocking and caller ID Photo printing Print photos directly from digital memory cards PictBri...

Страница 8: ...rom the ADF 11 ADF tray Load original documents in the ADF Recommended for scanning copying or faxing multiple page documents Note Donot load postcards photos smallitems or thin media suchas magazinec...

Страница 9: ...NE Port Connect the printer to an active telephone line through a standard wall jack DSL filter or VoIP adapter to send and receive faxes 7 USB port Connect the printer to a computer using a USB cable...

Страница 10: ...ton Access the fax menu and send faxes 5 Photo button Access the photo menu and print photos 6 Back button Return to the previous screen Exit from one menu level to a higher one 7 Select button Select...

Страница 11: ...umber manually using the keypad before sending the fax 4 Color Black Switch to color mode or black and white mode 5 Start button Start a print scan or copy job depending on which mode is selected 6 2...

Страница 12: ...r the flash drive from the computer and insert it directly into the printer 1 Insert a memory card into the card slot or a flash drive into the USB port Inserting a memory card Inserting a flash drive...

Страница 13: ...to use Supported memory cards and file types Memory Card File Type Secure Digital SD Micro Secure Digital with adapter Micro SD Mini Secure Digital with adapter Mini SD MultiMedia Card MMC Reduced Si...

Страница 14: ...icensed for a single use only After use return this cartridge to Lexmark for remanufacturing refilling or recycling 2 Available only on the Lexmark Web site at www lexmark com Lexmark Pro208 models It...

Страница 15: ...rn on your printer 2 Open the printer Note The printhead moves to the cartridge installation position 3 Press the release tab and then remove the used ink cartridge or cartridges 4 Install each ink ca...

Страница 16: ...ts Note Do not remove the alignment page until printing is finished Using the printer software For Windows users 1 Load plain paper 2 Click or Start 3 Click All Programs or Programs and then select th...

Страница 17: ...panel press 2 Press the up or down arrow button to scroll to Maintenance and then press 3 Press the up or down arrow button to scroll to Clean Printhead or Deep Clean Printhead and then press A cleani...

Страница 18: ...e but need to reinstall the software then uninstall the current software first For Windows users 1 Close all open software programs 2 Insert the installation software CD If the Welcome screen does not...

Страница 19: ...einstallationsoftware andthenselectInstallAdditionalSoftware from theSoftwareAlreadyInstalledscreen Printer software Use the To LexmarkTM Printer Home referred to as Printer Home Launch applications o...

Страница 20: ...s wireless capability Lexmark Service Center referred to as Service Center Troubleshoot the printer Access the printer maintenance functions Contact technical support Notes This program is installed a...

Страница 21: ...All In One Center referred to as All In One Center Scan photos and documents Customize settings for scan jobs Lexmark Fax Setup Utility referred to as Fax Setup Utility Customize settings for fax jobs...

Страница 22: ...to print the type of paper to use and how the pages should print e Click Print Printing on both sides of the paper duplexing automatically The automatic duplex unit available only on selected printer...

Страница 23: ...t 4 From the Two Sided menu select Long edge binding or Short edge binding For Long edged binding pages are bound along the long edge of the page left edge for portrait top edge for landscape Note Lon...

Страница 24: ...r settings press the up or down arrow button to scroll to Continue and then press 8 Press the Color Black button to set a color or black and white print When you select color or black only printing th...

Страница 25: ...if the computer requires it Enter the PIN using the keypad To assign a computer name and a PIN to the computer see the Help for the printer software associated with your operating system Canceling pri...

Страница 26: ...ss close the top cover to avoid dark edges on the scanned image Do not load postcards photos small items transparencies photo paper or thin media such as magazine clippings into the ADF Place these it...

Страница 27: ...opy manually Note You cannot make duplex copies on envelopes card stock or photo paper 1 Load paper 2 Load an original document faceup into the ADF or facedown on the scanner glass 3 From the printer...

Страница 28: ...as magazine clippings into the ADF Place these items on the scanner glass Scanning to a local or network computer 1 Load an original document faceup into the ADF or facedown on the scanner glass 2 Fro...

Страница 29: ...file type if you want to scan multiple pages and save them as one file 6 Press to start scanning The scan is complete when a message appears on the printer control panel indicating that the file you...

Страница 30: ...cument faceup into the ADF or facedown on the scanner glass 2 Click or Start 3 Click All Programs or Programs and then select the printer program folder from the list 4 Select Printer Home 5 Choose yo...

Страница 31: ...the Service Center to solve printer problems The Service Center provides step by step troubleshooting help and contains links to printer maintenance tasks and customer support To open the Service Cent...

Страница 32: ...the arrow buttons to scroll to Set Defaults and then press 4 Press the arrow buttons to scroll to Use Factory and then press 5 Complete the initial printer setup CHANGE THE LANGUAGE USING A BUTTON COM...

Страница 33: ...and lift the latch 2 Remove the printhead 3 Wipe the printhead contacts using a clean lint free cloth 4 Reinsert the printhead Note If removing and reinserting the printhead does not resolve the erro...

Страница 34: ...he USB port of the computer The USB port is marked with a USB symbol RECONNECT THE PRINTER POWER SUPPLY 1 Turn off the printer and then unplug the power cord from the wall outlet 2 Gently remove the p...

Страница 35: ...E INK CARTRIDGES AND DEEP CLEAN AND ALIGN THE PRINTHEAD 1 Reinstall the ink cartridges see Replacing ink cartridges on page 15 for more information If the cartridges do not seem to fit make sure the p...

Страница 36: ...ot be communicating RESTART THE COMPUTER AND TRY AGAIN Cannot print through USB If the Before you troubleshoot checklist does not solve the problem then try one or more of the following CHECK THE USB...

Страница 37: ...ve User s Guide available on the installation software CD Printing a network setup page A network setup page lists the configuration settings of the printer including the IP address and MAC address of...

Страница 38: ...or service is not intended to state or imply that only that product program or service may be used Any functionally equivalent product program or service that does not infringe any existing intellectu...

Страница 39: ...erference received including interference that may cause undesired operation Any questions on this statement should be directed to Director of Lexmark Technology Services Lexmark International Inc 740...

Отзывы: