background image

Understanding the printer

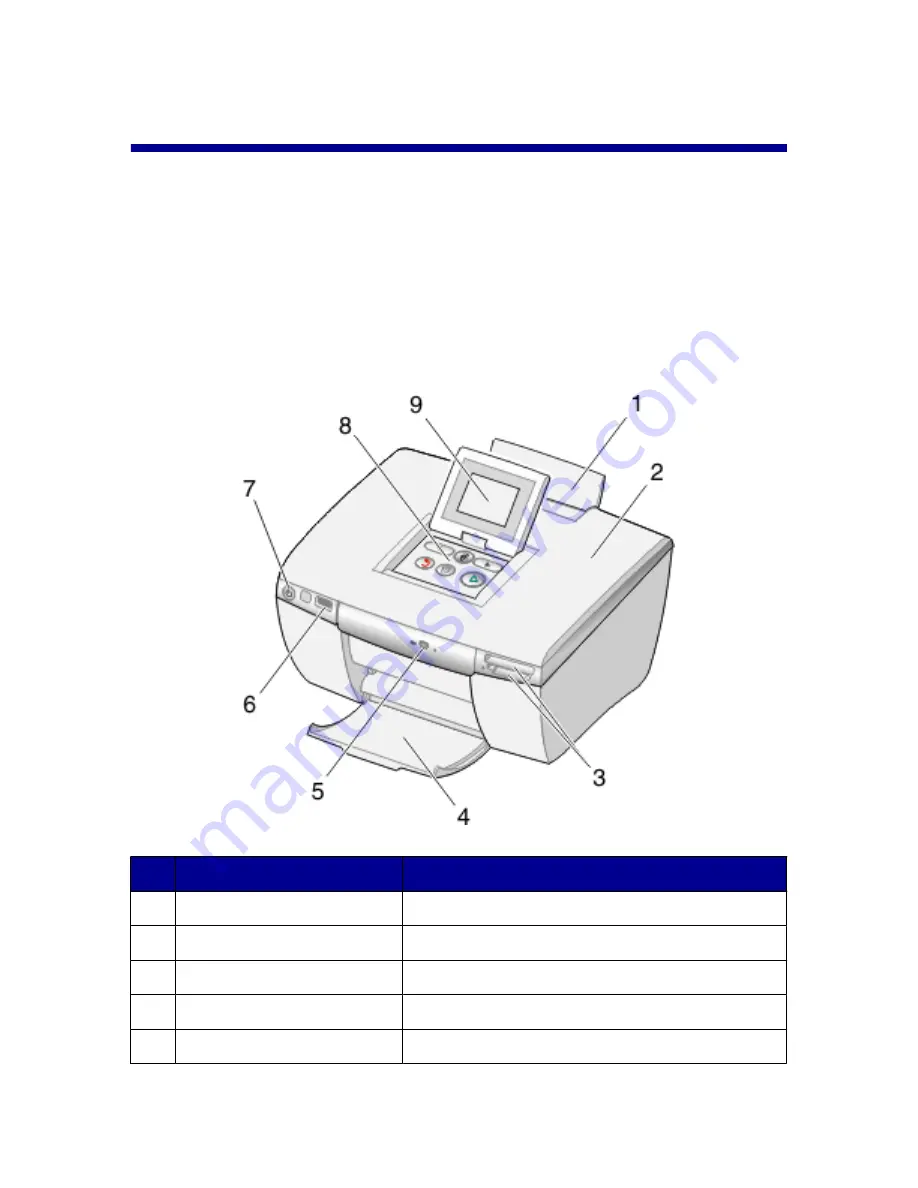
This compact printer is a standalone device that can be used to:

View

Print

Save

photos.

Printer parts

Use the

To

1

Paper support

Load paper.

2

Access cover

Access the print cartridge.

3

Memory card slots

Insert memory cards.

4

Paper exit tray

Stack paper as it exits.

5

CD drive

Insert a CD in the CD drive.


9

Содержание Memory Maker 450 Series

Страница 1: ...w lexmark com Lexmark and Lexmark with diamond design are trademarks of Lexmark International Inc registered in the United States and or other countries 2005 Lexmark International Inc All rights reserved 740 West New Circle Road Lexington Kentucky 40550 ...

Страница 2: ...e Marlow Bucks SL7 3RQ Lexmark may use or distribute any of the information you supply in any way it believes appropriate without incurring any obligation to you You can purchase additional copies of publications related to this product by calling 1 800 553 9727 In the United Kingdom and Eire call 44 0 8704 440 044 In other countries contact your point of purchase References in this publication to...

Страница 3: ...Selecting the paper size 16 Selecting the paper type 16 Getting started printing photos 17 Previewing photos 17 Selecting and printing photos 17 Printing an index page 17 Printing all photos from a photo storage device 19 Printing multiple copies of a photo 19 Changing the print quality 19 Selecting and editing photos 21 Adjusting the print area 21 Adjusting the appearance of photos 22 Using Color...

Страница 4: ... Printing from mobile phones 32 Bluetooth wireless support 32 Using a PictBridge enabled digital camera to control printing photos 34 Printing a DPOF selection 34 Maintaining the printer 36 Maintaining the cartridge 36 Refilling the print cartridge 42 Troubleshooting 43 General troubleshooting 43 Photo storage device troubleshooting 47 Error messages 48 Notices 50 Index 54 4 ...

Страница 5: ...t or make any electrical or cabling connections such as the power cord or telephone during a lightning storm Conventions Note A note identifies something that could help you CAUTION A caution identifies something that could cause you harm Warning A warning identifies something that could damage your product hardware or software Copyright advisory It may be illegal to copy certain materials without...

Страница 6: ...bled digital camera is connected or a camera phone is detected Memory card Insert the card with brand name label facing up If there is an arrow on the card make sure it points toward the printer Insert only one memory card at a time Bluetooth adapters An adapter is not included with the printer Consult the Lexmark Web site at www lexmark com for late breaking information about supported Bluetooth ...

Страница 7: ...tion see the camera or camera phone documentation Follow the instructions provided with your camera or camera phone to operate the printer Finding information about the printer Setup sheet Description Where to find The Setup sheet gives you instructions for setting up hardware You can find this document in the printer box or on the Lexmark Web site User s Guide Description Where to find The User s...

Страница 8: ...o to the Web site 2 Select a language from the drop down list in the upper right corner of the page 3 Select the link for the information you need Record the following information located on the store receipt and the back of the printer and have it ready when you contact us so that we may serve you faster Machine Type number Serial number Date purchased Store where purchased 8 ...

Страница 9: ...evice that can be used to View Print Save photos Printer parts Use the To 1 Paper support Load paper 2 Access cover Access the print cartridge 3 Memory card slots Insert memory cards 4 Paper exit tray Stack paper as it exits 5 CD drive Insert a CD in the CD drive 9 ...

Страница 10: ...er the printer is idle for five minutes the ink level screen appears 8 Control panel Operate the printer Before attempting to use the control panel be sure on the front of the printer is on 9 Display Raise the display to access the control panel buttons Adjust the angle of the screen for viewing View menus settings messages and photos Use the buttons on the control panel to select options 10 ...

Страница 11: ...o cable 3 Bluetooth port Connect a Bluetooth adapter only to the printer Using the control panel If you want to print a photo while using the control panel a photo storage device must be inserted in or connected to the printer Note The availability of some of these functions depends on your place within the menu you have selected 11 ...

Страница 12: ...en available Return Return to the previous or beginning screen Note This button has no effect when you are on the opening screen of a menu Edit Edit photos such as cropping enhancing the image and removing red eye Change the number of copies Note This button has no effect when you are on the opening screen of a menu Start Print Start printing Start a slideshow Start copying to a CD or USB flash dr...

Страница 13: ...nd options and perform maintenance tasks 2 Print All Index Print all photos or an index page 3 View Print Select edit and print photos 4 Save Copy Copy photos onto a CD or USB flash drive 5 Slide Show View a photo slide show on the display or TV screen 3 Press 4 Press 5 Press or until the option you want appears 6 Press 7 Follow the instructions on the display 13 ...

Страница 14: ... Power Save Clear Settings Restore Defaults Bluetooth Mode Video Output Format 1 Insert a memory card CD or USB flash drive connect a PictBridge enabled digital camera or make sure a Bluetooth adapter is attached 2 Press or until Setup appears 3 Press or until the option you want appears 4 Press 5 Follow the instructions on the display 14 ...

Страница 15: ... Premium Photo Using supported paper types 4 x 6 in A6 10 x 15 cm L Hagaki Before loading paper Make sure The paper is not used or damaged You do not force paper into the printer Do not attempt to overload the paper support Loading paper 1 Move the paper guide located inside the paper support to the left 2 Place the paper against the right side of the paper support 15 ...

Страница 16: ... Press or until Paper Size appears 4 Press 5 Press or until the paper size you want appears 6 Press Selecting the paper type 1 From the main screen press or until Setup appears 2 Press 3 Press or until Paper Type appears 4 Press 5 Press or until the paper type you want appears 6 Press 16 ...

Страница 17: ...ress 5 Press or to view the photos 6 Press to return to the previous display Selecting and printing photos You can select specific photos to print from a photo storage device 1 Insert a memory card CD or USB flash drive 2 Press or until View Print appears 3 Press twice 4 Press or to browse the photos 5 Press to select a photo You can select multiple photos before you press to print them Printing a...

Страница 18: ... contains a DPOF file 1 Insert a memory card CD or USB flash drive 2 Press until Print All Index appears 3 Press If there is no DPOF information on the photo storage device the following message appears on the display Would you like to print one photo per page or an index page with thumbnails 4 Press to choose Index Page 5 Press 6 Press to begin printing 18 ...

Страница 19: ... copies of each image 1 Insert a memory card CD or USB flash drive 2 Press or until View Print appears 3 Press 4 Press or to browse the photos 5 Press to select a photo 6 Press 7 Press or until Copies appears 8 Press 9 Press or to change the number of copies 10 Press 11 Press You can select multiple photos and adjust the number of copies for each photo before you press to print them Changing the p...

Страница 20: ...3 Press or until Print Quality appears 4 Press 5 Press or until the quality you want appears 6 Press 7 Press to return to the previous display 20 ...

Страница 21: ...on your prints They are not saved to the original image file To save your changes copy the photo from your camera card to a writable photo storage device such as a CD or USB flash drive once changes have been made Adjusting the print area You can adjust the area of your finished prints Notes Make sure a photo storage device is inserted in the printer For more information see Using photo storage de...

Страница 22: ...print area appears as you want it 12 Press 13 Press Note You can edit more photos before printing Adjusting the appearance of photos You can adjust the appearance of your photos to remove red eye change brightness and make other changes before printing 1 Insert a memory card CD or USB flash drive 2 Press or until View Print appears 3 Press twice 4 Press or repeatedly until the photo you want to ad...

Страница 23: ...l View Print appears 3 Press twice 4 Press or repeatedly until the photo you want to adjust appears 5 Press 6 Press 7 Press or until Image Enhance appears 8 Press 9 Press or until On Off or Manual appears If you select Manual press or to move the slider and adjust the brightness 10 Press 11 Press to return to the previous display 12 Press to print your photos Removing Red Eye 1 Insert a memory car...

Страница 24: ... Antique Gray or black and white B W Note This setting remains in effect only for the current printing process 1 Insert a memory card CD or USB flash drive 2 Press or until View Print appears 3 Press twice 4 Press or repeatedly until the photo you want to adjust appears 5 Press to choose a photo 6 Press 7 Press until Color Effects appears 8 Press 9 Press or until the option you want appears Off B ...

Страница 25: ...11 Press to return to the previous display 12 Press to begin printing Note You can select and edit more photos before printing 25 ...

Страница 26: ...gin the slide show Press to pause to continue to select a photo to rotate Note When you have completed viewing the slide show return to the View Print menu to print any selected photos or go to the Save Copy menu to copy the selected photos to the USB flash drive or to the CD Video output The printer lets you view the photo slide show on the printer display on your TV screen To connect a TV to the...

Страница 27: ...photos on page 17 Note The printer will not read a memory card if a second memory card is inserted or if a PictBridge enabled digital camera is connected Inserting a memory card 1 Locate the memory card slots on the right front of the printer 2 Insert a memory card into the appropriate slot Insert the card with the brand name label facing up If there is an arrow on the card make sure it points tow...

Страница 28: ...n quickly Bottom slot with adapter xD Picture Card Memory Stick Duo Mini SD RS MMC TransFlash Note Be sure to connect the memory card to the adapter that came with it before inserting it in the slot 3 Wait for a small light on the card reader to come on The light blinks to indicate the memory card is being read or is transmitting data If the printer does not read the memory card remove and reinser...

Страница 29: ...orage device at a time 2 Wait for the light on the printer to come on The light blinks to indicate the flash drive is being read or is transmitting data Copying photos to the USB flash drive 1 Insert a USB flash drive 2 Insert a memory card or CD 3 Press or until Save Copy appears Note If you edit photos before copying to the USB flash drive the changes are saved with the photo 4 Press 5 Press or ...

Страница 30: ... CD save photos to a CD and view photos stored on a CD You can use a CD as a source for a slide show Your printer has been designed to work with standard high quality CD R media Look for the following symbol when purchasing CDs for use with this printer Inserting a CD into the CD drive 1 Press the button on the front of the CD drive to open it 2 Insert a CD 3 Gently push the CD drawer toward the p...

Страница 31: ... before copying to the CD the changes are saved with the photo 5 Press 6 Press 7 Press or to choose Copy All Photos or Select Photos 8 Press Ready to Copy appears 9 Press The photos are copied to the CD 10 Press or to choose Copy to Another or Finished 11 Press twice 12 Press Print an index page to store with your CD For more information see Printing an index page on page 17 31 ...

Страница 32: ...This Mobile Printing Ready product is designed to provide easy printing from mobile phones This product follows Mobile Imaging and Printing Consortium MIPC Implementation Guidelines for Home Printing with Terminals Version 1 0 for Bluetooth PictBridge and memory cards See the documentation that came with your mobile phone for printing instructions Bluetooth wireless support Insert a USB Bluetooth ...

Страница 33: ...Press 7 Press to exit the Setup menu Locating the Device Name and Universally Administered Address UAA This option lets you view the Device Name and UAA number automatically assigned for Bluetooth devices You may do this to determine the factory assigned name or UAA number to assign to it for your mobile phone or personal digital assistant PDA Some mobile devices display the UAA number instead of ...

Страница 34: ...ntation 3 Follow the instructions in the camera documentation to select and print photos Printing a DPOF selection Digital Print Order Format DPOF is a feature available on some digital cameras and camera phones If your digital camera supports DPOF you can specify which photos to print and how many of each while the memory card is still in the camera The printer recognizes these settings when you ...

Страница 35: ...oto storage device For more information see Inserting a memory card on page 27 If a DPOF file is found on the memory card the message Print All or Print DPOF appears 4 Press 5 Press or until Print DPOF appears 6 Press 7 Press 35 ...

Страница 36: ...m the control panel on page 39 Print Test Page for more information see Printing a test page on page 41 Maintaining the cartridge Checking the ink level 1 From the main screen press or until Setup appears 2 Press 3 Press or until Ink Level appears 4 Press 5 Press to accept Done 6 Press to return to the previous menu Ordering supplies To order supplies or to locate a dealer near you visit our Web s...

Страница 37: ...sure the printer is on 2 Lift the access cover The print cartridge carrier moves and stops at the loading position unless the printer is busy 3 Press down on the cartridge lever to raise the cartridge lid 4 Remove the used print cartridge 37 ...

Страница 38: ...ove the sticker and tape from the back and bottom of the cartridge Warning Do not touch the gold contact area on the back or the metal nozzles on the bottom of the cartridge 2 Insert the cartridge in the carrier 3 Snap the lid closed 38 ...

Страница 39: ...ess 3 Press or until Align Cartridge appears 4 Press 5 Press to accept Align 6 Press to accept Done 7 Press to return to the previous menu If you aligned the cartridge to improve print quality print your photo again If print quality has not improved clean the print nozzles For more information see Cleaning the print cartridge from the control panel on page 39 Cleaning the print cartridge from the ...

Страница 40: ...ved continue with the following procedure Wiping the print cartridge nozzles and contacts Wipe the print cartridge nozzles and contacts when you Notice blank or faint areas in the printing Want to improve print quality 1 Remove the print cartridge For more information see Removing a used print cartridge on page 37 2 Dampen a clean lint free cloth with water 3 Gently hold the cloth against the nozz...

Страница 41: ...dge from the control panel on page 39 10 Print the photo again Notes If the print quality does not improve repeat step 3 and step 4 on page 41 up to two more times If print quality is not satisfactory after cleaning replace the print cartridge Printing a test page 1 Press or until Setup appears 2 Press 3 Press until Print Test Page appears 4 Press twice 5 Press to return to the Setup menu Using a ...

Страница 42: ... print cartridges Refilling the print cartridge The warranty does not cover repair of failures or damage caused by a refilled cartridge Lexmark does not recommend use of a refilled cartridge Refilling a cartridge can affect print quality and may cause damage to the printer For best results use Lexmark supplies Recycling Lexmark products To return Lexmark products to Lexmark for recycling 1 Visit o...

Страница 43: ...rinter does not respond on page 44 Poor photo quality on page 45 Poor quality at the edges of the page on page 46 Paper jam on page 46 Paper misfeeds on page 46 Printer does not feed paper on page 46 Power button is not lit 1 Disconnect the power supply cord from the wall outlet and then from the printer 2 Plug the cord all the way into the printer 43 ...

Страница 44: ... the printer but you can change it at any time 1 Press to turn the printer off 2 Press to turn the printer on 3 From the control panel press twice 4 Press 5 Press ten times 6 Press 7 Press or until the language you want appears 8 Press Page does not print or printer does not respond If an error message appears see Error messages on display on page 47 If the Power button light is not on see Power b...

Страница 45: ...ert the print cartridge For more information see Installing a print cartridge on page 38 1 Press to turn the printer off 2 Disconnect the power supply cord from the wall outlet 3 Gently remove the power supply from the printer 4 Push firmly to reconnect the power supply to the printer 5 Reinsert the power supply cord into the wall outlet 6 Press Poor photo quality Examples of poor photo quality in...

Страница 46: ...panel For more information see Selecting the paper size on page 16 Paper jam 1 Press to turn off the printer 2 Firmly grasp the paper and gently pull it out 3 Press to turn the printer back on Paper misfeeds If paper misfeeds or skews or multiple sheets feed or stick together try the following solutions Load a smaller amount of paper into the printer Load paper with the print side facing you Remov...

Страница 47: ...hat the type of memory card you are using can be used in the printer For more information see Inserting a memory card on page 27 See Inserting a memory card on page 27 to determine which slot accommodates your memory card and to see instructions on how to insert it Check that there is no obvious damage to the memory card or slots on the printer Insert only one memory device at a time Disconnect th...

Страница 48: ... the documentation that came with your device to determine whether it is PictBridge enabled Use only the USB cable that came with the camera Remove the memory card from the printer Error messages Start errors on page 48 Run errors on page 48 Start errors The printer was unable to start This includes the following errors 0000 0001 0002 0003 1102 1 Press to turn the printer off 2 Press to turn the p...

Страница 49: ...off 2 Disconnect the power supply cord from the wall outlet 3 Gently remove the power supply from the printer 4 Push firmly to reconnect the power supply to the printer 5 Reinsert the power supply cord into the wall outlet 6 Press Contact Lexmark Customer Support 49 ...

Страница 50: ...ce will not occur in a particular installation If this equipment does cause harmful interference to radio or television reception which can be determined by turning the equipment off and on the user is encouraged to try to correct the interference by one or more of the following measures Reorient or relocate the receiving antenna Increase the separation between the equipment and receiver Connect t...

Страница 51: ...Member States relating to electromagnetic compatibility and safety of electrical equipment designed for use within certain voltage limits A declaration of conformity with the requirements of the directives has been signed by the Director of Manufacturing and Technical Support Lexmark International Inc S A Boigny France This product satisfies the Class B limits of EN 55022 and safety requirements o...

Страница 52: ...products If you have further questions about recycling options visit the Lexmark Web site at www lexmark com for your local sales office phone number Power consumption The following table documents the power consumption characteristics of the product Mode Description Power consumption Printing Product is generating hard copy output 10 W Ready Product is waiting for a print job 7 W Power Saver Prod...

Страница 53: ...e Power Saver Timeout can be modified between 10 minutes and 30 minutes Setting the Power Saver Timeout to a low value reduces energy consumption but may increase the response time of the product Setting the Power Saver Timeout to a high value maintains a fast response but uses more energy Total energy usage It is sometimes helpful to calculate the total product energy usage Since power consumptio...

Страница 54: ...ture 24 control panel 9 display 9 using 11 Copies setting 19 Copy Photos 13 cropping photos 21 D Device Name 32 digital camera cannot print 48 digital camera PictBridge enabled 34 display control panel 9 DPOF settings 34 E emission notices 50 enhancing an image 23 error message 1102 48 error messages troubleshooting 48 F FCC notices 50 finding information 7 publications 7 Web site 8 flash drives s...

Страница 55: ...xit tray 9 paper jam 46 paper misfeeds 46 paper size selecting 16 Paper Size setting 16 paper support 9 Paper Type setting 16 part number cartridge 36 personal digital assistant 32 phone camera 32 photo storage device troubleshooting 47 photos adjusting print area 21 cropping 21 editing 21 previewing 17 printing from PictBridge enabled camera 34 rotating 21 selecting 17 viewing slide show 26 zoomi...

Страница 56: ... information 5 selecting paper size 16 photos 17 print quality 19 selecting paper types 16 Sepia Tone Print 24 Setup 13 Slide Show 13 slide show viewing 26 supplies ordering 36 T Test Page feature 41 test page printing 41 troubleshooting general 43 photo storage device 47 troubleshooting error messages 0000 0003 48 0200 48 1003 48 1102 48 1200 1207 48 2301 48 4301 48 U USB flash drives inserting 2...

Отзывы: