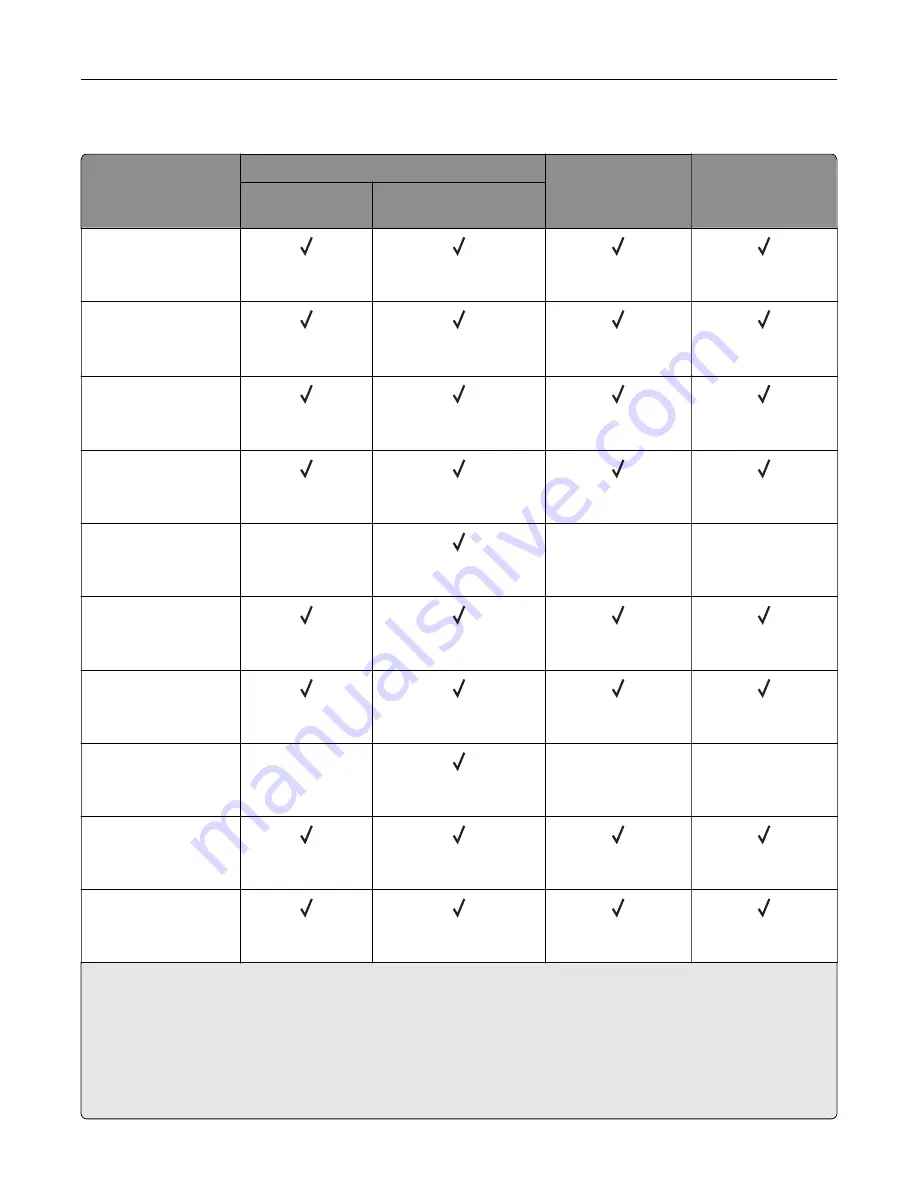
Supported paper sizes
Paper size
650
‑
sheet duo tray
Optional 550
‑
sheet
tray
Two
‑
sided printing
550
‑
sheet tray
100
‑
sheet multipurpose
feeder
A4
210 x 297 mm
(8.27 x 11.7 in.)
A5 landscape
1
210 x 148 mm
(8.27 x 5.83 in.)
A5 portrait
1
148 x 210 mm
(5.83 x 8.27 in.)
A6
105 x 148 mm
(4.13 x 5.83 in.)
Banner
215.9 x 1320.8 mm
(3 x 5 in. to 8.5 x 52 in.)
X
X
X
Executive
184.2 x 266.7 mm
(7.25 x 10.5 in.)
Folio
215.9 x 330.2 mm
(8.5 x 13 in.)
Hagaki
100 x 148 mm
(3.94 x 5.83 in.)
X
X
X
JIS B5
182 x 257 mm
(7.17 x 10.1 in.)
Legal
215.9 x 355.6 mm
(8.5 x 14 in.)
1
Supported in both the portrait and landscape orientations. When fed in portrait orientation, A5 is treated as narrow
paper. When fed in landscape orientation, it is treated as a regular width paper.
2
When Universal is selected, the page is formatted for 215.9 x 355.6 mm (8.5 x 14 in.) unless the size is specified
by the application.
3
Load narrow paper in portrait orientation.
4
When Other Envelope is selected, the page is formatted for 215.9 x 355.6 mm (8.5 x 14 in.) unless the size is
specified by the application.
Learn about the printer
14
Содержание C4342
Страница 46: ...4 Install the ISP into its housing Set up install and configure 46 ...
Страница 47: ...5 Attach the housing to the controller board shield Set up install and configure 47 ...
Страница 48: ...6 Connect the ISP extended cable to the ISP connector in the controller board Set up install and configure 48 ...
Страница 52: ...Set up install and configure 52 ...
Страница 55: ...Set up install and configure 55 ...
Страница 56: ...3 Install the wireless module into its housing Set up install and configure 56 ...
Страница 57: ...4 Attach the wireless module to the controller board shield Set up install and configure 57 ...
Страница 58: ...5 Connect the wireless assembly to the ISP connector in the controller board Set up install and configure 58 ...
Страница 122: ...Replacing parts and supplies Replacing a toner cartridge 1 Open door B Maintain the printer 122 ...
Страница 123: ...2 Remove the used toner cartridge 3 Unpack the new toner cartridge Maintain the printer 123 ...
Страница 124: ...4 Insert the new toner cartridge 5 Close door B Maintain the printer 124 ...
Страница 125: ...Replacing the black imaging unit 1 Open door B Maintain the printer 125 ...
Страница 127: ...3 Remove the toner cartridges Maintain the printer 127 ...
Страница 128: ...4 Disconnect the imaging kit cable Maintain the printer 128 ...
Страница 132: ...9 Insert the imaging kit Maintain the printer 132 ...
Страница 134: ...Replacing the color imaging kit 1 Open door B Maintain the printer 134 ...
Страница 136: ...3 Remove the toner cartridges Maintain the printer 136 ...
Страница 137: ...4 Disconnect the imaging kit cable Maintain the printer 137 ...
Страница 138: ...5 Remove the used imaging kit Maintain the printer 138 ...
Страница 141: ...8 Insert the black imaging unit into the new imaging kit Maintain the printer 141 ...
Страница 142: ...9 Insert the new imaging kit Maintain the printer 142 ...
Страница 144: ...Replacing the waste toner bottle 1 Open door B Maintain the printer 144 ...
Страница 153: ...2 Remove the used separator bracket 3 Unpack the new separator bracket Maintain the printer 153 ...
Страница 200: ...Jam locations 1 Standard bin 2 Door A 3 Trays 4 Multipurpose feeder Troubleshoot a problem 200 ...
Страница 203: ...2 Remove the jammed paper Note Make sure that all paper fragments are removed 3 Open door A1 Troubleshoot a problem 203 ...


