background image

21

DEUTSCH

Lerne deine Gitarre kennen

So wird eine Gitarre gestimmt

Erkunde deine neue Gitarre und lerne die verschiedenen Teile deines Instrumentes mithilfe des Schaubildes 

auf der ersten Seite des Heftes kennen. 

Deine Gitarre hat sechs Saiten: Die drei linken Saiten (gerollter Draht) entsprechen den tiefen Tönen und die 

drei rechten Saiten (Stahl) den hohen Tönen. 

Stellen Sie beim Auspacken des Geräts fest, ob folgende Teile enthalten sind:

1 x Gitarre / 1 x plektron / 1 x Gurt / 2 x Ersatz-Gitarrensaiten / 1 x Bedienungsanleitung

*Anmerkung:

 Du kannst die Gitarre sowohl mit deinen Fingern als auch dem Plektron spielen. 

WARNUNG:

 Entfernen Sie das Verpackungsmaterial, wie Plastikfolien, Klebebänder, Etiketten 

und Befestigungsbänder aus Metall. Diese sind nicht Bestandteil des produkt und müssen aus 

Sicherheitsgründen entfernt werden, bevor Ihr Kind das produkt benutzt.

Bevor du zu spielen beginnst, ist es ratsam, deine Gitarre gut zu stimmen, 

um falsche Töne zu vermeiden! Benutze hierzu die Wirbel oben am Hals.

Jeder Wirbel ist mit einer Saite verbunden. Wenn du den Wirbel im 

Uhrzeigersinn drehst, wird der Ton der Saite tiefer. Wenn du den Wirbel 

gegen den Uhrzeigersinn drehst, wird der Ton höher.

Deine Gitarre ist korrekt gestimmt, wenn alle Saiten, leer gezupft (ohne 

Finger auf die Bünde zu legen) die richtigen Töne gemäß Schaubild A 

erzeugen.

Vorsicht:

 Sei vorsichtig, wenn du die Wirbel im Uhrzeigersinn drehst. 

Wenn du die Wirbel zu weit drehst, sind die Saiten möglicherweise zu fest 

gespannt und können reißen.

Beginne mit der 6. Saite (die tiefste und dickste Saite) und fahre fort, bis du 

die 1. Saite (die höchste und feinste Saite) erreichst. Folge der Reihenfolge 

der Zahlen im Schaubild gegenüber. Wenn du andersherum beginnst, 

besteht die Gefahr, dass deine Gitarre sich leichter verstimmt, während du 

spielst. 

Es gibt mehrere Methoden zur Stimmung einer Gitarre. Am einfachsten ist 

die Stimmung mit einem elektronischen Stimmer. Diese Methode vereinfacht 

das Stimmen deiner Gitarre auf jeden Fall. Wenn du keinen hast, kannst du 

die im Folgenden beschriebenen Methoden verwenden.

a) Mit einem Klavier


Spiele ein mittleres 

E

/Mi auf dem Klavier (das 

mittlere 

E

/Mi ist die 12. weiße Taste von der 

linken Seite einer normalen Klaviertastatur aus 

gezählt, die aus 88 Tasten besteht). Stimme 

deine 6. Saite (

E

/Mi), bis sie genau so klingt. 

Siehe Schaubild C, um die restlichen fünf Saiten 

auf die gleiche Weise zu stimmen.

Beginne von 

dieser Saite!

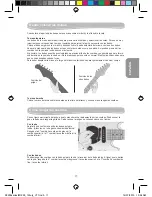
1. Kopf 

2. Hals 

3. Korpus  

4.  Lautsprecher-Lautstärke  

5. Audio-Eingangsbuchse  

6. Ausgangsbuchse  

7. Steg  

8. Saiten (x6)  

9. Lautsprecher  

10. Tonabnehmer  

11. Griffbrett

12. Bünde (x21)

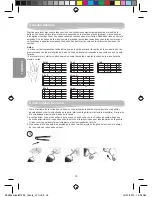
A

G

B

E

3

2

4

5

6

1

D

E

A

1. Bund
2. Bund
3. Bund
4. Bund
5. Bund
6. Bund

1. Saite 

2. Saite

3. Saite
4. Saite
5. Saite
6. Saite

13. Sattel

14. Stimmmechaniken (x 6)

15. Wirbel (x6)  

B

E

A

D

G

B

E

K2500seriesIM1293_12July_V11.indb   21

15/07/2013   10:54 AM

Содержание K2500 series

Страница 1: ...K2500 series www lexibook com K2500seriesIM1293_12July_V11 indb 1 15 07 2013 10 54 AM ...

Страница 2: ...5 4 1 15 14 12 13 11 10 2 3 9 7 8 6 K2500seriesIM1293_12July_V11 indb 2 15 07 2013 10 54 AM ...

Страница 3: ... vide sans mettre de doigts sur les cases produiront bien les notes du schéma A Attention Sois vigilent lorsque tu tournes les clefs dans le sens contraire des aiguilles d une montre Si tu sers trop fort les cordes risquent d être trop tendues et de se casser Pars de la 6ème corde plus grave et plus épaisse et continue jusqu à la 1ère corde plus aiguë et plus fine Suis l ordre des numéros du schém...

Страница 4: ...e Mi E Voir E Comment tenir ta guitare Il existe plusieurs façons de tenir ta guitare Le plus important est que tu sois à l aise En général pour les droitiers comme pour les gauchers la guitare est tenue de la manière suivante main gauche sur le manche et main droite sur la caisse Il est possible de tenir ta guitare comme un gaucher main droite sur le manche et main gauche sur la caisse mais tu do...

Страница 5: ...ude d appuyer fort sur les cordes il est possible que de la corne se forme au bout des doigts Ne t inquiète pas cela est normal Garde tes ongles courts pour ne pas être gêné e lorsque tu joues Pour pouvoir facilement déplacer ta main le long du manche décolle légèrement ton coude du corps Comment gratter les cordes Avec un léger mouvement du poignet passe ta main droite rapidement sur les cordes T...

Страница 6: ...r quelques accords simples Les schémas ci dessous représentent le manche de ta guitare Les lignes horizontales du bas correspondent aux cordes graves épaisses et celles du haut aux aigus cordes fines Les lignes verticales correspondent aux frettes Chaque doigt est assigné à un numéro Avec les doigts de ta main gauche appuie sur les cordes en tenant compte des numéros qui correspondent à ceux assoc...

Страница 7: ... 9V de type 6LR61 non fournie 1 Ouvrir le compartiment de la pile situé au dos de la guitare 2 Insérer la pile 6LR61 en prenant soin de respecter les polarités indiquées sur le compartiment et selon le schéma ci contre 3 Refermer le compartiment de la pile Ne pas recharger les piles non rechargeables Retirer les accumulateurs du produit avant de les recharger Ne charger les accumulateurs que sous ...

Страница 8: ...re la tension des cordes sans les retirer 6 Dans le cas où un évènement anormal se produit contacte un magasin de musique proche de ton domicile et demande conseil à un personnel qualifié Note Veuillez garder ce mode d emploi il contient d importantes informations Ce produit est couvert par notre garantie de 2 ans Pour toute mise en œuvre de la garantie ou du service après vente vous devez vous ad...

Страница 9: ...ng notes To do this use the tuning keys located at the top of the neck Each key is attached to a string When you turn the key clockwise the string will produce a lower tone and if you turn the key in the opposite direction the string will produce a higher tone Your guitar is properly tuned when all the strings played in an open position without applying your fingers on the frets produce the notes ...

Страница 10: ...th string A La of your guitar using 1 a piano adjust the string up until it sounds the same as the 15th white key of the standard piano keyboard 2 a tuning fork A La 440Hz adjust the string up until its tone is the same as the tuning fork but 2 octaves lower Playing the 5th string open put and keep your finger between the 4th and the 5th fret on the 6th string and adjust the string up until it sou...

Страница 11: ... not worry this is normal Keep your nails short so they are not in the way when you play To be able to easily move your hand along the neck maintain a slight distance between your elbow and the guitar body How to strum the strings With a flick of the wrist quickly run your right hand over the strings You can either use the pick or your finger to strum Each strum corresponds to one beat Using the p...

Страница 12: ... 3 2 Practice playing a few basic chords The diagrams below represent your guitar neck The lower horizontal lines correspond to the lower strings thick strings and those above to the higher strings thin strings The vertical lines are the frets Each finger is assigned a number Use the fingers of your left hand to press the strings by taking into account the numbers that correspond to those associat...

Страница 13: ...cated at the back of the guitar 2 Insert the 6LR61 battery taking care to observe the polarities indicated on the battery compartment and according to the diagram opposite 3 Close the battery compartment Non rechargeable batteries are not to be recharged Rechargeable batteries are to be removed from the product before being charged Rechargeable batteries are only to be charged under adult supervis...

Страница 14: ...une all the strings without removing them 6 Should any abnormal event occurs contact your local music shop and ask a qualified technician for assistance Note Please keep this instruction manual it contains important information This product is covered by our 2 year warranty For any claim under the warranty or after sale service please contact your distributor and present a valid proof of purchase ...

Страница 15: ...as tocadas en vacío sin poner los dedos en los trastes produzcan correctamente las notas de la ilustración A Atención Presta atención al girar las llaves en sentido antihorario Si lo haces demasiado fuerte las cuerdas podrían tensarse demasiado y romperse Comienza por la sexta cuerda más gruesa y más grave y continúa hasta la primera más aguda y más fina Sigue el orden de los números de la ilustra...

Страница 16: ... traste 2o traste 3o traste 4o traste 5o traste 6o traste C A B D G E 16 ESPAÑOL Cómo sujetar la guitarra En general tanto para personas diestras como para personas zurdas la guitarra se sujeta de la siguiente forma la mano izquierda sobre el mástil y la mano derecha sobre la caja Es posible sujetar la guitarra como una persona zurda la mano derecha sobre el mástil y la mano izquierda sobre la caj...

Страница 17: ...ntén las uñas cortas para que se vean aseadas cuando tocas Para poder desplazar la mano a lo largo del mástil con facilidad separa ligeramente el codo del cuerpo Cómo rasgar las cuerdas Con un ligero movimiento del puño pasa tu mano derecha rápidamente por las cuerdas Puedes usar la púa o tu dedo para rasgar la guitarra Cada vez que la rasgas se corresponde con un tiempo Con la púa Sujeta la púa c...

Страница 18: ... MI o E 1 3 2 4 SOL o G 3 2 LA o A 1 3 2 Practica para tocar algunos acordes sencillos Las ilustraciones siguientes representan el mástil de tu guitarra Las líneas horizontales inferiores corresponden a las cuerdas graves gruesas y las superiores a las agudas cuerdas finas Las líneas verticales corresponden a los trastes Cada dedo tiene un número asignado Con los dedos de la mano izquierda presion...

Страница 19: ...parte posterior de la guitarra 2 Instala la pila 6LR61 asegurándote de respetar las polaridades indicadas en el compartimento y de acuerdo con el esquema que se presenta al lado 3 Vuelve a cerrar el compartimento de la pila No intente nunca recargar pilas no recargables Para cargar las pilas recargables antes retírelas del producto Las pilas recargables deben recargarse siempre bajo la supervisión...

Страница 20: ... cambiar las cuerdas ponte en contacto con tu tienda de música local y pide ayuda a un técnico cualificado 5 Cuando no utilices la guitarra guárdala dentro de un estuche duro diseñado especialmente para guitarras eléctricas Si no piensas utilizarla durante un período de tiempo prolongado es recomendable que aflojes ligeramente todas las cuerdas sin quitarlas 6 Si se produjera algún hecho anómalo p...

Страница 21: ... gemäß Schaubild A erzeugen Vorsicht Sei vorsichtig wenn du die Wirbel im Uhrzeigersinn drehst Wenn du die Wirbel zu weit drehst sind die Saiten möglicherweise zu fest gespannt und können reißen Beginne mit der 6 Saite die tiefste und dickste Saite und fahre fort bis du die 1 Saite die höchste und feinste Saite erreichst Folge der Reihenfolge der Zahlen im Schaubild gegenüber Wenn du andersherum b...

Страница 22: ...klingt Mi E Siehe E So hältst du deine Gitarre Generell gilt sowohl für Rechts als auch Linkshänder die folgende Gitarrenhaltung die linke Hand am Hals und die rechte Hand auf dem Korpus Du kannst deine Gitarre wie ein Linkshänder halten rechte Hand am Hals und linke Hand auf dem Korpus doch dann musst du den Steg modifizieren um die Saiten umzukehren Es gibt verschiedene Methoden deine Gitarre zu...

Страница 23: ...lte deine Fingernägel kurz damit sie dich beim Spielen nicht stören Damit du problemlos deine Hand den Hals entlang bewegen kannst winkle deinen Ellbogen leicht vom Körper ab So schlägst du die Saiten an Fahre mit einer leichten Bewegung aus dem Handgelenk mit deiner rechten Hand schnell über die Saiten Du kannst das Plektron oder deinen Finger zum Anschlagen benutzen Jeder Anschlag entspricht ein...

Страница 24: ...Übe einige einfache Akkorde ein Die nachfolgenden Schaubilder zeigen den Hals deiner Gitarre Die waagerechten Linie unten entsprechen den tiefen Saiten dicke Saiten und die oberen den hohen Saiten dünne Saiten Die senkrechten Linien entsprechen den Bundstäbchen Jedem Finger ist eine Zahl zugeordnet Drücke mit den Fingern deiner linken Hand auf die Saiten und berücksichtige dabei die Zahlen die mit...

Страница 25: ...tät die am Fach markiert ist und gemäß des Schaubildes nebenan ein 3 Schließe das Batteriefach wieder Nicht wieder aufladbare Batterien können nicht aufgeladen werden Aufladbare Batterien müssen vor der Aufladung aus dem Produkten genommen werden Batterien dürfen nur unter Aufsicht eines Erwachsenen aufgeladen werden Unterschiedliche Batterietypen bzw alte und neue Batterien dürfen nicht gemischt ...

Страница 26: ...rt alle Saiten leicht zu verstimmen ohne sie zu entfernen 6 Bei unvorhergesehenen Ereignissen wende dich an deine örtliche Musikhandlung und bitte einen Fachmann um Hilfe Anmerkung Bitte bewahren Sie diese Bedienungsanleitung auf da sie wichtige Hinweise enthält Dieses Produkt hat 2 Jahre Garantie Für jede Inanspruchnahme der Garantie oder des Kundendienstes kontaktieren Sie bitte Ihren Einzelhänd...

Страница 27: ...corde sem colocares os dedos nas casas produzirem correctamente as notas da imagem A Atenção Tem cuidado quando rodares as cravelhas no sentido inverso ao dos ponteiros do relógio Se apertares demasiado as cordas podem ficar demasiado esticadas e podem partir Começa na 6ª corda mais grave e mais espessa e continua até à 1ª corda mais aguda e mais fina Segue a ordem dos números da imagem apresentad...

Страница 28: ...com o som da 1ª corda Mi E Imagem E Como segurar a guitarra No geral tanto para os destros como para os canhotos a guitarra é segurada do seguinte modo Mão esquerda no braço e mão direita no corpo Também podes segurar a guitarra do modo oposto para canhotos mão direita no braço e mão esquerda no corpo mas tens de modificar o cavalete para poderes inverter as cordas Existem vários modos de segurare...

Страница 29: ...Mantém as tuas unhas curtas para não te incomodarem enquanto tocas Para moveres facilmente a tua mão ao longo do braço afasta ligeiramente o teu cotovelo do corpo Como arranhar as cordas Com um ligeiro movimento do punho passa a tua mão direita rapidamente sobre as cordas Podes utilizar a palheta ou o teu dedo para arranhar Cada passagem corresponde a um tempo Com a palheta Segura bem a palheta en...

Страница 30: ...ou C 1 3 2 MI ou E 1 3 2 4 SOL ou G 3 2 LA ou A 1 3 2 Treina tocar alguns acordes simples As imagens em baixo representam o braço da tua guitarra As linhas horizontais inferiores correspondem às cordas graves espessas e as superiores às agudas cordas finas As linhas verticais correspondem aos trastos Cada dedo é atribuído a um número Com os dedos da tua mão esquerda prime as cordas tendo em conta ...

Страница 31: ...mento da pilha na parte traseira da guitarra 2 Insira a pilha 6LR61 respeitando as polaridades indicadas no fundo do compartimento das pilhas e de acordo com a imagem apresentada ao lado 3 Volte a fechar o compartimento das pilhas As pilhas não recarregáveis não deverão ser recarregadas As pilhas recarregáveis deverão ser retiradas do produto antes de serem recarregadas e só deverão ser recarregad...

Страница 32: ... a sua guitarra durante um longo período de tempo deve desafinar ligeiramente todas as cordas sem as retirar 6 Caso ocorra alguma situação anormal contacte a sua loja de música e consulte um técnico qualificado Nota Por favor guarde este manual pois contém informações importantes Este produto está coberto pela nossa garantia de 2 anos Para a utilização da garantia ou do serviço pós venda deverá di...

Страница 33: ...tamente se tutte le corde pizzicate a vuoto senza mettere le dita sui tasti riproducono perfettamente le note dell illustrazione A Attenzione fai attenzione quando ruoti le chiavette in senso antiorario Se le tiri troppo le corde potrebbero tendersi eccessivamente e rompersi Parti dalla 6 corda più grave e più spessa e continua fino alla 1 corda più acuta e più sottile Segui l ordine dei numeri de...

Страница 34: ... chitarra In generale sia per i destrimani che per i mancini la chitarra si tiene nel modo seguente mano sinistra sul manico e mano destra sulla cassa È possibile tenere la chitarra da mancino mano destra sul manico e mano sinistra sulla cassa ma in tal caso è necessario far modificare l osso del ponte per poter invertire le corde È possibile tenere la chitarra in diversi modi l importante è senti...

Страница 35: ...mere forte sulle corde quindi potrebbero formarsi dei calli sui polpastrelli Non preoccuparti è normale Tieni le unghie corte affinché non ti diano fastidio mentre suoni Per spostare facilmente la mano lungo il manico allontana leggermente il gomito dal corpo Come pizzicare le corde Con un leggero movimento del polso passa rapidamente la mano destra sulle corde Puoi utilizzare il plettro o il dito...

Страница 36: ...nare 1 2 3 4 RE ou D 1 3 2 DO ou C 1 3 2 MI ou E 1 3 2 4 SOL ou G 3 2 LA ou A 1 3 2 Allenati a suonare qualche semplice accordo Le illustrazioni seguenti rappresentano il manico della chitarra Le linee orizzontali inferiori corrispondono alle corde gravi spesse e quelle superiori alle acute sottili Le linee verticali corrispondono alle barrette A ogni dito è assegnato un numero Con le dita della m...

Страница 37: ...o 6LR61 non fornita 1 Aprire il vano batteria situato sul retro della chitarra 2 Inserire la batteria 6LR61 facendo attenzione a rispettare le polarità indicate nel vano e nella figura a lato 3 Richiudere il vano batteria Le batterie non ricaricabili non devono essere ricaricate le batterie ricaricabili devono essere tolte dal prodotto prima di essere ricaricate le batterie ricaricabili devono ess...

Страница 38: ...nza rimuoverle 6 In caso di malfunzionamenti contattare un rivenditore di strumenti musicali e richiedere l assistenza di un tecnico qualificato Nota Conservare il presente libretto d istruzioni in quanto contiene informazioni importanti Questo prodotto è coperto dalla nostra garanzia di 2 anni Per servirsi della garanzia o del servizio di assistenza post vendita rivolgersi al negoziante muniti di...

Страница 39: ... de vakken te plaatsen de noten van het schema A juist spelen Opgelet Wees voorzichtig wanneer je de sleutels tegen de klok in draait De snaren kunnen overmatig gespannen staan en breken wanneer je te veel draait Start bij de 6e snaar laagst en dikst en vervolg tot de 1ste snaar hoogst en fijnst Volg de volgorde van de cijfers op het schema hiernaast weergegeven Als je in omgekeerde volgorde start...

Страница 40: ... Hoe je gitaar vasthouden Over het algemeen voor zowel rechts als linkshandigen houd de gitaar op de volgende manier vast linkerhand op de hals en rechterhand op de klankkast Het is mogelijk om je gitaar als een linkshandige rechterhand op de hals en linkerhand op de klankkast vast te houden maar dan moet je eerst het zadel aanpassen om de snaren te kunnen omkeren Er bestaan meerdere manieren om j...

Страница 41: ... je nagels kort om tijdens het spelen niet gehinderd te worden Om je hand makkelijk over de lengte van de hals te verplaatsen maak de elleboog lichtjes van het lichaam los Hoe op de snaren tokkelen Verplaats je rechterhand snel over de snaren met een lichte beweging van de pols Je kan tevens het plectrum of je vinger gebruiken om te tokkelen Elke tokkeling komt met een maatdeel overeen Met het ple...

Страница 42: ...spelen 1 2 3 4 D 1 3 2 C 1 3 2 E 1 3 2 4 G 3 2 A 1 3 2 Oefen met het spelen van enkele eenvoudige akkoorden Onderstaande schema s stellen de hals van je gitaar voor De onderste horizontale lijnen komen overeen met de lage tonen dikke snaren en de bovenste met de hoge tonen fijne snaren De verticale lijnen komen overeen met de fretten Er is een nummer aan elke vinger toegekend Druk op de snaren met...

Страница 43: ...n in het batterijvak en de afbeelding hiertegenover 3 Sluit het batterijvak opnieuw Niet heroplaadbare batterijen kunnen niet worden heropgeladen oplaadbare batterijen moeten uit het product worden verwijderd alvorens deze op te laden heroplaadbare batterijen mogen alleen onder toezicht van een volwassene worden opgeladen verschillende types batterijen of nieuwe en oude batterijen mogen niet onder...

Страница 44: ...de niet zult gebruiken is het aanbevolen om alle snaren lichtjes te ontstemmen zonder deze af te halen 6 Als uw gitaar niet naar behoren speelt neem contact op met uw lokale muziekwinkel en vraag een gekwalificeerde technicus om advies Opmerking Gelieve deze handleiding te bewaren aangezien het belangrijke informatie bevat Het product is gedekt door onze 2 jaar garantie Voor alle herstellingen tij...

Страница 45: ...K2500MH K2500B K2500seriesIM1293_12July_V11 indb 45 15 07 2013 10 55 AM ...

Страница 46: ...K2500seriesIM1293_12July_V11 indb 46 15 07 2013 10 55 AM ...

Отзывы: