QUICKSTART GUIDE
//
DGT 260
//
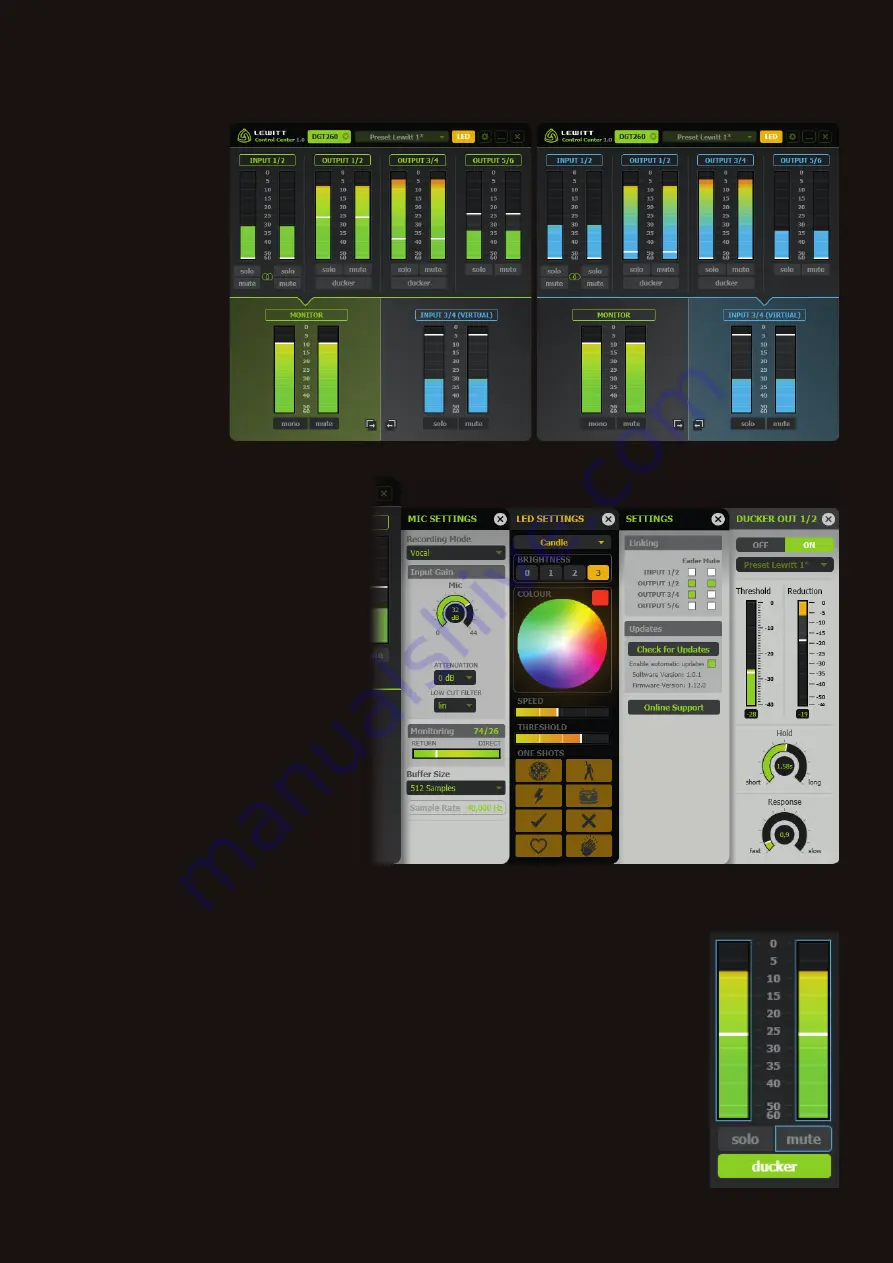
MIC Settings Panel
Input Gain
//
Sets the input gain of your
microphone.
Attenuation
//
Activate for loud input signals to
prevent clipping.
Low-cut fi lter
//
Reduces unwanted low
frequencies. Activate when recording vocals!
Monitoring
//
Sets the ratio between direct and
playback monitoring.
Buffer Size
//
Low buffer sizes have low latency,
but are more CPU-intense. In case you experience
audio drop-outs try the next bigger buffer size.
Sample Rate
//
Is fi xed at 48.000 Hz.
Find more information about this topics on our
website
www.lewitt-audio.com/dgt260.
//
LED Settings
Some presets indicate relevant information like
clipping, signal level and if the ducker is currently
active or not. Other presets are only used to create
a nice mood for your vocal performance. Check out all of them!
//
Settings
Linking
//
This allows you to link the fader and the mute button of a selected channel. This channel now
always has the same volume in both mixes - MONITOR and INPUT 3/4 (VIRTUAL) mix. A blue or green
border around the fader and mute button indicates a channel is linked. See Figure 5.
Updates
//
Always try to be up to date as we are introducing new features on a regular basis.
//
Ducker
A channel’s volume can be automatically lowered when the software detects a microphone input signal
above a certain threshold. This way your voice and the playback create a perfect mix.
Ducker is available for OUTPUT 1/2 and OUTPUT 3/4.
Figure 4
Figure 3a
Figure 3b
The virtual mixing console:
Click on the MONITOR or
INPUT 3/4 area to select
your mix.
Green color scheme
on the
left (Figure 3a) - MONITOR
mix selected.
Blue color scheme
on the
right (Figure 3b) - INPUT 3/4
mix selected.
Pro tip:
you can link faders
and mute buttons to have
the same mix for MONITOR
and INPUT 3/4.
See
Linking below.
Figure 5


