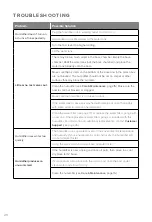
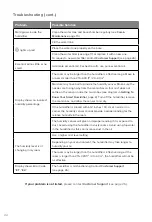
Levoit LV450S Скачать руководство пользователя страница 20

20

Problem

Possible Solution

Humidifier doesn’t turn on, 
or turns off unexpectedly.

Plug the humidifier into a working outlet and turn it on.

Add purified or distilled water to the water tank.

Little or no mist comes out.

Turn the mist level to a higher setting.

Fill the water tank.

There may be too much water in the base chamber. Empty the base 
chamber. Refill the water tank (not the base chamber) and place the 
water tank properly onto the base.

Make sure the air inlets on the bottom of the base and in the aroma box 
are not blocked. The humidifier should not be set on carpet or other 
surfaces that may block the air inlets. 

Clean the humidifier (see 

Care & Maintenance

, page 15). Make sure the 

nozzles are not blocked or clogged.

Make sure the humidifier is on a level surface. 

If the water tank or base was washed with detergent, rinse thoroughly 
with clean water to remove any detergent. 

Clean the water filter (see page 17) or replace the water filter sponge with 
a new one. One replacement water filter sponge is included with this 
humidifier. For information on additional replacements, contact 

Customer 

Support

 (see page 26). 

Humidifier uses water too 
quickly.

The humidifier uses up water based on the environmental temperature 

and humidity. If your environment is cold and/or dry, the humidifier will 

run out of water faster. 

Using the warm mist function will use up water faster. 

Humidifier produces an  
unusual smell.

If the humidifier is new, unplug and rinse all parts, then place in a cool, 
dry place for 12 hours. 

If essential oils were placed on the aroma pad, rinse the pad under 
clean water and allow it to dry. 

Clean the humidifier (see 

Care & Maintenance

, page 15).

TROUBLESHOOTING

Содержание LV450S

Страница 1: ...OasisMist Smart Humidifier Model LUH O451S WUS Questions or Concerns Please contact us Mon Fri 9 00 am 5 00 pm PST PDT at support levoit com or at 888 726 8520 USER MANUAL...

Страница 2: ...rt Guide 2 2 3 5 7 8 10 11 15 20 23 25 26 Specifications Package Contents Power Supply AC 120V 60Hz Rated Power 280W Water Tank Capacity 1 19 gal 4 5 L Max Cool Mist Output 300 mL h Max Warm Mist Outp...

Страница 3: ...duce the risk of fire electric shock or other injury follow all instructions and safety guidelines General Safety Do not cover the nozzles while the humidifier is on Doing so may damage the humidifier...

Страница 4: ...in order to avoid an electric or fire hazard Please contact Customer Support see page 26 Unplugging the power cord will disable remote control of the humidifier and temporarily disconnect the humidif...

Страница 5: ...J Water Filter Sponge K Heating Element L Float M Transducer N Float Brackets O Power Cord P Noise Silencer Q Absorption Pad R Air Outlet S Aroma Pad T Aroma Box U Humidity Sensor Air Inlet In Aroma B...

Страница 6: ...ton Relative Humidity RH Percentage Warm Mist Indicators Mist Level Button Auto Mode Button Mist Level Indicators Auto Mode Indicator Mist Level Indicators White Low Mist Medium Mist High Mist Heat Of...

Страница 7: ...Press to use warm mist while in Auto Mode Press to turn Auto Mode off and resume manual controls Warm Mist Button Cycles through warm mist settings low heat medium heat high heat and heat off see pag...

Страница 8: ...he filter clockwise to secure it in place Figure 1 1 Note Make sure the water tank is clean before filling 1 Remove the water tank cover Figure 1 4 Figure 1 4 4 Mist should be directed away from walls...

Страница 9: ...1 7 CAUTION Do not add water through the mist tube Do not add essential oils into the humidifier Only add essential oils to the aroma pad Figure 1 5 Do not use water treatment liquids or third party w...

Страница 10: ...the Wi Fi indicator turns off This will restore the smart humidifier s default settings and disconnect it from the VeSync app To reconnect please follow the instructions in the VeSync app for adding...

Страница 11: ...minutes to warm up before producing warm mist Caution Mist may be hot Do not place your bare hands face or other exposed skin over the nozzles while using warm mist Figure 3 4 Nozzles can reach temper...

Страница 12: ...reduce noise levels Note The humidifier will automatically mist for 15 seconds after being turned on even if the room has reached the target humidity level 1 Press to turn Auto Mode on 2 Optionally p...

Страница 13: ...to Mode settings and the display will automatically turn back on when the humidifier is turned back on 2 Put 8 10 drops of essential oils on the aroma pad Figure 4 2 3 Insert the aroma box back into t...

Страница 14: ...nd Do not place the humidifier on an inclined surface Never pour water directly into the base chamber Figure 5 1 Only add water to the water tank The humidifier will automatically release the correct...

Страница 15: ...ry the humidifier instead Note Never immerse the base in water or liquid Do not place any part of the humidifier in a dishwasher Do not use detergents to clean the humidifier Cleaning You should clean...

Страница 16: ...e 6 5 Figure 6 4 7 Remove the float noise silencer absorption pad and aroma box from the base 8 Rinse all parts except the outside of the base with room temperature water Figure 6 5 To descale the hum...

Страница 17: ...ng the shaft out from the float brackets One side of the float brackets is open U shaped to allow the shaft to be removed Figure 7 5 7 Place the float water filter mist channel aroma box and noise sil...

Страница 18: ...he Aroma Pad Absorption Pad 1 Pull out the aroma box and remove the aroma pad Figure 8 1 Figure 8 1 Figure 8 4 Figure 8 5 Figure 8 2 Figure 8 3 2 Remove the noise silencer then remove the absorption p...

Страница 19: ...dry completely before storing Store in a cool dry location 2 Place the absorption pad and the noise silencer back over the heating element Figure 9 2 Figure 9 1 Figure 9 4 Figure 9 3 Figure 9 2 3 Flip...

Страница 20: ...e humidifier is on a level surface If the water tank or base was washed with detergent rinse thoroughly with clean water to remove any detergent Clean the water filter see page 17 or replace the water...

Страница 21: ...fier in a room with over 60 relative humidity Wipe any excess water off the top and bottom of the base Do not shake the humidifier Make sure to place the humidifier on a flat level surface Check the w...

Страница 22: ...mart Humidifier page 8 Turn off the humidifier remove the aroma box and allow the sensor to air dry If the humidifier is placed within 12 inches 30 cm of a wall or in a corner the humidity sensor cann...

Страница 23: ...s not settle on the sensor inside the aroma box see diagram in Getting To Know Your Smart Humidifier page 8 Turn off the humidifier remove the aroma box and allow the sensor to air dry If the humidifi...

Страница 24: ...ur body The availability of some specific channels and or operational frequency bands are country dependent and are firmware programmed at the factory to match the intended destination The firmware se...

Страница 25: ...he product and is not transferable to any subsequent owner of the product regardless of whether the product is transferred during the specified term of the warranty This warranty does not extend to pr...

Страница 26: ...se contact our helpful Customer Support Team Arovast Corporation 1202 N Miller St Suite A Anaheim CA 92806 Email support levoit com Toll Free 888 726 8520 Mon Fri 9 00 am 5 00 pm PST PDT Support Hours...

Страница 27: ...Notes...

Страница 28: ...DL021522RF M1_1121LUH O451S WUS LEVOITLIFESTYLE LEVOIT LEVOIT LEVOIT LEVOIT COM...

Отзывы: