background image


HYDROFOIL ASSEMBLY INSTRUCTIONS 

GDM003450-ENG-A 


Manufacturer:  LEVITA

Z


10 / 25 


Contact: 

[email protected] 

Confidentiality code: GREEN
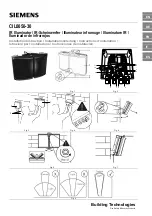


5.1


Connection of the glider  


1.


Notice  the  correct  position  for  the 
frontwing  (2)  and  the  rearwing  (3) 
(marking for “Port” side). 
Orientation  of  the  rearwing:  middle  fin 
shows to the mast (box side)


Figure 5.1 


2.


Connect the rearwing and the frontwing 
by simply plugging the parts together. 

Figure 5.2 


3.


Make  sure  that  the  holes  of  the  steel 
part  and  rearwing  are  in  exact 
alignment. 

Figure 5.3 


Содержание Hydrofoil R5

Страница 1: ...LEVITA LEVITAZ Z Hydrofoils Hydrofoils Manual R5 Manual R5 ...

Страница 2: ...NSTRUCTIONS 9 5 1 Connection of the glider 10 5 2 Connection of the glider and the mast 12 5 3 Adjustment of the rearwing s angle of attack 14 5 4 Control correct assembly 14 6 DISASSEMBLY OF THE HYDROFOIL 15 6 1 Dismounting the glider and the mast 15 6 2 Disassembly of the glider 17 7 Part ID 19 8 PACKAGING AND STORAGE 20 9 MAINTENANCE AND REPAIR INFORMATION 21 9 1 Maintenance 21 9 2 Repair infor...

Страница 3: ...uct If the product is transferred to a new owner this manual and all associated documents must be passed on to the new owner The meaning and appearance of safety symbols used in this manual are as follows The text after the signal word WARNING contains important information which must be followed to avoid serious personal injury or death WARNING NOTICE The text after the signal word NOTICE contain...

Страница 4: ...this product exposes the user to unexpected and unavoidable risks dangers and hazards Read the manual for important information about the installation care and maintenance of the board before use Always use extreme caution when using this product Never use this product unless you are in good physical health Never use this product unless you are an experienced swimmer Never act in a careless manner...

Страница 5: ...the tightening torque that is described in this manual Geislinger GmbH is not responsible for injuries death or damage to the product due to misuse or any use not consistent with these instructions Do not use this product under the influence of alcohol drugs or medications Minimum age of rider 18 years At temperatures above 650 C decomposition of the carbon fiber can cause respirable fiber particl...

Страница 6: ...or both WARNING NOTICE Do not use power tools for the assembly or disassembly process as control of torque and power is limited This may cause serious damage to the product Doing so will render your warranty void NOTICE Do not use hammer or other sharp objects for the assembly or disassembly process This may cause serious damage to the product Doing so will render your warranty void NOTICE As your...

Страница 7: ...the mast and the tuttle box fit together and are clean of any objects like dirt or sand prior to the assembly 2 Before proceeding apply a small amount of the Loctite grease provided in the Tool kit onto the threads and undersides of the heads on the two screws Note screws are not included 3 Connect the mast with suitable M6 bolts from the deck side Due to the tight fit between the board tuttle box...

Страница 8: ...APPLICATION OF THE PRODUCT AND TECHNICAL DATA GDM003450 ENG A Manufacturer LEVITAZ 7 25 Contact office levitaz com Confidentiality code GREEN Figure 3 2 Dimension tuttle box ...

Страница 9: ...rts The mast 1 the frontwing 2 the rearwing 3 the Screw kit and the Tool kit Part list of foil set No Designation 1 Mast 2 Frontwing 3 Rearwing Screw kit 4 1 x Screw M6x30 TX 5 1 x Crossway bolt 6 2 x Screw M6x60 TX pre mounted 7 2 x Threaded pins mounted 8 5 x Mast inserts Ø 9 mm mounted Tool kit A Anti seize paste Loctite B Torx TX30 tool C Inbus 3 0 mm tool Figure 4 2 Symbol photo ...

Страница 10: ...nents are being assembled and while the Levitaz hydrofoil is in use WARNING NOTICE Do not use an electric screwdriver hammer or other sharp objects for the assembly or disassembly process This may cause serious damage to the product NOTICE Ensure that all surfaces are free from dirt or sand prior to the assembly This is particularly important when assembling the glider onto the mast NOTICE Grease ...

Страница 11: ...ider 1 Notice the correct position for the frontwing 2 and the rearwing 3 marking for Port side Orientation of the rearwing middle fin shows to the mast box side Figure 5 1 2 Connect the rearwing and the frontwing by simply plugging the parts together Figure 5 2 3 Make sure that the holes of the steel part and rearwing are in exact alignment Figure 5 3 ...

Страница 12: ...Check with your fingertips the correct surface curvature Figure 5 5 6 Now use the M6x30 Screw 4 supplied in the Screw kit Before proceeding apply a small amount of the Loctite grease A provided in the Tool kit onto the thread and underside of the head Connect the frontwing to the rearwing using the greased screw Tighten the screw to 9 1 Nm tightening torque using the Torx TX30 tool B provided in t...

Страница 13: ...sassembled always keep the screws screwed in 7 Remove the pre mounted screws 6 from the mast 1 Position the glider onto the bottom of the mast whilst ensuring the correct position is maintained Tip If you first mount the mast onto your board you can ensure a safe and secure positioning See chapter 3 1 Connection to the board Figure 5 7 8 Make sure that the holes of the steel part and mast are in e...

Страница 14: ...sed screws evenly matching turns of each screw at a time If you tighten one screw significantly more than the other the glider could locate unevenly and damage the box connection Figure 5 9 10 Tighten the screws to 9 1 Nm tightening torque using the Torx TX30 tool B provided in the Tool kit until the glider is fully secured and the screws are tight Figure 5 10 NOTICE Do not overtighten screws as t...

Страница 15: ...ssure follow these instructions Turn the lower screw bottom side clockwise to increase front foot pressure See figure 5 11 Turn the upper screw box side to reduce front foot pressure See figure 5 12 It takes two to three turns to adjust the desired angle It is recommended to lock both screws to ensure maximum safety NOTICE Ensure that the threaded pins for angle adjustment are always greased and f...

Страница 16: ...ng assembled and while the Levitaz hydrofoil is in use WARNING NOTICE Do not use power tools for the assembly or disassembly process as control of torque and power is limited This may cause serious damage to the product Doing so will render your warranty void NOTICE Ensure that the threaded pins for angle adjustment are always loosened prior to the disassembly 6 1 Dismounting the glider and the ma...

Страница 17: ...it Figure 6 2 Figure 6 3 3 Pull the glider off the bottom of the mast 1 Tip If you leave the hydrofoil mounted onto your board you can ensure a safe and secure positioning Tip Gently tapping by hand against the frontwing direction away from mast frontwing in its cover will help you to pull the glider off Tip Insert the M6 screws 6 again in the mast threads to avoid sand or dirt entering the mast t...

Страница 18: ... 4 using the Torx TX30 tool B provided in the Tool kit Figure 6 4 5 Before pulling out the rearwing remove the crossway bolt 5 by pushing against the bolt with your finger and then pull it out Tip If the bolt is stuck use a stick with a smooth surface to avoid mechanical damage to the metallic crossway bolt Figure 6 5 6 Hold the frontwing 2 and pull out the rearwing 3 Figure 6 6 ...

Страница 19: ...OTICE Ensure that the threaded pins for angle adjustment are loosened as described in step 1 in the disassembly instruction STORAGE See chapter Packaging and Storage NOTICE Always store the disassembled product in suitable covers and carrier bag for optimal protection Failure to do so can reduce the service life of the product ...

Страница 20: ... Contact office levitaz com Confidentiality code GREEN 7 Part ID Each Hydrofoil System part has an individual Part ID These can be found in the following locations Mast Figure 7 1 Example of Part ID Frontwing and rearwing Figure 7 2 Example of Part ID ...

Страница 21: ...ARD PACKAGING The cardboard box and PE film can be recycled STORAGE INSTRUCTIONS The following instructions must be observed to prevent the product from being damaged during storage NOTICE Only store the product clean and dry in disassembled condition and in its covers and suitable bag for optimal protection Failure to do so can reduce the service life of the product Do not place heavy parts on to...

Страница 22: ...product in suitable covers and a durable carrier bag for optimal protection This is to prevent unnecessary sun exposure exposure to hot temperatures scratches and other wear and tear NOTICE Failure to do so may cause serious damage to the product and void the warranty 9 2 Repair information INSPECTED CONDITION CORRECTIVE MEASURE Visible fiber failure or any other heavy damage like delamination sep...

Страница 23: ...ity code GREEN 10 DISPOSING OF USED PARTS After replacing individual components All metal parts can be recycled scrap metal All old fiber reinforced plastic parts must be disposed of as residual waste Federal state and local regulations must always be observed when disposing of the product or parts thereof ...

Страница 24: ...e GREEN 11ORDERING REPLACEMENT PARTS NOTICE Use only original Levitaz replacement parts Failure to do so may cause serious damage to the product and void the warranty Keep the parts bar code label and invoice with this manual This will help to speed up your order for replacement parts or any possible troubleshooting ...

Страница 25: ... Product may be returned only if a return authorization is given in advance by the Levitaz head office or official distributor If a product is deemed to be defective by Levitaz the warranty covers the repair or replacement of the defective product only Levitaz will not be responsible for any costs losses or damages incurred as a result of loss of use of this product This warranty does not cover da...

Страница 26: ...turer LEVITAZ 25 25 Contact office levitaz com Confidentiality code GREEN CONTACT INFORMATION LEVITAZ Hydrofoils a brand of Geislinger GmbH Hallwanger Landesstr 3 5300 Hallwang Salzburg AUSTRIA T 43 662 66 999 0 E office levitaz com levitaz com ...

Страница 27: ...FLY OVER WATER Levitaz com LEVITAZ Hydrofoils a brand of Geislinger GmbH Hallwanger Landesstr 3 5300 Hallwang Salzburg AUSTRIA T 43 662 66 999 0 E office levitaz com ...

Отзывы: