background image

Network Camera User’s Manual 


49/54 


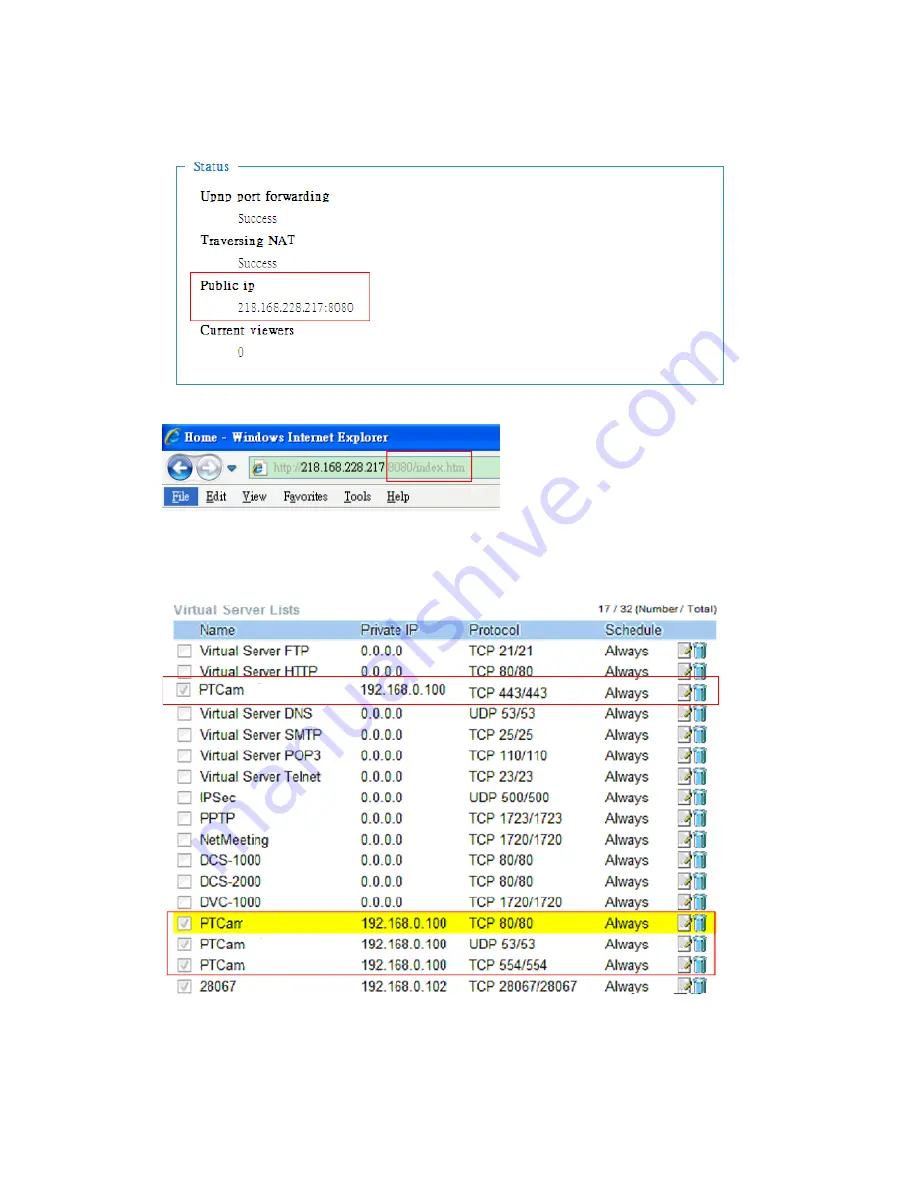
6. Type IP address:8080 at browser. Then you can see camera through Internet. 


7. You can also type the DDNS name at below label of camera on browser URL 
field. For example, you may type user01.C2.mylevel1.com:8080
 
(2) By Setting Port Forwarding Manually 
1. Select a router. Set the port forwarding as following. 


PS. Port 80 is HTTP Port, port 53 is stream port, port 554 is RTSP port. and port 
443 is HTTPS port. 

Содержание WCS-6020

Страница 1: ...WCS 6020 WCS 6050 User Manual 1 54 WCS 6020 WCS 6050 2 5 Megapixel Day Night Wireless P T Network User Manual Version 1 0...

Страница 2: ...en with Camera View 18 Client Setting 21 Definitions in Configuration 23 System parameters 23 User Management 25 Network 27 Access list 31 Audio and Video setting 32 Video record 34 Stream 36 Camera c...

Страница 3: ...communications Moreover users can also set up 16 motion detection regions with the camera each with adjustable size and sensitivity When motion is detected at the specified regions the system can send...

Страница 4: ...er Camera Stand LAN Cable Quick Installation Guide CD Manual Utility If any of the above items are missing please contact your dealer immediately Note Using a power supply with a different voltage tha...

Страница 5: ...d of camera 4 Front LEDs Red LED indicates power red LED will turn on always after plug in power Green LED indicates networking green LED will blink every second after getting IP address Upon powering...

Страница 6: ...rk disconnection 9 Microphone Line In The Network Camera supports two way audio communication so that operators can transmit and receive audio simultaneously By using the Network Camera s built in or...

Страница 7: ...or fix it onto ceiling or wall Use screws to fix the Network Camera onto the ceiling or wall You could also place the Network Camera on the table directly 3 Plug a RJ 45 Ethernet cable into the Networ...

Страница 8: ...d connect it to wall outlet for AC power Once you have installed the Network Camera well and powered on the camera will do self rotation and then the red LED will turn on and green LED will flash ever...

Страница 9: ...WCS 6020 WCS 6050 User Manual 9 54...

Страница 10: ...rk through the installer program CamFinder Step 1 Insert product software CD into the CD ROM drive of a PC running Microsoft Windows An auto run program will pop up If the program is not on auto run g...

Страница 11: ...Network Camera User s Manual 11 54 Step 4 Click Next to proceed with installing Step 5 Click Next to proceed with installing...

Страница 12: ...Network Camera User s Manual 12 54 Step 6 Click Install to start installing CamFinder Step 7 Click Finish to exit setup wizard...

Страница 13: ...Network Camera User s Manual 13 54 Step 8 Locate the CamFinder shortcut icon on your desktop and double click on it Step 9 Click on Search Camera...

Страница 14: ...Network Camera User s Manual 14 54 Step 10 Click on Start Find to start searching for any WCS 6020 WCS 6050 that is on your network Step 11 Select and double click on the camera you wish to access...

Страница 15: ...Network Camera User s Manual 15 54 Step 12 Enter root as the username and leave the password blank Press OK Step 13 Click on Install when the following window appears...

Страница 16: ...Network Camera User s Manual 16 54 Step 14 Congratulations you can now use the camera through the network to view videos...

Страница 17: ...ng simultaneous monitoring and video recording for multiple network cameras Please install the recording software then launch the program to add the Network Camera to the Channel list For detailed inf...

Страница 18: ...camera sees Configuration functions ePTZ Settings Electronic pan tilt zoom capabilities that enable users to move to a target region instantly for close up shots by simply clicking on the video feeds...

Страница 19: ...ch to full screen mode Press the Esc key to switch back to normal mode 4 Click on this button to pause play the video 5 Click on this button stop video output 6 Click on this button to adjust the audi...

Страница 20: ...o center when click Home button 5 Pan Angle User can choose the angles when the camera moves left and right each time 6 Tilt Angle User can choose the angles when the camera moves up and down each tim...

Страница 21: ...TP Select to use HTTP protocol 3 Intranet Protocol Options Set intranet protocol UDP Select to use UDP protocol TCP Select to use TCP protocol HTTP Select to use HTTP protocol NOTE Protocol options al...

Страница 22: ...fect is not as good as that of the UDP protocol If no special need is required UDP protocol is recommended Generally speaking the client choice will be in the order of UDP HTTP After the Network Camer...

Страница 23: ...rator can access the system configuration Each category in the left column will be explained on the following pages System parameters 1 General Setting 1 Host name The text displays the title on the t...

Страница 24: ...th the local computer C Manually set the time Adjust the date and time manually D Adjust by NTP server Synchronize the time according to NTP server over the Internet whenever the Network Camera is swi...

Страница 25: ...mera can provide up to twenty accounts 1 Change root password Change the Administrator s password by typing in the new password identically in both text boxes The typed entries will be displayed as as...

Страница 26: ...name Click Finish to enable the setting 3 Update a existing user Select an existing user name Administrators can modify user s password and privilege Click Finish to enable the setting Access rights a...

Страница 27: ...t IP address automatically This could be tedious to perform software installation whenever the Network Camera starts Therefore once the network is set the IP address should be entered correctly Select...

Страница 28: ...RTP Port The RTP port can be typed besides the default Port 54 Note Please set Video RTP port in even number after default value port 54 Then Video RTCP port Audio RTP port Audio RTCP port will automa...

Страница 29: ...d as following 64 bits key length 10 Hex digits or 5 characters 128 bites key length 26 Hex digits or 13 characters Note When 22 3C or 3E are input in network key the key format can t be changed to AS...

Страница 30: ...mal or ASCII format When selecting different key length acceptable input length is listed as following 64 bits key length 10 Hex digits or 5 characters 128 bites key length 26 Hex digits or 13 charact...

Страница 31: ...er s Manual 31 54 Access list Access list setting 1 Add denied address This rule allows the user to assign a range of IP addresses to the Deny List 2 Delete denied address Delete IP address list from...

Страница 32: ...k Camera User s Manual 32 54 Audio and Video setting General Setting 1 Color mode Select use color or monochrome video display 2 Video orientation The orientation of video 1 Flip Vertically rotate the...

Страница 33: ...t the image sharpness level which ranges from 5 to 5 The default value is set to 0 5 EV Exposure value represent the expected target value of the luminance of the weighting result of AE windows in the...

Страница 34: ...art time and Stop time for day mode Note that the time format is hh mm and is expressed in 24 hour clock time By default the start and end time of day mode are set to 01 00 00 and 23 59 59 2 Sun Mon T...

Страница 35: ...ree choices of server types available NAS SD Card and USB storage Select the item to display the detailed configuration options 1 NAS NAS server address Enter IP address of the NAS server NAS shared d...

Страница 36: ...rate AMR The bit rates are selectable at the following rates 4750 5150 5900 6700 7400 7950 10200 and 12200 AAC The bit rates are selectable at the following rates 8Kbps 16Kbps 24Kbps and 32Kbps Video...

Страница 37: ...er video quality 6 Intra frame period Determine how often to plant an I frame The shorter the duration the more likely you will get a better video quality but at the cost of higher network bandwidth c...

Страница 38: ...s Manual 38 54 Camera control Camera control The pan and tilt functions can be controlled with these buttons The Left button controls the camera to the left the Right Up and Down buttons control the...

Страница 39: ...a reboots or finishes calibration it will automatically aim to the defined home position 2 Set the auto pan range Set default value as auto pan range Restore auto pan range to original default auto pa...

Страница 40: ...Schedule information 1 Enter the Start time and Stop time for day mode Note that the time format is hh mm ss and is expressed in 24 hour clock time By default the start and end time of day mode are se...

Страница 41: ...tput signal Record Motion Detection only and System log Snapshot Record file setting You can setting the file name and enable or disable to add the date and time on file name Can setting the digital o...

Страница 42: ...IP address of the NAS server NAS shared directory Enter the NAS shared directory path Workgroup Enter the NAS workgroup parameter User account Enter the login name of the NAS account User password En...

Страница 43: ...can delete files Move the mouse over the directory Press the mouse left button that the file structure expand Press the mouse right button that Right click menu is displayed You can choose upload or d...

Страница 44: ...you can use some software on Windows that is compliant to RFC 3164 An example is Kiwi Syslog Daemon Visit http www kiwisyslog com kiwi syslog daemon overview Check Setup and Enable then input the IP...

Страница 45: ...anual 45 54 Status and Parameters User can find a lot of information about the system such as Upnp port forwarding Traversing NAT Public IP and so on User also can get the number of current viewer of...

Страница 46: ...Network type and Root Password The system will restart and require the installer program to set up the network again 3 Calibrate Recalibrate the home position to the default center to recover the tole...

Страница 47: ...d or network connection are broken during the procedure it might possibly cause serious damage to the Network Camera Note When upgrading firmware please wait for 90 180 seconds and then you can connec...

Страница 48: ...lved please contact your dealer for further help Q2 What kind of Ethernet cable is used by network camera A2 The network Camera uses Category 5 UTP cable allowing 10 and or 100 Base T networking Q3 Th...

Страница 49: ...can also type the DDNS name at below label of camera on browser URL field For example you may type user01 C2 mylevel1 com 8080 2 By Setting Port Forwarding Manually 1 Select a router Set the port forw...

Страница 50: ...ple you may type user01 C2 mylevel1 com Note The firewall software at PC may block the transfer of network camera Please remove or stop the kind software Q4 What is the default name and password of ad...

Страница 51: ...nfiguration Audio and Video Infrared LED Control is Auto or Manual Turn on Q9 The network camera cannot focus accurately A9 1 The lens is dirty or dust is attached Clean the lens with lens cleaner And...

Страница 52: ...Network Camera default 80 is forward to the Network Camera s private IP address The port number assigned in your Network Camera might not be available via Internet Check your ISP for available port T...

Страница 53: ...80x800 VGA 640x480 QVGA 320x240 QCIF 176x144 5M 2560x1920 1080p 1920x1080 SXGA 1280x1024 WXGA 1280x800 VGA 640x480 QVGA 320x240 QCIF 176x144 Frame Rate Up to 30 fps at 1920x1080 Up to 10 fps at 2560x1...

Страница 54: ...ensor and alarm General Local storage SD SDHC card slot USB slot Power DC12V 1 5A Power Consumption Max 12W Connectors RJ 45 10BASE T 100BASE TX 3 5mm line out 3 5mm mic line in WPS Button I O termina...

Отзывы: