background image


116


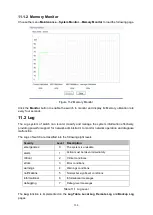
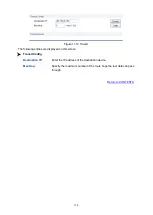
Figure 11-10 Tracert 

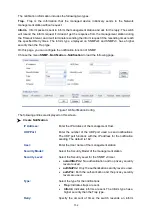
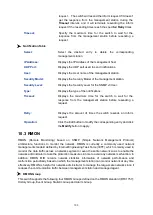
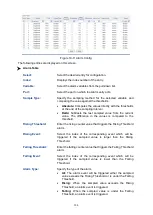
The following entries are displayed on this screen: 


Tracert Config 

Destination IP:   

Enter the IP address of the destination device.   

Max Hop: 

Specify the maximum number of the route hops the test data can pass 
through. 

Return to CONTENTS 


Содержание GES -2451

Страница 1: ...LevelOne GES 2451 24 GE with 4 Shared SFP Web Smart Switch User Manual REV1 0 0 1910020632...

Страница 2: ...idential area is likely to cause harmful interference in which case the user will be required to correct the interference at his own expense This device complies with part 15 of the FCC Rules Operatio...

Страница 3: ...in 8 3 2 Configuration 8 Chapter 4 System 10 4 1 System Info 10 4 1 1 System Summary 10 4 1 2 Device Description 11 4 1 3 System Time 12 4 1 4 Daylight Saving Time 13 4 1 5 System IP 14 4 2 User Manag...

Страница 4: ...6 1 1 VLAN Config 41 6 1 2 Port Config 44 6 2 Application Example for 802 1Q VLAN 45 Chapter 7 Spanning Tree 47 7 1 STP Config 52 7 1 1 STP Config 52 7 1 2 STP Summary 54 7 2 Port Config 54 7 3 MSTP...

Страница 5: ...ntrol 90 9 2 1 Rate Limit 90 9 2 2 Storm Control 91 Chapter 10 SNMP 93 10 1 SNMP Config 95 10 1 1 Global Config 95 10 1 2 SNMP View 96 10 1 3 SNMP Group 97 10 1 4 SNMP User 98 10 1 5 SNMP Community 10...

Страница 6: ...e Diagnostics 112 11 3 1 Cable Test 112 11 3 2 Loopback 113 11 4 Network Diagnostics 114 11 4 1 Ping 114 11 4 2 Tracert 115 Appendix A Specifications 117 Appendix B Configuring the PCs 118 Appendix C...

Страница 7: ...be found in your box GES 2451 power cord 19 Rackmount Kit Quick Installation Guide Resource CD User Manual Note Make sure that the package contains the above items If any of the listed items are damag...

Страница 8: ...indicates the menu structure System System Info System Summary means the System Summary page under the System Info menu option that is located under the System menu Bold font indicates a button a too...

Страница 9: ...used to configure spanning tree function of the switch Here mainly introduces STP Config Configure and view the global settings of spanning tree function Port Config Configure CIST parameters of ports...

Страница 10: ...commonly used system tools to manage the switch Here mainly introduces System Monitor Monitor the memory and CPU of the switch Log View configuration parameters on the switch Device Diagnostics Test t...

Страница 11: ...cellent performance and is friendly to manage which can fully meet the need of the users demanding higher networking performance 2 2 Main Features Resiliency and Availability IEEE 802 1s Multiple Span...

Страница 12: ...ding Link Act LED and a 1000Mbps LED SFP ports Designed to install the SFP module GES 2451 features 4 Combo SFP Slots Port 21 24F shares the same LED with Port 21 24 The Port 21 24F and Port 21 24 are...

Страница 13: ...ower cable into this connector and the male into a power outlet Grounding Terminal GES 2451 already comes with Lightning Protection Mechanism You can also ground the switch through the PE Protecting E...

Страница 14: ...e IP address is 192 168 1 x x is any number from 2 to 254 Subnet Mask is 255 255 255 0 For the detailed instructions as to how to do this please refer to Appendix B 2 After a moment a login window wil...

Страница 15: ...tive before the switch is rebooted If you want to keep the configurations effective even the switch is rebooted please click Saving Config You are suggested to click Saving Config before cutting off t...

Страница 16: ...iagram shows the working status of 48 10 100 1000Mbps RJ45 ports and 4 SFP ports of the switch The ports labeled as numbers are 10 100 1000Mbps ports the ports labeled as SFP are SFP ports Choose the...

Страница 17: ...ilization monitored every four seconds Monitoring the bandwidth utilization on each port facilitates you to monitor the network traffic and analyze the network abnormities Figure 4 3 Bandwidth Utiliza...

Страница 18: ...ystem time and the settings here will be used for other time based functions Choose the menu System System Info System Time to load the following page Figure 4 5 System Time The following entries are...

Страница 19: ...ig DST Status Enable or disable the DST Predefined Mode Select a predefined DST configuration USA First Sunday in April 02 00 Last Sunday in October 02 00 Australia First Sunday in October 02 00 First...

Страница 20: ...s The switch supports three modes to obtain an IP address Static IP DHCP and BOOTP The IP address obtained using a new mode will replace the original IP address On this page you can configure the syst...

Страница 21: ...tch in the DHCP server if DHCP option is selected but no DHCP server exists in the network a few minutes later the switch will restore the setting to the default 4 If DHCP or BOOTP option is selected...

Страница 22: ...ht to edit and modify User Status Select Enable Disable the user configuration Password Type a password for users login Confirm Password Retype the password User Table Select Select the desired entry...

Страница 23: ...nfig Restore Restore Config Click the Restore Config button to restore the backup configuration file It will take effect after the switch automatically reboots Note 1 It will take a few minutes to res...

Страница 24: ...mware Upgrade The switch system can be upgraded via the Web management page To upgrade the system is to get more functions and better performance Choose the menu System System Tools Firmware Upgrade t...

Страница 25: ...System System Tools System Reset to load the following page Figure 4 14 System Reset Note After the system is reset the switch will be reset to the default and all the settings will be cleared 4 4 Ac...

Страница 26: ...this option to limit the ports for login IP Address Mask These fields can be available for configuration only when IP based mode is selected Only the users within the IP range you set here are allowe...

Страница 27: ...ant to reconfigure please login again Access User Number Number Control Select Enable Disable the Number Control function Admin Number Enter the maximum number of the users logging on to the Web manag...

Страница 28: ...acant for a long time can reduce the power consumption effectively And you can enable the port when it is in need The parameters will affect the working mode of the port please set the parameters appr...

Страница 29: ...h can not be managed through the disabled port Please enable the port which is used to manage the switch 2 The parameters of the port members in a LAG should be set as the same 3 The SFP port only sup...

Страница 30: ...rroring Port Select the mirroring port number Mirrored Port Port Select Click the Select button to quick select the corresponding port based on the port number you entered Select Select the desired po...

Страница 31: ...to generate the cheating MAC address and quickly occupy the MAC Address Table When the MAC Address Table is full the switch will broadcast the packets to all the ports At this moment the attacker can...

Страница 32: ...d manually The learned entries will be cleared after the switch is rebooted Permanent When Permanent mode is selected the learned MAC address will be out of the influence of the aging time and can onl...

Страница 33: ...ist Select the port that to be forwarded to Port Isolation List Port Display the port number Forward Portlist Display the forwardlist 5 2 LAG LAG Link Aggregation Group is to combine a number of ports...

Страница 34: ...ber port is 2000Mbps counting the up linked speed of 1000Mbps and the down linked speed of 1000Mbps 2 The traffic load of the LAG will be balanced among the ports according to the Aggregate Arithmetic...

Страница 35: ...ember Operation Allows you to view or modify the information for each LAG Edit Click to modify the settings of the LAG Detail Click to get the information of the LAG Click the Detail button for the de...

Страница 36: ...ll member ports 2 A port can only be added to a LAG If a port is the member of a LAG the port number will be displayed in gray and can not be selected 5 3 Traffic Monitor The Traffic Monitor function...

Страница 37: ...select the corresponding port based on the port number you entered Port Displays the port number Packets Rx Displays the number of packets received on the port The error packets are not counted in Pa...

Страница 38: ...e in seconds to specify the refresh interval Statistics Port Enter a port number and click the Select button to view the traffic statistics of the corresponding port Received Displays the details of t...

Страница 39: ...ed by a port during packet transmissions 5 4 MAC Address The main function of the switch is forwarding the packets to the correct ports based on the destination MAC address of the packets Address Tabl...

Страница 40: ...rresponding port number of your desired entry Type Select the type of your desired entry All This option allows the address table to display all the address entries Static This option allows the addre...

Страница 41: ...the following page Figure 5 12 Static Address The following entries are displayed on this screen Create Static Address MAC Address Enter the static MAC Address to be bound VLAN ID Enter the correspon...

Страница 42: ...ot to be recognized dynamically by the switch Therefore please ensure the entries in the Static Address Table are correct and valid 3 The MAC address in the Static Address Table can not be added to th...

Страница 43: ...the Bind button to bind the MAC address of your selected entry to the corresponding port statically Tips Setting aging time properly helps implement effective MAC address aging The aging time that is...

Страница 44: ...MAC address of your desired entry VLAN ID Enter the VLAN ID number of your desired entry Filtering Address Table Select Select the entry to delete the corresponding filtering address It is multi optio...

Страница 45: ...broadcast packets are limited in a VLAN Hosts in the same VLAN communicate with one another via Ethernet whereas hosts in different VLANs communicate with one another through the Internet devices such...

Страница 46: ...VLAN ID is a 12 bit field indicating the ID of the VLAN to which this packet belongs It is in the range of 0 to 4 095 Generally 0 and 4 095 is not used so the field is in the range of 1 to 4 094 VLAN...

Страница 47: ...ter being received by ports of different link types which is illustrated in the following table Port Type Receiving Packets Forwarding Packets Untagged Packets Tagged Packets Access When untagged pack...

Страница 48: ...he corresponding entry based on the VLAN ID number you entered Select Select the desired entry to delete the corresponding VLAN It is multi optional VLAN ID Displays the ID number of VLAN Description...

Страница 49: ...Select button to quick select the corresponding entry based on the port number you entered Select Select the desired port to be a member of VLAN or leave it blank It s multi optional Port Displays th...

Страница 50: ...port for configuration It is multi optional Port Displays the port number Link Type Select the Link Type from the pull down list for the port ACCESS The ACCESS port can be added in a single VLAN and t...

Страница 51: ...N Configuration Procedure Step Operation Description 1 Set the link type for port Required On the VLAN 802 1Q VLAN Port Config page set the link type for the port based on its connected device 2 Creat...

Страница 52: ...VLAN with its VLAN ID as 10 owning Port 2 and Port 3 3 Create VLAN20 Required On VLAN 802 1Q VLAN VLAN Config page create a VLAN with its VLAN ID as 20 owning Port 3 and Port 4 Configure Switch B Ste...

Страница 53: ...ugh the designated bridge The switch with the lowest bridge ID will be chosen as the designated bridge Root Path Cost Indicates the sum of the path cost of the root port and the path cost of all the s...

Страница 54: ...hat is the new root port and the designated port begins to forward data after twice forward delay which ensures the new configuration BPDUs are spread in the whole network BPDU Comparing Principle in...

Страница 55: ...th cost the switch generates a designated port BPDU for each of its ports Root ID is replaced with that of the root port Root path is replaced with the sum of the root path cost of the root port and t...

Страница 56: ...ANs to be forwarded along their respective paths so as to provide redundant links with a better load balancing mechanism Features of MSTP MSTP combines VLANs and spanning tree together via VLAN to ins...

Страница 57: ...ng In this status the port can only receive BPDU packets Disconnected In this status the port is not participating in the STP Port Roles In an MSTP the following roles exist Root Port Indicates the po...

Страница 58: ...plemented on STP Config and STP Summary pages 7 1 1 STP Config Before configuring spanning trees you should make clear the roles each switch plays in each spanning tree instance Only one switch can be...

Страница 59: ...number of BPDU packets transmitted per Hello Time interval The default value is 5pps Max Hops Enter a value from 1 to 40 to set the maximum number of hops that occur in a specific region before the BP...

Страница 60: ...lt value is recommended 7 1 2 STP Summary On this page you can view the related parameters for Spanning Tree function Choose the menu Spanning Tree STP Config STP Summary to load the following page Fi...

Страница 61: ...rmining the root port The lower value has the higher priority IntPath IntPath Cost is used to choose the path and calculate the path costs of ports in an MST region It is an important criterion on det...

Страница 62: ...ports and enable the BPDU protection function as well This not only enables these ports to transit to forwarding state rapidly but also secures your network 2 All the links of ports in a LAG can be co...

Страница 63: ...property of MST region is used to describe the VLAN to Instance mapping configuration You can assign VLAN to different instances appropriate to your needs Every instance is a VLAN group independent o...

Страница 64: ...ed to the CIST Clear Click the Clear button to clear up all VLAN IDs from the instance ID The cleared VLAN ID will be automatically mapped to the CIST VLAN Instance Mapping VLAN ID Enter the desired V...

Страница 65: ...ort in the instance It is an important criterion on determining if the port connected to this port will be chosen as the root port Path Cost Path Cost is used to choose the path and calculate the path...

Страница 66: ...ion can be implemented on Port Protect and TC Protect pages Port Protect function is to prevent the devices from any malicious attack against STP features 7 4 1 Port Protect On this page you can confi...

Страница 67: ...f the account number of the received TC BPDUs exceeds the maximum number you set in the TC threshold field the switch will not performs the removing operation in the TC protect cycle Such a mechanism...

Страница 68: ...alculating STP because of link failures and network congestions Root Protect Root Protect is to prevent wrong network topology change caused by the role change of the current legal root bridge TC Prot...

Страница 69: ...value is 20 TC Protect Cycle Enter a value from 1 to 10 to specify the TC Protect Cycle The default value is 5 7 5 Application Example for STP Function Network Requirements Switch A B C D and E all s...

Страница 70: ...ure ports On VLAN 802 1Q VLAN page configure the link type of the related ports as Trunk and add the ports to VLAN 101 VLAN 106 The detailed instructions can be found in the section 802 1Q VLAN 2 Enab...

Страница 71: ...of Instance 2 On Spanning Tree MSTP Instance Instance Config page configure the priority of Instance 2 to be 0 Configure Switch D Step Operation Description 1 Configure ports On VLAN 802 1Q VLAN page...

Страница 72: ...Suggestion for Configuration Enable TC Protect function for all the ports of switches Enable Root Protect function for all the ports of root bridges Enable Loop Protect function for the non edge port...

Страница 73: ...is suitable for networks with sparsely users whereas broadcast is suitable for networks with densely distributed users When the number of users requiring this information is not certain unicast and b...

Страница 74: ...ng relationship is described as Figure 8 2 Figure 8 2 Mapping relationship between multicast IP address and multicast MAC address The high order 4 bits of the IP multicast address are 1110 identifying...

Страница 75: ...o IGMP report message from the host within a period of time IGMP Messages The switch running IGMP Snooping processes the IGMP messages of different types as follows 1 IGMP Query Message IGMP query mes...

Страница 76: ...a switch port connected to a multicast group member 2 Timers Router Port Time Within the time if the switch does not receive IGMP query message from the router port it will consider this port is not...

Страница 77: ...Multicast Select the operation for the switch to process unknown multicast Forward or Discard IGMP Snooping Status Description Displays IGMP Snooping status Member Displays the member of the correspo...

Страница 78: ...a port the switch will immediately remove this port from the multicast group upon receiving IGMP leave messages LAG Displays the LAG number which the port belongs to Note 1 Fast Leave on the port is...

Страница 79: ...port is not a member port any more Leave Time Specify the interval between the switch receiving a leave message from a host and the switch removing the host from the multicast groups Static Router Por...

Страница 80: ...deliver each VLAN owning a receiver one copy This mode wastes a lot of bandwidth The problem above can be solved by configuring a multicast VLAN By adding switch ports to the multicast VLAN and enabli...

Страница 81: ...se GENERAL as the link type of the member ports in the multicast VLAN 4 Configure the link type of the router port in the multicast VLAN as TRUNK or configure the egress rule as TAG and the link type...

Страница 82: ...onnected to the router and the packets are transmitted in VLAN3 port 4 is connected to user A and the packets are transmitted in VLAN4 port 5 is connected to user B and the packets are transmitted in...

Страница 83: ...re the VLAN ID of a multicast VLAN as 3 and keep the other parameters as default on Multicast IGMP Snooping Multicast VLAN page 5 Check Multicast VLAN 3 5 and Multicast VLAN 3 will be displayed in the...

Страница 84: ...ote If the configuration on VLAN Config page and multicast VLAN page is changed the switch will clear up the dynamic multicast addresses in multicast address table and learn new addresses 8 2 2 Static...

Страница 85: ...ilter When IGMP Snooping is enabled you can specified the multicast IP range the ports can join so as to restrict users ordering multicast programs via configuring multicast filter rules When applying...

Страница 86: ...modify the corresponding IP range It is multi optional IP Range ID Displays IP range ID Start Multicast IP Displays start multicast IP of the IP range End Multicast IP Displays end multicast IP of the...

Страница 87: ...mum number of multicast groups to prevent some ports taking up too much bandwidth LAG Displays the LAG number which the port belongs to Note 1 Multicast Filter feature can only have effect on the VLAN...

Страница 88: ...on the port number you entered Port Displays the port number of the switch Query Packet Displays the number of query packets the port received Report Packet V1 Displays the number of IGMPv1 report pa...

Страница 89: ...he ingress packets to different priority queues based on the priority modes This switch implements three priority modes based on port on 802 1P and on DSCP Queue scheduling algorithm When the network...

Страница 90: ...e Web management page you can configure different DS field mapping to the corresponding priority levels Non IP datagram with 802 1Q tag are mapped to different priority levels based on 802 1P priority...

Страница 91: ...of The default weight value ratio of TC0 TC1 TC2 and TC3 is 1 2 4 8 Figure 9 5 WRR Mode 3 SP WRR Mode Strict Priority Weight Round Robin Mode In this mode this switch provides two scheduling groups S...

Страница 92: ...function can be implemented on Port Priority Schedule Mode 802 1P Priority and DSCP Priority pages 9 1 1 Port Priority On this page you can configure the port priority Choose the menu QoS DiffServ Po...

Страница 93: ...priority are sent only when the queue with higher priority is empty WRR Mode Weight Round Robin Mode In this mode packets in all the queues are sent in order based on the weight value for each queue...

Страница 94: ...tween the 802 1P priority and TC Required On QoS DiffServ 802 1P Priority page configure the mapping relation between the 802 1P priority and TC 2 Select a schedule mode Required On QoS DiffServ Sched...

Страница 95: ...led as CoS0 CoS7 Note To complete QoS function configuration you have to go to the Schedule Mode page to select a schedule mode after the configuration is finished on this page Configuration Procedure...

Страница 96: ...idth Control Rate Limit to load the following page Figure 9 10 Rate Limit The following entries are displayed on this screen Rate Limit Config Port Select Click the Select button to quick select the c...

Страница 97: ...losest to the rate you entered as the real Ingress Egress rate For example if you enter 1000Kbps for egress rate the system will automatically select 1024Kbps as the real Egress rate 3 When egress rat...

Страница 98: ...ect Enable Disable to enable disable the multicast control function for the port UL Frame Select Enable Disable to enable disable the UL Frame control function for the port Rate bps Select the bandwid...

Страница 99: ...Agent is the server software operated on network devices with the responsibility of receiving and processing the request packets from SNMP Management Station In the meanwhile Agent will inform the SN...

Страница 100: ...identify the management objects of the device in SNMP messages SNMP adopts the hierarchical architecture to identify the managed objects It is like a tree and each tree node represents a managed objec...

Страница 101: ...munity pages 10 1 1 Global Config To enable SNMP function please configure the SNMP function globally on this page Choose the menu SNMP SNMP Config Global Config to load the following page Figure 10 3...

Страница 102: ...screen View Config View Name Give a name to the View for identification Each View can include several entries with the same name MIB Object ID Enter the Object Identifier OID for the entry of View Vie...

Страница 103: ...P Community page directly v2c SNMPv2c is defined for the group In this model the Community Name is used for authentication SNMP v2c can be configured on the SNMP Community page directly v3 SNMPv3 is d...

Страница 104: ...me in the entry Write View Displays the Write View name in the entry Notify View Displays the Notify View name in the entry Operation Click the Edit button to modify the Views in the entry and click t...

Страница 105: ...ash Algorithm This authentication mode has a higher security than MD5 mode Auth Password Enter the password for authentication Privacy Mode Select the Privacy Mode for the SNMP v3 User None No privacy...

Страница 106: ...ts of the community read only Management right of the Community is restricted to read only and changes cannot be made to the corresponding View read write Management right of the Community is read wri...

Страница 107: ...g page enable SNMP function globally 2 Create SNMP View Required On the SNMP SNMP Config SNMP View page create SNMP View of the management agent The default View Name is viewDefault and the default OI...

Страница 108: ...age Figure 10 8 Notification Config The following entries are displayed on this screen Create Notification IP Address Enter the IP Address of the management Host UDP Port Enter the number of the UDP p...

Страница 109: ...t Retry Displays the amount of times the switch resends an inform request Operation Click the Edit button to modify the corresponding entry and click the Modify button to apply 10 3 RMON RMON Remote M...

Страница 110: ...rm event is generated which triggers the switch to act in the set way The RMON Groups can be configured on the History Control Event Config and Alarm Config pages 10 3 1 History Control On this page y...

Страница 111: ...ve a description to the event for identification Type Select the event type which determines the act way of the network device in response to an event None No processing Log Logging the event Notify S...

Страница 112: ...e threshold Rising Threshold Enter the rising counter value that triggers the Rising Threshold alarm Rising Event Select the index of the corresponding event which will be triggered if the sampled val...

Страница 113: ...orresponding alarm entry Note When alarm variables exceed the Threshold on the same direction continuously for several times an alarm event will only be generated on the first time that is the Rising...

Страница 114: ...ation device is reachable and detect the route hops from the switch to the destination device 11 1 System Monitor System Monitor functions to display the utilization status of the memory and the CPU o...

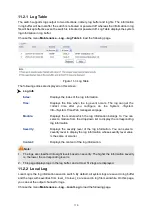
Страница 115: ...ort for network administrator to monitor network operation and diagnose malfunction The Logs of switch are classified into the following eight levels Severity Level Description emergencies 0 The syste...

Страница 116: ...splays the module which the log information belongs to You can select a module from the drop down list to display the corresponding log information Severity Displays the severity level of the log info...

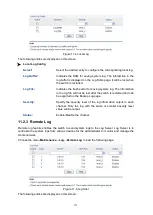
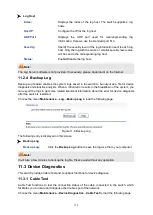
Страница 117: ...e lost after the switch is restarted and can be exported on the Backup Log page Severity Specify the severity level of the log information output to each channel Only the log with the same or smaller...

Страница 118: ...lysis When a critical error results in the breakdown of the system you can export the logs to get some related important information about the error for device diagnosis after the switch is restarted...

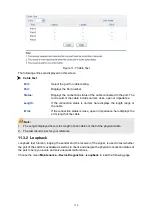
Страница 119: ...If the connection status is close open or impedance here displays the error length of the cable Note 1 The Length displayed here is the length of pair cable not that of the physical cable 2 The test...

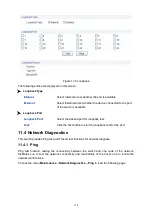
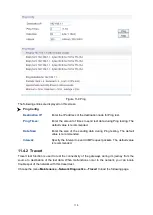
Страница 120: ...ed port for loopback test Test Click the Test button to start the loopback test for the port 11 4 Network Diagnostics This switch provides Ping test and Tracert test functions for network diagnose 11...

Страница 121: ...sending data during Ping testing The default value is recommended Interval Specify the interval to send ICMP request packets The default value is recommended 11 4 2 Tracert Tracert test function is us...

Страница 122: ...following entries are displayed on this screen Tracert Config Destination IP Enter the IP address of the destination device Max Hop Specify the maximum number of the route hops the test data can pass...

Страница 123: ...uplex Transmission Medium 10Base T UTP STP of Cat 3 or above 100Base TX UTP STP of Cat 5 or above 100Base FX MMF or SMF SFP Module Optional 1000Base T 4 pair UTP 100m of Cat 5 Cat 5e Cat 6 or above 10...

Страница 124: ...s manual if necessary 1 On the Windows taskbar click the Start button and then click Control Panel 2 Click the Network and Internet Connections icon and then click on the Network Connections tab in th...

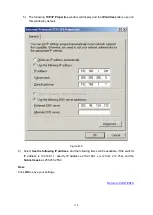
Страница 125: ...window by default Figure B 3 6 Select Use the following IP address And the following items will be available If the switch s IP address is 192 168 1 1 specify IP address as 192 168 1 x x is from 2 to...

Страница 126: ...e output queues Domain Name Service DNS A system used for translating host names for network nodes into IP addresses Dynamic Host Control Protocol DHCP Provides a framework for passing configuration i...

Страница 127: ...O 7 Layer Data Communications Protocol This is related directly to the hardware interface for network devices and passes on traffic based on MAC addresses Link Aggregation See Port Trunk Management In...

Страница 128: ...cts data along the shortest available path maximizing the performance and efficiency of the network Telnet Defines a remote communication facility for interfacing to a terminal device over TCP IP Tran...

Отзывы: