LevelOne FCS-5056 Скачать руководство пользователя страница 9


Hardware Manual 


Installation Procedures Using the 

Bundled Bracket 

Step 1: Install the Bundled Bracket 

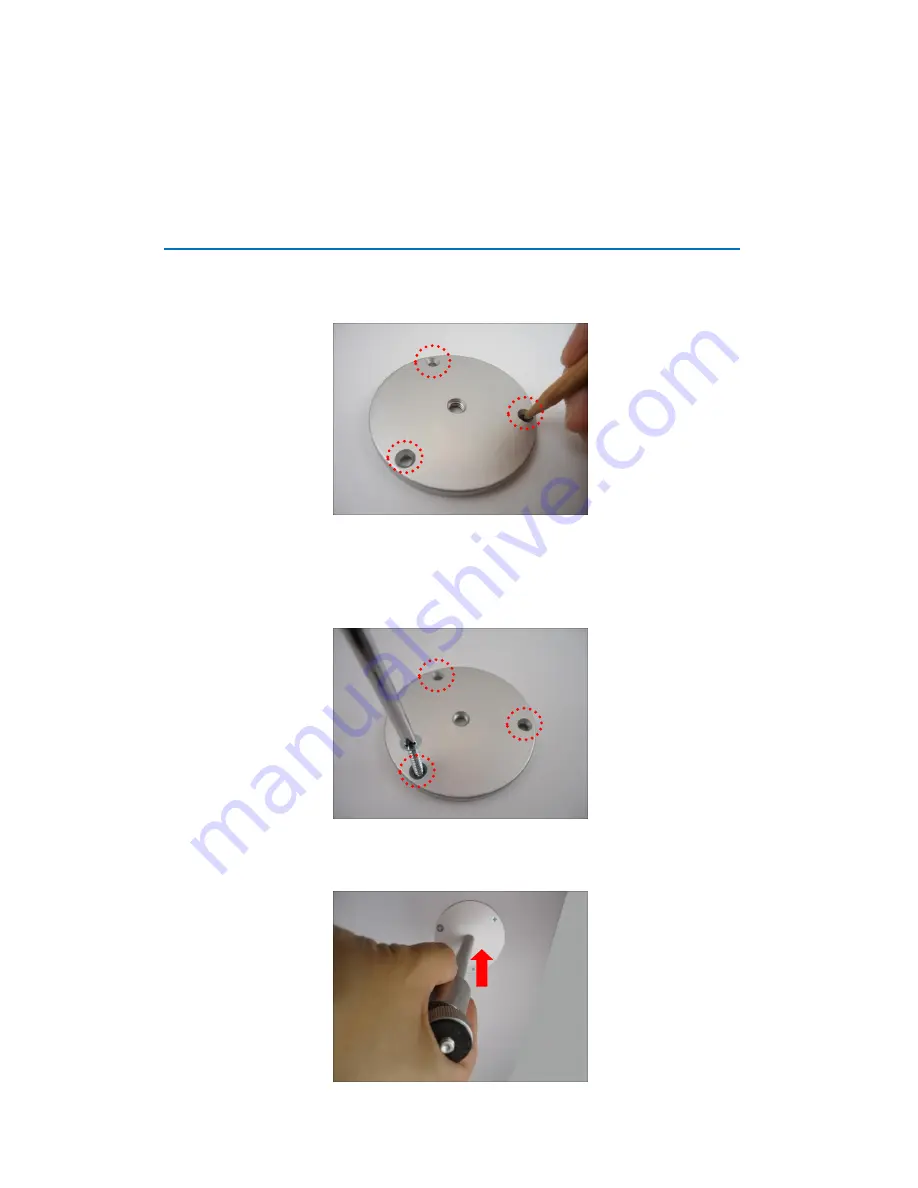
1.  Mark the location of the three (3) screw holes using the bracket plate included in the 

package. 


NOTE:

 Depending on the surface where you will install the camera, it may be necessary to 

drill the holes and use the supplied screw tox. 


2.  Attach the plate to the surface using the three (3) supplied screws. 


3.  Attach the bracket to the plate. 


Содержание FCS-5056

Страница 1: ...Fixed Network Camera Hardware User Manual FCS 5056 FCS 5063 Ver 2014 06 30...

Страница 2: ...e 12 Using the Waterproof Tape 13 Using the Bundled Conduit Gland 14 Replacing the Pre Installed Square Shaped Pigtail 19 Step 5 Connect the Cable 23 Step 6 Access the Camera Live View 23 Other Adjust...

Страница 3: ...Hardware Manual 3 Appendix 34 How to Make an Ethernet Cable 34...

Страница 4: ...to service this video device yourself as opening or removing covers may expose you to dangerous voltage or other hazards Refer all servicing to qualified service personnel Trademarks All names used i...

Страница 5: ...the equipment off and on the user is encouraged to try to correct the interference by one or more of the following measures Reorient or relocate the receiving antenna Increase the separation between t...

Страница 6: ...lified service personnel Damage Requiring service Disconnect this video product from the power supply immediately and refer servicing to qualified service personnel under the following conditions 1 Wh...

Страница 7: ...Hardware Manual 7 Introduction Package Contents Camera Sunshield Sunshield Screw Kit Bracket Bracket Plate Lens Focus Tuner Conduit Gland Quick Installation Guide...

Страница 8: ...default settings To do the reset press and hold the Reset button for at least 5 seconds or until the Power LED lights up When the Power LED lights up again reset is complete See How to Reset the Camer...

Страница 9: ...ation of the three 3 screw holes using the bracket plate included in the package NOTE Depending on the surface where you will install the camera it may be necessary to drill the holes and use the supp...

Страница 10: ...be installed outdoors attach the sunshield to protect the lens from all types of weather and lighting conditions 1 Loosely secure the supplied screws and washers to attach the sunshield 2 Slide to adj...

Страница 11: ...p 4 Waterproof and Connect the Cable on page 12 Some methods may require the cable to be waterproof first before installing the camera to its bracket 1 Depending on how you want to install the camera...

Страница 12: ...led outdoors check the type of Ethernet port and follow the applicable procedures to waterproof the cable connection Type of Ethernet Port Description Square Shaped There are three 3 ways to manage an...

Страница 13: ...Ethernet cables are only designed for indoor use and may deteriorate quickly when exposed to outdoor elements Exterior grade Ethernet cables are waterproof and do not require a conduit CAUTION If the...

Страница 14: ...ended to use a flexible conduit with 1 2 diameter and the conduit gland included in the package to protect the camera cabling In this case the pre installed network cable with pigtail female connector...

Страница 15: ...il 1 Loosen the three 3 screws to detach the back cover NOTE A cable is connected inside the camera do not abruptly pull the back cover 2 Disconnect the network connector 3 Remove the pre installed ca...

Страница 16: ...the Conduit Gland and Flex Conduit 1 Disassemble the bundled conduit gland as shown below 2 Pull the Ethernet cable through the flex conduit 3 Insert the clamping nut through the flex conduit Clamping...

Страница 17: ...ttach it at the end of the flex conduit Step 3 Install the Ethernet Cable 1 Insert the body A to the back cover and secure it with the lock nut B 2 Insert the Ethernet cable through the back cover and...

Страница 18: ...ssible water leak Step 4 Connect the Ethernet Cable 1 Connect the Ethernet cable to the Ethernet port inside the camera 2 When done close the back cover by tightening the three 3 screws NOTE Make sure...

Страница 19: ...e and gland are resistant to salt water weak acid alcohol oil grease and common solvents In case the installation environment requires a change of this network cable follow the step by step procedures...

Страница 20: ...e the camera do not abruptly pull the back cover 2 Disconnect the network connector A and remove the sealing nut B 3 Pull out the network cable from the back cover and disassemble the parts as marked...

Страница 21: ...tor to the Ethernet cable See How to Make an Ethernet Cable on page 34 for more information 3 Assemble the seal and claw and then connect the RJ 45 connector to the Ethernet port inside the camera 4 A...

Страница 22: ...When replacing the pre installed network cable it is recommended to use exterior grade Ethernet cables CAT5 CAT5e CAT6 ordinary Ethernet cables are only designed for indoor use and may deteriorate qu...

Страница 23: ...or to a network PC and a power source See Power over Ethernet PoE connection example below Network AC Power Source PoE Injector Power Cable Ethernet Cable Ethernet Cable Data Power Ethernet Cable Data...

Страница 24: ...ts local video recording or saving of snapshots to a memory card NOTE Supports microSDHC and microSDXC cards How to Insert the Memory Card 1 Loosen the three 3 screws to detach the back cover NOTE A c...

Страница 25: ...er seal is properly attached and the back cover is closed to ensure water or dust cannot enter the camera How to Remove the Memory Card In case there is a need to remove the card make sure to access t...

Страница 26: ...era do not abruptly pull the back cover 2 Using a pointed object such as the tip of a pen press and hold the Reset button for at least 5 seconds or until the Power LED lights up to reset the camera 3...

Страница 27: ...er running then you do not need to configure the IP addresses at all both the camera and the PC would request a unique IP address from DHCP server automatically In such case the camera will immediatel...

Страница 28: ...are tool that can not only discover the cameras but also list lots of valuable information such as IP and MAC addresses serial numbers firmware versions etc and allows quick configuration of multiple...

Страница 29: ...nd it does not detect any DHCP services it will automatically assign itself a default IP 192 168 0 100 Whereas the default port number would be 80 In order to access that camera the IP address of the...

Страница 30: ...ity With the procedure shown above all the cameras will have unique IP addresses starting from 192 168 0 101 In case there are 20 cameras selected the last one of the cameras would have the IP 192 168...

Страница 31: ...er browsers free third party software plug ins must be installed to the PC first to be able to get the live video feed from the camera Browser Required Plug In Safari QuickTime http www apple com quic...

Страница 32: ...g address into Web browser s address bar http 192 168 0 100 Upon successful connection to the camera the user interface called Web Configurator would appear together with the login page The HTTP port...

Страница 33: ...Hardware Manual 33 To check the firmware version through the Web Configurator access the Setup page and click System System Info For further operations please refer to the Firmware User Manual 1 2 3...

Страница 34: ...w 1 Stripe Orange 2 Orange 3 Stripe Green 4 Blue 5 Stripe Blue 6 Green 7 Stripe Brown 8 Brown 4 Pinch the wires between your fingers and straighten them out 5 Use the scissors to make a straight cut a...

Отзывы: