-
285
-
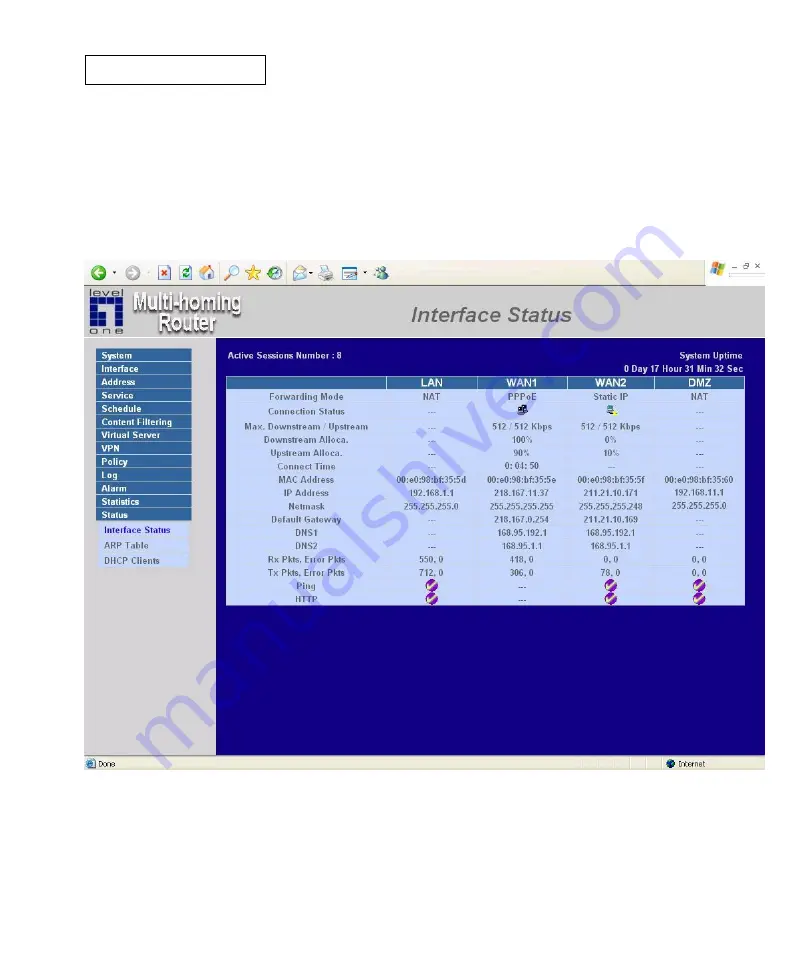
Interface Status
Entering the Interface Status window
Click on
Status
in the menu bar, then click
Interface Status
below it. A window will appear
providing information from the
Configuration
menu.
Interface Status
will list the settings
for LAN
Interface, WAN 1/2 Interface, and the DMZ Interface.
Содержание FBR-2000
Страница 1: ...LevelOne FBR 2000 2 WAN Load Balance Broadband Router User Manual V1 3...
Страница 25: ...18...
Страница 34: ...27 Step 4 Adding a new Incoming Policy In the incoming window click the New Entry button...
Страница 48: ...41...
Страница 50: ...43...
Страница 56: ...49 Permitted IPs Only the authorized IP address is permitted to manage the Multi Homing Gateway...
Страница 61: ...54 Software Update Under Software Update the admin may update the device s software with a newer software...
Страница 68: ...61...
Страница 70: ...63...
Страница 72: ...65...
Страница 98: ...91...
Страница 121: ...114 Blocked URL site When a user from the LAN network tries to access a blocked URL the error below will appear...
Страница 123: ...116 When the system detects the setting the Multi Homing Gateway Gateway will spontaneously work...
Страница 133: ...126...
Страница 145: ...138...
Страница 147: ...140...
Страница 154: ...147...
Страница 158: ...151 Step 2 In the Execute window enter the command MMC in Open...
Страница 159: ...152 Step 3 Enter the Console window click Console C option and click Add Remove Embedded Management Option...
Страница 161: ...154 Step 5 Choose Local Machine L for finishing the setting of Add...
Страница 162: ...155 Step 6 Finish the setting of Add...
Страница 164: ...157 Step 8 Click Next...
Страница 165: ...158 Step 9 Enter the Name of this VPN and optionally give it a brief description...
Страница 166: ...159 Step 10 Disable Activate the default response rule And click Next...
Страница 167: ...160 Step 11 Completing the IP Security Policy setting and click Finish Enable Edit properties...
Страница 168: ...161 Step 12 In VPN_B window click Add and please don t click Use Add Wizard...
Страница 169: ...162 Step 13 In IP Filter List tab click Add...
Страница 170: ...163 Step 14 In IP Filter List window please don t choose Use Add Wizard and change Name to VPN_B WAN TO LAN Click Add...
Страница 172: ...165 Step 16 Finish the setting and close IP Filter List window...
Страница 173: ...166 Step 17 Click Filter Action tab and choose Require Security Click Edit...
Страница 174: ...167 Step 18 In Security Methods tab choose accept unsecured communication but always respond using IPSec...
Страница 175: ...168 Step 19 Click Edit in Custom None 3DES MD5...
Страница 176: ...169 Step 20 Click Custom For professional user and click Edit...
Страница 178: ...171 Step 22 Click Connection Type tab and click all network connections...
Страница 180: ...173 Step 24 Click Authentication Methods and click Edit...
Страница 181: ...174 Step 25 Choose Use this string to protect the key exchange Preshared Key And enter the key 123456789...
Страница 182: ...175 Step 26 Finish the setting and close the window...
Страница 183: ...176 Step 27 Finish the Policy setting of VPN_B WAN TO LAN...
Страница 184: ...177 Step 28 Enter VPN_B window again and click Add to add second IP Security Policy Please don t enable Use Add Wizard...
Страница 185: ...178 Step 29 In New Rule Properties click Add...
Страница 186: ...179 Step 30 In IP Filter List window please disable Use Add Wizard and change Name to VPN_B LAN TO WAN Click Add...
Страница 188: ...181 Step 32 Finish the setting and close IP Filter List window...
Страница 189: ...182 Step 33 Click Filter Action tab and choose Require Security Click Edit...
Страница 190: ...183 Step 34 In Security Methods tab choose accept unsecured communication but always respond using IPSec...
Страница 191: ...184 Step 35 Click Edit in Custom None 3DES MD5...
Страница 192: ...185 Step 36 Click Custom For professional user and click Edit...
Страница 194: ...187 Step 38 Click Connection Type tab and click all network connections...
Страница 196: ...189 Step 40 Click Authentication Methods and click Edit...
Страница 197: ...190 Step 41 Choose Use this string to protect the key exchange Preshared Key And enter the key 123456789...
Страница 198: ...191 Step 42 Finish the setting and close the window...
Страница 199: ...192 Step 43 Finish the Policy setting of VPN_B LAN TO WAN...
Страница 200: ...193 Step 44 In VPN_B window click General tab And click Advanced for Key Exchange using these settings...
Страница 201: ...194 Step 45 Click Master key Perfect Forward Secrecy...
Страница 202: ...195 Step 46 Move IKE 3DES MD5 up to the highest order Finish all settings...
Страница 203: ...196 Step 47 Finish the settings of Company B s Windows 2000 VPN...
Страница 204: ...197 Step 48 Click the right button of mouse in VPN_B and enable Assign...
Страница 205: ...198 Step 49 To restart IPSec by Start Settings Control Panel...
Страница 206: ...199 Step 50 Enter Control Panel and click Administrative Tools...
Страница 207: ...200 Step 51 After entering Administrative Tools click Services...
Страница 208: ...201 Step 52 After entering Service click IPSec Services Restart the Service...
Страница 209: ...202 Step 53 Finish all settings...
Страница 211: ...204...
Страница 218: ...211...
Страница 224: ...217 Step 9 Click OK to finish the setting of Company B...
Страница 228: ...221 Step 3 Click OK to save modifications or click Cancel to cancel modifications...
Страница 267: ...260...
Страница 288: ...281...
Страница 297: ...290 Step 4 When the following screen appears the setup is completed...
Страница 300: ...293 Step 8 When the following screen appears the setup is completed...
Страница 302: ...295 Step 7 A new Virtual Service should appear...
Страница 303: ...296 Step 8 Go to the Incoming window under the Policy menu then click on the New Entry button...
Страница 304: ...297 Step 9 In the Add New Policy window set each parameter then click OK...
Страница 305: ...298 Step 10 An Incoming FTP policy should now be created...
Страница 307: ...300 Step 3 In the Add New IP Mapping window enter each parameter and then click OK...
Страница 308: ...301 Step 4 When the following screen appears the IP Mapping setup is completed...
Страница 309: ...302 Step 5 Go to the Incoming window under the Policy menu Step 6 Click the New Entry button...
Страница 310: ...303 Step 7 In the Add New Policy window set each parameter then click OK Step 8 Open all the services ANY...
Страница 311: ...304 Step 9 The setup is completed...


