background image

EN

13

CHECKING THE ACCURACY

IMPORTANT!!!


Always check accuracy before starting work! 

LEVELFIX is not responsible for any damage caused by the use 
of this laser. You are responsible for the use and accuracy of 
the instrument at all times.

1. 

Place the 860H on a flat, level surface or tripod approxi

-

mately 100 feet (30 meters) from a wall.

2. 

Align the first axis so that it is perpendicular to the wall. 

Let the 860H level itself fully automatically.

3. 

Mark the position of the beam (X+).

4. 

Rotate the laser 180° and let the laser level itself againy.

5. 

Mark the opposite side of the first axis (X-)

6. 

Align the second axis of the 860H by turning it 90° so 
that it is perpendicular to the wall. Let the laser level 
itself again.

7. 

Mark the position of the beam (Y+).

8. 

Rotate the laser 180° and let the laser level itself again.

9. 

Mark the opposite side of the first axis (Y-) 

The 860 is within spec if the maximum distance 

between the 4 marks is less than 3mm.

If the distance is greater than 3 mm, the laser must be 
calibrated.

Please contact your dealer or a LEVELFIX authorized ser-
vice center for this. 

SET UP

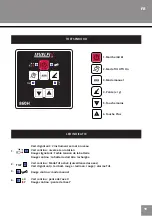
Place the laser on a flat surface or on tripod. Press KEY 1 to 

switch the instrument on. The laser will level and LED 1 will 

flash green. When the laser is leveled, LED 1 will glow contin

-

uous green and the laser will begin to rotate. The laser is now 
ready for use. 

After setting, press KEY 4, LED 4 will be green. A slope in the 
X-axis can now be set. The Y-axis will remain level in this 
position. Also, the TILT function will continue to operate on the 
Y-axis. With KEY 5 & 6 you can now set a slope up or down on 
the X-axis.

Press KEY 4 again to set a grade on the Y axis, LED 4 will be 
red. The X-axis will remain level in this position. Also, the TILT 
function will continue to operate on the X-axis. With KEY 5 & 6 
you can now set a slope up or down on the Y-axis. 

Press KEYN 3 to activate manual mode. LED 3 will light up red. 

The laser is no longer self-leveling.

 When the manual mode 

is switched on, the laser can be set at an arbitrary angle of up 
to 50°. 

After about 30 seconds, the TILT function will be turned on 
automatically. TILT LED 2 will then light up green. In the event 

of a shock or severe vibration affecting the accuracy of the 
laser, the laser will stop and the TILT LED (2) will flash green.


You can start the laser again by pressing the TILT KEY (2). 

In 

this case, you should check whether the laser is still set to 
the correct level. 

SETTING A GRADE

USE OF THE MANUAL MODE

TILT FUNCTION

Содержание 860H

Страница 1: ...LEVELFIX 860H GEBRUIKSAANWIJZING USER MANUAL MANUEL D UTILISATION NL EN FR...

Страница 2: ...VAN DE LASER 6 HET INSTELLEN VAN EEN AFSCHOT 6 GEBRUIK VAN DE MANUELE MODUS 6 WERKEN VAN DE TILT FUNCTIE 6 CONTROLEREN VAN DE NAUWKEURIGHEID 6 ONDERHOUD 7 MOGELIJKE FOUTEN 7 GARANTIE EN AANSPRAKELIJK...

Страница 3: ...e van het toestel mogen enkel door een erkende serviceonderneming worden uitgevo erd Al onze apparaten worden in de fabriek gecontroleerd en zijn perfect afgesteld Het toestel kan echter door schok ke...

Страница 4: ...slagtemperatuur 4 8 mm 100 m 5 10 800 m afhankelijk van ontvanger 30 sec 600 rpm 1 635 nm 55 uur met accupack 10 uur Nimh Accupack IP67 10 50 C 20 60 C IDENTIFICATIE ACCU Type batterij Voltage Capacit...

Страница 5: ...ment stelt zich waterpas Groen continu Waterpas gesteld en roteert Rood knipperen Lage batterijspanning Rood continu Batterij moet opgeladen worden Groen continu Tilt modus aan as bewaking Groen knipp...

Страница 6: ...ats de laser zo vlak mogelijk op een statief of oppervlak Druk op TOETS 1 om in te schakelen De laser zal niveleren en LED 1 zal groen knipperen Wanneer de laser is genivelleerd zal LED 1 continu groe...

Страница 7: ...ng Wacht enkele minuten om het toestel aan de omgevingstem peratuur aan te passen De garantieperiode bedraagt 1 jaar De garantie geldt niet voor storingen of defecten die te wijten zijn aan slecht geb...

Страница 8: ...G WEEE conformiteit Dit product voldoet aan de vereisten van de richtlijn 2002 96 EG In toepassing van de Europese WEEE richtlijn AEEA is het ver boden om afgedankte elektrische en elektronische appar...

Страница 9: ...LED INDICATION 12 SET UP 13 SETTING A GRADE 13 USE OF THE MANUAL MODE 13 TILT FUNCTION 13 CHECKING THE ACCURACY 13 MAINTENANCE 14 POSSIBLE ERRORS 14 WARRANTY AND LIABILITY 14 USING THE BATTERY 14 ENV...

Страница 10: ...e and repair must only be done by a specialist company All devices are checked and shipped in perfect condition but should any impact occur a device may lose precision The user must regularly check th...

Страница 11: ...Temperature 4 8mm 100m 5 10 800 m depending on receiver 30 sec 600 rpm 1 635 nm 55 hours with battery pack 10 hours Nimh Battery Pack IP67 10 50 C 20 60 C IDENTIFICATION BATTERY Battery type Voltage C...

Страница 12: ...Instrument is leveling Green continuous Level and rotate Blinking red Low battery voltage Red continuous Battery needs charging Green continuous Tilt mode on axis monitoring Green flash batt led red...

Страница 13: ...ess KEY 1 to switch the instrument on The laser will level and LED 1 will flash green When the laser is leveled LED 1 will glow contin uous green and the laser will begin to rotate The laser is now re...

Страница 14: ...er being stored in a warm envi ronment wait a few minutes for the laser to reach room temperature before carrying out any measurements The device has a two year warranty This warranty does not cover b...

Страница 15: ...rective 2002 96 CE In accordance with the WEEE directive concerning the environment it is prohibited to abandon used electric or elec tronic equipment or leave them at a standard public dump The equip...

Страница 16: ...R 20 R GLAGE DE LA PENTE 20 UTILASTION DU MODE MANUEL 20 FONCTIONNEMENT DE LA FONCTION TILT 20 V RIFICATION DE LA PR CISION 20 ENTRETIEN 21 ERREURS POSSIBLES 21 GARANTIE ET RESPONSABILIT 21 UTILISATIO...

Страница 17: ...appareil ne peuvent treffectu s que par une soci t sp cialis e Les appareils sont tous v rifi s et partent parfaitement r gl s mais en cas de choc un instrument peut perdre de sa pr cision ou peut m...

Страница 18: ...ure de fonctionnement Temp rature de stockage 4 8 mm 100 m 5 10 800 m d pend du r cepteur 30 sec 600 rpm 1 635 nm 55 h avec batterie 10 uur Batterie Nimh IP67 10 50 C 20 60 C IDENTIFICATIE ACCU Type d...

Страница 19: ...e met niveau Vert continu nivel et en rotation Rouge clignotant Faible tension de la batterie Rouge continu la batterie doit tre recharg e Vert continu Mode Tilt activ surveillance des axes Vert clign...

Страница 20: ...e 1 pour mettre en marche Le laser se met niveau et la LED 1 clignote en vert Lorsque le laser est mis niveau la LED 1 est verte et le laser commence tourner Le laser est maintenant pr t tre utilis Ap...

Страница 21: ...chaud attendre quelques minutes que le laser se mette temp rature ambiante avant d effectuer des mesures La garantie sur l appareil est d une dur e d un an Cette garantie ne couvre pas les pannes ou...

Страница 22: ...irective 2002 96 CE En application de la directive DEEE concernant l environnement il est interdit d liminer des appareils lectriques ou lectroniques usag s dans la nature ou dans une simple d charge...

Страница 23: ...FR 23...

Страница 24: ...FOR MORE INFORMATION LEVELFIXINSTRUMENTS COM VERSION 2022 04 29...

Отзывы: