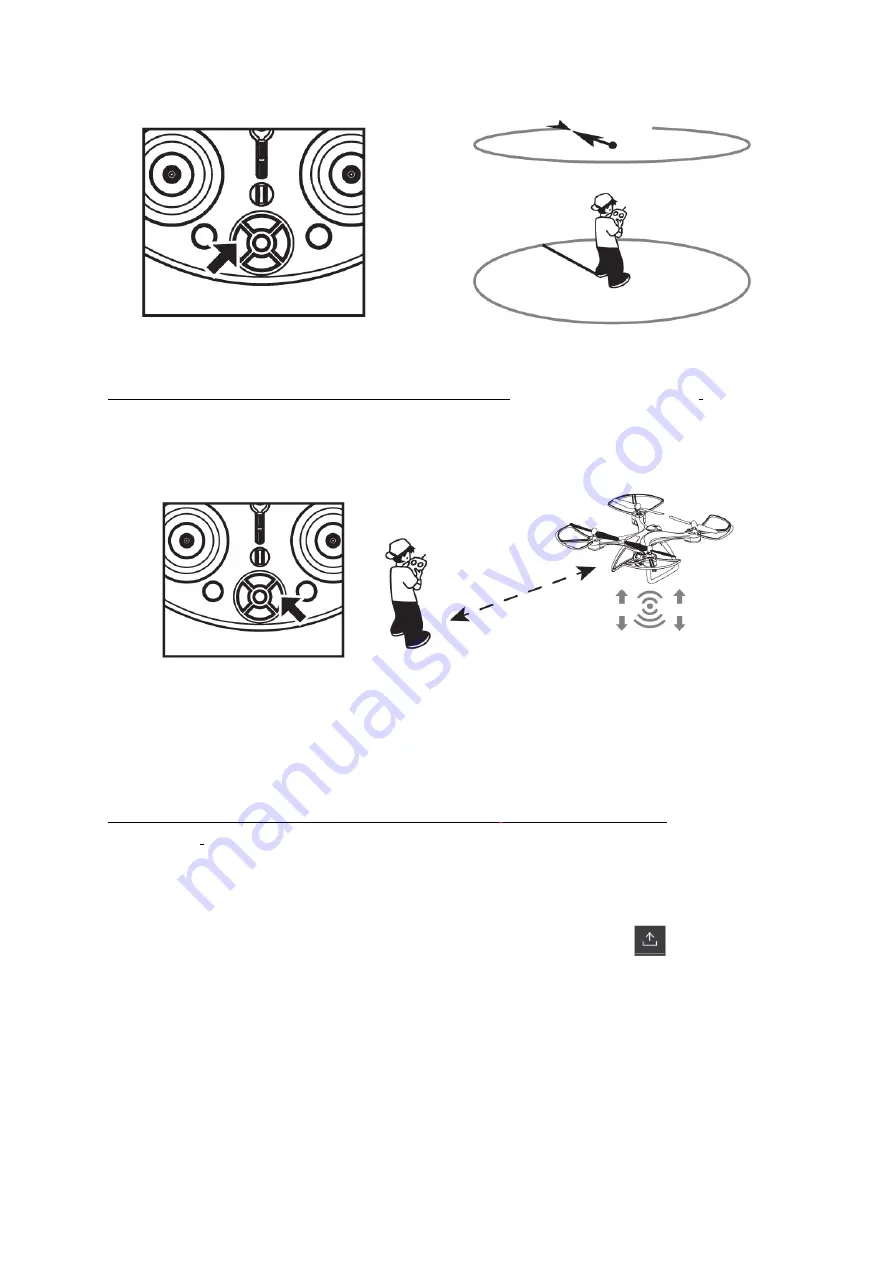
background image


FOLLOW


ME


FUNCTION:


This


function


will


only


work


with


the


app


open


GPS


MODE.


CALIBRATING


THE


DRONE”).


The


map


in


the


app


must


be


loaded


and


showing


in


the


app


screen.


Then,


press


the


one


key


follow


button


on


the


controller.


Use


of


the


righthand


side


joy


stick


on


the


controller


will


stop


this


function.


*


*


If


the


smart


phone


being


used


loses


power


or


if


a


phone


call


comes


through


during


follow


me


operation,


the


drone


will


stop


following


and


will


just


hover.


WAYPOINT


FLIGHT:


This


function


will


only


work


with


the


app


open


GPS


MODE.


(Please


see


the


section


CALIBRATING


THE


DRONE”

).


The


map


in


the


app


must


be


loaded


and


showing


in


the


app


screen.


Press


the


waypoint


flight


button


in


the


app.


In


the


app,


mark


the


flying


points


(max


of


5


flying


points


per


time)


and


press


.


You


can


set


the


flying


height,


hover


time


and


flight


speed


yourself).


After


setting,


press


the


one


key


take


off


button


on


the


controller,


the


drone


will


fly


to


the


first


point,


then


the


second


point


and


so


on.


It


will


be


hovering


and


waiting


for


the


next


instruction


after


the


last


point.


After


using


the


waypoint


flight,


delete


the


point


settings


in


the


app.


To


use


waypoint


flight


again,


mark


new


flying


points.


Содержание FD1550

Страница 1: ...ly within 5 5 km of an air field You must not fly closer than 30 meters to vehicles buildings or people You must only operate this drone in your line of sight in day light Do not let it get away from you You must not fly under any populous area such as beaches other people s backyards heavy populated parks or sports ovals where there is a game in progress ...

Страница 2: ...ope of the law and safety regulations 10 In experienced users of a drone are advised to use it under the guidance of another person who is experienced with drones 11 The drone is not designed to carry a payload 12 When the rotor blades of the drone are rotating at high speed do not touch or come into contact with them Keep any objects away from the rotating parts 13 Keep the drone and it s parts a...

Страница 3: ...th each other 29 In order to comply with the command of the magnetic environment requirement formulated by the Aviation Radio Bureau and the related authority during the regulated period in certain areas please stop using the controller of this drone when such regulation command is issued MAINTENANCE 1 Use a soft clean cloth to clean the drone 2 Do not put the drone or it s parts into water 3 Plea...

Страница 4: ...PARTS INCLUDED CONTROLLER ...

Страница 5: ... the phone holder Push in the phone holder along the sliding chute on the rear of the controller The phone holder is correctly in place when you hear a slight click Lock in the screw with a screwdriver To remove the phone holder remove the screw with a screwdriver Press the round button located just under the sliding chute on the rear of the controller While pressing the button down pull the phone...

Страница 6: ...ge of the battery can take 150 180 minutes The flight time on a fully charged battery is up to 15 minutes To charge the battery Remove the battery from the drone by pushing down on the release points on the battery Connect the charge lead to the charging port on the battery Connect the USB end to a USB charging point While the battery is charging the light on the battery will show red lights indic...

Страница 7: ... A battery which has not been used for a long time will lose it s charge automatically 7 Charging or discharging too often may reduce the use of the battery APP DOWNLOAD Scan the QR codes to download the app Google Play ios Alternatively you can search for the app by searching for HK GPS in the app store or google play store and download it to your smart phone WIFI 1 Once the drone is turned on ac...

Страница 8: ... To start flying move both the left hand and right hand side joystick at the same time Move the left hand side joystick to the 5 o clock position and the right hand side joystick to the 7 o clock position at the same time 6 When the blades on the drone have started spinning move the left hand joystick up to begin flight The one key take off will not work to start flight when using the controller o...

Страница 9: ... the right hand side of the drone will remain blinking can not receive GPS signal 4 After Pairing access the settings on your smart phone and open the WIFI settings Find the WIFI network HK GPS 720 XXXXX and connect to that WIFI network When the connection has been made successfully exit out of the settings on your smart phone 5 Open the app HK GPS on your smart phone 6 Choose drone model FX 8G in...

Страница 10: ...g and remain on GPS connection has been successful 10 Press the one key take off landing button to begin flight 11 To land press the throttle left hand joystick or the one key take off landing button Note If the drone hovers unstably pls land the drone and press this icon in the app interface for gyroscope calibration SPEED Press the speed button on the controller to change the flight speed 1 One ...

Страница 11: ...BASIC OPERATION ...

Страница 12: ...y return button is pressed again it will stop the return 1 The drone will return when battery power is low 2 The drone will return automatically when signal has been lost 3 The drone will return automatically if power is turned off the controller ONE KEY SURROUNDING This function will only work with the app open GPS MODE Please see the section CALIBRATING THE DRONE This function allows you to find...

Страница 13: ...on will only work with the app open GPS MODE Please see the section CALIBRATING THE DRONE The map in the app must be loaded and showing in the app screen Press the waypoint flight button in the app In the app mark the flying points max of 5 flying points per time and press You can set the flying height hover time and flight speed yourself After setting press the one key take off button on the cont...

Страница 14: ...he head of the drone Is facing to the front and the position of the camera is in the front and is consistent with the front of the remote controller When the drone is in headless mode the flying direction is operated by geography as shown below No matter how the drone turns it will follow the direction as it set while pairing Operation and flying as below ...

Страница 15: ...APP FUNCTIONS ...

Страница 16: ...be lit It is not a button Follow me Please see the section FOLLOW ME When follow me is pressed on the controller this icon will be lit it is not a button Settings Press to access a full list of settings Map Real time preview Press to switch between viewing a map of the area you are flying over or image from the camera on the drone on the display section on the app screen VR box access the screen t...

Страница 17: ...APP SETTINGS The app may update to improve it s performance occasionally additional settings and features may be added Press on the app to access various settings ...

Страница 18: ...button on the controller for two seconds The controller will beep twice and the green indicator 1 light on the controller will be blinking The timer of the video being taken will be show on the app screen To stop recording either press and hold the photo video button on the controller for two seconds The controller will beep twice and the green light will stop blinking on the controller The video ...

Страница 19: ...included rotor blades There are two types of rotor blades included with the drone A Blade clockwise rotation B Blade anti clockwise rotation 1 Remove the screw on the rotor blade 2 Remove the rotor blade by pulling it upward off the motor stalk 3 Replace the rotor blade by making sure to replace it with the equivalent blade A for A or B for B 4 Press the replacement blade into position making sure...

Страница 20: ...emergency stop button on controller or you can move the left hand side joystick to the 5 o clock position and the right hand side joystick to the 7 o clock position at the same time The drone will then quickly coast down to the ground It is highly recommended that you do not push this button unless it is an emergency ALTITUDE HOLD When the drone has not been connected with GPS flying it will have ...

Страница 21: ...tly 1 Replace the blades 2 Replace the motor The drone has no response 1 Unsuccessful pairing 2 Low battery in the drone or the controller 1 Pair again 2 Re charge the battery in the drone Change the batteries in the controller The LED light on the bottom right corner of the drone flashes slowly The drone is searching for GPS signal 1 During start up please wait for the GPS 2 Ensure pairing the dr...

Страница 22: ...TTER Operating Frequency 2 4GHZ Operating voltage 3 7V Mobile Device Holder 4 7 5 5 smart phones Controller battery 4 x 1 5V AA battery not included BATTERY Battery charge time 150 180 minutes Battery flight time up to 15 minutes Battery 3 7V 1800MAH Battery Type Li on battery Charge method USB Cable Energy 6 66wh Net weight of battery 51 4g Max Charging Power 5V CAMERA Camera resolution 720P Reso...

Страница 23: ...P Mobile APP HK GPS Live View Working Frequency 2 4Ghz 5G wifi signal Live View Quality 720P 20fps Latency depending on conditions and mobile device Required Operating Systems iOS 8 0 or later Android 4 1 2 or later Recommended Devices 4 7 to 6 0 Smart phones ...

Отзывы: