background image

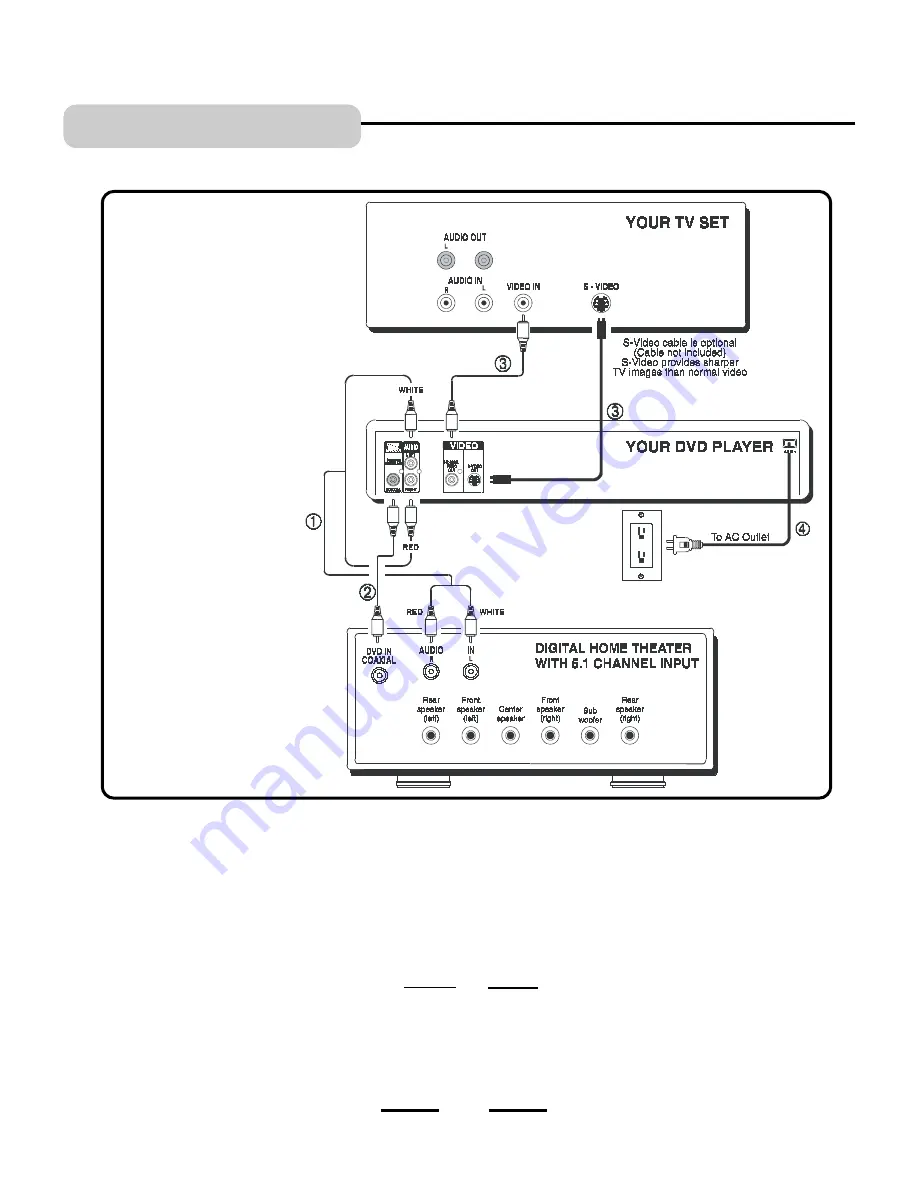
DVD TV + Dolby Digital Theater System (Audio/Video Receiver/Home Theater)

1. Insert the audio cables into the AUDIO OUT L (left -white) and R (right-red) jacks on the back of your DVD Player,

and into the corresponding audio input jacks on your audio video receiver.

2. If you have a Dolby Digital or Digital Theatre receiver, insert a coaxial digital cable (not included, see note above)

to the DIGITAL AUDIO OUT jack on the DVD player and to the Digital Input jack on the back of the receiver. This

connection will allow you to use the Dolby Digital or DTS decoder functions of your AV amplifier (receiver). You

must also set the Digital Output setting in the Audio Setup menu (see page 18).

3. Connect the video cable.

•

Basic video connection

 - Insert the video cable (yellow) to the VIDEO OUT jack on the back of your DVD

Player, and into the Video Input jack on your TV.

OR

•

S-Video

 (optional) -  If your TV has an S-Video Input jack, insert the S-Video cable to the S-VIDEO OUT jack

on the back of your DVD player and into the S-Video jack on your TV. If your TV doesn’t have S-Video, use the

basic video connection listed above as on Page 4 (yellow plugs: VIDEO IN or OUT, are not needed for S-Video).

4. Insert the AC power cord into an AC outlet.
5. Go to Page 20 for playing DVDs (discs).

CONNECTIONS

8

NOTE:

A coaxial cable is

not an antenna

coaxial cable, it is a

high quality audio

cable with RCA

jacks on both ends.

When buying this,

ask the store for

DVD coaxial audio

cable, this is for 5.1

channel sound.

IB-DVD2003-COMPUSA-E-061202

R

Содержание DVD- 2OO3

Страница 1: ...EAD CAREFULLY BEFORE USE DVD VIDEO PLAYER INSTRUCTION MANUAL MODEL DVD 2OO3 FULL ON SCREEN DISPLAY PLAYS DVD VIDEOS PLAYS ALL AUDIO CDS PLAYS CD R CDRW DISCS PLAYS MP3 RECORDED DISCS IB DVD2003 COMPUSA E 061202 ...

Страница 2: ...LADES CAN BE FULLY INSERTED TO PREVENT BLADE EXPOSURE TO PREVENT FIRE OR SHOCK HAZARD DO NOT EXPOSE THIS APPLIANCE TO RAIN OR MOISTURE 1 Read these instructions 2 Keep these instructions 3 Heed all warnings 4 Follow all instructions 5 Do not use this apparatus near water 6 Clean only with dry cloth 7 Do not block any ventilation openings install in accordance with the manufacturer s instructions 8...

Страница 3: ...nguages OSD MENU AUDIO and SUBTITLE 16 Select TV Screen Type 17 Select Screen Saver 18 Setting Audio Output 18 Custom Setup parental controls 19 Changing Password 19 Basic Operation 1 Basic Play 20 2 Using the Search Skip Functions 22 3 Pause and Step Play 22 4 Repeat Play 23 5 Programmed Play 24 6 Search for Preferred Play 24 7 Zoom Play 25 8 Slow Motion Play 25 9 Viewing from a Desired Angle 26 ...

Страница 4: ... cables for short are usually sold as a bundled set but the connection pictures in this booklet show each cable separately for better visibility Audio Video included Coaxial optional S Video optional Audio Video included Coaxial optional S Video optional Audio Video included S Video optional Coaxial needed but not included Audio Video included Coaxial optional S Video optional TV DVD TV DVD VCR TV...

Страница 5: ... TV This connection will allow you to enjoy standard quality video images 3 Insert the AC power cord into an AC outlet 4 Go to Page 20 for playing DVDs discs NOTE Your cable or antenna connection to the television should not be affected by this connection Connect your antenna cable to your television as you normally would You may need to consult your television manual for details but no changes wi...

Страница 6: ...ou to enjoy higher quality images If your TV doesn t have S VIDEO use the basic video connection listed above on Page 4 yellow plugs VIDEO IN or OUT are not needed for S Video 3 Insert the AC power cord into an AC outlet 4 Go to Page 20 for playing DVDs discs NOTE Your cable or antenna connection to the television should not be affected by this connection Connect your antenna cable to your televis...

Страница 7: ...nal If your TV has an S Video Input jack connect the S Video cable to the S VIDEO OUT jack on the back of your DVD player for sharper pictures and to the S Video jack on your TV If your TV doesn t have S Video use the basic video connection listed above yellow plugs VIDEO IN or OUT are not needed for S Video 3 Connections of your antenna cables are not changed when you add your DVD player 4 Insert...

Страница 8: ...ULATOR S antenna cable not included into the ANTENNA jack on the back of your TV VCR player and to the TV OUT jack of your VIDEO RF MODULATOR 4 Insert the AC power cord into an AC outlet 5 Go to Page 20 for playing DVDs discs CONNECTIONS NOTE A Video RF Modulator is needed for any TV VCR combined set which do not have VIDEO AUDIO inputs jacks Some TV VCR sets have VIDEO AUDIO inputs for these sets...

Страница 9: ...udio Setup menu see page 18 3 Connect the video cable Basic video connection Insert the video cable yellow to the VIDEO OUT jack on the back of your DVD Player and into the Video Input jack on your TV OR S Video optional If your TV has an S Video Input jack insert the S Video cable to the S VIDEO OUT jack on the back of your DVD player and into the S Video jack on your TV If your TV doesn t have S...

Страница 10: ...e S Video cable into the S VIDEO OUT jack on the back of your DVD player and into the S Video jack on your TV If your TV doesn t have S Video use the basic video connection listed above as on Page 4 yellow plugs VIDEO IN or OUT are not needed for S Video 3 Use an antenna cable to connect the antenna output on the satellite receiver to the antenna input on the VCR the same as you have it connected ...

Страница 11: ...WER button on the REMOTE this indicator lights up in GREEN and the player is off in standby mode 4 PLAY indicator During play this indicator lights up also when you press any button on the REMOTE this lamp flashes rapidly to show you the remote s signal was received 5 DISC TRAY Set the disc into this tray CAUTION Do not put anything but a disc on the tray FRONT PANEL LOCATION OF CONTROLS 6 OPEN CL...

Отзывы: