background image

Specification

19

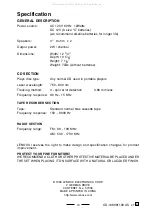
GENERAL DESCRIPTION

Power source:

AC 120V, 60Hz  12Watts

DC 12V (8 size “C” batteries)

(we recommend alkaline batteries for longer life)

Speakers:

3

”

  8 ohm   x 2

Output power:

2W / channel

Dimensions:

Width: 12 1/4

”

Depth: 10 5/8

”

Height: 7 1/8

”

Weight: 7LBs (without batteries)

CD SECTION

Plays disc type:

Any normal CD used in portable players

Laser wavelength:

760 - 800 nm

Tracking  method:

3 - spot error detection            3.86 mm lens

TAPE RECORDER SECTION

Tape:

Standard normal bias cassette tape

Frequency response: 150  - 8000 Hz

RADIO SECTION

Frequency range:

FM: 88 - 108 MHz
AM: 530 - 1700 KHz

LENOXX reserves the right to make design and specification changes for product

improvement.

PROTECT YOUR FINE FURNITURE!

WE RECOMMEND A CLOTH OR OTHER PROTECTIVE MATERIAL BE PLACED UNDER

THE SET WHEN PLACING IT ON SURFACE WITH A NATURAL OR LACQUER FINISH.

© 1999 LENOXX ELECTRONICS CORP.

2 GERMAK DRIVE

CARTERET, N.J. 07008

MADE & PRINTED IN CHINA

http://www.lenoxx.com

Frequency response: 80 Hz - 15 KHz

CD-106081199 AS v.1 E

All manuals and user guides at all-guides.com

Содержание CD-106

Страница 1: ...MMABLE CD PLAYER WITH REPEAT RECEIVES AM FM STEREO BROADCASTS RECORDS FROM CD RADIO OR BUILT IN MICROPHONE FM STEREO AND POWER LED INDICATORS 2 WAY POWER AC DC BASS BOAST SYSTEM REQUIRES 8 SIZE C BATT...

Страница 2: ...e 6 Wall or Ceiling Mounting The appliance should not be mounted to a wall or ceiling 7 Ventilation The appliance should be situated so that its location or position does not interfere with its proper...

Страница 3: ...ppear to operate normally or exhibits a marked change in performance or E The appliance has been dropped or the enclosure damaged 16 Servicing The user should not attempt to service the appliance beyo...

Страница 4: ...ore since during the period the batteries could leak damaging the product 10 Discard weak or dead batteries as soon as possible since they are more likely to leak in the product Batteries should be re...

Страница 5: ...o open the CD Door and place the CD in the CD compartment The label side of the CD should face upward 2 Press the CD Play Pause Button The player plays all the tracks once 4 Connect the supplied AC po...

Страница 6: ...ss and hold down until you find the point Tip When CD play is paused the Play Pause Lamp will flash and no music will play Remove the CD CD Door Open Button press first 5 Volume Control Open Button Tu...

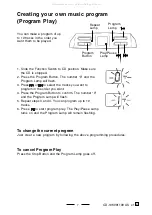
Страница 7: ...el Repeat Play Press the Repeat Button until the Repeat Lamp is off 3 Press 4 You may select the track by pressing or 6 Function Switch Repeat Lamp Flashing Program Lamp Repeat Lamp Repeat Program Pla...

Страница 8: ...and the Program Lamp will flash 5 Repeat steps 3 and 4 You can program up to 19 tracks 6 Press to start program play The Play Pause Lamp turns on and the Program Lamp will remain flashing To change t...

Страница 9: ...3 1 2 3 Slide the Band Switch to the proper band position that you want Tune into the station you prefer using the Tuning Control Adjust for the clearest sound 8 4 This indicator will light up when r...

Страница 10: ...tereo broadcast the FM Stereo indicator will be on Turn off the Radio Slide the Function Switch to TAPE position To improve broadcast reception Reorient the antenna for FM or FM Stereo Reorient the pl...

Страница 11: ...2 2 3 Press the Play Button The player turns on and starts playing 1234567 1234567 1234567 1234567 1234567 1234567 1234567 STOP EJECT 1234567 1234567 1234567 1234567 1234567 1234567 PLAY Slide the Fu...

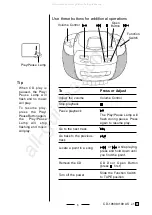
Страница 12: ...k Pause Button Press again to resume play after pause Stop Eject Button Stop Eject Button 11 Volume Control Bass Boost Switch Stop Eject Fast F Rewind Play To enjoy the music without disturbing others...

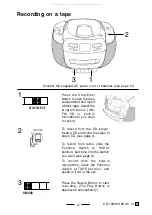
Страница 13: ...player insert a CD and follow the steps to play a CD see page 4 To record from radio slide the Function Switch to RADIO position and tune into the station you want see page 8 To record from the built...

Страница 14: ...t the recording level Press or Adjust Stop recording Stop Eject Button Pause Button Press the button again to resume recording Pause recording For best recording effect use the AC power instead of bat...

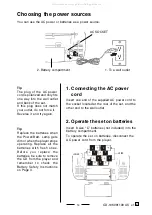
Страница 15: ...e you replace the batteries be sure to remove the CD from the player and remember to check the Battery Safety Instructions on Page 3 1 Connecting the AC power cord Insert one end of the supplied AC po...

Страница 16: ...yback mode to warm it up for a few minutes before inserting a cassette This CD player is designed to be played on a stable no vibration position If you bump the set during CD play the music will stop...

Страница 17: ...may cause tracking error Notes on cassettes Break off the cassette tab from side A or B to prevent accidental recording If you want to reuse the tape for recording cover the broken tab with adhesive t...

Страница 18: ...he areas cleaned are completely dry Cleaning the cabinet Clean the cabinet panel and controls with a soft cloth slightly moistened with a mild detergent solution Do not use any type of abrasive pad sc...

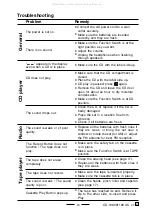
Страница 19: ...ration Check if all batteries are fresh The sound is weak or of poor quality Replace all the batteries with fresh ones if they are weak or bring the set near a window or rotate the set for AM or adjus...

Страница 20: ...ns TAPE RECORDER SECTION Tape Standard normal bias cassette tape Frequency response 150 8000 Hz RADIO SECTION Frequency range FM 88 108 MHz AM 530 1700 KHz LENOXX reserves the right to make design and...

Отзывы: