background image


© Copyright Lenovo 2020 


ThinkSystem 36i 12Gb Internal Expander Adapter Installation and User Guide 

Chapter 2:  Expander Card Installation Instructions 

To install the expander card, follow these steps: 
1.  Unpack the expander card and inspect the expander card for damage.  

Unpack the expander card in a static-free environment. Remove the expander card from the antistatic bag, and 

carefully inspect the expander card for damage. If you notice any damage, contact Lenovo or your reseller support 

representative. 

ATTENTION 

To avoid the risk of data loss, back up your data before you change your system configuration. 

2.  Review the expander card connectors. 
3.  Check whether the expander card is well-fixed on the mounting bracket. 

The expander card ships preinstalled on a mounting bracket. Check that the expander card is fixed in place. If any 

loose screws exist, tighten the screws using a No.1 Phillips torque screwdriver. The maximum torque is 4.8 ± 0.5 inch-

pounds. 

ATTENTION 

Exceeding this torque specification can damage the board, connectors, or screws, and can void 

the warranty on the expander card. Damage caused to the expander card as a result of changing 

the bracket can void the warranty on the board. Expander cards returned without a bracket 

mounted on the board will be returned without return merchandise authorization (RMA) 

processing. 

4.  Prepare the server. 

Turn off the power to the server and disconnect all power cords.  

5.  Remove the top cover from the chassis. 
6.  Remove any components that might impede the expander card installation.  

Refer t

ThinkSystem Server Documentation Center

, select your product, and review the Hardware replacement 

procedures section for detailed instructions. 

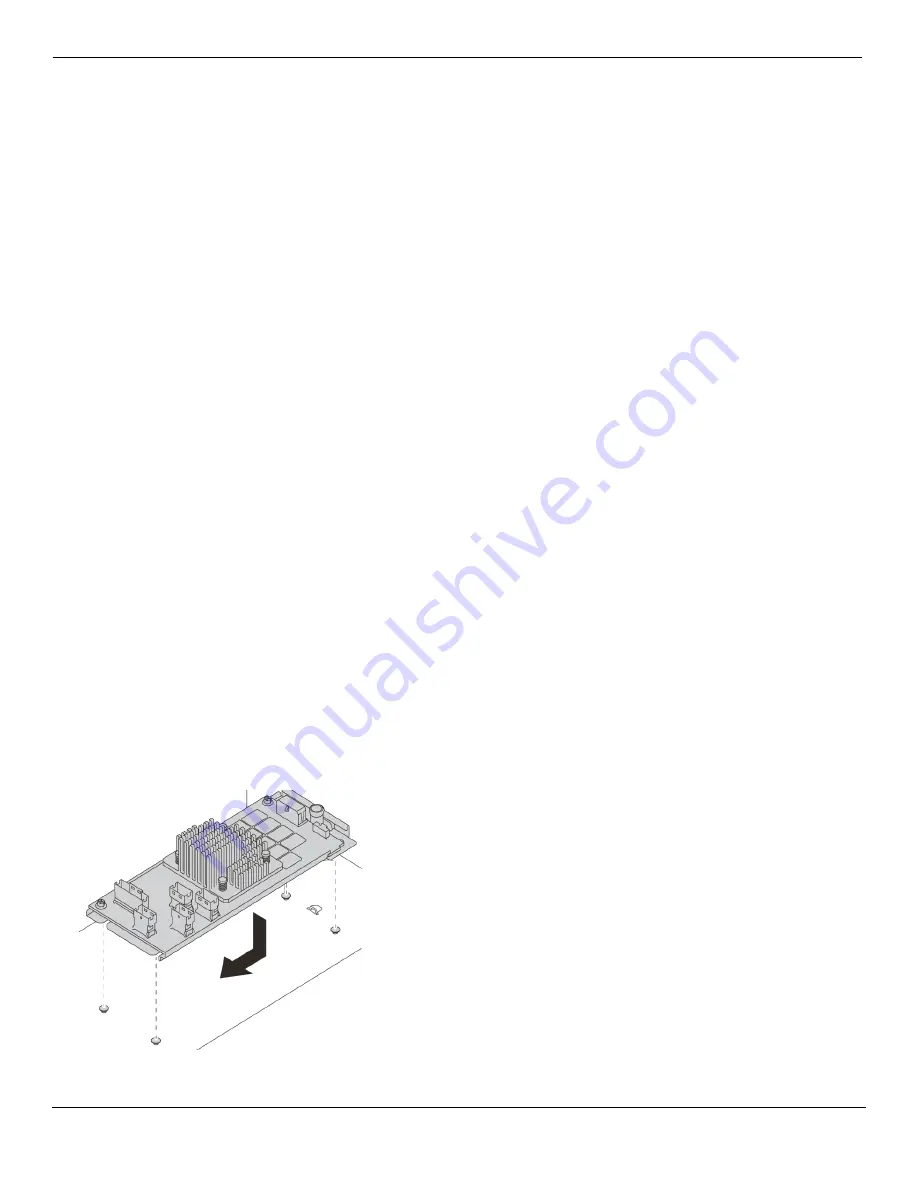
7.  Install the expander card. 

Align the notches on the mounting bracket with the four pins or three pins on the chassis, place down the expander 

card, and slightly slide the expander card to secure it in place, as the following figure shows. 

ATTENTION 

The shape, size, and locations of the components on your expander card and its bracket might 

vary from the following illustration. 

Figure 2 

Installing the Expander Card 

8.  Connect any cables to the expander card.  

Содержание ThinkSystem 36i

Страница 1: ...ThinkSystem 36i 12Gb Internal Expander Installation and User Guide ...

Страница 2: ...enovo 2020 LIMITED AND RESTRICTED RIGHTS NOTICE If data or software is delivered pursuant to a General Services Administration GSA contract use reproduction or disclosure is subject to restrictions set forth in Contract No GS 35F 05925 ...

Страница 3: ...ents Chapter 1 Overview 4 1 1 Operating System Support 4 1 2 Sideband Backplane Management 5 1 3 Expander Card Characteristics 5 Chapter 2 Expander Card Installation Instructions 6 Chapter 3 Safety Characteristics 8 ...

Страница 4: ... link rates of 3Gb s 6Gb s and 12Gb s Provides DataBolt Bandwidth Optimizer technology to match the bandwidth between fast hosts and slower SAS or SATA devices Provides one heartbeat LED The following table summarizes key expander card features Table 1 Card Features Expander Card 36i Ports 36 internal I O Processor SAS35x48 Form Factor Custom Storage Interface Connectors Four SFF 8654 x8 Two SFF 8...

Страница 5: ...s and connectors on the expander card Table 2 Headers and Connectors Connector Type Description RAID HBA Card connector One x8 SFF 8654 Slimline internal connector The interface between the expander card and the host system J4 Default serial boot ROM SBR header 2 pin connector Reserved J8 J9 UART connectors 4 pin connectors Reserved C0 C1 C2 C3 Interface connectors Four x8 SFF 8654 Slimline intern...

Страница 6: ...ding this torque specification can damage the board connectors or screws and can void the warranty on the expander card Damage caused to the expander card as a result of changing the bracket can void the warranty on the board Expander cards returned without a bracket mounted on the board will be returned without return merchandise authorization RMA processing 4 Prepare the server Turn off the powe...

Страница 7: ...nternal cables Refer to ThinkSystem Server Documentation Center select your product and review the Hardware replacement procedures section and the Internal cable routing section for detailed instructions 10 Reinstall the top cover on the chassis Refer to ThinkSystem Server Documentation Center select your product and review the Hardware replacement procedures for detailed instructions 11 Reconnect...

Страница 8: ...hapter 3 Safety Characteristics The adapter meets or exceeds the requirements of UL flammability rating 94 V0 Each bare board is also marked with the supplier name or trademark type and UL flammability rating For the boards installed in a PCIe bus slot all voltages are lower than the SELV 42 4 V limit ...

Страница 9: ...ThinkSystem 36i 12Gb Internal Expander Adapter Installation and User Guide 9 Trademarks LENOVO LENOVO logo and THINKSYSTEM are trademarks of Lenovo All other trademarks are the property of their respective owners 2020 Lenovo ...

Страница 10: ......

Отзывы: