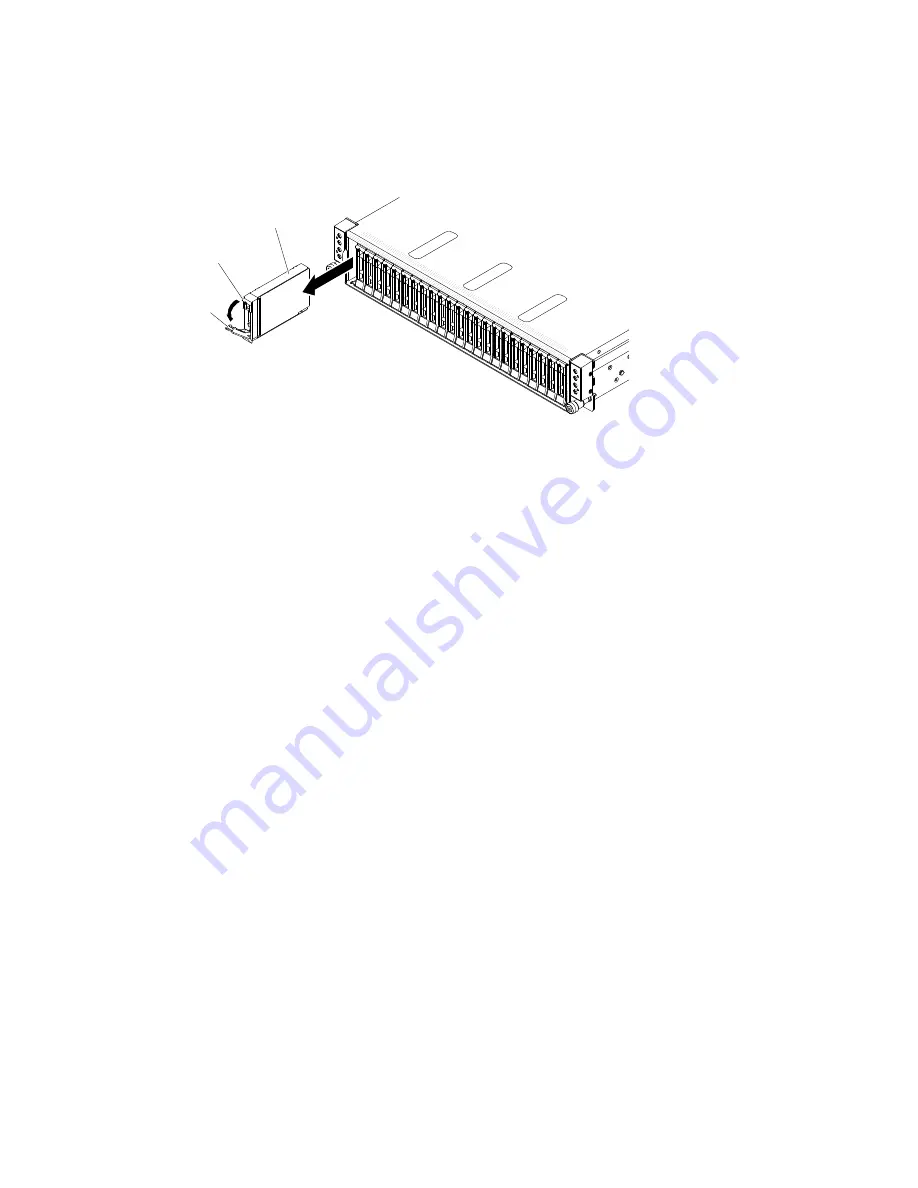
Step 1.
Make sure you save the data on your drive, especially if it is part of a RAID array, before you
remove it from the server.
Step 2.
Slide the release latch (orange) gently to the left to unlock the drive handle.
0
0
0
0
0
0
0
0000000000000000000000
0000000000000000000000
0000000000000000000000
0000000000000000000000
0000000000000000000000
0000000000000000000000
0000000000000000000000
0000000000000000000000
0000000000000000000000
0000000000000000000000
0000000000000000000000
0000000000000000000000
0000000000000000000000
00000000000000000000
00000000000000000000
00000000000000000000
00000000000000000000
00000000000000000000
00000000000000000000
00000000000000000000
00000000000000000000
00000000000000000000
00000000000000000000
00000000000000000000
00000000000000000000
Latch
Handle
2.5-inch hot-swap
hard disk drive
Figure 30. Hot-swap hard disk drive removal
Step 3.
Grasp the handle and pull the hot-swap hard disk drive out of the drive bay.
Step 4.
Reinstall the drive bay filler panel.
If you are instructed to return the server component or optional device, follow all packaging instructions,
and use any packaging materials for shipping that are supplied to you.
Installing a hot-swap hard disk drive
Use this information to install a hot-swap hard disk drive.
The following notes describe the type of hard disk drives that the server supports and other information
that you must consider when you install a hard disk drive. For a list of supported hard disk drives, see
http://www.lenovo.com/us/en/ serverproven/.
• Locate the documentation that comes with the hard disk drive and follow those instructions in addition to
the instructions in this chapter.
• Make sure that you have all the cables and other equipment that are specified in the documentation that
comes with the drive.
• Select the bay in which you want to install the drive.
• Check the instructions that come with the drive to determine whether you have to set any switches or
jumpers on the drive. If you are installing a SAS or SATA hard disk drive, be sure to set the SAS or
SATA ID for that device.
• You can install up to six 2.5-inch hard disk drives for each node hot-swap SAS or SATA hard disk drives in
the server.
• The electromagnetic interference (EMI) integrity and cooling of the server are protected by having all bays
and PCI and PCI Express slots covered or occupied. When you install a drive, PCI, or PCI Express
adapter, save the EMC shield and filler panel from the bay or PCI or PCI Express adapter slot cover in the
event that you later remove the device.
• For a complete list of supported optional devices for the server, see http://www.lenovo.com/us/en/
The following table describes the hard disk drive slot IDs.
Removing and replacing server components
91
Содержание ThinkServer n400
Страница 5: ...Taiwan BSMI RoHS declaration 182 Index 183 Copyright Lenovo iii ...
Страница 184: ...168 Lenovo ThinkServer sd350 Server Type 5493 Lenovo ThinkServer n400 Enclosure Type 5495Installation and Service Guide ...
Страница 186: ...170 Lenovo ThinkServer sd350 Server Type 5493 Lenovo ThinkServer n400 Enclosure Type 5495Installation and Service Guide ...
Страница 190: ...174 Lenovo ThinkServer sd350 Server Type 5493 Lenovo ThinkServer n400 Enclosure Type 5495Installation and Service Guide ...
Страница 205: ......
Страница 206: ...Part Number 00MV565 Printed in China 1P P N 00MV565 1P00MV565 ...


