background image

LPe12000, LPe12002 and LPe12004 Hardware Installation Manual

Page 3

Installing the Host Bus Adapter

The Emulex


LPe12000, LPe12002 and LPe12004 host bus adapters (HBAs) use removable optical 

transceivers. If you need to change the bracket for HBA installation, you must first


remove the optical 

transceiver(s), if installed, from the housing (cage). This document explains how to install the HBA and, 
if necessary, how to remove the transceiver and bracket safely. 

To install the HBA:

1.

Each HBA is shipped with several numbers clearly marked on the board. these include

IEEE Address

World Wide Name (WWN)

Serial number

The IEEE address is a unique 64-bit identifier that you use when configuring your system. The 
FC industry uses the WWN derived from the Institute of Electrical and Electronics Engineers  
(IEEE) address for FC connectivity. If the adapter has two ports, there are two IEEE addresses 
and two WWNs. If the adapter has four ports, there are four IEEE addresses and four WWNs. 
Use the serial number when communicating with Emulex. Record these numbers before installa-
tion. 

2.

Turn off the computer and unplug it.

3.

Remove the computer case.

4.

Follow steps 5

12 to change the bracket if they are different sizes. Otherwise, skip to step 13.

5.

To change the bracket, you must first remove the transceiver from its cage assembly.

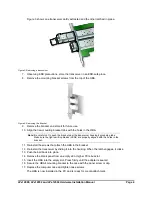
The HBA uses different types of transceivers. Figure 2 shows an example of one type showing 
the bail (handle) extended. 

Figure 2: Example of a transceiver

6.

To remove the transceiver, pull the bail (handle) out and down to release the latch and gently pull 
the transceiver out. Do not force it. After the latch is released, the transceiver slides out easily. 

Note: 

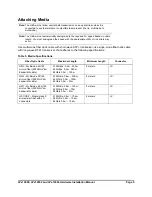
The HBA comes with a standard PCIe bracket installed. A low-profile bracket is 

included in the box with the LPe12000, LPe12002 HBAs. (The LPe12004 will not fit in 
a half height slot.) The low-profile mounting bracket is shorter than the standard 
bracket; approximately 3.11 in. (7.9 cm) compared to 4.75 in. (12.06 cm) long.

Caution: 

This is a delicate operation–take care not to damage the transceiver. 

bail (handle)

Содержание ThinkServer LPe12000

Страница 1: ...HBA Installation Manual LPe12000 LPe12002 and LPe12004 ...

Страница 2: ...ppendix A Notices on page 17 First Edition November 2013 Copyright Lenovo 2013 LIMITED AND RESTRICTED RIGHTS NOTICE If data or software is delivered pursuant a General Services Administration GSA contract use reproduction or disclosure is subject to restrictions set forth in Contract No GS 35F 05925 ...

Страница 3: ...1 Major Features 1 Compatibility 1 Prerequisites 1 Setting the Jumpers 2 Installing the Host Bus Adapter 3 Attaching Media 5 Applying Power 7 Viewing the LEDs 7 POST Conditions and Results 7 References 9 Specifications 9 FCC and Regulatory Notices 11 Declaration of Conformity 12 Laser Safety Notice 14 ...

Страница 4: ...he PCIe link The supported physical PCIe connector is x4 or x8 The fully featured FC port is compliant to various American National Standards Institute ANSI FC standards The product is targeted at FC storage networking environments that require the highest degrees of robustness performance and ease of management Major Features Multifunction PCIe 2 0 device with one LPe12000 two LPe12002 or four LP...

Страница 5: ... electronic components that can be damaged by static electricity through an electrostatic discharge ESD event To prevent ESD damage maintain constant contact with any grounded metal surface A grounding wrist strap is useful for this purpose Handle the card carefully at all times and preferably by the edges Avoid touching electronic components and keep the card in the original packaging until you a...

Страница 6: ...e four IEEE addresses and four WWNs Use the serial number when communicating with Emulex Record these numbers before installa tion 2 Turn off the computer and unplug it 3 Remove the computer case 4 Follow steps 5 12 to change the bracket if they are different sizes Otherwise skip to step 13 5 To change the bracket you must first remove the transceiver from its cage assembly The HBA uses different ...

Страница 7: ...at attach the HBA to the bracket 12 Re install the transceiver by sliding it into the housing When the latch engages it clicks 13 Push the bail back into place 14 Remove the blank panel from an empty x8 or higher PCIe bus slot 15 Insert the HBA into the empty slot Press firmly until the adapter is seated 16 Secure the HBA s mounting bracket to the case with the panel screw or clip 17 Replace the c...

Страница 8: ...d on cable length You must downgrade the speed with the appropriate utility or link errors may occur Table 5 Media Specifications Fiber Optic Cable Maximum Length Minimum Length Connector OM3 Multimode 50 125 micron fiber 2000 MHz km bandwidth cable 2 125Gbps 0 5m 500m 4 25Gbps 0 5m 380m 8 5Gb s 0 5m 150m 5 meters LC OM2 Multimode 50 125 micron fiber 500 MHz km bandwidth cable 2 125Gb s 0 5m 300m ...

Страница 9: ... media to the HBA 1 Connect a fiber optic cable to an LC connector on the HBA See figure 6 Figure 6 Connecting Fiber Optic Cable 2 Connect the other end of the cable to the Fibre Channel device After the media is connected to the HBA you are ready to apply power to the computer ...

Страница 10: ...7 LEDs POST Conditions and Results The following table summarizes POST conditions and results Note For the link rate conditions there is a 1 second pause when the LED is off between each group of fast blinks 2 3 or 4 Observe the LED sequence for several seconds to be sure you have correctly identified the pattern Table 8 POST Conditions and Results Yellow LED Green LED State Off Off Wake up failur...

Страница 11: ...normal link up Off Slow Blink Normal link down or not started Slow Blink Slow Blink Off line for download Fast Blink Slow Blink Restricted off line mode waiting for restart Flashing Slow Blink Restricted off line mode test active Table 8 POST Conditions and Results Continued Yellow LED Green LED State ...

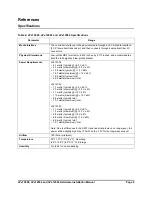
Страница 12: ... V 9 4 7 watts maximum 3 3 V 9 15 3 watts typical 12 V 8 18 7 watts maximum 12 V 8 19 5 watts typical total 23 5 watts maximum total LPe12002 1 7 watts typical 3 3 V 9 2 0 watts maximum 3 3 V 9 7 1 watts typical 12 V 8 11 3 watts maximum 12 V 8 8 8 watts typical total 13 3 watts maximum total LPe12000 1 1 watts typical 3 3 V 9 1 3 watts maximum 3 3 V 9 5 8 watts typical 12 V 8 8 8 watts maximum 12...

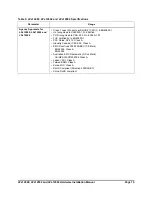
Страница 13: ... to CSA 22 2 No 60950 1 07 TUV certified by to EN60950 1 FCC Rules Part 15 Class A Industry Canada ICES 003 Class A EMC Directives 2004 108 EEC CE Mark EN55022 Class A EN55024 Australian EMC Framework C Tick Mark AS NZS CISPR22 2006 Class A Japan VCCI Class A Taiwan BSMI Class A Korea MIC Class A RoHS Compliant Directive 2002 95 EC China RoHS compliant Table 9 LPe12000 LPe12002 and LPe12004 Specif...

Страница 14: ...ommunications Operation of this equipment in a residential area is likely to cause harmful interference in which case the user will be required to correct the interference at his own expense The reader is cautioned that changes or modifications made to the equipment not expressly approved by Emulex could void the user s authority to operate this equipment The above statement applies to products ma...

Страница 15: ...pproved for business purposes with regards to electromagnetic interference If purchased in error for use in a residential area you may wish to exchange the equipment where you purchased it Declaration of Conformity LPe12000 LPe12002 and LPe12004 HBA This equipment complies with CISPR22 EN55022 Class A WARNING This is a class A product In a domestic environment this product may cause radio interfer...

Страница 16: ...LPe12000 LPe12002 and LPe12004 Hardware Installation Manual Page 13 ...

Страница 17: ...rm factor transceivers sold by Emulex are certified as Class 1 laser products that conform to the requirements contained in the Department of Health and Human Services DHHS regulation 21 CFR subchapter J The certification is indicated by a label located on the optical small form factor transceiver In Europe all optical small form factor transceivers sold by Emulex are certified as Class 1 laser co...

Страница 18: ...om either an open fiber or open laser transmitter is guaranteed to be below the Class 1 limit Class 1 laser products are not considered hazardous No user maintenance service operations or adjustments can be performed the small form factor transceiver Usage Restrictions Failure to comply with these usage restrictions may result in incorrect operation of the system and could possible lead to points ...

Страница 19: ...need to recertify their product for laser safety The procedure for full system certification is therefore identical to that used for any other electronic system When applying for system level certification to electronic standards such as IEC950 the regulatory engineers may want to see the DHHS and European conformity labeling on the small form factor transceiver and the system level documentation ...

Страница 20: ...may make improvements and or changes in the product s and or the program s described in this publication at any time without notice The products described in this document are not intended for use in implantation or other life support applications where malfunction may result in injury or death to persons The information contained in this document does not affect or change Lenovo product specifica...

Страница 21: ...r BlockGuard Connectivity Continuum Convergenomics Emulex Connect Emulex Secure EZPilot FibreSpy HBAnyware InSpeed LightPulse MultiPulse OneCommand OneConnect One Network One Company SBOD SLI and VEngine are trademarks of Emulex Other company product or service names may be trademarks or service marks of others LPe12000 LPe12002 and LPe12004 Hardware Installation Manual Page 18 ...

Страница 22: ......

Отзывы: