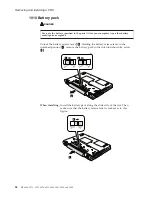

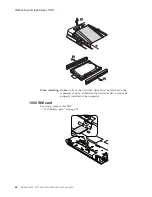


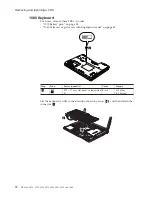
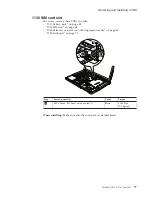

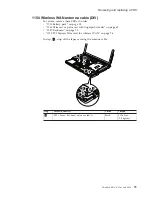
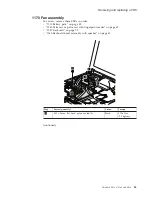


1070
DIMM
For
access,
remove
these
FRUs
in
order:
v
“1010
Battery
pack”
on
page
58
v
“1060
Palm
rest
or
palm
rest
with
fingerprint
reader”
on
page
65
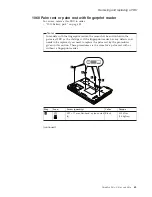
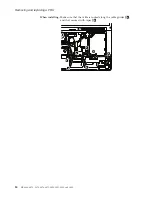
2
1
1
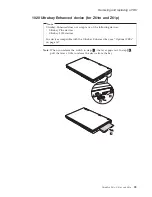
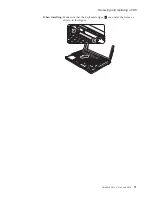
When
installing:
Insert
the
notched
end
of
the
DIMM
into
the
socket.
Press
the
DIMM
firmly,
and
pivot
it
until
it
snaps
into
the
place.
Make
sure
that
it
is
firmly
fixed
in
the
slot
and
does
not
move
easily.
Removing
and
replacing
a
FRU
ThinkPad
Z61e,
Z61m,
and
Z61p
69
Содержание ThinkPad Z61E
Страница 2: ......
Страница 3: ...ThinkPad Z61e Z61m and Z61p Hardware Maintenance Manual ...
Страница 6: ...iv MT 0660 0672 0673 0674 0675 9450 9451 9452 and 9453 ...
Страница 8: ...2 MT 0660 0672 0673 0674 0675 9450 9451 9452 and 9453 ...
Страница 72: ...2 4 3 Removing and replacing a FRU 66 MT 0660 0672 0673 0674 0675 9450 9451 9452 and 9453 ...
Страница 90: ...2 3 Removing and replacing a FRU 84 MT 0660 0672 0673 0674 0675 9450 9451 9452 and 9453 ...
Страница 95: ...7 7 Removing and replacing a FRU ThinkPad Z61e Z61m and Z61p 89 ...
Страница 115: ...3a 3b 6 5 4 continued Removing and replacing a FRU ThinkPad Z61e Z61m and Z61p 109 ...
Страница 118: ...3 4 5 continued Removing and replacing a FRU 112 MT 0660 0672 0673 0674 0675 9450 9451 9452 and 9453 ...
Страница 121: ...Wireless LAN antenna cable AUX black a Removing and replacing a FRU ThinkPad Z61e Z61m and Z61p 115 ...
Страница 147: ...LCD FRUs a g b c e d 1 3 2 4 8 9 10 11 5 6 7 f Parts list ThinkPad Z61e Z61m and Z61p 141 ...
Страница 177: ...Trademarks ThinkPad Z61e Z61m and Z61p 171 ...
Страница 178: ...Part Number 42T7846 1P P N 42T7846 ...


